Note
Access to this page requires authorization. You can try signing in or changing directories.
Access to this page requires authorization. You can try changing directories.
Applies to: Azure Logic Apps (Consumption)
Note
This feature is in preview, might incur charges, and is subject to the Supplemental Terms of Use for Microsoft Azure Previews.
Agents often need to work with external systems, such as calling APIs, updating systems, or coordinating multiple steps. However, if you mix agent and integration logic, or if you directly embed integration logic in agent code, your solutions become harder to maintain, test, update, and evolve. Agents can adeptly choose actions to take or tools to use. However, they're not designed to manage retry attempts, long‑running steps, or external system failures.
In Foundry, add workflows from Azure Logic Apps to agents as actions. Your agents can then run multistep business tasks across Microsoft and non-Microsoft services and products - often without code. Your solutions gain and benefit from agentic capabilities with reusable integration logic.
The following diagram shows how agent actions in Foundry (classic) relate to workflows in Azure Logic Apps:

The agent focuses on choosing the correct action to call the integration workflow, while the workflow handles the orchestration and integration tasks.
Azure Logic Apps supports 1,400+ connectors and native, built-in data operations, so agents can integrate with many Microsoft and non-Microsoft services or products. If a prebuilt connector or operation doesn't exist, create a custom connector.
This article shows how to a workflow from Azure Logic Apps as an agent action tool in Foundry. A wizard guides you through how to set up the action. You can then edit the workflow or extend the workflow in the workflow designer for Azure Logic Apps.
For more information, see:
Note
This article refers to the Microsoft Foundry (classic) portal. For more information about the new portal, see the new Microsoft Foundry portal
Prerequisites
An Azure account and subscription. Get a free Azure account.
-
This project organizes your work and saves the state while you build your AI apps and solutions.
To create a hub project so you can host your project and set up a team collaboration environment, you need one of the following roles for Microsoft Entra role-based access control (RBAC), based on the principle of least privilege:
- Contributor (least privilege)
- Owner
If you have any other role, you need to have the hub created for you. For more information, see:
An Azure OpenAI model version gpt-4.1 or earlier deployed for your Foundry project.
If you don't have this model, see Deploy a model.
A Consumption logic app resource and workflow that meets the following requirements:
Requirement Description Hosting option Uses the Consumption hosting option. Azure subscription Uses the same subscription as your Foundry project. Azure resource group Uses the same resource group as your Foundry project. Request trigger The operation that specifies the conditions to meet before running any subsequent actions in the workflow. The default trigger name is When an HTTP request is received.
Agent action calling requires a REST-based API. The Request trigger provides a REST endpoint that a service or system can call to run the workflow. So, for action calling, you can use only workflows that start with the Request trigger.Trigger description This description, which you provide with the trigger information in Azure Logic Apps, helps the agent choose the correct action in Foundry. Trigger schema A JSON schema that describes the expected inputs for the trigger.
Foundry automatically imports the schema with the action definition. For more information, see Request trigger.Response action The workflow must always end with this action, which returns the response to Foundry when the workflow completes. To implement your business logic or use case, your workflow can contain any other actions from the connectors gallery, including runtime-native, built-in operations, that implement the logic for your business scenario.
For example, the following diagram shows an example action named
Get-weather-forecast-todaythat's added as a tool for an agent namedWeatherAgentin Foundry. This action runs a workflow namedGet-weather-forecast-todayin Azure Logic Apps: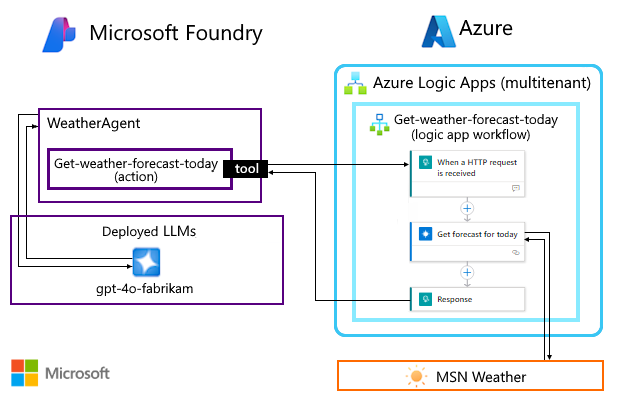
For more information, see:
Set up the following environment variables with information from your Foundry project:
export PROJECT_ENDPOINT="<your_project_endpoint>"
export MODEL_DEPLOYMENT_NAME="<your_model_deployment_name>"
export SUBSCRIPTION_ID="<your_Azure_subscription_ID>"
export resource_group_name="<your_resource_group_name>"
For sample code, see the AzureLogicAppTool utility on GitHub.

Limitations
This release has the following limitations:
| Limitation | Description |
|---|---|
| Logic app workflow support | Agent actions currently support only Consumption logic app workflows that run in multitenant Azure Logic Apps. A Consumption logic app resource can have only one workflow. Agent actions currently don't support Standard logic app workflows in single-tenant Azure Logic Apps, App Service Environments, or hybrid deployments. A Standard logic app resource can have multiple workflows. |
For more information, see Hosting options for logic app deployments.
1: Add an action to your agent
To set up an action for your agent to run a logic app workflow, follow these steps:
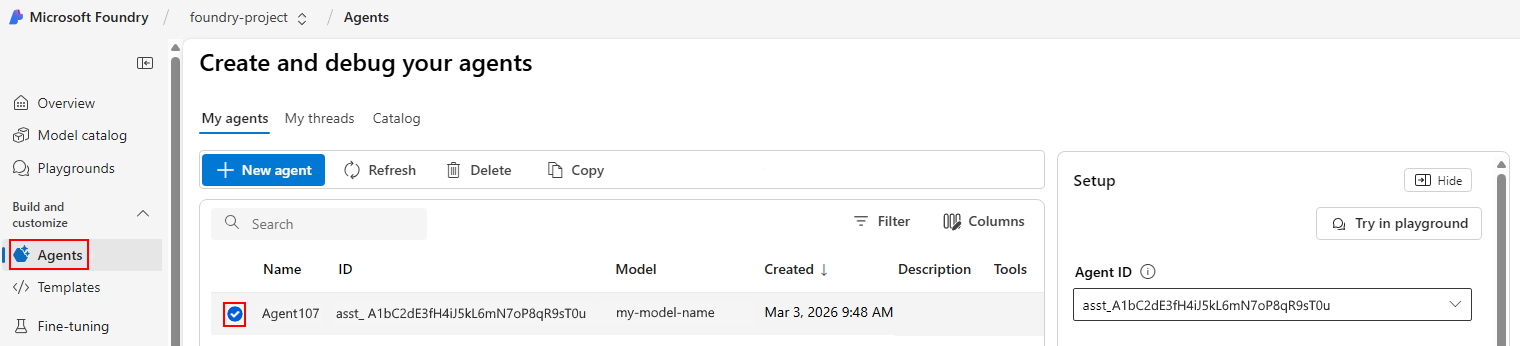
In the Foundry (classic) portal, open your project.
On the project sidebar, under Build and customize, select Agents.
If you didn't deploy a model for your agent, a wizard opens for you to complete this task before you continue. Make sure to select a model that supports actions on agents. For more information, see Deploy a model.
On the Create and debug your agents page, under My agents, select your agent.
Next to the agents list, in the Setup section, scroll down to the Actions section, and select Add.
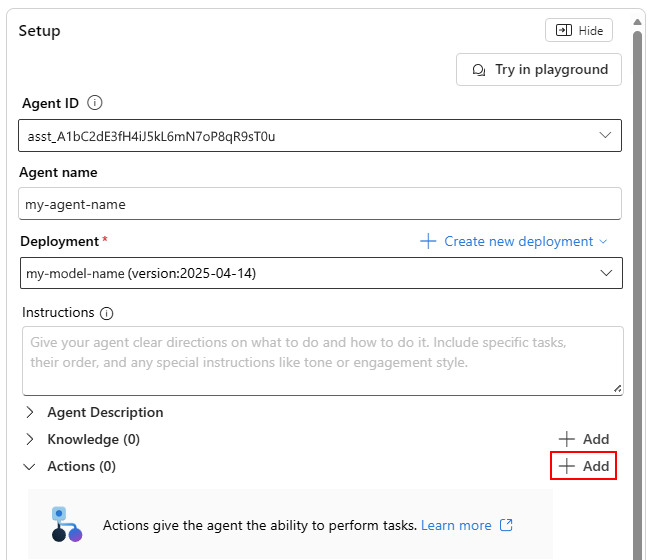
Note
Not all models support agent actions. If the Actions section appears unavailable, you need to deploy a GPT-4.1 model or earlier.
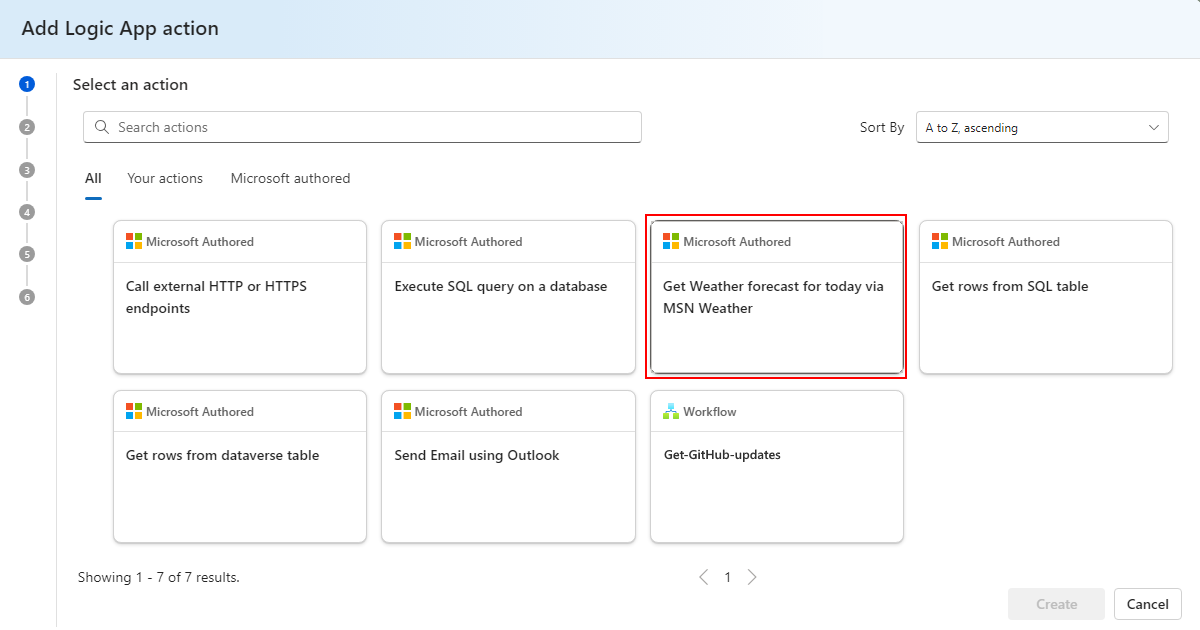
In the Add action wizard, select Azure Logic Apps.
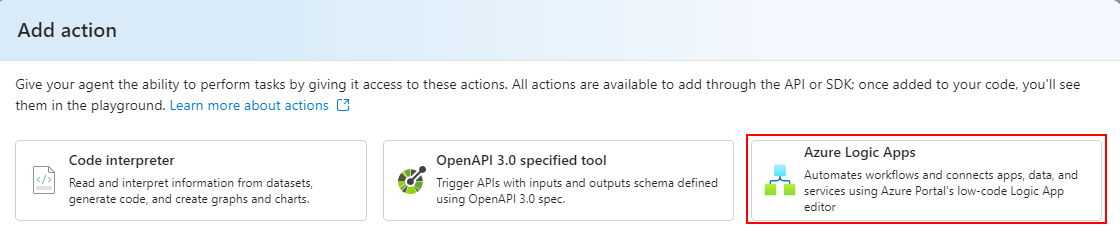
Under Select an action, select a predefined action with one of the following labels:
Action label Description Microsoft Authored This action uses a Microsoft authored template to create the workflow for the action. Workflow This action uses an eligible logic app workflow in your Azure subscription as a template to create the workflow for the action.
Note: If you select this option, skip to the section named Confirm action details. If your workflows don't appear as expected in the actions gallery, check the prerequisites#.The following example uses the Microsoft authored action named Get Weather forecast for today via MSN Weather:
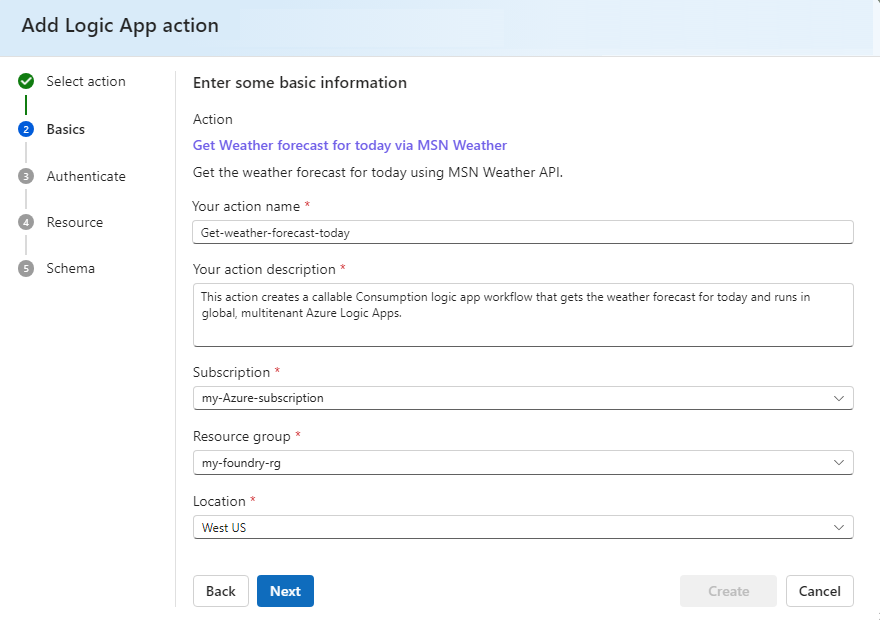
In the Add Logic App action wizard, under the Enter some basic information, provide the following information:
Parameter Required Value Description Your action name Yes <action-name> A friendly, but task-focused, verb-first, concise name for the action. This name is also used for the logic app resource and workflow in Azure Logic Apps.
Note: Review the following:
- The action name can use only letters, numbers, and the following special characters: -, (, ), _, or '.
- You can't use whitespace or other special characters.
- A Consumption logic app resource and workflow are combined and have a 1:1 relationship, so they use the same name. By comparison, a Standard logic app resource can have multiple workflows that use different names.
This example uses Get-weather-forecast-today.Your action description Yes <action-description> A description that clearly describes the purpose for the action.
This example uses This action creates a callable Consumption logic app workflow that gets the weather forecast for today and runs in global, multitenant Azure Logic Apps.Subscription Yes <Azure-subscription> The Azure subscription to use, presumably the same as your project and model. Resource group Yes <Azure-resource-group> The Azure resource group to use. Location Yes <Azure-region> The Azure region where to host the logic app resource and workflow. The following screenshot shows the example details for the sample action Get-weather-forecast-today:
When you finish, select Next.


2: Create and authenticate connections
To create connections that the action needs and to authenticate access to the required services, systems, apps, or data sources, follow these steps. The underlying template specifies the connectors to use for this action and in the corresponding logic app workflow.
In the Add Logic App action wizard, under Authenticate, authenticate any connections that you need to create for the action.
In the Connection column, select Connect for the related service or data source.
The following screenshot shows the example connection to create and authenticate for the MSN Weather service:
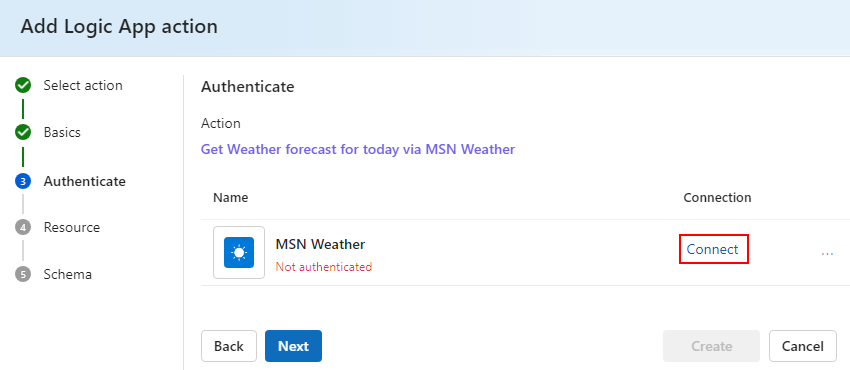
Some connections require more details, so follow the prompts to provide the requested information.
Repeat these steps for each required connection.
When you finish, select Next.

3: Confirm action details
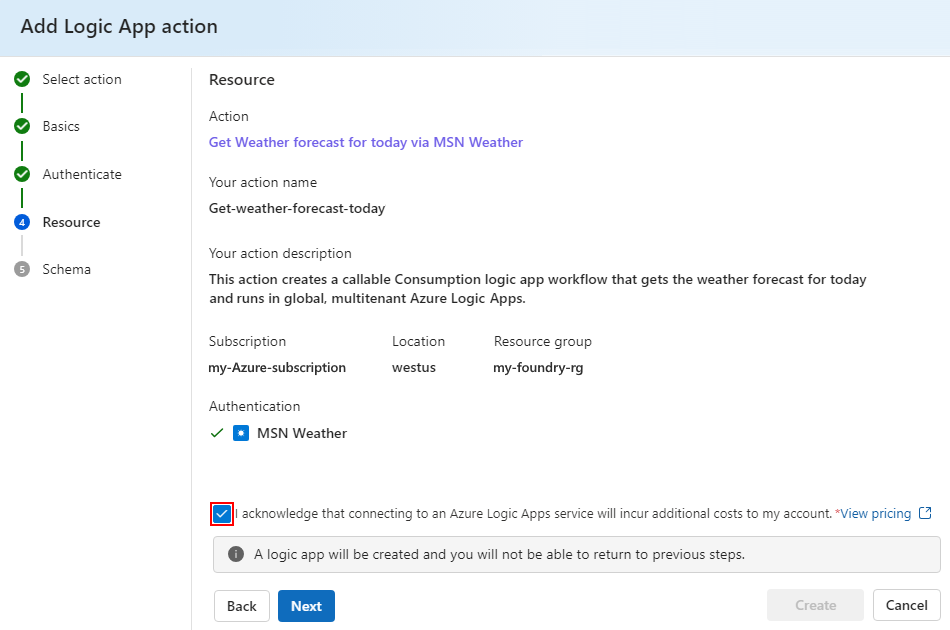
Check that all the action information appears correct. If you selected a Microsoft authored action, review and consent to the acknowledgment statement.
In the Add Logic App action wizard, under Resource, check all the provided action information.
For a selected Microsoft authored action, complete the following steps:
Review the statement that you acknowledge and understand the following events after you leave the Resource section by selecting Next:
You can't return to the previous steps.
The action creates a Consumption logic app resource.
Connecting to Azure Logic Apps incurs charges in your Azure account.
For more information about the billing model for Consumption logic app workflows, see:
To consent, select the confirmation box, for example:
When you finish, select Next.

4: Finish creating the action as a tool
Review the information that the portal generates about the action as a tool. The agent uses this information to run the action (tool) and authenticate access to any relevant Azure, Microsoft, and non-Microsoft services or resources.
In the Add Logic App action wizard, in the Schema section, review the following information, and make sure to provide a description about the scenario for calling the tool:
Parameter Description Tool name The editable name for the tool that the agent uses to run your action and access Azure, Microsoft, external services, data sources, or specialized AI models so that the agent can get data, run tasks, and interact with other platforms.
Note:
- The tool name can use only letters, numbers, and the underscore (_) character.
- You can't use whitespace or other special characters.Connection for authentication The read-only name for the connection that the tool uses to access Azure, Microsoft, and external resources without having to ask for credentials every time. For more information, see Connections in Foundry portal. Describe how to invoke the tool The description that specifies when the agent calls the tool. Schema The schema for the logic app workflow in JavaScript Object Notation (JSON) format. 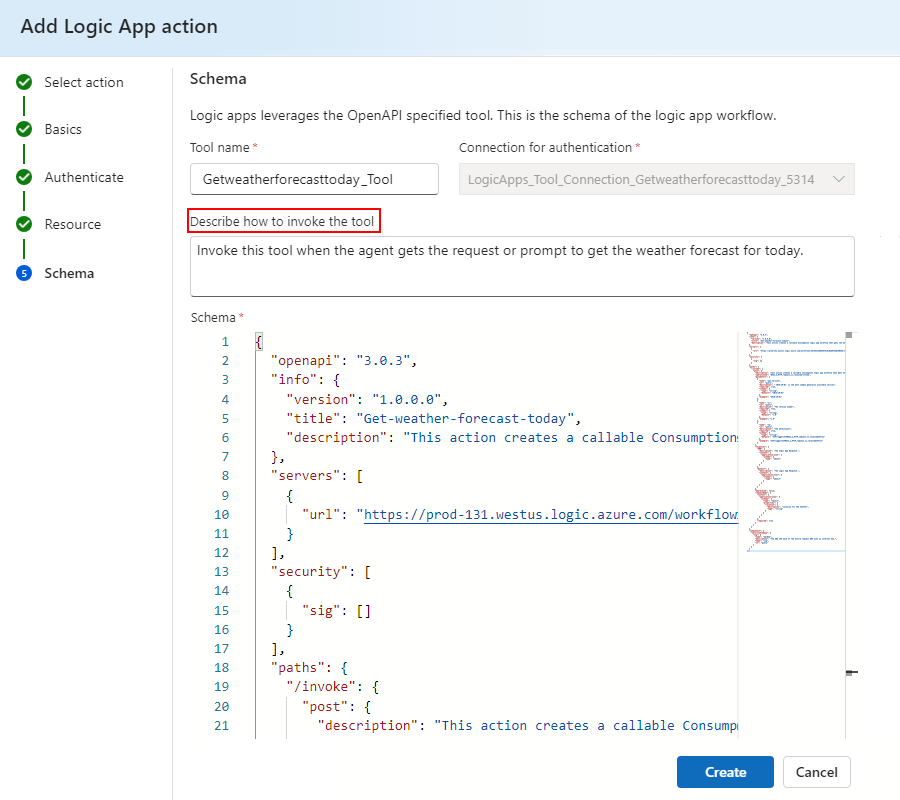
When you finish, select Create.
The wizard returns you to the Agents page for your agent. In the Setup section, the Actions section now shows the tool name and icon for Azure Logic Apps, for example:


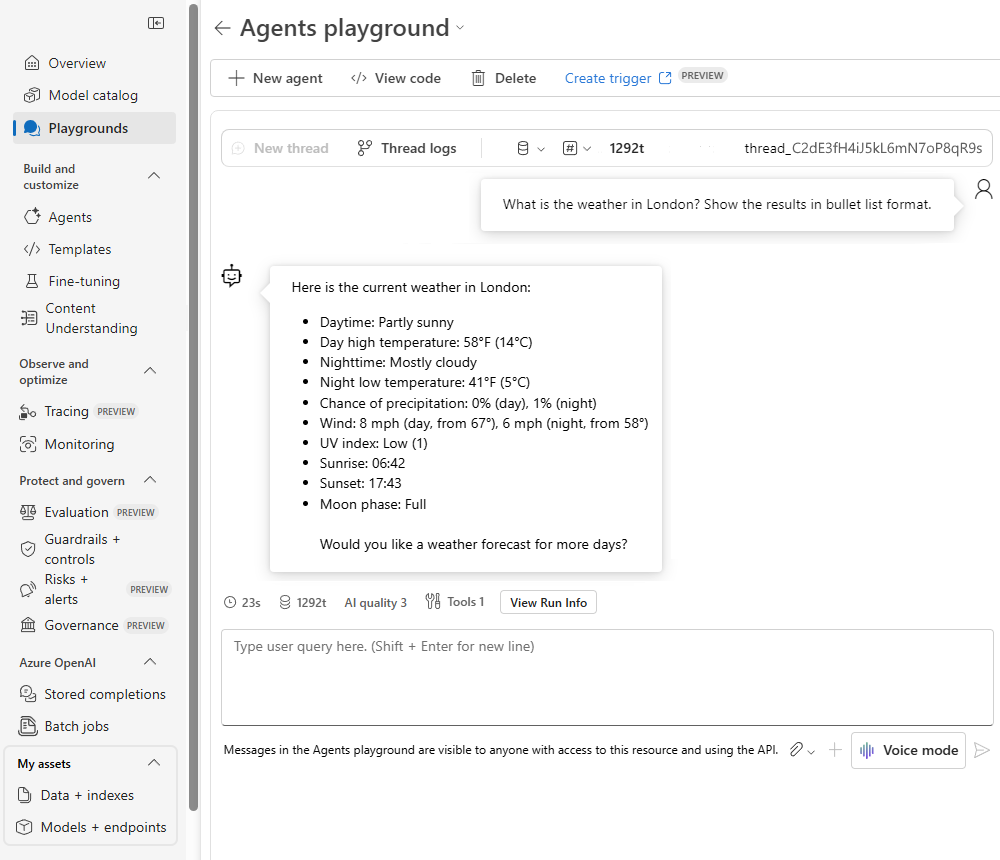
5: Test the agent action
To try the new agent action by using the Agents playground, follow these steps:
On the Agents page, in the Setup section, select Try in playground.
On the Agents playground page, in the user query chat box, ask a question about the weather, for example:
What is the weather in London? Show the results in bullet list format.
The agent returns a response similar to the following example:

6: Delete resources
If you don't need the resources that you created for this guide, delete them so you don't continue getting charged. You can either follow these steps to delete the resource group that contains these resources, or you can delete each resource individually.
In the Foundry portal, to remove the action from the agent, next to the action name, select the ellipses (...) button, and then select Remove.
In the Azure portal title bar search box, enter resource groups, and select Resource groups.
Find the resource group that contains your deployed hub resources.
On the Overview page toolbar, select Delete resource group.
When the confirmation pane appears, enter the resource group name, and select Delete.
1: Set the environment variables
On your system, set the following environment variables:
| Environment variable | Description |
|---|---|
PROJECT_ENDPOINT |
The endpoint for your Microsoft Foundry project. To find this value, in the Foundry portal, on the project sidebar, select Overview. Find the property named Microsoft Foundry project endpoint. |
MODEL_DEPLOYMENT_NAME |
The deployment name for the AI model. To find this value, in the Foundry portal, on the project sidebar menu, in the My assets section, select Models + endpoints, and look in the Name column. |
SUBSCRIPTION_ID |
The ID for your Azure subscription. |
resource_group_name |
The name for your resource group. |
For sample code, see:
Full sample for Azure Logic Apps integration with Foundry agent
This sample shows how to integrate an agent in Foundry (classic) with a Consumption logic app in the Azure portal.
2: Create a project client
To connect to your Foundry project and other resources, follow these steps to create a client object:
import os
from azure.ai.projects import AIProjectClient
from azure.identity import DefaultAzureCredential

# Initialize the AIProjectClient
project_client = AIProjectClient(
   endpoint=os.environ["PROJECT_ENDPOINT"],
   credential=DefaultAzureCredential()
)
3: Register your logic app
Register your Consumption logic app resource by providing the trigger name and information. To find the AzureLogicAppTool utility code, visit the full sample on GitHub.
from user_logic_apps import AzureLogicAppTool

# Logic app details
LOGIC_APP_NAME = "your_logic_app_name"
TRIGGER_NAME = "your_trigger_name"

# Register the logic app name with the agent tool utility by extracting the following values from environment variables
subscription_id = os.environ["SUBSCRIPTION_ID"]
resource_group = os.environ["resource_group_name"]

# Create and initialize AzureLogicAppTool utility
logic_app_tool = AzureLogicAppTool(subscription_id, resource_group)
logic_app_tool.register_logic_app(LOGIC_APP_NAME, TRIGGER_NAME)
print(f"Registered logic app '{LOGIC_APP_NAME}' with trigger '{TRIGGER_NAME}'.")
4: Create an agent with a workflow as an action (tool)
The following code creates an agent and attaches the logic app as an agent action or tool. In this example, the logic app workflow sends an email.
from azure.ai.agents.models import ToolSet, FunctionTool
from user_functions import fetch_current_datetime
from user_logic_apps import create_send_email_function

# Create the logic app action for the agent
send_email_func = create_send_email_function(
    logic_app_tool, logic_app_name
)

# Prepare the action tool for the agent
functions_to_use = {fetch_current_datetime, send_email_func}

# Create an agent and assign the toolset
functions = FunctionTool(functions=functions_to_use)
toolset = ToolSet()
toolset.add(functions)

agent = project_client.agents.create_agent(
    model=os.environ["MODEL_DEPLOYMENT_NAME"],
    name="SendEmailAgent",
    instructions="You're a specialized agent for sending emails.",
    toolset=toolset,
)
print(f"Created agent, ID: {agent.id}")
5: Create a thread for communication
The following code creates a thread and adds a user message to start the conversation between the project client and your agent.
# Create a thread for communication
thread = project_client.agents.threads.create()
print(f"Created thread, ID: {thread.id}")

# Create a message in the thread
message = project_client.agents.messages.create(
    thread_id=thread.id,
    role="user",
    content="Hello, send an email to <RECIPIENT_EMAIL> with the date and time in '%Y-%m-%d %H:%M:%S' format.",
)
print(f"Created message, ID: {message['id']}")
6: Test your agent and the action
To test how well the agent performs the task, run the agent, observe how the model uses the logic app tool, and check the output.
# Create and run the agent on the thread
run = project_client.agents.runs.create_and_process(
    thread_id=thread.id, agent_id=agent.id
)
print(f"Run finished with status: {run.status}")

if run.status == "failed":
    print(f"Run failed: {run.last_error}")

# Fetch, log, and display all messages
messages = project_client.agents.messages.list(thread_id=thread.id)
for message in messages:
    if msg.txt = msg.text_messages[-1]
    print(f"Role: {msg.role}: {last_text.text.value}")
7: Clean up resources
Delete the agent when you finish to clean up resources so you don't continue getting charged.
# Delete the agent
project_client.agents.delete_agent(agent.id)
print("Deleted agent.")
Optional: Review underlying logic app and workflow
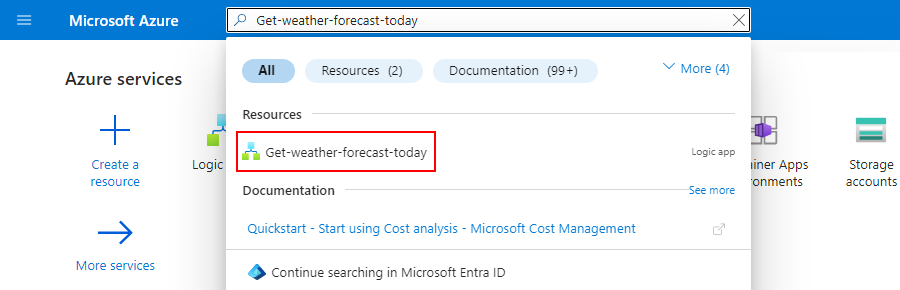
After the action runs, you can view the underlying logic app resource and workflow in the Azure portal. You can review the workflow's run history to debug or troubleshoot problems that the workflow might encounter.
In the Azure portal title bar search box, enter the name for the action you created.
From the results list, under Resources, select the logic app resource.
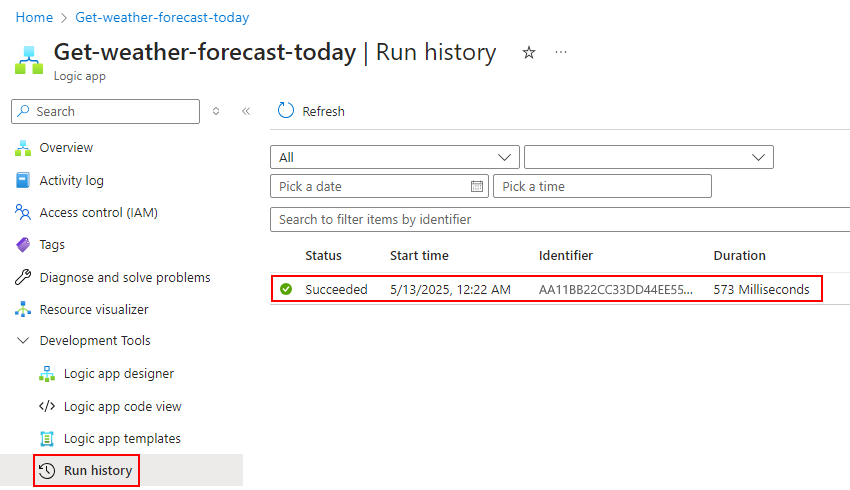
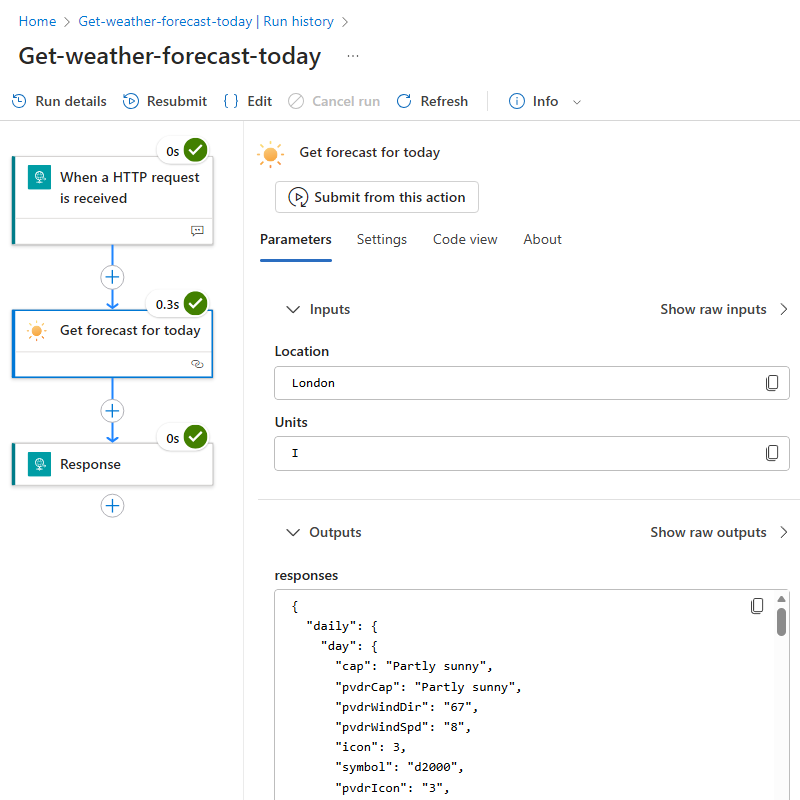
To view the workflow's run history, inputs, outputs, and other information, on the logic app sidebar, under Development Tools, select Run history.
In the Run history list, select the latest workflow run, for example:
After the monitoring view opens and shows the status for each operation in the workflow, select an operation to open the information pane and review the operation's inputs and outputs.
This example selects the action named Get forecast for today, for example:
For more information, see View workflow status and run history.


Optional: Open workflow in the designer
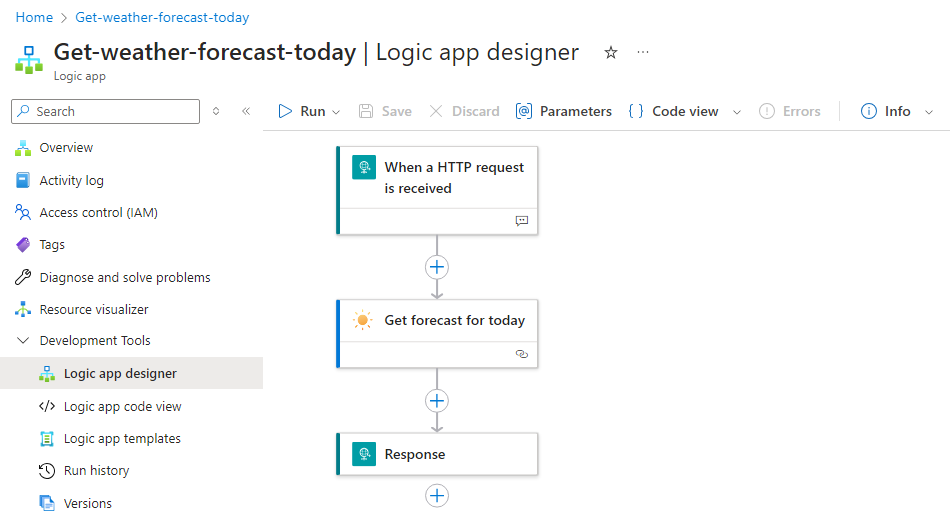
To review the workflow definition and operations or to edit the workflow, open the designer.
On the logic app sidebar, under Development Tools, select the designer. If you're still in monitoring view, on the monitoring view toolbar, select Edit.
You can now review the workflow's operations, which include the trigger and actions, for example:
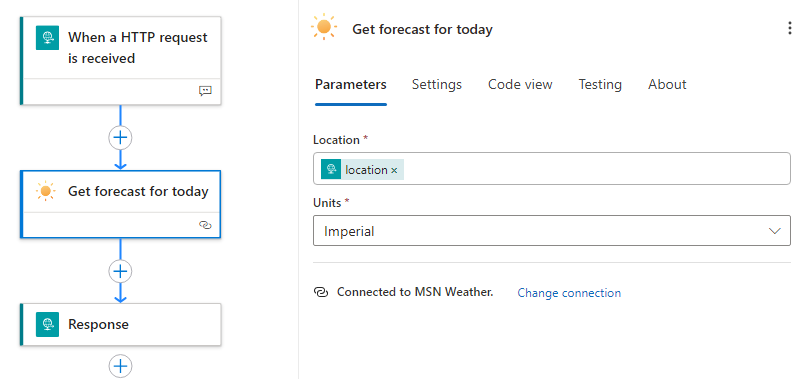
To view an operation's parameters and settings, on the designer, select the operation, for example:
To expand the workflow's behavior, add more actions.
For any workflow to appear through the agent's Add a Logic app action gallery in Foundry and to run as an agent tool, make sure any changes you make to the workflow still meet specific requirements.
Caution
Although you can edit the workflow, don't remove or change the Request trigger and existing actions in the workflow. Otherwise, you risk breaking the relationship between the agent and the corresponding action in Foundry and the workflow in the Azure portal. These items have set up parameters that work together, so changes to these operations risk breaking the action in the agent.
Instead, consider creating a custom version or a different workflow that you can add as an action to an agent. For example, the trigger uses the following parameters, which are necessary to call the trigger:
Parameter Description Name This name is part of the trigger's HTTPS URL. External callers, such as other services, outside the workflow send an HTTPS request to this URL, which fires the trigger and starts the workflow. The trigger is always the first step in a workflow and specifies the condition to meet for the trigger to run. HTTPS URL When you save the workflow for the first time, this URL is generated and used for calling an endpoint that the trigger creates for the workflow. Method This setting specifies whether the trigger accepts all or only specific HTTPS methods. Request Body JSON Schema If you want to validate the input that the trigger expects to receive in the HTTPS request, include a JSON schema that specifies and validates the input that external callers include in their request. For more information, see Build a workflow with a trigger or action.
To save any changes, on the designer toolbar, select Save.


Optional: Test an updated workflow in the designer
If you make changes to the weather workflow or want to test a different workflow, follow these steps:
On the designer toolbar, select Run > Run with payload.
After the Run with payload pane opens, in the Body field, provide the expected trigger inputs in JSON format, for example:
{
    "location": {
        "type": "London",
        "description": "Location for the weather"
    }
}
When you finish, select Run.
On the Output tab, the Response Body contains the results and response from the workflow.
If your workflow run produces errors or requires troubleshooting, open the workflow's run history. Examine each operation's inputs and outputs by using the relevant steps in View workflow run history.
Billing and pricing
You incur charges for Consumption logic app workflows based on the pay-for-use billing model.
For Azure Logic Apps, see:
For Foundry, see the following resources:
FAQ
How does authentication work for calls from Foundry to Azure Logic Apps?
Azure Logic Apps supports the following types of authentication for inbound calls from Foundry to the Request trigger in a logic app workflow:
Shared Access Signature (SAS) based authentication
When an agent calls an action that runs a logic app workflow, Foundry sends a request to the callback URL in the workflow's Request trigger. You can get this callback URL, which includes an SAS, by using Workflows - List callback Url from the REST API for Azure Logic Apps.
For SAS authentication, Azure Logic Apps also supports the following tasks:
- Create SAS URLs with a specified validity period.
- Use multiple keys and rotate them as needed.
For more information, see Generate a Shared Access Signature (SAS) key or token.
Microsoft Entra ID-based OAuth authentication policy
Azure Logic Apps supports authentication for calls to request triggers by using OAuth with Microsoft Entra ID. You can specify authentication policies to use when validating OAuth tokens. For more information, see Enable OAuth 2.0 with Microsoft Entra ID in Azure Logic Apps.
For more information about securing inbound calls in Azure Logic Apps, see Access for inbound calls to request-based triggers.