Note
Access to this page requires authorization. You can try signing in or changing directories.
Access to this page requires authorization. You can try changing directories.
Applies to: Azure Logic Apps (Consumption)
To improve security for calls to your APIs, you can set up Microsoft Entra authentication through the Azure portal so you don't have to update your code. Or, you can require and enforce authentication through your API's code.
You can add authentication in the following ways:
No code changes: Protect your API with Microsoft Entra ID through the Azure portal, so you don't have to update your code or redeploy your API.
Note
By default, the Microsoft Entra authentication that you select in the Azure portal doesn't provide fine-grained authorization. For example, this authentication locks your API to just a specific tenant, not to a specific user or app.
Update your API's code: Protect your API by enforcing certificate authentication or Microsoft Entra authentication through code.
Authenticate calls to your API without changing code
Here are the general steps for this method:
Create two Microsoft Entra application identities (app registration): one for your logic app resource and one for your web app (or API app).
To authenticate calls to your API, use the credentials (client ID and secret) for the service principal that's associated with the Microsoft Entra application identity for your logic app.
Include the application IDs in your logic app's workflow definition.
Part 1: Create a Microsoft Entra application identity for your logic app
Your logic app resource uses this Microsoft Entra application identity to authenticate against Microsoft Entra ID. You only have to set up this identity one time for your tenant. For example, you can choose to use the same identity for all your logic apps, even though you can create unique identities for each logic app. You can set up these identities in the Azure portal or use PowerShell.
In the Azure portal search box, find and select Microsoft Entra ID.
Confirm that you're in the same tenant as your web app or API app.
Tip
To switch tenants, from the Azure title bar, open your profile, and select Switch directory.
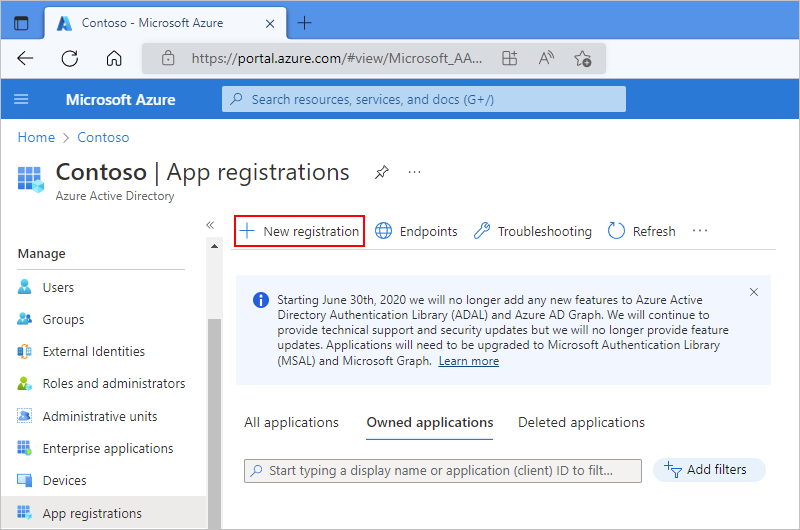
On the tenant resource menu, under Manage, select App registrations.
The App registrations page shows all the app registrations in your tenant. To view only your app registrations, select Owned applications.
On the toolbar, select New registration.
On the Register an application page, follow these steps:
For Name, provide a friendly, user-facing name for your logic app's application identity.
Under Supported account types, select the option that best describes the account types that can use the application identity or get access to your API.
Under Redirect URI, select Web as the platform. Next to this option, provide a unique URL for the location to return the authentication response.
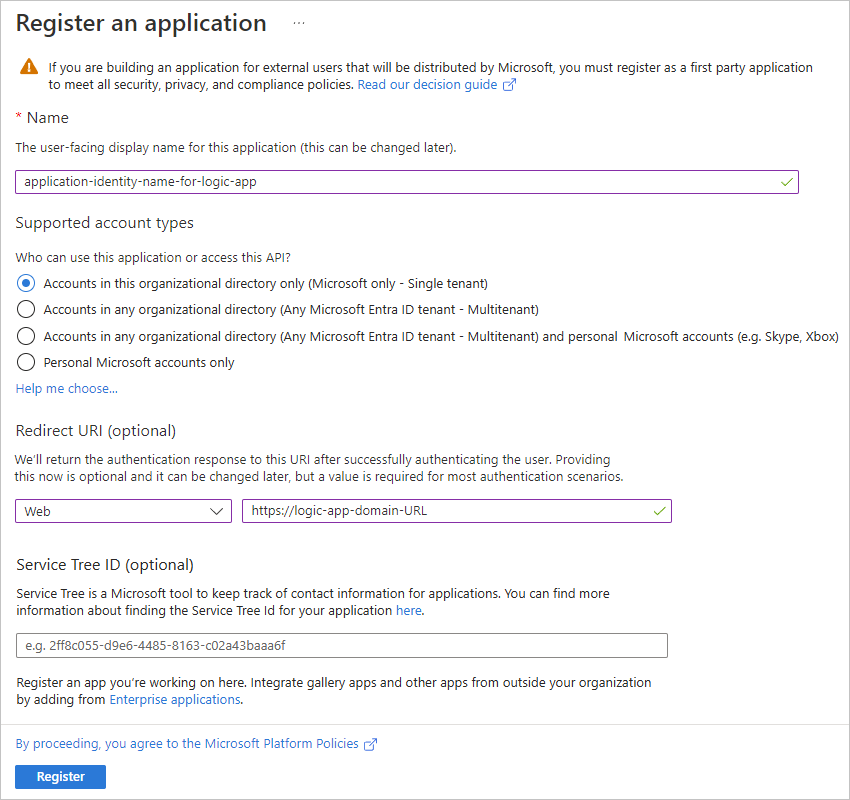
When you're done, select Register.
The Owned applications tab now shows your created application identity. If this identity doesn't appear, on the toolbar, select Refresh.
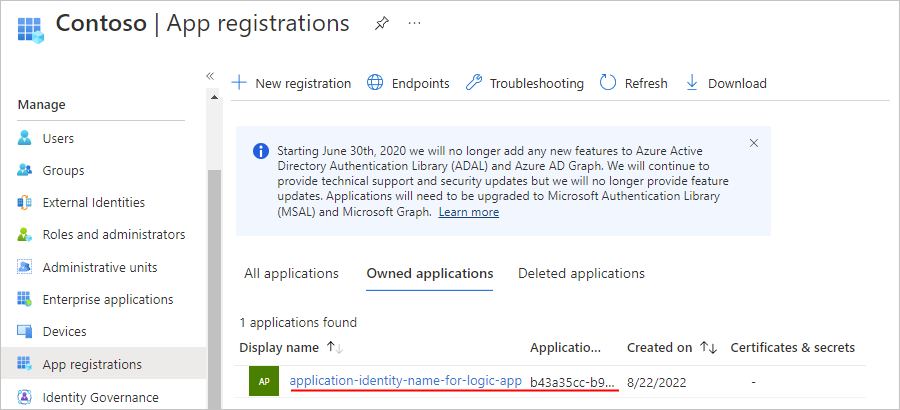
From the app registrations list, select your new application identity.
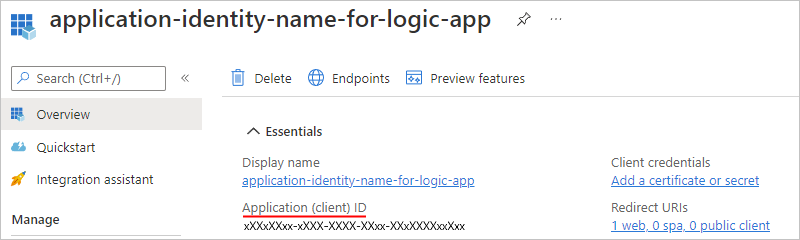
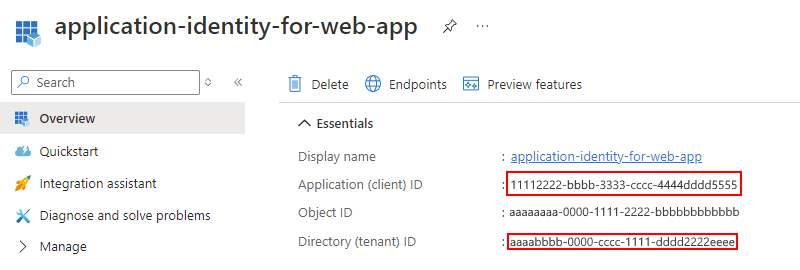
From the application identity navigation menu, select Overview.
On the Overview page, under Essentials, copy and save the Application (client) ID to use as the client ID for your logic app in Part 3.
From the application identity menu, under Manage, select Certificates & secrets.
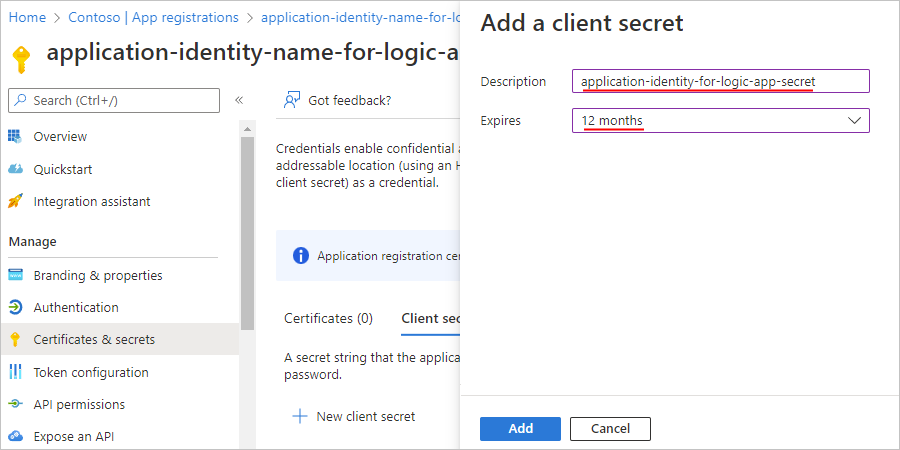
On the Client secrets page, select New client secret.
On the Add a client secret pane, for Description, provide a name for your secret. For Expires, select a duration for your secret. When you're done, select Add.
The secret that you create acts as the application identity's "secret" or password for your logic app.
On the Certificates & secrets page, on the Client secrets tab, your secret now appears along with a secret value and secret ID.
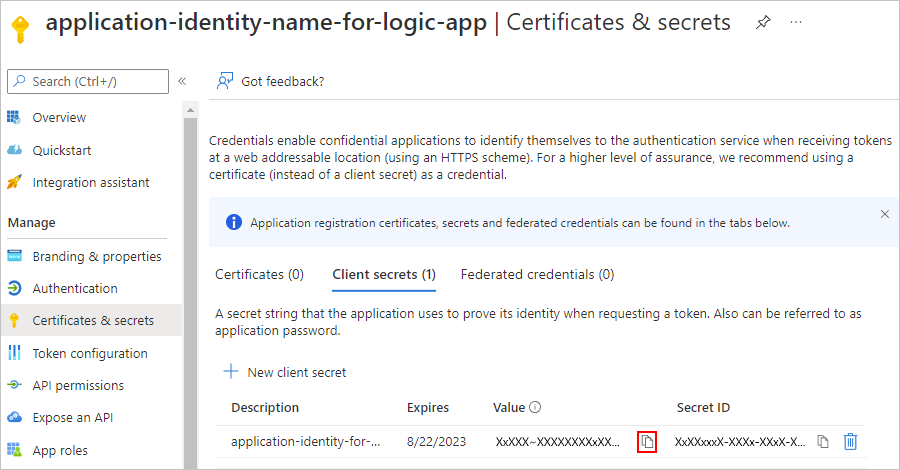
Copy the secret value for later use. When you configure your logic app in Part 3, you specify this value as the "secret" or password.
Part 2: Create a Microsoft Entra application identity for your web app or API app
If your web app or API app is already deployed, you can turn on authentication and create the application identity in the Azure portal. Otherwise, you can turn on authentication when you deploy with an Azure Resource Manager template.
Create the application identity for a deployed web app or API app in the Azure portal
In the Azure portal, find and select your web app or API app.
Under Settings, select Authentication > Add identity provider.
After the Add an identity provider pane opens, on the Basics tab, from the Identity provider list, select Microsoft to use Microsoft Entra identities, and then select Add.
Now, create an application identity for your web app or API app as follows:
For App registration type, select Create new app registration.
For Name, provide a name for your application identity.
For Supported account types, select the account types appropriate for your scenario.
For Restrict access, select Require authentication.
For Unauthenticated requests, select the option based on your scenario.
When you're done, select Add.
In the Identity provider section, the new application identity for your web app or API app now appears:
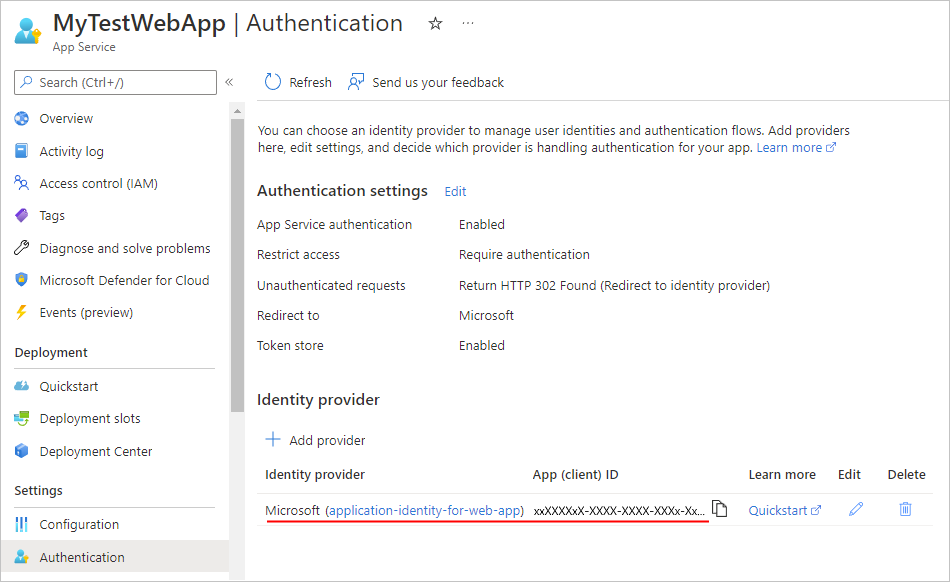
Tip
If the application identity doesn't appear, on the toolbar, select Refresh.
Now you must find the application (client) ID and tenant ID for the application identity that you just created for your web app or API app. You use these IDs in Part 3. So, continue with the following steps for the Azure portal.
Find application identity's client ID and tenant ID for your web app or API app in the Azure portal
On your web app menu, under Manage, select Authentication.
In the Identity provider section, find your previously created application identity. Select the application identity name.
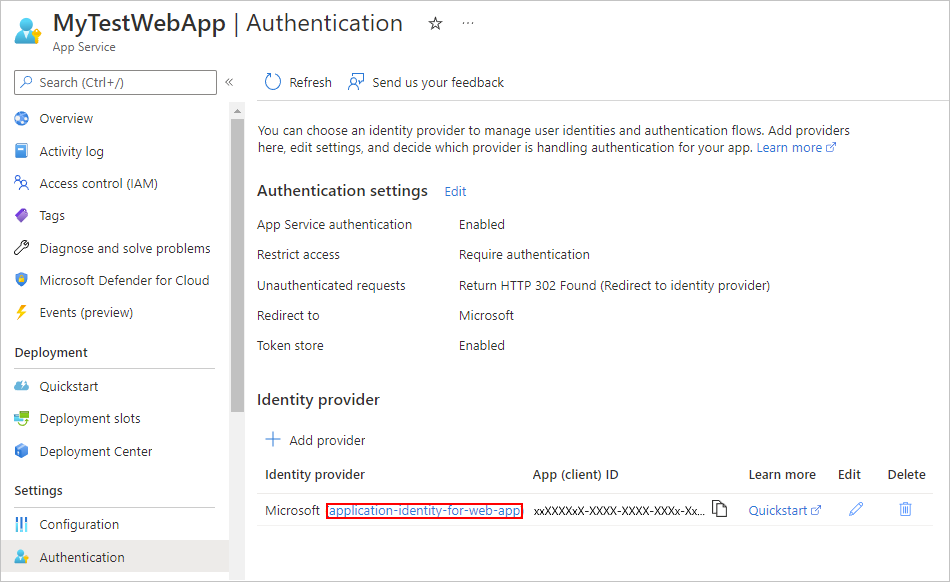
On the Overview page, find the values for Application (client) ID and Directory (tenant) ID. Copy and save the values for use in Part 3.
You can also use the tenant ID GUID in your web app or API app's deployment template, if necessary. This GUID is your specific tenant's GUID ("tenant ID") and should appear in this URL:
https://sts.windows.net/<tenant-GUID>
Set up authentication when you deploy with an Azure Resource Manager template
If you're using an Azure Resource Manager template (ARM template), you still have to create a Microsoft Entra application identity for your web app or API app that differs from the app identity for your logic app. To create the application identity, and then find the client ID and tenant ID, follow the previous steps in Part 2 for the Azure portal. You'll use both the client ID and tenant ID in your app's deployment template and also for Part 3.
Important
When you create the Microsoft Entra application identity for your web app or API app, you must use the Azure portal, not PowerShell. The PowerShell commandlet doesn't set up the required permissions to sign users into a website.
After you get the client ID and tenant ID, include these IDs as a subresource of your web app or API app in your deployment template:
"resources": [
   {
      "apiVersion": "2015-08-01",
      "name": "web",
      "type": "config",
      "dependsOn": ["[concat('Microsoft.Web/sites/','parameters('webAppName'))]"],
      "properties": {
         "siteAuthEnabled": true,
         "siteAuthSettings": {
            "clientId": "<client-ID>",
            "issuer": "https://sts.windows.net/<tenant-ID>/"
         }
      }
   }
]
To automatically deploy a blank web app and a logic app together with Microsoft Entra authentication, view the complete template here, or select the following Deploy to Azure button:

Part 3: Populate the Authorization section in your logic app
The previous template already has this authorization section set up, but if you are directly authoring your logic app definition, you must include the full authorization section.
Open your logic app definition in code view.
Go to the HTTP action definition, find the Authorization section, and include the following properties:
{
   "tenant": "<tenant-ID>",
   "audience": "<client-ID-from-Part-2-web-app-or-API app>",
   "clientId": "<client-ID-from-Part-1-logic-app>",
   "secret": "<secret-from-Part-1-logic-app>",
   "type": "ActiveDirectoryOAuth"
}
| Property | Required | Description |
|---|---|---|
tenant |
Yes | The GUID for the Microsoft Entra tenant. |
audience |
Yes | The GUID for the target resource that you want to access, which is the client ID from the application identity for your web app or API app. |
clientId |
Yes | The GUID for the client requesting access, which is the client ID from the application identity for your logic app. |
secret |
Yes | The secret or password from the application identity for the client that's requesting the access token. |
type |
Yes | The authentication type. For ActiveDirectoryOAuth authentication, the value is ActiveDirectoryOAuth. |
For example:
{
   "actions": {
      "HTTP": {
         "inputs": {
            "method": "POST",
            "uri": "https://your-api-azurewebsites.net/api/your-method",
            "authentication": {
               "tenant": "tenant-ID",
               "audience": "client-ID-from-azure-ad-app-for-web-app-or-api-app",
               "clientId": "client-ID-from-azure-ad-app-for-logic-app",
               "secret": "key-from-azure-ad-app-for-logic-app",
               "type": "ActiveDirectoryOAuth"
            }
         }
      }
   }
}
Secure API calls through code
Certificate authentication
To validate the incoming requests from your logic app workflow to your web app or API app, you can use client certificates. To set up your code, learn how to configure TLS mutual authentication.
Important
Always secure and protect sensitive and personal data, such as credentials, secrets, access keys, connection strings, certificates, thumbprints, and similar information with the highest available or supported level of security.
Make sure that you securely store such information by using Microsoft Entra ID and Azure Key Vault. Don't hardcode this information, share with other users, or save in plain text anywhere that others can access. Set up a plan to rotate or revoke secrets in the case they become compromised. For more information, see the following resources:
In the Authorization section, include the following properties:
{
   "type": "ClientCertificate",
   "password": "<password>",
   "pfx": "<long-pfx-key>"
}
| Property | Required | Description |
|---|---|---|
type |
Yes | The authentication type. For TLS/SSL client certificates, the value must be ClientCertificate. |
password |
No | The password for accessing the client certificate (PFX file). |
pfx |
Yes | The base64-encoded contents of the client certificate (PFX file). |
Basic authentication
To validate incoming requests from your logic app to your web app or API app, you can use basic authentication, such as a username and password. Although basic authentication is a common pattern, and you can use this authentication in any language used to build your web app or API app, always use the best authentication level available or supported.
Warning
Microsoft advises against using the following flows for authentication and authorization:
Resource Owner Password Credentials (ROPC) for OAuth 2.0
This flow lets you sign in to an application with a password. The flow is incompatible with multifactor authentication (MFA), requires a very high degree of trust in the application, and carries risks that don't exist in other flows. Use this flow only if other more secure flows aren't supported or available.
For more information, see Oauth 2.0 Resource Owner Password Credentials.
Implicit grant flow for OAuth 2.0
This token-based flow is intended for traditional web apps where the server has more secure control over processing
POSTdata and is often used with the authorization code flow. Due to how this flow handles and returns ID tokens or access tokens, the flow requires a very high degree of trust in the application and carries risks that don't exist in other flows. Use this flow only when other more secure flows aren't supported or available.For more information, see OAuth 2.0 implicit grant flow.
In the Authorization section, include the following properties:
{
   "type": "Basic",
   "username": "<username>",
   "password": "<password>"
}
| Property | Required | Description |
|---|---|---|
type |
Yes | The authentication type that you want to use. For basic authentication, the value must be **Basic**. |
username |
Yes | The username that you want to use for authentication. |
password |
Yes | The password that you want to use for authentication. |
Microsoft Entra authentication through code
By default, the Microsoft Entra authentication that you turn on in the Azure portal doesn't provide fine-grained authorization. For example, this authentication locks your API to just a specific tenant, not to a specific user or app.
To restrict API access to your logic app through code, extract the header that has the JSON web token (JWT). Check the caller's identity, and reject requests that don't match.