Note
Access to this page requires authorization. You can try signing in or changing directories.
Access to this page requires authorization. You can try changing directories.
On a Microsoft Azure Virtual Machine (VM), or a Data Science Virtual Machine (DSVM), you create local user accounts while provisioning the VM. Users then authenticate to the VM with credentials for those user accounts. If you have multiple VMs and your users need to access them, credential management can become difficult. To solve the problem, you can deploy common user accounts and manage those accounts through a standards-based identity provider. You can then use a single set of credentials to access multiple resources on Azure, including multiple DSVMs.
Active Directory is a popular identity provider. Azure supports it both as a cloud service and as an on-premises directory. You can use Microsoft Entra ID or on-premises Active Directory to authenticate users on a standalone DSVM, or a cluster of DSVMs, in an Azure virtual machine scale set. To do this, you join the DSVM instances to an Active Directory domain.
If you already have Active Directory, you can use it as your common identity provider. If you don't have Active Directory, you can run a managed Active Directory instance on Azure through Microsoft Entra Domain Services.
The Microsoft Entra ID documentation provides detailed management instructions, including guidance about how to connect Microsoft Entra ID to your on-premises directory, if you have one.
This article describes how to set up a fully managed Active Directory domain service on Azure, using Microsoft Entra Domain Services. You can then join your DSVMs to the managed Active Directory domain. This approach allows users to access a pool of DSVMs (and other Azure resources) through a common user account and credentials.
Set up a fully managed Active Directory domain on Azure
Microsoft Entra Domain Services makes it simple to manage your identities. It provides a fully managed service on Azure. On this Active Directory domain, you manage users and groups. To set up an Azure-hosted Active Directory domain and user accounts in your directory, follow these steps:
In the Azure portal, add the user to Active Directory:
Sign in to the Azure portal as a Privileged Role Administrator
Browse to Microsoft Entra ID > Users > All users
Select New user
The User pane opens, as shown in this screenshot:
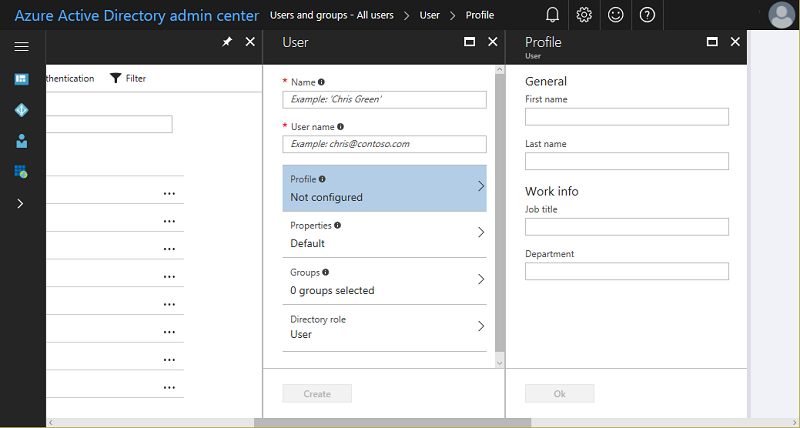
Enter information about the user, such as Name and User name. The domain name portion of the user name must be either the initial default domain name "[domain name].onmicrosoft.com" or a verified, nonfederated custom domain name such as "contoso.com."
Copy or otherwise note the generated user password. You must provide this password to the user after this process is complete
Optionally, you can open and fill out the information in Profile, Groups, or Directory role for the user
Under User, select Create
Securely distribute the generated password to the new user so that the user can sign in
Create a Microsoft Entra Domain Services instance. In the Enable Microsoft Entra Domain Services using the Azure portal resource, visit the Create an instance and configure basic settings section for more information. You need to update the existing user passwords in Active Directory to sync the password in Microsoft Entra Domain Services. You must also add DNS to Microsoft Entra Domain Services, as described under Complete the fields in the Basics window of the Azure portal to create a Microsoft Entra Domain Services instance in that section.
In the Create and configure the virtual network section of the preceding step, create a separate DSVM subnet in the virtual network you created
Create one or more DSVM instances in the DSVM subnet
Follow the instructions to add the DSVM to Active Directory
Mount an Azure Files share to host your home or notebook directory, so that your workspace can be mounted on any machine. If you need tight file-level permissions, you need Network File System [NFS] running on one or more VMs
Mount this share on the Linux DSVM. When you select Connect for the Azure Files share in your storage account in the Azure portal, the command to run in the bash shell on the Linux DSVM appears. The command looks like this:
sudo mount -t cifs //[STORAGEACCT].file.core.windows.net/workspace [Your mount point] -o vers=3.0,username=[STORAGEACCT],password=[Access Key or SAS],dir_mode=0777,file_mode=0777,sec=ntlmsspFor example, assume that you mounted your Azure Files share in the /data/workspace directory. Now, create directories for each of your users in the share:
- /data/workspace/user1
- /data/workspace/user2
- etc.
Create a
notebooksdirectory in the workspace of each userCreate symbolic links for
notebooksin$HOME/userx/notebooks/remote

You now have the users in your Active Directory instance, which is hosted in Azure. With Active Directory credentials, users can sign in to any DSVM (SSH or JupyterHub) that is joined to Microsoft Entra Domain Services. Because an Azure Files share hosts the user workspace, users can access their notebooks and other work from any DSVM when they use JupyterHub.
For autoscaling, you can use a virtual machine scale set to create a pool of VMs that are all joined to the domain in this fashion, and with the shared disk mounted. Users can sign in to any available machine in the virtual machine scale set, and can access the shared disk where their notebooks are saved.