Upgrade your Data Science Virtual Machine to Ubuntu 20.04
If you have a Data Science Virtual Machine (DSVM) that runs an older release, such as Ubuntu 18.04, you should migrate your DSVM to Ubuntu 20.04. This migration ensures that you get the latest operating system patches, drivers, preinstalled software, and library versions. This document tells you how to migrate from older Ubuntu versions.
Prerequisites
- Familiarity with SSH and the Linux command line
Overview
You have two migration options:
- In-place migration, also called "same server" migration. This option upgrades the existing VM without creation of a new virtual machine. In-place migration is the easier way to migrate from Ubuntu 18.04 to Ubuntu 20.04.
- Side-by-side migration, also called "inter-server" migration. This option transfers data from the existing virtual machine to a newly created VM. You might prefer side-by-side migration for upgrades between Ubuntu versions if you believe that your old install became needlessly cluttered.
Snapshot your VM in case you need to roll back
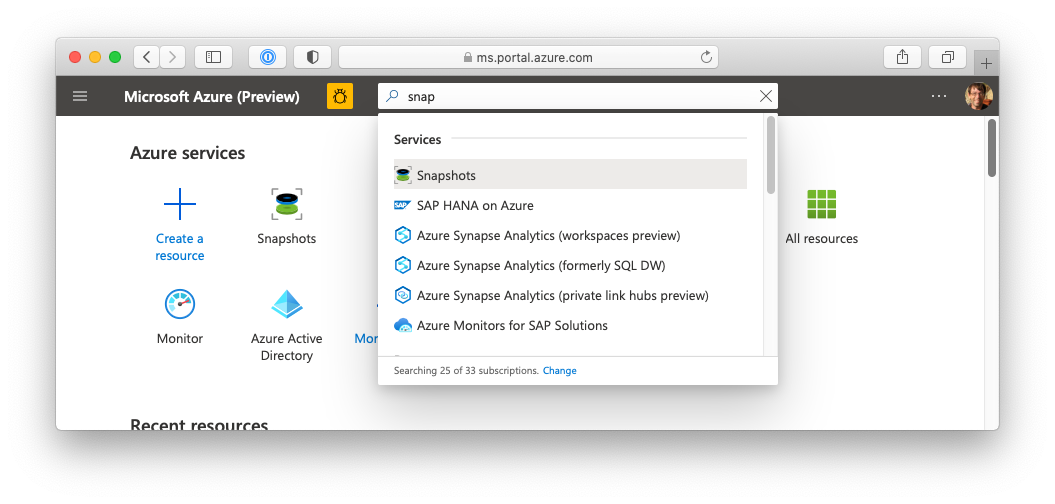
In the Azure portal, use the search bar to find the Snapshots functionality.
- Select Add, to take you to the Create snapshot page. Select the subscription and resource group of your virtual machine. For Region, select the same region in which the target storage exists. Select the DSVM storage disk and other backup options. Standard HDD is an appropriate storage type for this backup scenario.

- After you fill in the details and the validations pass, select Review + create to validate and create the snapshot. When the snapshot successfully completes, a message appears to tell you that the deployment is complete.

In-place migration
To migrate an older Ubuntu release, you might choose an in-place migration option. This migration doesn't create a new virtual machine and it has fewer steps compared to a side-by-side migration. For more control, or for a migration from a different distribution, consider a side-by-side migration. For more information, skip to the Side-by-side migration section of this document.
From the Azure portal, launch your DSVM, and sign in with SSH. To do so, select Connect and SSH, and follow the connection instructions.
Once you connect to a terminal session on your DSVM, run this upgrade command:
sudo do-release-upgrade
The upgrade process takes a while to complete. After it finishes, the program will request your permission to restart the virtual machine. Answer Yes, to disconnect from the SSH session as the system reboots.
If necessary, regenerate SSH keys
Important
After you upgrade and reboot, you might need to regenerate your SSH keys.
After your VM upgrades and reboots, try to access it again via SSH. The IP address might change during the reboot, so confirm it before you try to connect.
If you receive the error REMOTE HOST IDENTIFICATION HAS CHANGED, you must regenerate your SSH credentials.

To do so on your local machine, run this command:
ssh-keygen -R "your server hostname or ip"
You should now be able to connect with SSH. If you still have trouble, follow the link to Troubleshoot SSH connectivity issues at the Connect page.
Side-by-side migration
For a clean OS install, you can do a side-by-side migration. This migration type has more steps, but offers more control over the exact files that carry over.
Migrations from other systems based on the same set of upstream source packages should be relatively straightforward.
You can upgrade the operating system parts of the filesystem, and leave the user directories, for example /home, in place. If you do leave the old user home directories in place, you can expect some problems with the GNOME/KDE menus and other desktop items. It might be easier to create new user accounts, and mount the old directories somewhere else in the filesystem. This is done for purposes of reference, copying, or linking users' material after the migration.
Migration at a glance
- Create a snapshot of your existing VM as described previously.
- Create a disk from that snapshot.
- Create a new Ubuntu DSVM.
- Recreate user account(s) on the new virtual machine.
- Mount the disk of the snapshotted VM as a data disk on your new DSVM.
- Manually copy the relevant data.
Create a disk from your VM snapshot
Create a VM snapshot as described previously, if you haven't yet done so.
- In the Azure portal, search for Disks and select Add. This opens the Disk page

Set the Subscription, Resource group, and Region to the values of your VM snapshot. Choose a Name for the disk to be created
Select Source type as Snapshot and select the VM snapshot as the Source snapshot. Review and create the disk

Create a new Ubuntu Data Science Virtual Machine
Create a new Ubuntu Data Science Virtual Machine with the Azure portal or an ARM template.
Re-create user account(s) on your new Data Science Virtual Machine
Since you'll only copy data from your old computer, you must re-create the user accounts and software environments that you want to use on the new machine.
Linux has enough flexibility to allow you to customize directories and paths on your new installation, to mirror your old machine. In general, however, it's easier to use the preferred layout of modern Ubuntu, and modify your user environment and scripts to adapt.
For more information, visit Quickstart: Set up the Data Science Virtual Machine for Linux (Ubuntu).
Mount the disk of the snapshotted VM as a data disk on your new Data Science Virtual Machine
- In the Azure portal, verify that your Data Science Virtual Machine is running
- In the Azure portal, go to the page of your DSVM. Choose the Disks blade on the left rail. Choose Attach existing disks
- In the Disk name dropdown, select the disk that you created from your old VM's snapshot
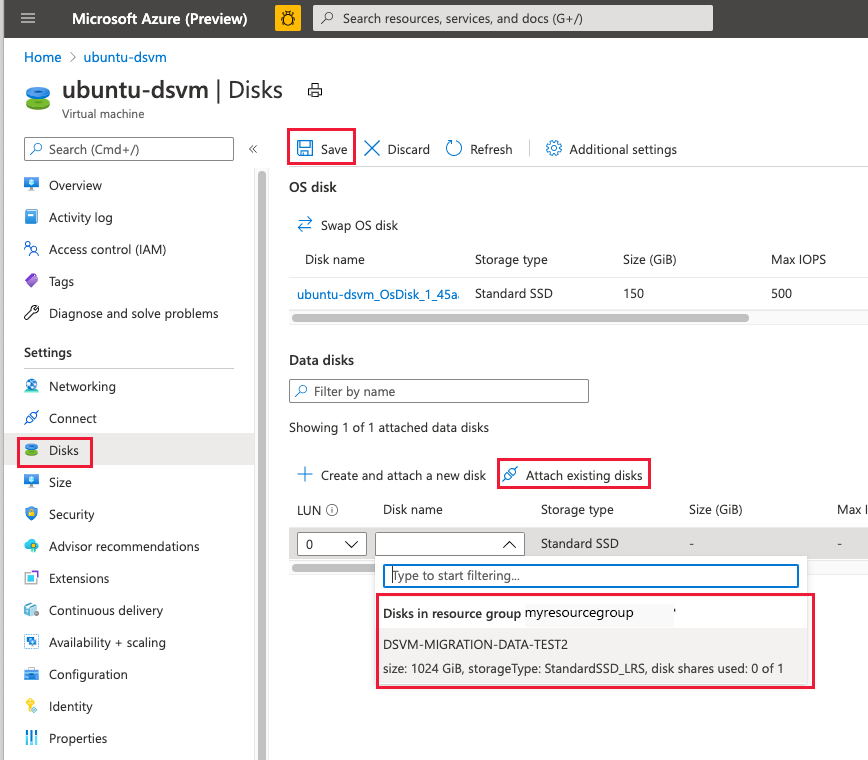
- Select Save to update your virtual machine.

Important
Your VM should be running at the time you attach the data disk. If the VM isn't running, the disks might get added in an incorrect order. This leads to a confusing and potentially non-bootable system. If you add the data disk with the VM off, choose the X beside the data disk, start the VM, and re-attach it.
Manually copy the wanted data
Sign on to your running virtual machine using SSH
Confirm that you attached the disk created from the snapshot of your old VM by running this command:
lsblk -o NAME,HCTL,SIZE,MOUNTPOINT | grep -i 'sd'The results should resemble the next image. In the image, disk
sda1is mounted at the root andsdb2is the/mntscratch disk. The data disk created from the snapshot of your old VM is identified assdc1, but isn't yet available, as evidenced by the lack of a mount location. Your results might have different identifiers, but you should see a similar pattern.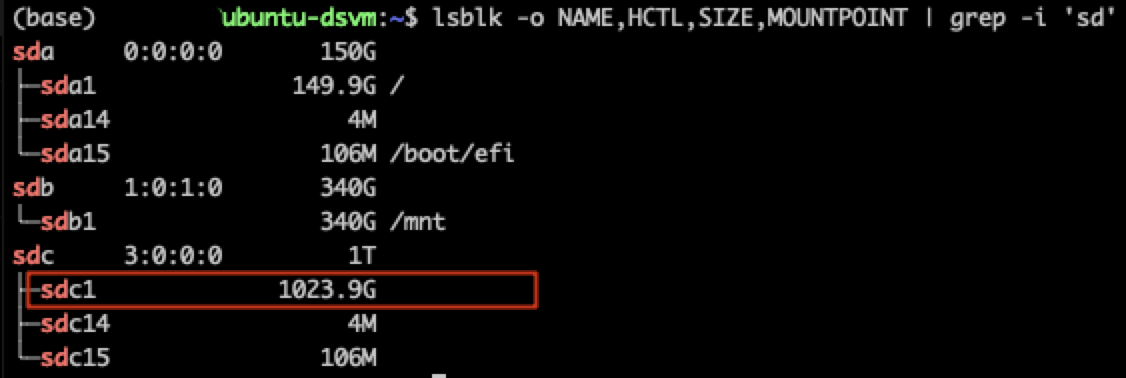
To access the data drive, create a location for it and mount it. Replace
/dev/sdc1with the appropriate value thatlsblkreturns:sudo mkdir /datadrive && sudo mount /dev/sdc1 /datadriveThe
/datadriveresource contains the directories and files of your old DSVM. Move or copy the directories or files you want from the data drive to the new VM as you wish.

For more information, visit Use the portal to attach a data disk to a Linux VM.
Connect and confirm version upgrade
For either an in-place or side-by-side migration, verify that the upgrade succeeded. From a terminal session, run:
cat /etc/os-release
The terminal should show that you're running Ubuntu 20.04.

The Azure portal also shows the version change.
