APPLIES TO:
 Azure CLI ml extension v2 (current)
Python SDK azure-ai-ml v2 (current)
Azure CLI ml extension v2 (current)
Python SDK azure-ai-ml v2 (current)
Warning
Import data from external sources (preview) and Data Connections (preview) in Azure Machine Learning are deprecated and won't be available after September 30, 2026. Until then, you can continue to use these features without disruption. After that date, any workloads that depend on them will be disrupted.
Recommended action: Migrate external data imports to Microsoft Fabric and use Azure Machine Learning datastores to make data available in Azure Machine Learning.
In this article, you learn how to connect to external data sources to make their data available to Azure Machine Learning. You also learn how to connect to several external nondata services. You can use the Azure Machine Learning CLI, the Azure Machine Learning SDK for Python, or Machine Learning studio to create these connections.
An Azure Machine Learning connection securely stores usernames and passwords as secrets in a key vault. Azure connections serve as key vault proxies, and interactions with the connections are direct interactions with Azure Key Vault. Key Vault role-based access control (RBAC) manages access to the data resources. You don't need to deal directly with the credentials after they're stored in the key vault.
Azure supports connections to the following external sources for data availability:
- Snowflake
- Azure SQL Database
- Amazon S3
Important
This feature is currently in public preview. This preview version is provided without a service-level agreement, and we don't recommend it for production workloads. Certain features might not be supported or might have constrained capabilities.
For more information, see Supplemental Terms of Use for Microsoft Azure Previews.
Prerequisites
An Azure subscription with the free or paid version of Azure Machine Learning.
An Azure Machine Learning workspace.
The Azure CLI with the ml extension version 2.15.1 or later installed.
If you have an older Azure CLI version or extension, use the following code to uninstall it and install the new one.
az extension remove -n ml
az extension add -n ml --yes
az extension show -n ml 2.15.1
Create a Snowflake data connection
You can use the Azure Machine Learning CLI, Azure Machine Learning SDK for Python, or Machine Learning studio to create a Snowflake data connection that uses username/password authentication.
You can also use the Azure CLI or Python SDK to create a Snowflake connection that uses OAuth with a service principal. Machine Learning studio doesn't support creating OAuth connections.
Create a connection that uses username/password authentication
To create the Snowflake connection, first assemble a YAML file that defines the connection, and then run a command or script that calls the YAML file. For Python SDK, you can also specify the connection information directly without using a YAML file.
You can store credentials in the YAML file, and override the stored credentials in the Azure CLI command line when you create the connection. However, it's best to avoid storing credentials in a file, because a security breach could lead to a credential leak. Instead you can leave the credentials values blank and provide them in the command line.
The following YAML file defines a Snowflake connection that uses username/password authentication. To create the file, provide a <connection-name>, and replace the <account>, <database>, <warehouse>, and <role> placeholders with the values from your Snowflake account. If you don't provide a <role>, the value defaults to PUBLIC. Save the file with a name like my_snowflake_connection.yaml.
$schema: http://azureml/sdk-2-0/Connection.json
type: snowflake
name: <connection-name>

target: jdbc:snowflake://<account>.snowflakecomputing.com/?db=<database>&warehouse=<warehouse>&role=<role>
credentials:
    type: username_password
    username: <snowflake-username>
    password: <snowflake-password>
You can create a data connection to a Snowflake database in Machine Learning studio and use the connection to run data import jobs. Username/password credentials are securely stored in the key vault associated with the workspace.
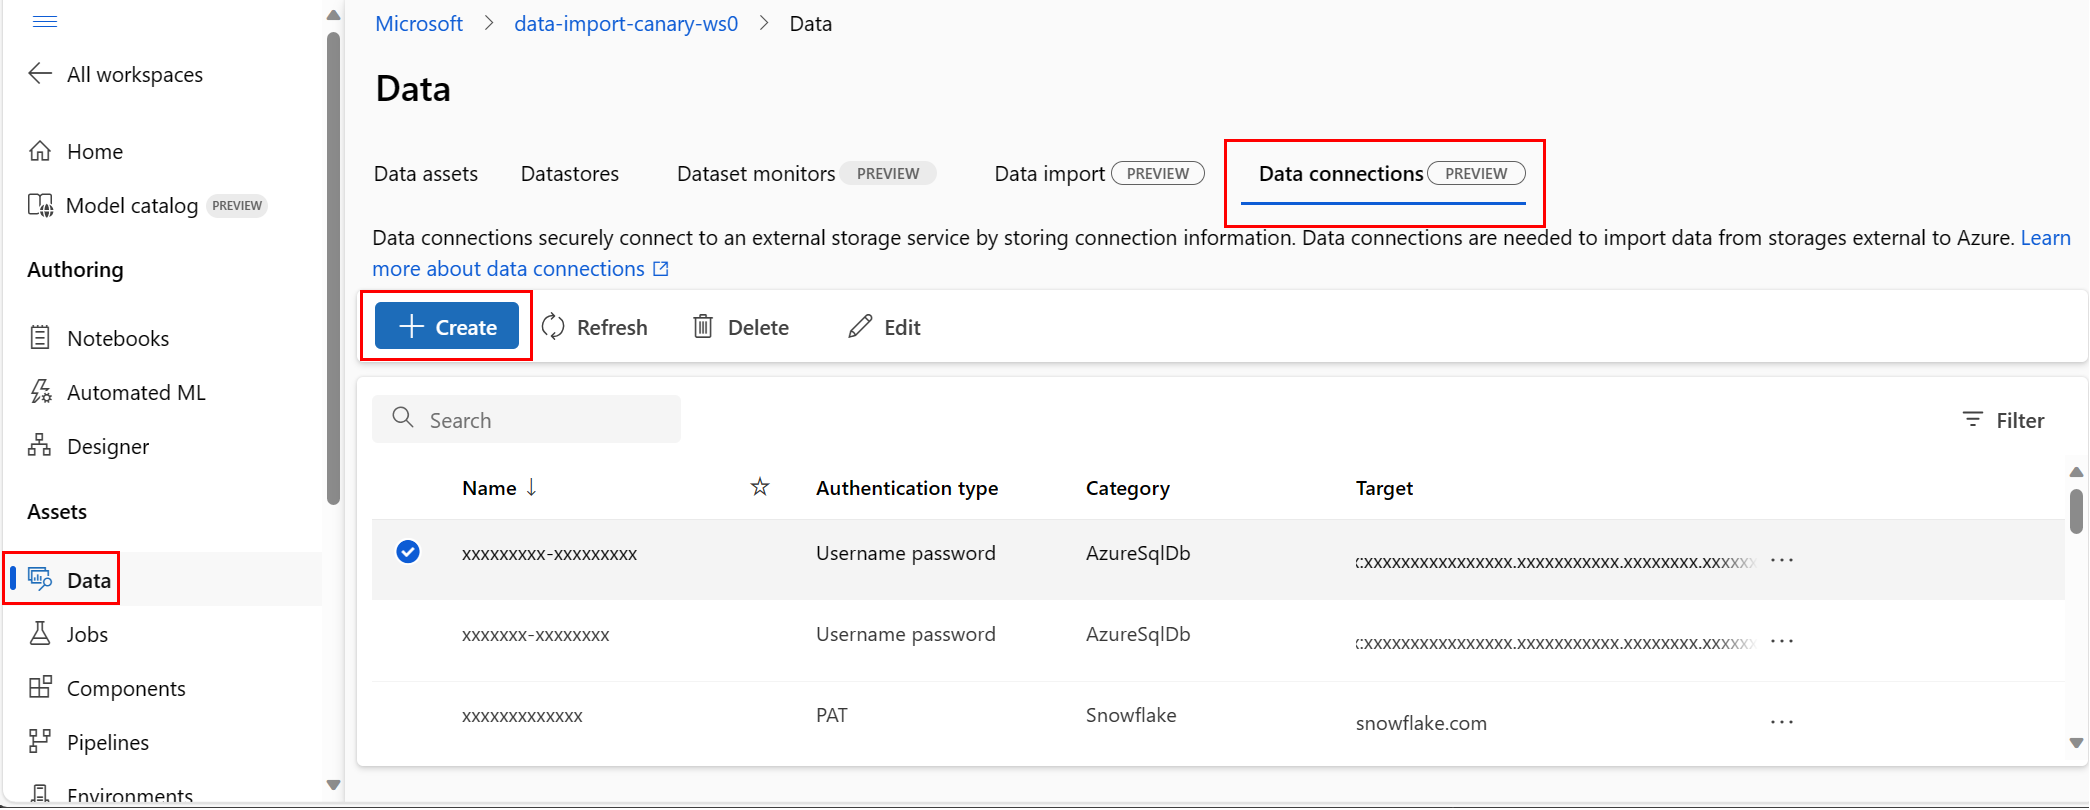
To create a data connection in Azure Machine Learning studio:
In your Machine Learning workspace, select Data under Assets in the left navigation menu.
On the Data page, select the Data connections tab, and then select Connect.
To create the connection, run one of the following command lines, providing your YAML filename for the <yaml-filename> placeholder.
To use the username and password you stored in the YAML file, run the following command:
az ml connection create --file <yaml-filename>.yaml
To provide the username and password as part of the command line, run the following command, entering your <username> and <password> for the placeholders:
az ml connection create --file <yaml-filename>.yaml --set credentials.username="<username>" credentials.password="<password>"
To create the Snowflake connection by calling the YAML file, run the following Python script, replacing the <yaml-filename> placeholder with your YAML filename.
from azure.ai.ml import MLClient, load_workspace_connection

ml_client = MLClient.from_config()

wps_connection = load_workspace_connection(source="./<yaml-filename>.yaml")
wps_connection.credentials.username="<snowflake-username>"
wps_connection.credentials.password="<snowflake-password>"
ml_client.connections.create_or_update(workspace_connection=wps_connection)
Create directly
To directly specify the connection information without using a YAML file, run the following Python script. Provide a <connection-name> and replace the <account>, <database>, <warehouse>, and <role> placeholders with the values from your Snowflake account.
If you don't provide a <role>, the value defaults to PUBLIC. For the username-password authentication type, the name/password values should be URL-encoded.
from azure.ai.ml import MLClient
from azure.ai.ml.entities import WorkspaceConnection
from azure.ai.ml.entities import UsernamePasswordConfiguration

import urllib.parse
username = urllib.parse.quote(os.environ["SNOWFLAKEDB_USERNAME"], safe="")
password = urllib.parse.quote(os.environ["SNOWFLAKEDB_PASSWORD"], safe="")

target= "jdbc:snowflake://<account>.snowflakecomputing.com/?db=<database>&warehouse=<warehouse>&role=<role>"
name= <connection-name>
wps_connection = WorkspaceConnection(name= name,
type="snowflake",
target= target,
credentials= UsernamePasswordConfiguration(username=username, password=password)
)

ml_client.connections.create_or_update(workspace_connection=wps_connection)
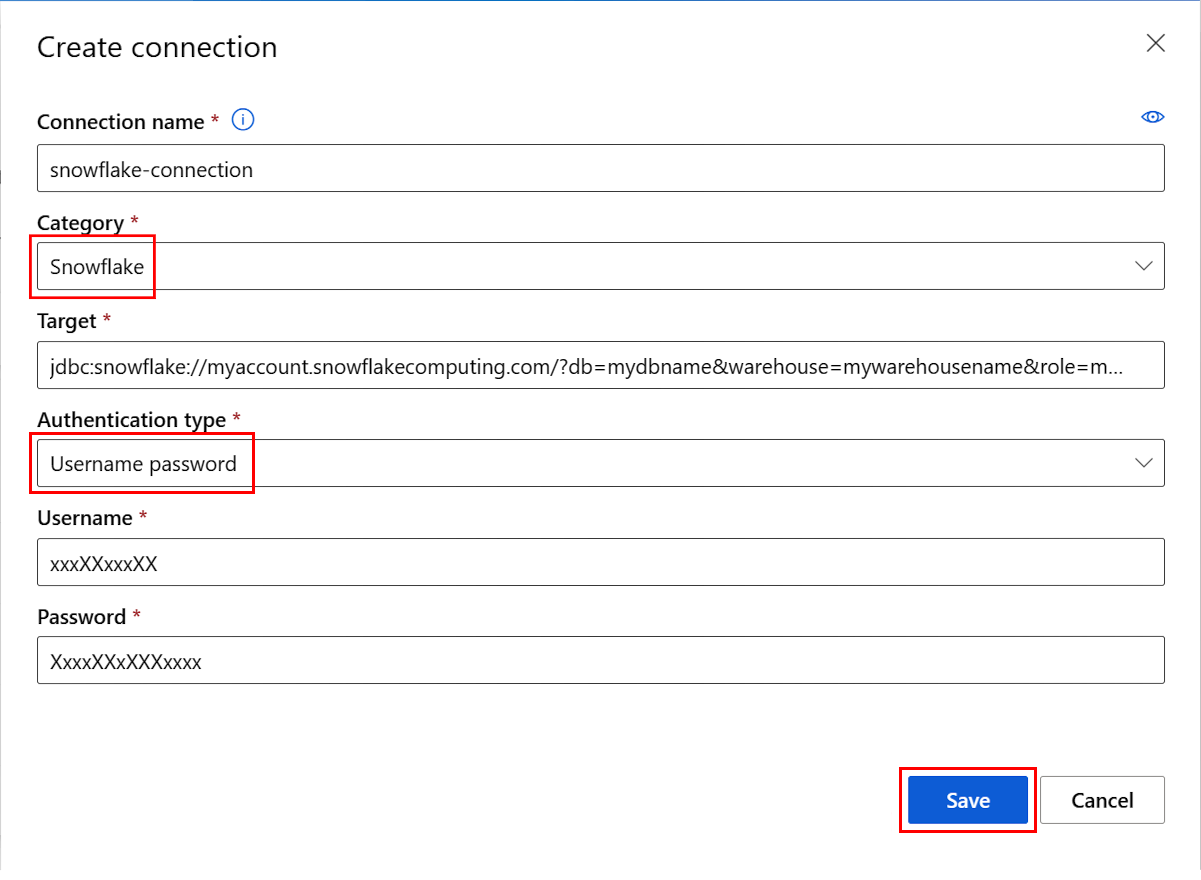
On the Create connection screen, complete the following information:
- Service: Select Snowflake.
- Target: Enter the following target, using the values from your Snowflake account for the placeholders:
jdbc:snowflake://<account>.snowflakecomputing.com/?db=<database>&warehouse=<warehouse>&role=<role>
- Authentication type: Select Username password.
- Username: Enter your Snowflake user name.
- Password: Enter your Snowflake password.
- Connection name: Enter a name for the Snowflake connection.
Optionally select Test Connection to test the connection, and then select Save.
Use the Azure CLI or Python SDK to create a connection with OAuth authentication
You can use the Azure CLI or Python SDK to create a Snowflake connection that uses a service principal for OAuth to authenticate.
To create an OAuth connection for Azure Machine Learning, you need the following information:
- Client ID: The ID of the service principal
- Client Secret: The service principal secret
- Tenant ID: The ID of the Microsoft Entra ID tenant
To create the connection, first assemble a YAML file that defines the connection, and then run a command or script that calls the YAML file. For Python SDK, you can also specify the connection information directly without using a YAML file.
Create the following YAML file to define a Snowflake connection that uses OAuth. Provide a <connection-name>, and replace the <account>, <database>, <warehouse>, and <service-principal-scope> placeholders with the values from your Snowflake account. For credentials, provide your <client-id>, <client-secret>, and <tenant_id>.
name: <connection-name>
type: snowflake
target: jdbc:snowflake://<account>.snowflakecomputing.com/?db=<database>&warehouse=<warehouse>&scope=<service-principal-scope>
credentials:
  type: service_principal
  client_id: <client-id>
  client_secret: <client-secret>
  tenant_id: <tenant-id>
Machine Learning studio doesn't support creating data connections that use OAuth authentication.
To create the connection using the credential information stored in the YAML file, run the following command, replacing the <yaml-filename> placeholder with your YAML filename.
az ml connection create --file <yaml-filename>.yaml
To override the credential information in the YAML file or provide credentials in the command line, run the following command, entering your <client-id>, <client-secret>, and <tenant-id> values for the placeholders:
az ml connection create --file <yaml-filename>.yaml --set credentials.client_id="<client-id>" credentials.client_secret="<client-secret>" credentials.tenant_id="<tenant-id>"
To create the OAuth connection by calling the YAML file, run the following Python script, replacing the <yaml-filename> placeholder with your YAML filename. You can optionally provide or override the <wps_connection.credentials> values.
from azure.ai.ml import MLClient, load_workspace_connection

ml_client = MLClient.from_config()

wps_connection = load_workspace_connection(source="./<yaml-filename>.yaml")
wps_connection.credentials.client_id="<client-id>"
wps_connection.credentials.client_secret="<client-secret>"
wps_connection.credentials.tenant_id="<tenant-id>"
ml_client.connections.create_or_update(workspace_connection=wps_connection)
Create directly
Run the following Python script to directly specify the OAuth connection information without using a YAML file. Provide a <connection-name>, and replace the <account>, <database>, <warehouse>, and <role> placeholders with the values from your Snowflake account. Enter your <client-id>, <client-secret>, and <tenant-id> values in the corresponding placeholders.
from azure.ai.ml import MLClient
from azure.ai.ml.entities import WorkspaceConnection
from azure.ai.ml.entities import ServicePrincipalConfiguration

target= "jdbc:snowflake://<account>.snowflakecomputing.com/?db=<database>&warehouse=<warehouse>&role=<role>"
name= <connection-name>
auth = ServicePrincipalConfiguration(client_id="<client-id>", client_secret="<client-secret>", tenant_id="<tenant-id>")
wps_connection = WorkspaceConnection(name= name,
                                     type="snowflake",
                                     target=target,
                                     credentials=auth
)

ml_client.connections.create_or_update(workspace_connection=wps_connection)
You can create a Snowflake connection with username/password authentication, or use Azure CLI or Python SDK to create the connection with OAuth authentication.
Create an Azure SQL Database data connection
You can use the Azure Machine Learning CLI, the Azure Machine Learning SDK for Python, or Machine Learning studio to create an Azure SQL Database data connection.
To create an Azure SQL database connection, first assemble a YAML file that defines the connection, and then run an Azure CLI or Python SDK command or script that calls the YAML file. For Python SDK, you can also specify the connection information directly without using a YAML file.
Create the following YAML file to define the Azure SQL Database connection, and save the file with a name like my_azuresqldb_connection.yaml. Provide a <connection-name>, and replace the <server>, <port>, and <database> placeholders with the appropriate values from your Azure SQL database.
For credentials, you can store the Azure SQL database user name and password in this file, but it's more secure to leave the values blank and provide them in the command line that creates the connection.
$schema: http://azureml/sdk-2-0/Connection.json

type: azure_sql_db
name: <connection-name>

target: Server=tcp:<server>,<port>;Database=<database>;Trusted_Connection=False;Encrypt=True;Connection Timeout=30
credentials:
    type: sql_auth
    username: <username>
    password: <password>
You can create a data connection to an Azure SQL database in Machine Learning studio and use the connection to run data import jobs. Username/password credentials are securely stored in the key vault associated with the workspace.
To create a data connection in Azure Machine Learning studio:
In your Machine Learning workspace, select Data under Assets in the left navigation menu.
On the Data page, select the Data connections tab, and then select Connect.
To create the connection, run one of the following CLI command lines, providing your YAML filename for the <yaml-filename> placeholder.
To use the username and password stored in the YAML file, run the following command:
az ml connection create --file <yaml-filename>.yaml
To provide the username and password as part of the command line, run the following command, entering your <username> and <password> for the placeholders:
az ml connection create --file <yaml-filename>.yaml --set credentials.username="<username>" credentials.password="<password>"
To create the Azure SQL Database connection by calling the YAML file, run the following Python script, replacing the <yaml-filename> placeholder with your YAML filename.
from azure.ai.ml import MLClient, load_workspace_connection

ml_client = MLClient.from_config()

wps_connection = load_workspace_connection(source="./<yaml-filename>.yaml")
wps_connection.credentials.username="<username>"
wps_connection.credentials.password="<password>"
ml_client.connections.create_or_update(workspace_connection=wps_connection)
Create directly
To directly specify the connection information without using a YAML file, run the following Python script. Provide a <connection-name>, and replace the <server>, <port>, and <database> placeholders with the values for your Azure SQL database. For the username-password authentication type, the name and password values should be URL-encoded.
from azure.ai.ml import MLClient
from azure.ai.ml.entities import WorkspaceConnection
from azure.ai.ml.entities import UsernamePasswordConfiguration

import urllib.parse
username = urllib.parse.quote(os.environ["MYSQL_USERNAME"], safe="")
password = urllib.parse.quote(os.environ["MYSQL_PASSWORD"], safe="")

target= "Server=tcp:<server>,<port>;Database=<database>;Trusted_Connection=False;Encrypt=True;Connection Timeout=30"
# add the sql servername, port address and database

name= <connection-name>
wps_connection = WorkspaceConnection(name= name,
type="azure_sql_db",
target= target,
credentials= UsernamePasswordConfiguration(username=username, password=password)
)

ml_client.connections.create_or_update(workspace_connection=wps_connection)
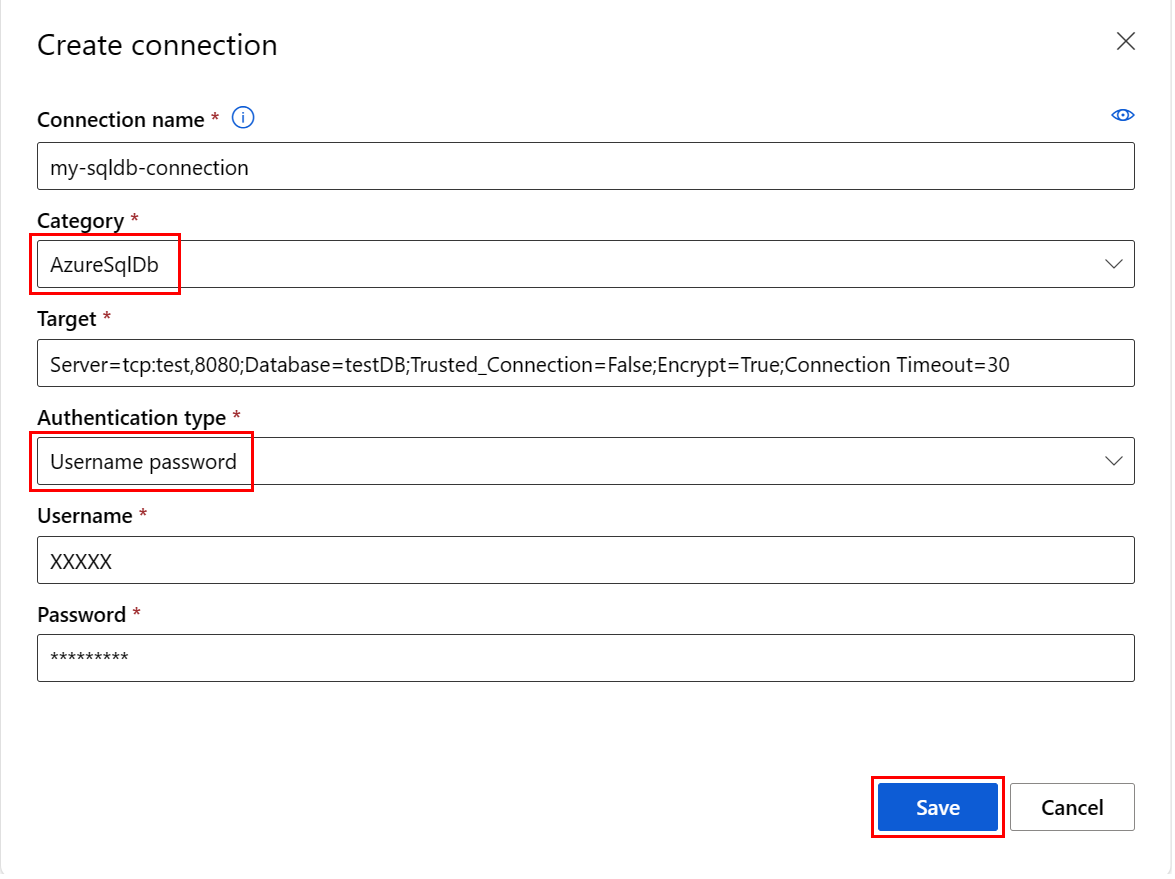
On the Create connection screen, complete the following information:
- Service: Select AzureSqlDb.
- Target: Enter the following target, using the values from your Azure SQL database for the placeholders:
Server=tcp:<server>,<port>;Database=<database>;Trusted_Connection=False;Encrypt=True;Connection Timeout=30
- Authentication type: Select Username password.
- Username: Enter your Azure SQL Database username.
- Password: Enter your Azure SQL Database password.
- Connection name: Enter a name for the Azure SQL Database connection.
Optionally select Test Connection to test the connection, and then select Save.
Create an Amazon S3 data connection
You can use the Azure Machine Learning CLI, the Azure Machine Learning SDK for Python, or Machine Learning studio to create an Amazon S3 data connection.
To create an Amazon S3 data connection, first assemble a YAML file that defines the connection, and then run an Azure CLI or Python SDK command or script that calls the YAML file. For Python SDK, you can also specify the connection information directly without using a YAML file.
To use the Azure Machine Learning CLI to create an Amazon S3 data connection, first assemble a YAML file that defines the connection, and then run an Azure CLI command that calls the YAML file.
Create the following YAML file that defines the Amazon S3 connection. Provide a <connection-name> and replace the <s3-bucket-name>, <access-key-id>, and <secret-access-key> placeholders with the values from your Amazon S3 account. Save the file with a name like my_amazons3_connection.yaml.
$schema: http://azureml/sdk-2-0/Connection.json

type: s3
name: <connection-name>

target: <s3-bucket-name>
credentials:
    type: access_key
    access_key_id: <access-key-id>
    secret_access_key: <secret-access-key>
You can create a connection to Amazon S3 data in Machine Learning studio and use the connection to run data import jobs. Username/password credentials are securely stored in the key vault associated with the workspace.
To create a data connection in Azure Machine Learning studio:
In your Machine Learning workspace, select Data under Assets in the left navigation menu.
On the Data page, select the Data connections tab, and then select Connect.
To create the connection, run the following CLI command, providing your YAML filename for the <yaml-filename> placeholder.
az ml connection create --file <yaml-filename>.yaml
To create the Amazon S3 connection by calling the YAML file, run the following Python script, replacing the <yaml-filename> placeholder with your YAML filename.
from azure.ai.ml import MLClient, load_workspace_connection

ml_client = MLClient.from_config()

wps_connection = load_workspace_connection(source="./<yaml-filename>.yaml")
ml_client.connections.create_or_update(workspace_connection=wps_connection)
Create directly
To specify the connection information directly without using a YAML file, run the following Python script. Provide a <connection-name>, and replace the <s3-bucket-name>, <access-key-id>, and <secret-access-key> placeholders with the values for your Amazon S3 account.
from azure.ai.ml import MLClient
from azure.ai.ml.entities import WorkspaceConnection
from azure.ai.ml.entities import AccessKeyConfiguration

target=<s3-bucket-name>
name=<connection-name>
wps_connection=WorkspaceConnection(name=name,
type="s3",
target= target,
credentials= AccessKeyConfiguration(access_key_id="<access-key-id>",secret_access_key="<secret-access-key>")
)

ml_client.connections.create_or_update(workspace_connection=wps_connection)
On the Create connection screen, complete the following information:
- Service: Select S3.
- Target: Enter your Amazon S3 bucket name.
- Authentication type: Select Access key.
- Access key ID: Enter your Amazon S3 access key ID.
- Secret Access Key: Enter your Amazon S3 Secret Access Key.
- Connection name: Enter a name for the Amazon S3 connection.
Optionally select Test Connection to test the connection, and then select Save.

Create external nondata connections
You can also create nondata Azure Machine Learning connections to external services you use in your code. This section shows how to create the following nondata connections:
- Git
- Python feed
- Azure Container Registry
- Generic container registry
- API key
Create a Git connection
You can create a Git connection using Azure CLI, Python SDK, or Machine Learning studio.
To create a Git connection using Azure CLI, define the connection by using one of the following YAML files. Name the file something like git-connection.yml.
To connect using a personal access token (PAT), provide a <connection-name>, and replace the <account>, <repo>, and <PAT> placeholders with the values for your Git account, repo, and PAT.
name: <connection-name>
type: git
target: https://github.com/<account>/<repo>
credentials:
   type: pat
   pat: <PAT>
To connect to a public repo without using credentials, provide a <connection-name>, and replace the <account>, and <repo> placeholders with your values.
name: <connection-name>
type: git
target: https://github.com/<account>/<repo>
Create the Azure Machine Learning connection by running the following command, providing your YAML filename for the <yaml-filename> placeholder.
az ml connection create --file <yaml-filename>.yaml
To create a connection to a Git repository by using Python SDK, use the following script. You use a GitHub personal access token (PAT) to authenticate the connection. Provide a <connection-name>, and replace the <account>, <repo>, and <PAT> placeholders with your values.
from azure.ai.ml.entities import WorkspaceConnection
from azure.ai.ml.entities import UsernamePasswordConfiguration, PatTokenConfiguration

name = "<connection-name>"

target = "https://github.com/<account>/<repo>"

wps_connection = WorkspaceConnection(
    name=name,
    type="git",
    target=target,
    credentials=PatTokenConfiguration(pat="<PAT>"),
)
ml_client.connections.create_or_update(workspace_connection=wps_connection)
To create a Git connection in Machine Learning studio:
In Azure Machine Learning studio, select Connections under Manage in the left navigation, and then select Connect.

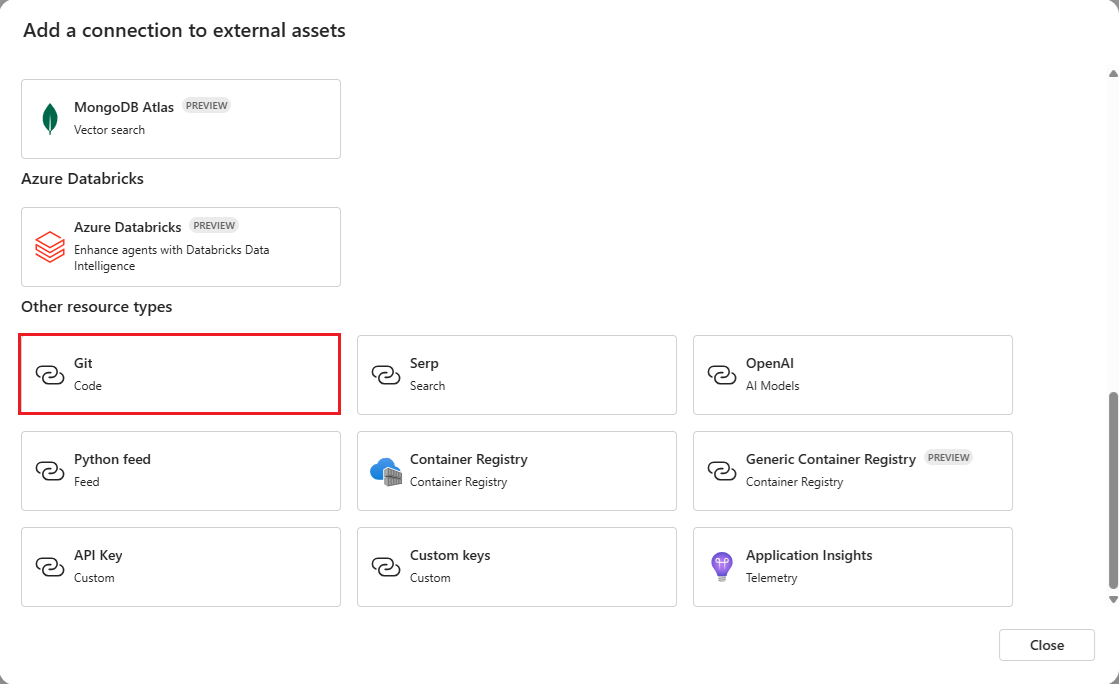
On the Add a connection to external assets screen, scroll down to Other resource types, and select Git.
On the Connect a Git repository screen, input the path to your Git repo under Endpoint and your Git personal access token (PAT) under Personal access token. Provide a Connection name, and then select Add connection.

Python feed
You can create a connection to a Python feed by using Azure CLI, Python SDK, or Machine Learning studio.
Define a Python feed connection by using one of the following YAML files. Name the file something like python-feed-connection.yml.
To connect using a PAT, provide a <connection-name>, and replace the <feed-url> and <PAT> placeholders with the values for your feed.
name: <connection-name>
type: python_feed
target: https://<feed-url>
credentials:
   type: pat
   pat: <PAT>
To connect using a username and password, provide a <connection-name>, and replace the <feed-url>, <username>, and <password> placeholders with the values for your feed.
name: <connection-name>
type: python_feed
target: https://<feed-url>
credentials:
   type: username_password
   username: <username>
   password: <password>
To connect to a public feed without using credentials, provide a <connection-name>, and replace the <feed-url> placeholder with your Python feed URL.
name: <connection-name>
type: python_feed
target: https://<feed-url>
Create the Azure Machine Learning connection by running the following command, providing your YAML filename for the <yaml-filename> placeholder.
az ml connection create --file <yaml-filename>.yaml
Use the following script to create a Python feed connection using Python SDK. Provide a <connection-name>, and replace the <feed-url> placeholder with your Python feed URL.
You can use a PAT or user name and password to authenticate the connection, or connect to a public feed without credentials. For the PAT authentication type, provide your PAT for the <PAT> placeholder. For the username-password authentication type, the name/password values should be URL-encoded.
To use username/password or no authentication instead of a PAT, uncomment the appropriate line or lines in the following script and comment out the credentials=PatTokenConfiguration(pat="<PAT>"), line.
from azure.ai.ml.entities import WorkspaceConnection
from azure.ai.ml.entities import UsernamePasswordConfiguration, PatTokenConfiguration

# import urllib.parse
# username = urllib.parse.quote(os.environ["FEED_USERNAME"], safe="")
# password = urllib.parse.quote(os.environ["FEED_PASSWORD"], safe="")

name = "<connection-name>"

target = "https://<feed-url>"

wps_connection = WorkspaceConnection(
    name=name,
    type="python_feed",
    target=target,
    #credentials=UsernamePasswordConfiguration(username=username, password=password),
    credentials=PatTokenConfiguration(pat="<PAT>"),

    #credentials=None
)
ml_client.connections.create_or_update(workspace_connection=wps_connection)
To create a connection to a Python feed in Machine Learning studio:
In your Azure Machine Learning studio workspace, select Connections under Manage in the left navigation, and then select Connect.
On the Add a connection to external assets screen, scroll down to Other resource types, and select Python feed.
On the Connect a Python feed screen:
- Input the path to your Git repository under Endpoint.
- Select None, PAT, or Username password for Authentication, and provide appropriate values.
- Provide a Connection name.
Select Add connection.
Azure Container Registry
You can create a connection to Azure Container Registry by using Azure CLI, Python SDK, or Machine Learning studio.
Use the following YAML file to define a connection to Azure Container Registry with username/password authentication.
name: <connection-name>
type: container_registry
target: https://<container-registry-url>
credentials:
   type: username_password
   username: <username>
   password: <password>
To create the connection, run the following command:
az ml connection create --file connection.yaml
The following example creates an Azure Container Registry connection:
from azure.ai.ml.entities import WorkspaceConnection
from azure.ai.ml.entities import UsernamePasswordConfiguration

# If using username/password, the name/password values should be url-encoded
import urllib.parse
username = os.environ["REGISTRY_USERNAME"]
password = os.environ["REGISTRY_PASSWORD"]

name = "my_acr_conn"

target = "https://iJ5kL6mN7.core.windows.net/mycontainer"

wps_connection = WorkspaceConnection(
    name=name,
    type="container_registry",
    target=target,
    credentials=UsernamePasswordConfiguration(username=username, password=password),
)
ml_client.connections.create_or_update(workspace_connection=wps_connection)
To create a connection to Azure Container Registry in Machine Learning studio:
In your Azure Machine Learning workspace, select Connections under Manage in the left navigation, and then select Connect.
On the Add a connection to external assets screen, scroll down to Other resource types, and select Container Registry.
Input the path to your Azure container registry under Endpoint, select None or Username password for Authentication with appropriate values, and enter a Connection name.
Select Add connection.
Generic Container Registry
The GenericContainerRegistry workspace connection specifies an external registry, such as Nexus or Artifactory, for image builds. Environment images are pushed from the specified registry, and the previous cache is ignored. You can create a connection to a generic container registry using Azure CLI, Python SDK, or Machine Learning studio.
For Azure CLI and Python SDK, the following example YAML files define a generic container registry connection. Update the example values with your own values.
#myenv.yml
$schema: https://azuremlschemas.azureedge.net/latest/environment.schema.json
name: docker-image-plus-conda-example
image: mcr.microsoft.com/azureml/openmpi4.1.0-ubuntu20.04
type: python_feed
conda_file: conda_dep.yml
description: Environment created from a Docker image plus Conda environment
#conda_dep.yml
name: project_environment
dependencies:
  - python=3.10
  - pip:
    - azureml-defaults
channels:
  - anaconda
  - conda-forge
#connection.yml
name: ws_conn_generic_container_registry
type: container_registry
target: https://test-registry.com
credentials:
  type: username_password
  username: myusername
  password: <password>
#hello_world_job.yml
$schema: https://azuremlschemas.azureedge.net/latest/commandJob.schema.json
command: echo "hello world"
environment: azureml:myenv@latest
You can also create a Generic Container Registry (preview) connection in studio.
In Azure Machine Learning studio, select Connections under Manage in the left navigation, and then select Connect.
On the Add a connection to external assets screen, select Generic Container Registry (PREVIEW) under Other resource types.
Run the following command to create the connection using the preceding YAML files and your credentials. Update the example values with your own values.
az ml connection create --file connection.yml --credentials username=myusername password=<password> --resource-group my-resource-group --workspace-name my-workspace
To create the environment, run the following command:
az ml environment create --name docker-image-plus-conda-example --version 1 --file myenv.yml --conda-file conda_dep.yml --image mcr.microsoft.com/azureml/openmpi4.1.0-ubuntu20.04 --resource-group my-resource-group --workspace-name my-workspace
Run the following command to verify that the environment was successfully created.
az ml environment show --name docker-image-plus-conda-example --version 1 --resource-group my-resource-group --workspace-name my-workspace
The following Python example script creates a Generic Container Registry connection using the preceding example files. Update the example values with your own values.
import os
from azure.ai.ml import MLClient
from azure.identity import DefaultAzureCredential
from azure.ai.ml.entities import Environment
from azure.ai.ml.entities import WorkspaceConnection
from azure.ai.ml.entities import UsernamePasswordConfiguration
from azureml.core.conda_dependencies import CondaDependencies
from azure.ai.ml import command

username = os.environ["REGISTRY_USERNAME"]
password = os.environ["REGISTRY_PASSWORD"]

# Enter details of Azure Machine Learning workspace
subscription_id = "00000000-0000-0000-0000-000000000000"
resource_group = "my-resource-group"
workspace = "my-workspace"

ml_client = MLClient( DefaultAzureCredential(), subscription_id, resource_group, workspace)
credentials = UsernamePasswordConfiguration(username=username, password=password)

# Create GenericContainerRegistry workspace connection for a generic registry
ws_connection = WorkspaceConnection(name="ws_conn_generic_container_registry", target="https://test-registry.com", type="GenericContainerRegistry", credentials=credentials)
ml_client.connections.create_or_update(ws_connection)

# Create an environment
env_docker_conda = Environment(image="mcr.microsoft.com/azureml/openmpi4.1.0-ubuntu20.04", conda_file="conda_dep.yml", name="docker-image-plus-conda-example", description="Environment created from a Docker image plus Conda environment.")
ml_client.environments.create_or_update(env_docker_conda)

job = command(command="echo 'hello world'", environment=env_docker_conda,display_name="v2-job-example")
returned_job = ml_client.create_or_update(job)
On the Connect a container registry screen:
- Input the path to your container registry under Endpoint.
- Enter your User name and Password.
- Provide a Connection name.
Select Add connection.
API key
Create the following YAML file to define a connection to an API key. Update the example values with your own values.
name: my_api_key
type: api_key
api_base: "https://myapi.core.windows.net/mycontainer"
api_key: "aAbBcCdD"
To create the connection, run the following command:
az ml connection create --file connection.yaml
For better security, leave the api_key value out of the YAML file and provide it in the command line:
az ml connection create --file connection.yml --set api_key="aAbBcCdD"
The following Python SDK example creates an API key connection. Update the example values with your own values.
from azure.ai.ml.entities import WorkspaceConnection
from azure.ai.ml.entities import UsernamePasswordConfiguration, ApiKeyConfiguration

name = "my_api_key"

target = "https://myapi.core.windows.net/mycontainer"

wps_connection = WorkspaceConnection(
    name=name,
    type="apikey",
    target=target,
    credentials=ApiKeyConfiguration(key="aAbBcCdD"),
)
ml_client.connections.create_or_update(workspace_connection=wps_connection)
To create a connection to an API key in Machine Learning studio:
In your Azure Machine Learning workspace, select Connections under Manage in the left navigation, and then select Connect.
On the Add a connection to external assets screen, scroll down to Other resource types, and select API key.
Input the path to your API key under Endpoint, enter your API key secret under Key, enter a Connection name, and then select Add connection.
Related content


