Note
Access to this page requires authorization. You can try signing in or changing directories.
Access to this page requires authorization. You can try changing directories.
APPLIES TO:
 Azure CLI ml extension v2 (current)
Python SDK azure-ai-ml v2 (current)
Azure CLI ml extension v2 (current)
Python SDK azure-ai-ml v2 (current)
Learn how to create a compute instance in your Azure Machine Learning workspace.
Use a compute instance as your fully configured and managed development environment in the cloud. For development and testing, you can also use the instance as a training compute target. A compute instance can run multiple jobs in parallel and has a job queue. As a development environment, a compute instance can't be shared with other users in your workspace.
In this article, you learn how to create a compute instance. See Manage an Azure Machine Learning compute instance for steps to start, stop, restart, and delete a compute instance.
You can also use a setup script to create the compute instance with your own custom environment.
Compute instances can run jobs securely in a virtual network environment, without requiring enterprises to open SSH ports. The job executes in a containerized environment and packages your model dependencies in a Docker container.
Note
This article uses CLI v2 in some examples. If you're still using CLI v1, see Create an Azure Machine Learning compute cluster CLI v1.
Prerequisites
- An Azure Machine Learning workspace. For more information, see Create an Azure Machine Learning workspace. In the storage account, the "Allow storage account key access" option must be enabled for compute instance creation to succeed.
Choose the tab for the environment you're using for other prerequisites.
- To use the Python SDK, set up your development environment with a workspace. Once your environment is set up, attach to the workspace in your Python script:
Run this code to connect to your Azure Machine Learning workspace.
Replace your Subscription ID, Resource Group name, and Workspace name in the following code. To find these values:
- Sign in to Azure Machine Learning studio.
- Open the workspace you wish to use.
- Select your workspace name in the upper right Azure Machine Learning studio toolbar.
- Copy the value for workspace, resource group, and subscription ID into the code.
APPLIES TO:
Python SDK azure-ai-ml v2 (current)
# Enter details of your AML workspace
subscription_id = "<SUBSCRIPTION_ID>"
resource_group = "<RESOURCE_GROUP>"
workspace = "<AML_WORKSPACE_NAME>"
# get a handle to the workspace
from azure.ai.ml import MLClient
from azure.identity import DefaultAzureCredential
ml_client = MLClient(
DefaultAzureCredential(), subscription_id, resource_group, workspace
)ml_client is a handler to the workspace that you use to manage other resources and jobs.
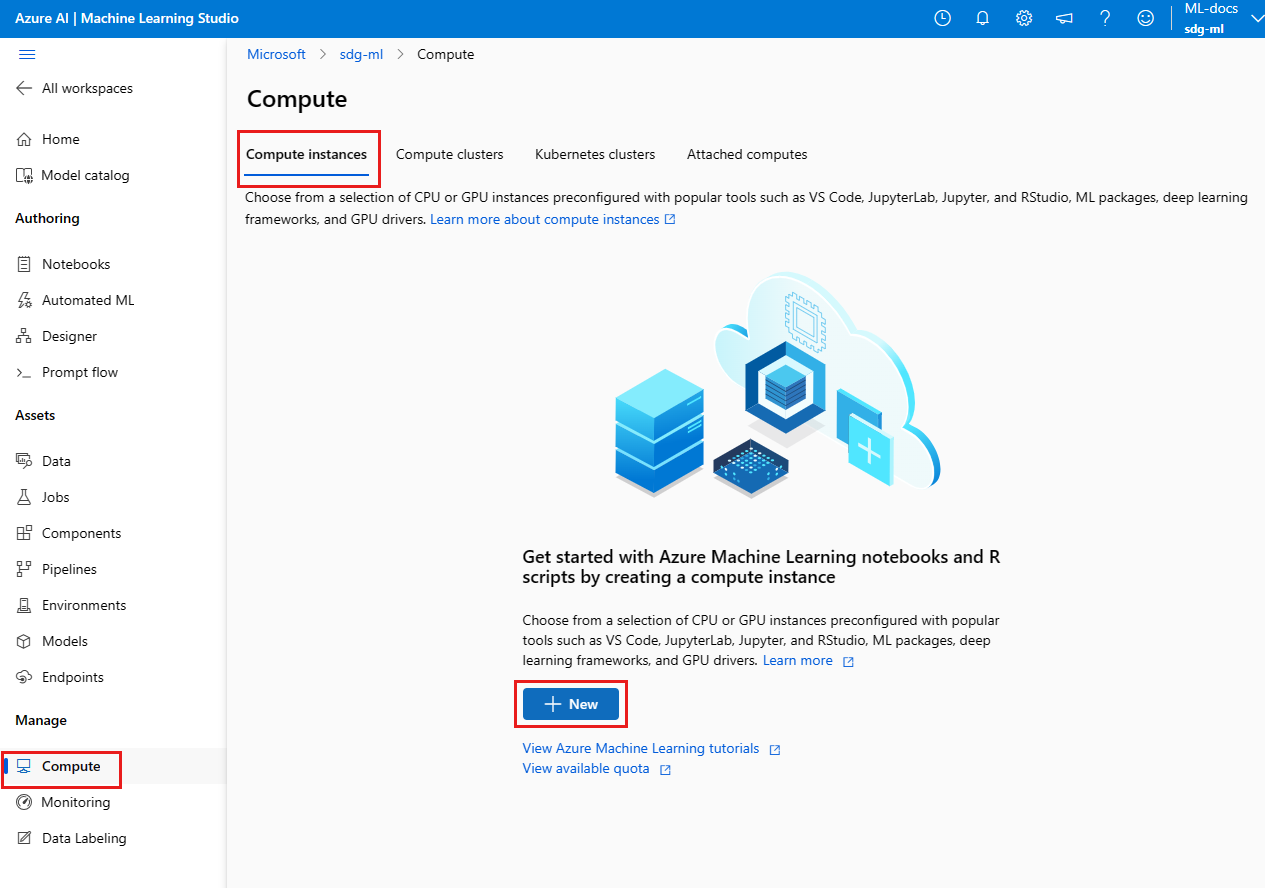
Create
Time estimate: Approximately 5 minutes.
Creating a compute instance is a one-time process for your workspace. You can reuse the compute as a development workstation or as a compute target for training. You can have multiple compute instances attached to your workspace.
The dedicated cores per region per VM family quota and total regional quota, which applies to compute instance creation, is unified and shared with Azure Machine Learning training compute cluster quota. Stopping the compute instance doesn't release quota to ensure you can restart the compute instance. A quota is a credit limit on Azure resources, not a capacity guarantee. Restarting a compute instance is still dependent on the available capacity of the region. If there's a capacity crunch in the region for the SKU, you might not be able to restart the compute instance. It isn't possible to change the virtual machine size of a compute instance once it's created.
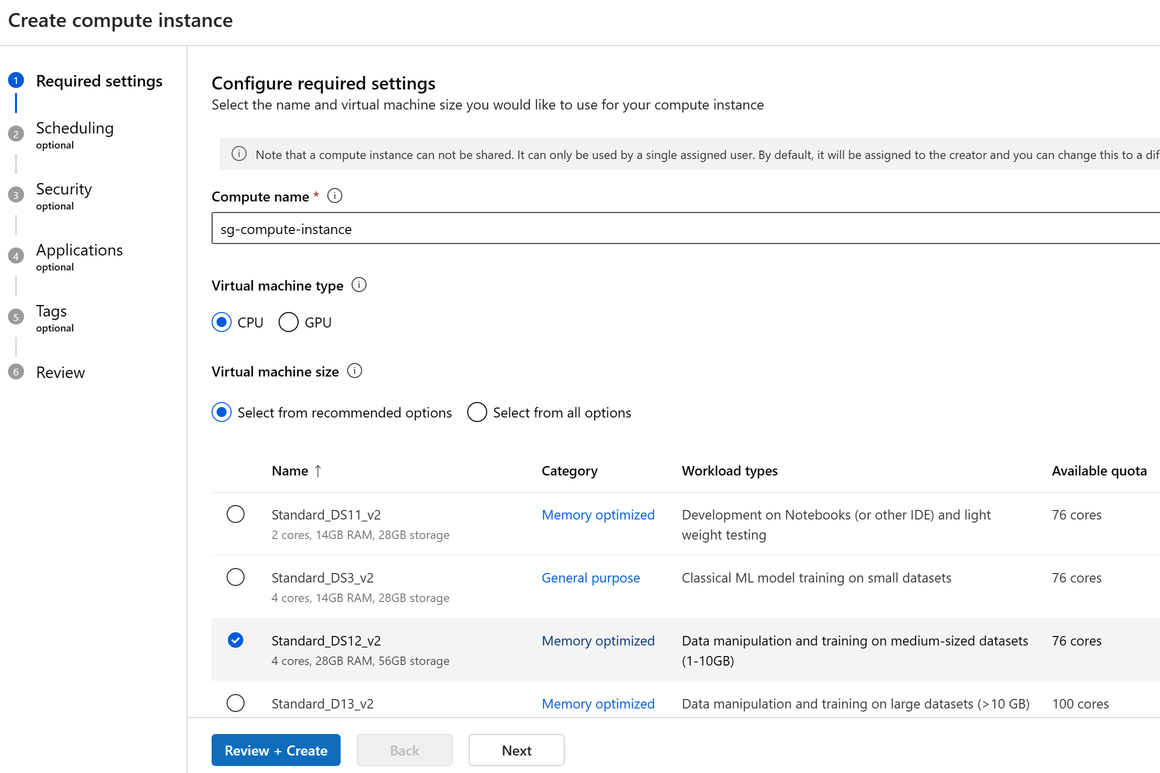
The fastest way to create a compute instance is to follow the Create resources you need to get started.
Or use the following examples to create a compute instance with more options:
APPLIES TO:
Python SDK azure-ai-ml v2 (current)
# Compute Instances need to have a unique name across the region.
# Here we create a unique name with current datetime
from azure.ai.ml.entities import ComputeInstance, AmlCompute
import datetime

ci_basic_name = "basic-ci" + datetime.datetime.now().strftime("%Y%m%d%H%M")
ci_basic = ComputeInstance(name=ci_basic_name, size="STANDARD_DS3_v2")
ml_client.begin_create_or_update(ci_basic).result()
For more information on the classes, methods, and parameters for creating a compute instance, see the following reference documents:

You can also create a compute instance with an Azure Resource Manager template.
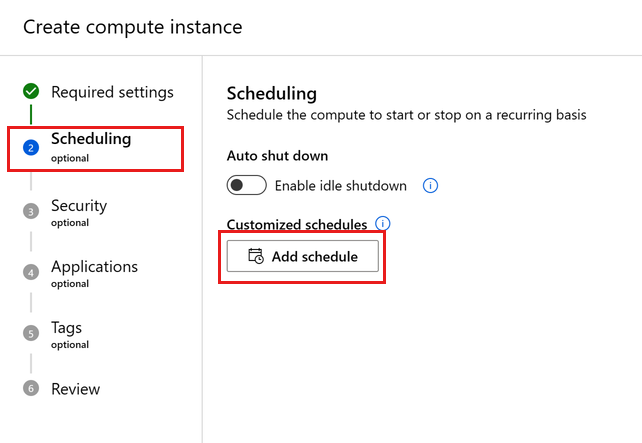
Configure idle shutdown
To avoid getting charged for a compute instance that is switched on but inactive, you can configure when to shut down your compute instance due to inactivity.
A compute instance is considered inactive if the following conditions are met:
- No active Jupyter kernel sessions (which translates to no Notebooks usage via Jupyter, JupyterLab, or Interactive notebooks)
- No active Jupyter terminal sessions
- No active Azure Machine Learning runs or experiments
- No VS Code connections; you must close your VS Code connection for your compute instance to be considered inactive. Sessions are automatically terminated if VS Code detects no activity for 3 hours.
- No custom applications are running on the compute
A compute instance won't be considered idle if any custom application is running. To shut down a compute with a custom application automatically, a schedule needs to be set up, or the custom application needs to be removed. There are also some basic bounds around inactivity time periods; a compute instance must be inactive for a minimum of 15 minutes and a maximum of three days. We also don't track VS Code SSH connections to determine activity.
Also, if a compute instance has already been idle for a certain amount of time, and idle shutdown settings are updated to an amount of time shorter than the current idle duration, the idle time clock resets to 0. For example, if the compute instance has already been idle for 20 minutes, and the shutdown settings are updated to 15 minutes, the idle time clock resets to 0.
Important
If the Azure Machine Learning workspace resource is also configured with a managed identity, the compute instance won't shut down due to inactivity unless the managed identity has contributor access to the Azure Machine Learning workspace. For more information on assigning permissions, see Manage access to Azure Machine Learning workspaces.
The setting can be configured during compute instance creation or for existing compute instances via the following interfaces:
APPLIES TO:
Python SDK azure-ai-ml v2 (current)
When creating a new compute instance, add the idle_time_before_shutdown_minutes parameter.
# Note that idle_time_before_shutdown has been deprecated.
ComputeInstance(name=ci_basic_name, size="STANDARD_DS3_v2", idle_time_before_shutdown_minutes="30")
You can't change the idle time of an existing compute instance with the Python SDK.


You can also change the idle time using:
REST API
Endpoint:
POST https://management.azure.com/subscriptions/{SUB_ID}/resourceGroups/{RG_NAME}/providers/Microsoft.MachineLearningServices/workspaces/{WS_NAME}/computes/{CI_NAME}/updateIdleShutdownSetting?api-version=2021-07-01Body:
{
    "idleTimeBeforeShutdown": "PT30M" // this must be a string in ISO 8601 format
}
ARM Templates: only configurable during new compute instance creation
// Note that this is just a snippet for the idle shutdown property in an ARM template
{
    "idleTimeBeforeShutdown":"PT30M" // this must be a string in ISO 8601 format
}
Schedule automatic start and stop
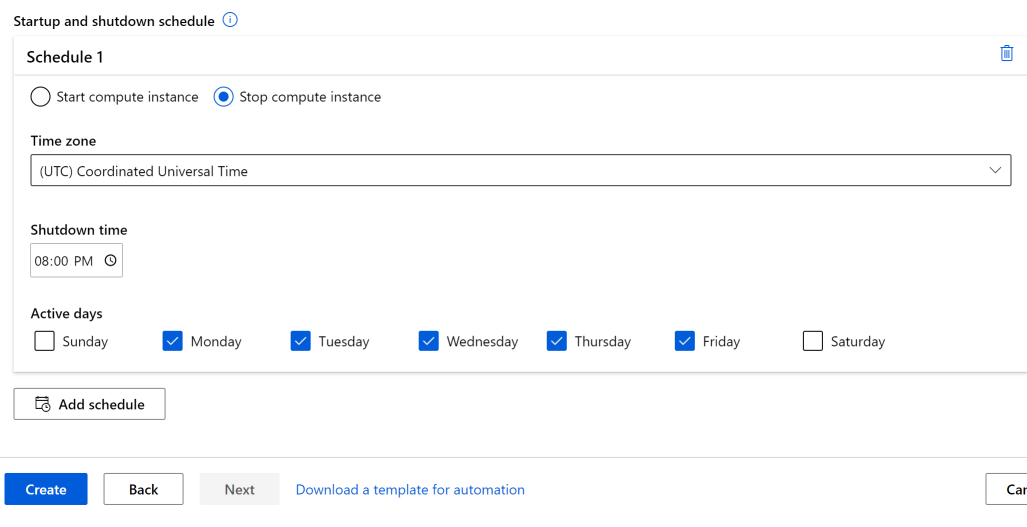
Define multiple schedules for autoshutdown and autostart. For instance, create a schedule to start at 9 AM and stop at 6 PM from Monday-Thursday, and a second schedule to start at 9 AM and stop at 4 PM for Friday. You can create a total of four schedules per compute instance.
Schedules can also be defined for create on behalf of compute instances. You can create a schedule that creates the compute instance in a stopped state. Stopped compute instances are useful when you create a compute instance on behalf of another user.
Before a scheduled shutdown, users see a notification alerting them that the compute instance is about to shut down. At that point, the user can choose to dismiss the upcoming shutdown event. For example, if they're in the middle of using their compute instance.
Create a schedule
APPLIES TO:
Python SDK azure-ai-ml v2 (current)
from azure.ai.ml.entities import ComputeInstance, ComputeSchedules, ComputeStartStopSchedule, RecurrenceTrigger, RecurrencePattern
from azure.ai.ml.constants import TimeZone
from azure.ai.ml import MLClient
from azure.identity import DefaultAzureCredential

ci_minimal_name = "ci-name"
ci_start_time = "2023-06-21T11:47:00" #specify your start time in the format yyyy-mm-ddThh:mm:ss

rec_trigger = RecurrenceTrigger(start_time=ci_start_time, time_zone=TimeZone.INDIA_STANDARD_TIME, frequency="week", interval=1, schedule=RecurrencePattern(week_days=["Friday"], hours=15, minutes=[30]))
myschedule = ComputeStartStopSchedule(trigger=rec_trigger, action="start")
com_sch = ComputeSchedules(compute_start_stop=[myschedule])

my_compute = ComputeInstance(name=ci_minimal_name, schedules=com_sch)
ml_client.compute.begin_create_or_update(my_compute)
Create a schedule with a Resource Manager template
You can schedule the automatic start and stop of a compute instance by using a Resource Manager template.
In the Resource Manager template, add:
"schedules": "[parameters('schedules')]"
Then use either cron or LogicApps expressions to define the schedule that starts or stops the instance in your parameter file:
  "schedules": {
    "value": {
      "computeStartStop": [
        {
          "triggerType": "Cron",
          "cron": {
            "timeZone": "UTC",
            "expression": "0 18 * * *"
          },
          "action": "Stop",
          "status": "Enabled"
        },
        {
          "triggerType": "Cron",
          "cron": {
            "timeZone": "UTC",
            "expression": "0 8 * * *"
          },
          "action": "Start",
          "status": "Enabled"
        },
        {
          "triggerType": "Recurrence",
          "recurrence": {
            "frequency": "Day",
            "interval": 1,
            "timeZone": "UTC",
            "schedule": {
              "hours": [17],
              "minutes": [0]
            }
          },
          "action": "Stop",
          "status": "Enabled"
        }
      ]
    }
  }
Action can have a value of
StartorStop.For trigger type of
Recurrence, use the same syntax as Logic Apps, with this recurrence schema.For trigger type of
cron, use standard cron syntax:// Crontab expression format: // // * * * * * // - - - - - // | | | | | // | | | | +----- day of week (0 - 6) (Sunday=0) // | | | +------- month (1 - 12) // | | +--------- day of month (1 - 31) // | +----------- hour (0 - 23) // +------------- min (0 - 59) // // Star (*) in the value field above means all legal values as in // braces for that column. The value column can have a * or a list // of elements separated by commas. An element is either a number in // the ranges shown above or two numbers in the range separated by a // hyphen (meaning an inclusive range).
Azure Policy support to default a schedule
Use Azure Policy to enforce that a shutdown schedule exists for every compute instance in a subscription or default to a schedule if none exists. The following is a sample policy to default a shutdown schedule at 10 PM PST:
{
    "mode": "All",
    "policyRule": {
     "if": {
      "allOf": [
       {
        "field": "Microsoft.MachineLearningServices/workspaces/computes/computeType",
        "equals": "ComputeInstance"
       },
       {
        "field": "Microsoft.MachineLearningServices/workspaces/computes/schedules",
        "exists": "false"
       }
      ]
     },
     "then": {
      "effect": "append",
      "details": [
       {
        "field": "Microsoft.MachineLearningServices/workspaces/computes/schedules",
        "value": {
         "computeStartStop": [
          {
           "triggerType": "Cron",
           "cron": {
            "startTime": "2021-03-10T21:21:07",
            "timeZone": "Pacific Standard Time",
            "expression": "0 22 * * *"
           },
           "action": "Stop",
           "status": "Enabled"
          }
         ]
        }
       }
      ]
     }
    }
}
Create on behalf of
As an administrator, you can create a compute instance on behalf of a data scientist and assign the instance to them with:
Studio, using the security settings in this article.
Azure Resource Manager template. For details on how to find the TenantID and ObjectID needed in this template, see Find identity object IDs for authentication configuration. You can also find these values in the Microsoft Entra admin center.
To further enhance security, when you create a compute instance on behalf of a data scientist and assign the instance to them, single sign-on (SSO) will be disabled during creation if the compute instance has a setup script or custom app.
The assigned user needs to enable SSO on the compute instance themselves after the compute is assigned to them by updating the SSO setting on the compute instance. The assigned user needs to have the following permission/action in their role: MachineLearningServices/workspaces/computes/enableSso/action. The assigned user does not need compute write (create) permission to enable SSO.
Here are the steps the assigned user needs to take. Note that the creator of the compute instance is not allowed to enable SSO on that compute instance for security reasons.
Select Compute in the left pane in Azure Machine Learning studio.
Select the name of the compute instance where you need to enable SSO.
Edit the Single sign-on details section.

Enable the single sign-on toggle.
Save. Updating will take some time.
Assign managed identity
You can assign a system- or user-assigned managed identity to a compute instance, to authenticate against other Azure resources such as storage. Using managed identities for authentication helps improve workspace security and management. For example, you can allow users to access training data only when logged in to a compute instance. Or use a common user-assigned managed identity to permit access to a specific storage account.
Important
If the compute instance is also configured for idle shutdown, the compute instance won't shut down due to inactivity unless the managed identity has contributor access to the Azure Machine Learning workspace. For more information on assigning permissions, see Manage access to Azure Machine Learning workspaces.
Use SDK V2 to create a compute instance with a system-assigned managed identity:
from azure.ai.ml import MLClient
from azure.identity import ManagedIdentityCredential
client_id = os.environ.get("DEFAULT_IDENTITY_CLIENT_ID", None)
credential = ManagedIdentityCredential(client_id=client_id)
ml_client = MLClient(credential, subscription_id, resource_group, workspace)
You can also use SDK V1:
from azureml.core.authentication import MsiAuthentication
from azureml.core import Workspace
client_id = os.environ.get("DEFAULT_IDENTITY_CLIENT_ID", None)
auth = MsiAuthentication(identity_config={"client_id": client_id})
workspace = Workspace.get("chrjia-eastus", auth=auth, subscription_id=subscription_id, resource_group=resource_group, location="East US")
Once the managed identity is created, grant the managed identity at least Storage Blob Data Reader role on the storage account of the datastore. See Accessing storage services. Then, when you work on the compute instance, the managed identity is used automatically to authenticate against datastores.
Note
The name of the created system-managed identity will be in the format /workspace-name/computes/compute-instance-name in your Microsoft Entra ID.
You can also use the managed identity manually to authenticate against other Azure resources. The following example shows how to use it to get an Azure Resource Manager access token:
import requests

def get_access_token_msi(resource):
    client_id = os.environ.get("DEFAULT_IDENTITY_CLIENT_ID", None)
    resp = requests.get(f"{os.environ['MSI_ENDPOINT']}?resource={resource}&clientid={client_id}&api-version=2017-09-01", headers={'Secret': os.environ["MSI_SECRET"]})
    resp.raise_for_status()
    return resp.json()["access_token"]

arm_access_token = get_access_token_msi("https://management.azure.com")
To use Azure CLI with the managed identity for authentication, specify the identity client ID as the username when logging in:
az login --identity --username $DEFAULT_IDENTITY_CLIENT_ID
Note
You cannot use azcopy when trying to use managed identity. azcopy login --identity will not work.
Enable SSH access
SSH access is disabled by default. SSH access can't be enabled or disabled after creation. Make sure to enable access if you plan to debug interactively with VS Code Remote.
After you have selected Next: Advanced Settings:
- Turn on Enable SSH access.
- In the SSH public key source, select one of the options from the dropdown:
- If you Generate new key pair:
- Enter a name for the key in Key pair name.
- Select Create.
- Select Download private key and create compute. The key is usually downloaded into the Downloads folder.
- If you select Use existing public key stored in Azure, search for and select the key in Stored key.
- If you select Use existing public key, provide an RSA public key in the single-line format (starting with "ssh-rsa") or the multi-line PEM format. You can generate SSH keys using ssh-keygen on Linux and OS X, or PuTTYGen on Windows.
- If you Generate new key pair:
Set up an SSH key later
Although SSH can't be enabled or disabled after creation, you do have the option to set up an SSH key later on an SSH-enabled compute instance. This allows you to set up the SSH key post-creation. To do this, select to enable SSH on your compute instance, and select to "Set up an SSH key later" as the SSH public key source. After the compute instance is created, you can visit the Details page of your compute instance and select to edit your SSH keys. From there, you can add your SSH key.
An example of a common use case for this is when creating a compute instance on behalf of another user (see Create on behalf of). When provisioning a compute instance on behalf of another user, you can enable SSH for the new compute instance owner by selecting Set up an SSH key later. This allows the new owner of the compute instance to set up their SSH key for their newly owned compute instance once it has been created and assigned to them following the previous steps.
Connect with SSH
After you create a compute with SSH access enabled, use these steps for access.
Find the compute in your workspace resources:
- On the left, select Compute.
- Use the tabs at the top to select Compute instance or Compute cluster to find your machine.
Select the compute name in the list of resources.
Find the connection string:
For a compute instance, select Connect at the top of the Details section.

For a compute cluster, select Nodes at the top, then select the Connection string in the table for your node.
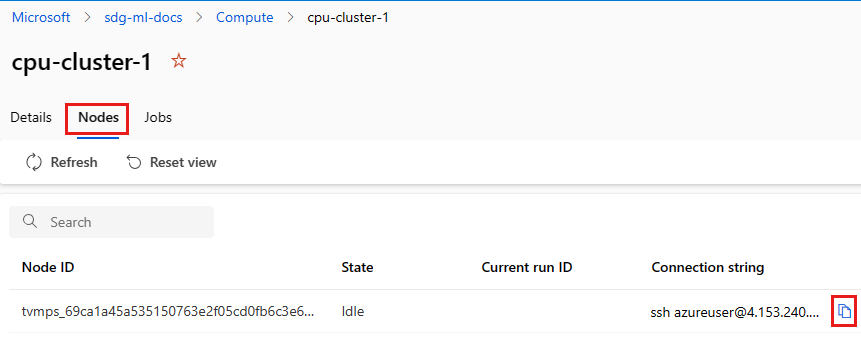
Copy the connection string.
For Windows, open PowerShell or a command prompt:
Go into the directory or folder where your key is stored
Add the -i flag to the connection string to locate the private key and point to where it is stored:
ssh -i <keyname.pem> azureuser@... (rest of connection string)
For Linux users, follow the steps from Create and use an SSH key pair for Linux VMs in Azure
For SCP use:
scp -i key.pem -P {port} {fileToCopyFromLocal } azureuser@yourComputeInstancePublicIP:~/{destination}
The data scientist you create the compute instance for needs the following Azure role-based access control (Azure RBAC) permissions:
- Microsoft.MachineLearningServices/workspaces/computes/start/action
- Microsoft.MachineLearningServices/workspaces/computes/stop/action
- Microsoft.MachineLearningServices/workspaces/computes/restart/action
- Microsoft.MachineLearningServices/workspaces/computes/applicationaccess/action
- Microsoft.MachineLearningServices/workspaces/computes/updateSchedules/action
The data scientist can start, stop, and restart the compute instance. They can use the compute instance for:
- Jupyter
- JupyterLab
- RStudio
- Posit Workbench (formerly RStudio Workbench)
- Integrated notebooks
Add custom applications such as RStudio or Posit Workbench
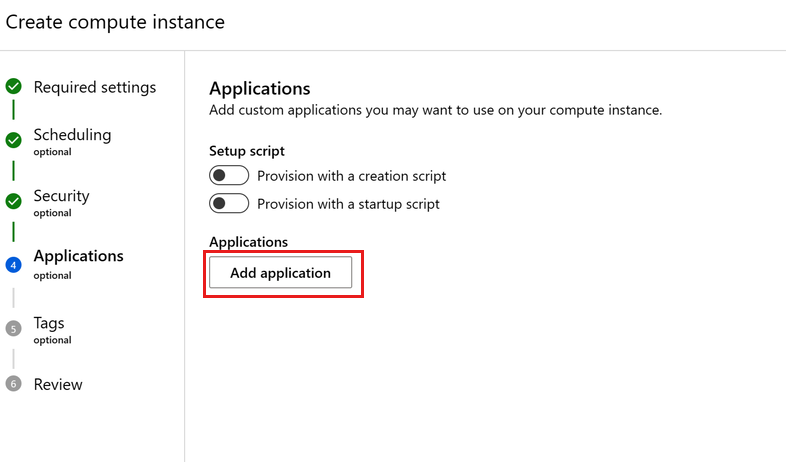
You can set up other applications, such as RStudio, or Posit Workbench (formerly RStudio Workbench), when creating a compute instance. Follow these steps in studio to set up a custom application on your compute instance:
- Fill out the form to create a new compute instance
- Select Applications
- Select Add application
Setup Posit Workbench (formerly RStudio Workbench)
RStudio is one of the most popular IDEs among R developers for ML and data science projects. You can easily set up Posit Workbench, which provides access to RStudio along with other development tools, to run on your compute instance, using your own Posit license, and access the rich feature set that Posit Workbench offers.
- Follow the steps listed above to Add application when creating your compute instance.
- Select Posit Workbench (bring your own license) in the Application dropdown and enter your Posit Workbench license key in the License key field. You can get your Posit Workbench license or trial license from Posit.
- Select Create to add Posit Workbench application to your compute instance.

Important
If using a private link workspace, ensure that the docker image, pkg-containers.githubusercontent.com and ghcr.io are accessible. Also, use a published port in the range 8704-8993. For Posit Workbench (formerly RStudio Workbench), ensure that the license is accessible by providing network access to https://www.wyday.com.
Note
- Support for accessing your workspace file store from Posit Workbench is not yet available.
- When accessing multiple instances of Posit Workbench, if you see a "400 Bad Request. Request Header Or Cookie Too Large" error, use a new browser or access from a browser in incognito mode.
Setup RStudio (open source)
To use RStudio, set up a custom application as follows:
Follow the previous steps to Add application when creating your compute instance.
Select Custom Application in the Application dropdown list.
Configure the Application name you would like to use.
Set up the application to run on Target port
8787- the Docker image for RStudio open source listed below needs to run on this Target port.Set up the application to be accessed on Published port
8787- you can configure the application to be accessed on a different Published port if you wish.Point the Docker image to
ghcr.io/azure/rocker-rstudio-ml-verse:latest.Select Create to set up RStudio as a custom application on your compute instance.

Important
If using a private link workspace, ensure that the docker image, pkg-containers.githubusercontent.com and ghcr.io are accessible. Also, use a published port in the range 8704-8993. For Posit Workbench (formerly RStudio Workbench), ensure that the license is accessible by providing network access to https://www.wyday.com.
Setup other custom applications
Set up other custom applications on your compute instance by providing the application on a Docker image.
- Follow the previous steps to Add application when creating your compute instance.
- Select Custom Application in the Application dropdown.
- Configure the Application name, the Target port you want to run the application on, the Published port you want to access the application on, and the Docker image that contains your application. If your custom image is stored in an Azure Container Registry, assign the Contributor role for users of the application. For information on assigning roles, see Manage access to an Azure Machine Learning workspace.
- Optionally, add Environment variables you want to use for your application.
- Use Bind mounts to add access to the files in your default storage account:
- Specify /home/azureuser/cloudfiles for Host path.
- Specify /home/azureuser/cloudfiles for the Container path.
- Select Add to add this mounting. Because the files are mounted, changes you make to them are available in other compute instances and applications.
- Select Create to set up the custom application on your compute instance.

Important
If using a private link workspace, ensure that the docker image, pkg-containers.githubusercontent.com and ghcr.io are accessible. Also, use a published port in the range 8704-8993. For Posit Workbench (formerly RStudio Workbench), ensure that the license is accessible by providing network access to https://www.wyday.com.
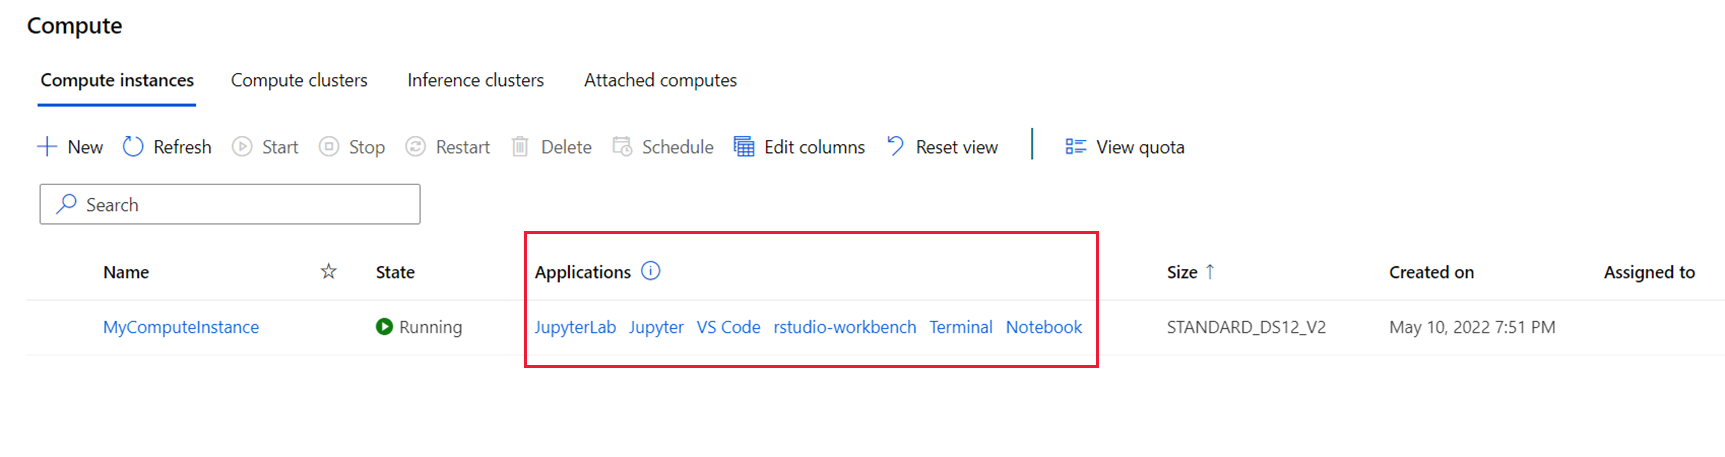
Accessing custom applications in studio
Access the custom applications that you set up in studio:
- On the left, select Compute.
- On the Compute instance tab, see your applications under the Applications column.
Note
It might take a few minutes after setting up a custom application until you can access it via the links. The amount of time taken will depend on the size of the image used for your custom application. If you see a 502 error message when trying to access the application, wait for some time for the application to be set up and try again. If the custom image is pulled from an Azure Container Registry, you'll need a Contributor role for the workspace. For information on assigning roles, see Manage access to an Azure Machine Learning workspace.
Related content
- Manage an Azure Machine Learning compute instance
- Access the compute instance terminal
- Create and manage files
- Update the compute instance to the latest VM image
- Use the compute instance in VS Code: