Note
Access to this page requires authorization. You can try signing in or changing directories.
Access to this page requires authorization. You can try changing directories.
Use a setup script for an automated way to customize and configure a compute instance at provisioning time.
Use a compute instance as your fully configured and managed development environment in the cloud. For development and testing, you can also use the instance as a training compute target or for an inference target. A compute instance can run multiple jobs in parallel and has a job queue. As a development environment, a compute instance can't be shared with other users in your workspace.
As an administrator, you can write a customization script to provision all compute instances in the workspace according to your requirements. You can configure your setup script as a:
- Creation script - runs once when the compute instance is created.
- Startup script - runs every time the compute instance starts (including initial creation).
Some examples of what you can do in a setup script:
- Install packages, tools, and software
- Mount data
- Create custom conda environment and Jupyter kernels
- Clone git repositories and set git config
- Set network proxies
- Set environment variables
- Install JupyterLab extensions
Create the setup script
The setup script is a shell script that runs as rootuser. Create or upload the script into your Notebooks files:
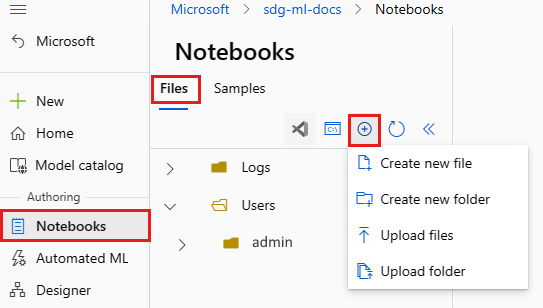
- Sign in to the studio and select your workspace.
- On the left, select Notebooks.
- Use the Add files tool to create or upload your setup shell script. Make sure the script filename ends in ".sh". When you create a new file, also change the File type to bash(.sh).
When the script runs, the current working directory of the script is the directory where you uploaded it. For example, if you upload the script to Users>admin, the location of the script on the compute instance and current working directory when the script runs is /home/azureuser/cloudfiles/code/Users/admin. This location enables you to use relative paths in the script.
You can refer to script arguments in the script as $1, $2, and so on.
If your script performs a task specific to azureuser, such as installing a conda environment or Jupyter kernel, put the task within a sudo -u azureuser block:
#!/bin/bash

set -e

# This script installs a pip package in compute instance azureml_py38 environment.

sudo -u azureuser -i <<'EOF'

PACKAGE=numpy
ENVIRONMENT=azureml_py38
source /anaconda/etc/profile.d/conda.sh
conda activate "$ENVIRONMENT"
pip install "$PACKAGE"
conda deactivate
EOF
The command sudo -u azureuser changes the current working directory to /home/azureuser. You also can't access the script arguments in this block.
For other example scripts, see azureml-examples.
You can also use the following environment variables in your script:
CI_RESOURCE_GROUPCI_WORKSPACECI_NAMECI_LOCAL_UBUNTU_USER- points toazureuser
Use a setup script in conjunction with Azure Policy to either enforce or default a setup script for every compute instance creation.
The default value for a setup script timeout is 15 minutes. You can change the time in studio or through ARM templates by using the DURATION parameter.
DURATION is a floating point number with an optional suffix: 's' for seconds (the default), 'm' for minutes, 'h' for hours, or 'd' for days.
Use the script in studio
After you store the script, specify it during creation of your compute instance:
- Sign in to studio and select your workspace.
- On the left, select Compute.
- Select +New to create a new compute instance.
- Fill out the form.
- On the Applications page of the form, toggle on the type of script you want to use: creation script (runs once when creating the compute instance) or startup script (runs every time the compute instance starts).
- Browse to the shell script you saved. Or upload a script from your computer.
- Add command arguments as needed.

Tip
If you attach workspace storage to a virtual network, you might not be able to access the setup script file unless you access the studio from within the virtual network.
Use the script in a Resource Manager template
In a Resource Manager template, add setupScripts to invoke the setup script when the compute instance is provisioned. For example:
"setupScripts":{
    "scripts":{
        "creationScript":{
        "scriptSource":"workspaceStorage",
        "scriptData":"[parameters('creationScript.location')]",
        "scriptArguments":"[parameters('creationScript.cmdArguments')]"
        }
    }
}
scriptData in this code specifies the location of the creation script in the notebooks file share such as Users/admin/testscript.sh.
scriptArguments is optional and specifies the arguments for the creation script.
You can instead provide the script inline for a Resource Manager template. The shell command can refer to any dependencies uploaded into the notebooks file share. When you use an inline string, the working directory for the script is /mnt/batch/tasks/shared/LS_root/mounts/clusters/<ciname>/code/Users, where .<ciname> is the name of the compute instance.
For example, specify a base64 encoded command string for scriptData:
"setupScripts":{
    "scripts":{
        "creationScript":{
        "scriptSource":"inline",
        "scriptData":"[base64(parameters('inlineCommand'))]",
        "scriptArguments":"[parameters('creationScript.cmdArguments')]"
        }
    }
}
Setup script logs
Logs from the setup script execution appear in the logs folder in the compute instance details page. The process stores logs back to your notebooks file share under the Logs\<compute instance name> folder. The details page shows the script file and command arguments for a particular compute instance.