Note
Access to this page requires authorization. You can try signing in or changing directories.
Access to this page requires authorization. You can try changing directories.
Important
This article provides information on using the Azure Machine Learning SDK v1. SDK v1 is deprecated as of March 31, 2025. Support for it will end on June 30, 2026. You can install and use SDK v1 until that date.
We recommend that you transition to the SDK v2 before June 30, 2026. For more information on SDK v2, see What is Azure Machine Learning CLI and Python SDK v2? and the SDK v2 reference.
In this article, you learn how to deploy a designer model to a real-time online endpoint in the Azure Machine Learning studio.
Once registered or downloaded, you can use designer-trained models just like any other model. Exported models can be deployed in use cases such as internet of things (IoT) and local deployments.
Deployment in the studio consists of the following steps:
- Register the trained model.
- Download the entry script and conda dependencies file for the model.
- (Optional) Configure the entry script.
- Deploy the model to a compute target.
You can also deploy models directly in the designer to skip model registration and file-download steps. This can be useful for rapid deployment. For more information, see Tutorial: Deploy a machine learning model using designer.
Models trained in the designer can also be deployed through the SDK or command-line interface (CLI). For more information, see Deploy machine learning models to Azure.
Prerequisites
A completed training pipeline containing one of following components:
- Train Model Component
- Train Anomaly Detection Model component
- Train Clustering Model component
- Train PyTorch Model component
- Train SVD Recommender component
- Train Vowpal Wabbit Model component
- Train Wide & Deep Model component
To learn more about pipelines, see What are Azure Machine Learning pipelines?
Register the model
After the training pipeline completes, register the trained model to your Azure Machine Learning workspace to access the model in other projects.
Sign in to Azure Machine Learning studio, and select your completed pipeline.
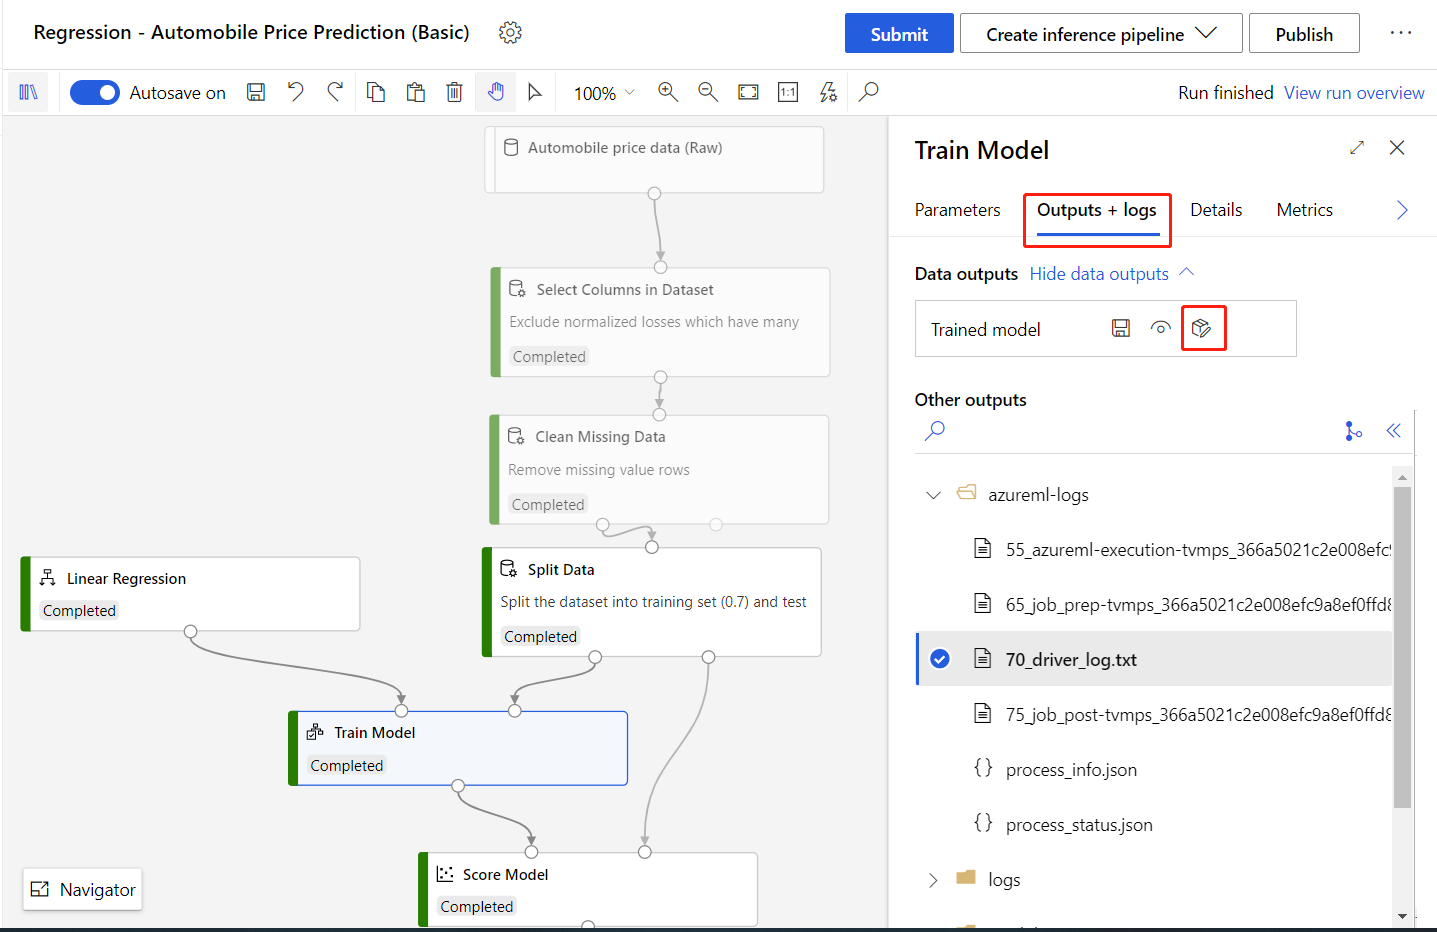
Double-click the Train Model component to open the details pane.
Select the Outputs + logs tab in the details pane.
Select Register model.
Enter a name for your model, then select Save.
After registering your model, you can find it in the Models asset page in the studio.

Download the entry script file and conda dependencies file
You need the following files to deploy a model in Azure Machine Learning studio:
Entry script file: loads the trained model, processes input data from requests, does real-time inferences, and returns the result. The designer automatically generates a
score.pyentry script file when the Train Model component completes.Conda dependencies file: specifies which pip and conda packages your webservice depends on. The designer automatically creates a
conda_env.yamlfile when the Train Model component completes.
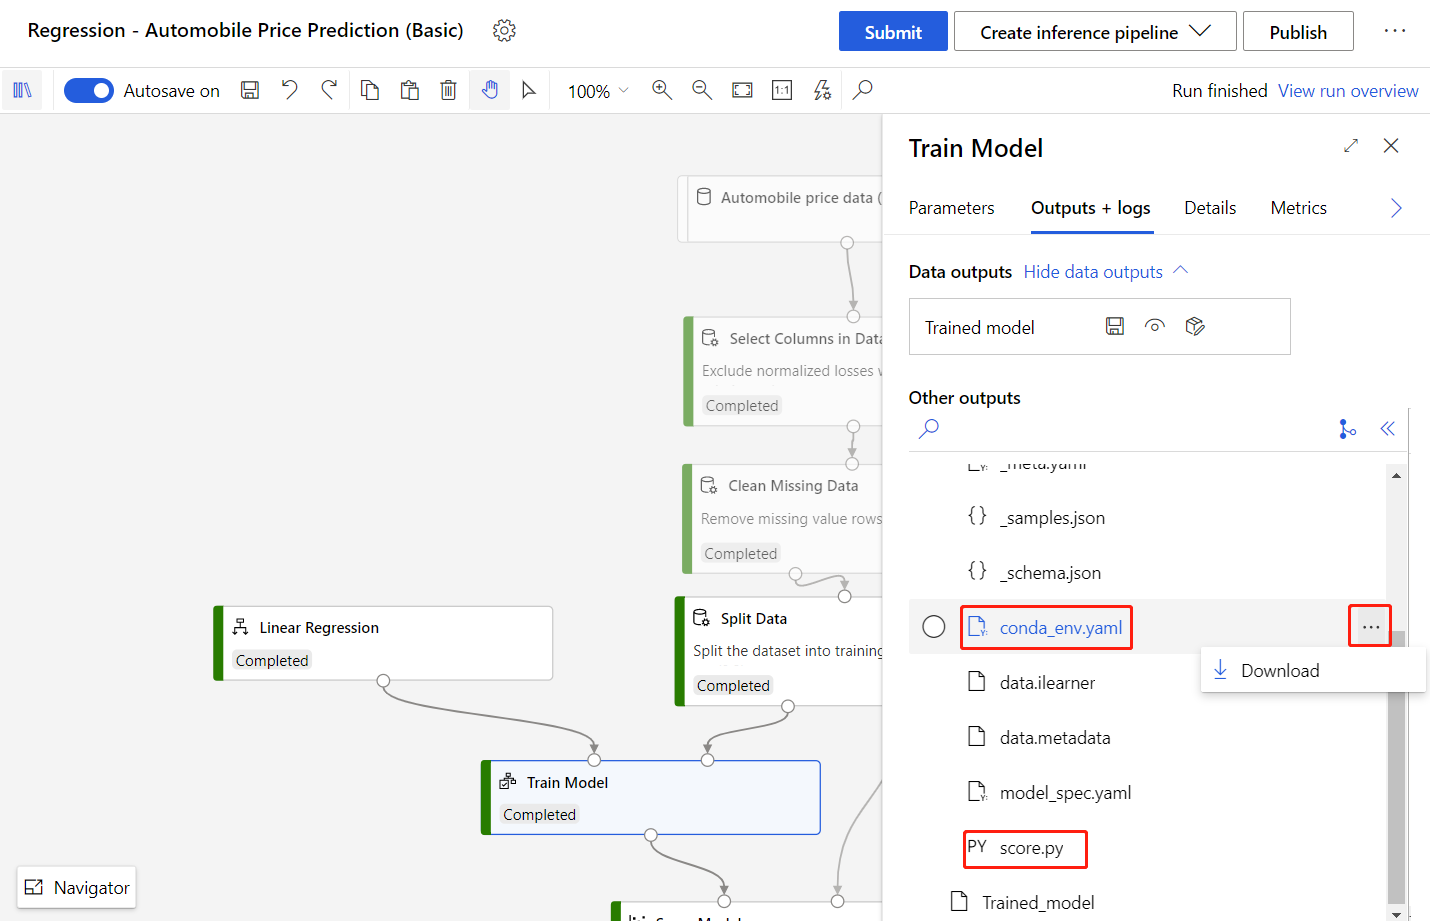
You can download these two files in the right pane of the Train Model component:
Select the Train Model component.
In the Outputs + logs tab, select the folder
trained_model_outputs.Download the
conda_env.yamlfile andscore.pyfile.
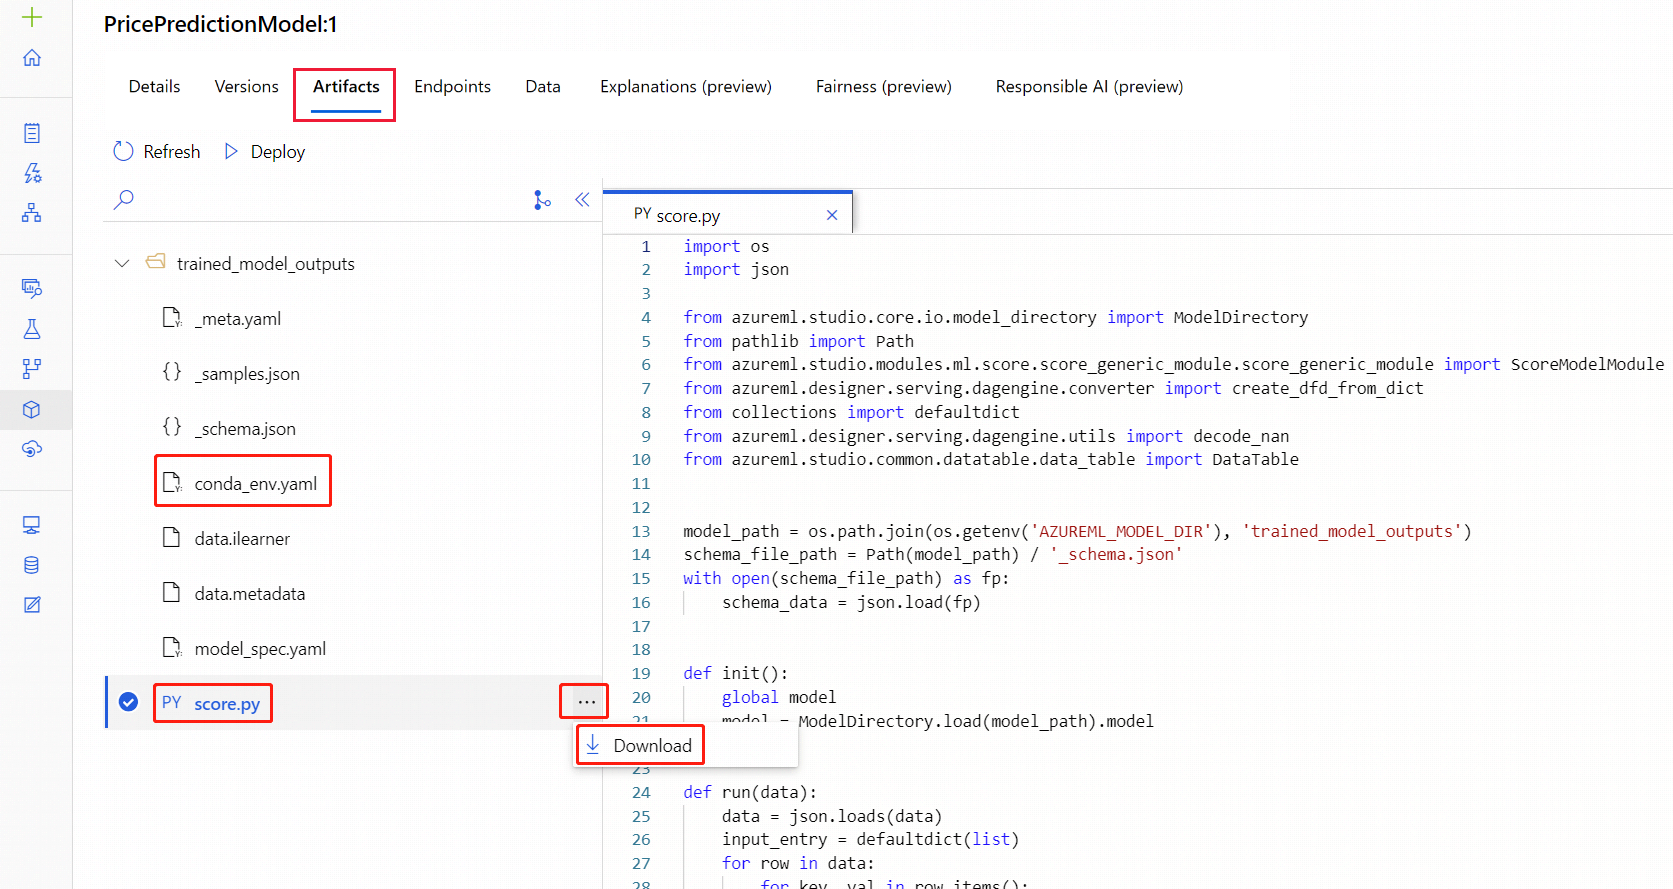
Alternatively, you can download the files from the Models asset page after registering your model:
Navigate to the Models asset page.
Select the model you want to deploy.
Select the Artifacts tab.
Select the
trained_model_outputsfolder.Download the
conda_env.yamlfile andscore.pyfile.
Note
The score.py file provides nearly the same functionality as the Score Model components. However, some components like Score SVD Recommender, Score Wide and Deep Recommender, and Score Vowpal Wabbit Model have parameters for different scoring modes. You can also change those parameters in the entry script.
For more information on setting parameters in the score.py file, see the section, Configure the entry script.
Deploy the model
After downloading the necessary files, you're ready to deploy the model.
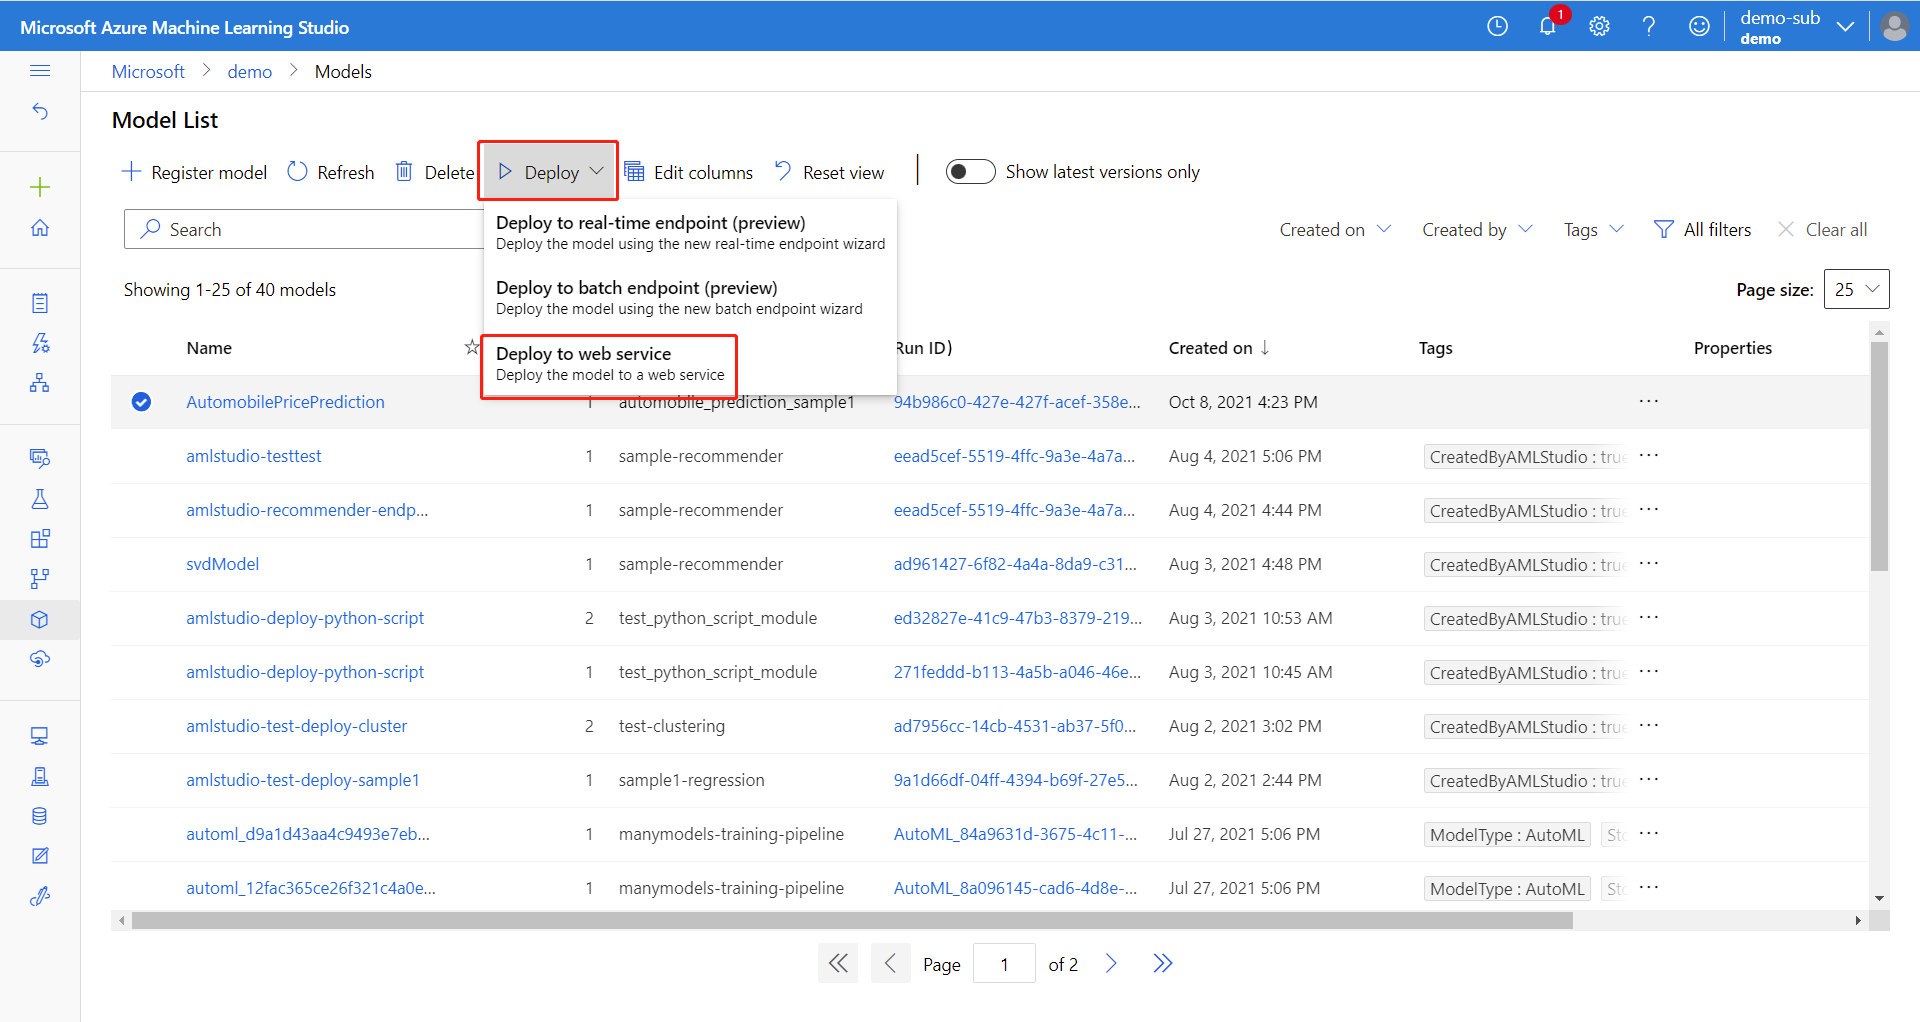
In the Models asset page, select the registered model.
Select Use this model, then select Web service from the drop-down menu.
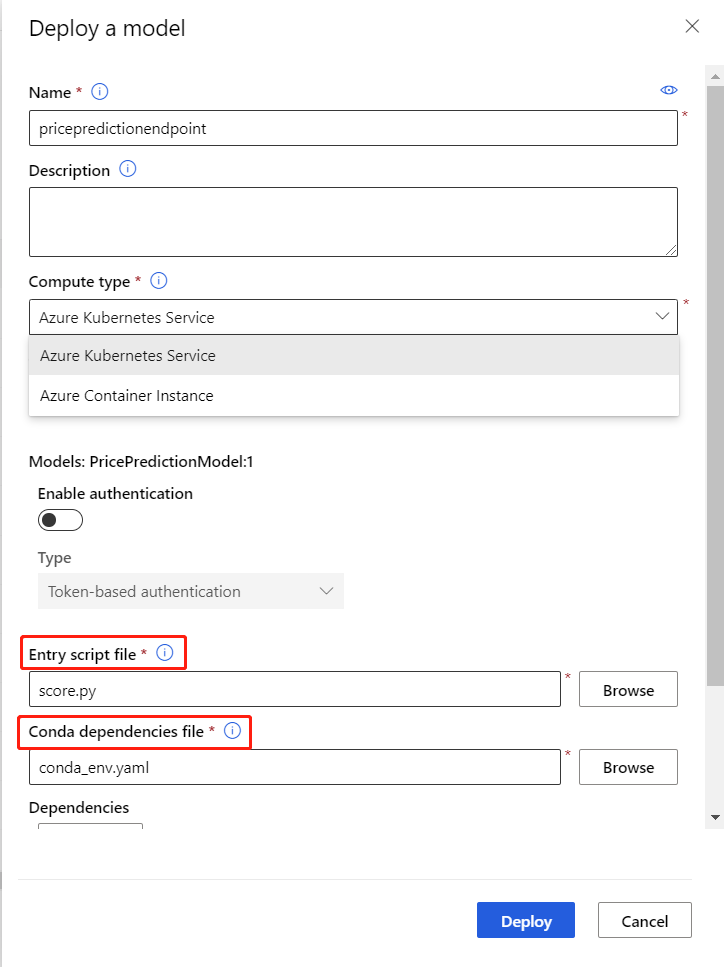
In the configuration menu, enter the following information:
- Input a name for the endpoint.
- Select the AksCompute or Azure Container Instance compute type.
- Select a compute name.
- Upload the
score.pyfor the Entry script file. - Upload the
conda_env.ymlfor the Conda dependencies file.
Tip
In the Advanced setting, you can set CPU/Memory capacity and other parameters for deployment. These settings are important for certain models such as PyTorch models, which consume considerable amount of memory (about 4 GB).
Select Deploy to deploy your model as an online endpoint.
Consume the online endpoint
After deployment succeeds, you can find the endpoint in the Endpoints asset page. Once there, you will find a REST endpoint, which clients can use to submit requests to the endpoint.
Note
The designer also generates a sample data json file for testing, you can download _samples.json in the trained_model_outputs folder.
Use the following code sample to consume an online endpoint.
import json
from pathlib import Path
from azureml.core.workspace import Workspace, Webservice

service_name = 'YOUR_SERVICE_NAME'
ws = Workspace.get(
    name='WORKSPACE_NAME',
    subscription_id='SUBSCRIPTION_ID',
    resource_group='RESOURCEGROUP_NAME'
)
service = Webservice(ws, service_name)
sample_file_path = '_samples.json'

with open(sample_file_path, 'r') as f:
    sample_data = json.load(f)
score_result = service.run(json.dumps(sample_data))
print(f'Inference result = {score_result}')
Consume computer vision-related online endpoints
When consuming computer vision related online endpoints, you need to convert images to bytes, since web service only accepts string as input. Following is the sample code:
import base64
import json
from copy import deepcopy
from pathlib import Path
from azureml.studio.core.io.image_directory import (IMG_EXTS, image_from_file, image_to_bytes)
from azureml.studio.core.io.transformation_directory import ImageTransformationDirectory

# image path
image_path = Path('YOUR_IMAGE_FILE_PATH')

# provide the same parameter setting as in the training pipeline. Just an example here.
image_transform = [
    # format: (op, args). {} means using default parameter values of torchvision.transforms.
    # See https://pytorch.org/docs/stable/torchvision/transforms.html
    ('Resize', 256),
    ('CenterCrop', 224),
    # ('Pad', 0),
    # ('ColorJitter', {}),
    # ('Grayscale', {}),
    # ('RandomResizedCrop', 256),
    # ('RandomCrop', 224),
    # ('RandomHorizontalFlip', {}),
    # ('RandomVerticalFlip', {}),
    # ('RandomRotation', 0),
    # ('RandomAffine', 0),
    # ('RandomGrayscale', {}),
    # ('RandomPerspective', {}),
]
transform = ImageTransformationDirectory.create(transforms=image_transform).torch_transform

# download _samples.json file under Outputs+logs tab in the right pane of Train PyTorch Model component
sample_file_path = '_samples.json'
with open(sample_file_path, 'r') as f:
    sample_data = json.load(f)

# use first sample item as the default value
default_data = sample_data[0]
data_list = []
for p in image_path.iterdir():
    if p.suffix.lower() in IMG_EXTS:
        data = deepcopy(default_data)
        # convert image to bytes
        data['image'] = base64.b64encode(image_to_bytes(transform(image_from_file(p)))).decode()
        data_list.append(data)

# use data.json as input of consuming the endpoint
data_file_path = 'data.json'
with open(data_file_path, 'w') as f:
    json.dump(data_list, f)
Configure the entry script
Some components in the designer like Score SVD Recommender, Score Wide and Deep Recommender, and Score Vowpal Wabbit Model have parameters for different scoring modes.
In this section, you learn how to update these parameters in the entry script file.
The following example updates the default behavior for a trained Wide & Deep Recommender model. By default, the score.py file tells the web service to predict ratings between users and items.
You can modify the entry script file to make item recommendations, and to return recommended items, by changing the recommender_prediction_kind parameter.
import os
import json
from pathlib import Path
from collections import defaultdict
from azureml.studio.core.io.model_directory import ModelDirectory
from azureml.designer.modules.recommendation.dnn.wide_and_deep.score. \
    score_wide_and_deep_recommender import ScoreWideAndDeepRecommenderModule
from azureml.designer.serving.dagengine.utils import decode_nan
from azureml.designer.serving.dagengine.converter import create_dfd_from_dict

model_path = os.path.join(os.getenv('AZUREML_MODEL_DIR'), 'trained_model_outputs')
schema_file_path = Path(model_path) / '_schema.json'
with open(schema_file_path) as fp:
    schema_data = json.load(fp)


def init():
    global model
    model = ModelDirectory.load(load_from_dir=model_path)


def run(data):
    data = json.loads(data)
    input_entry = defaultdict(list)
    for row in data:
        for key, val in row.items():
            input_entry[key].append(decode_nan(val))

    data_frame_directory = create_dfd_from_dict(input_entry, schema_data)

    # The parameter names can be inferred from Score Wide and Deep Recommender component parameters:
    # convert the letters to lower cases and replace whitespaces to underscores.
    score_params = dict(
        trained_wide_and_deep_recommendation_model=model,
        dataset_to_score=data_frame_directory,
        training_data=None,
        user_features=None,
        item_features=None,
        ################### Note #################
        # Set 'Recommender prediction kind' parameter to enable item recommendation model
        recommender_prediction_kind='Item Recommendation',
        recommended_item_selection='From All Items',
        maximum_number_of_items_to_recommend_to_a_user=5,
        whether_to_return_the_predicted_ratings_of_the_items_along_with_the_labels='True')
    result_dfd, = ScoreWideAndDeepRecommenderModule().run(**score_params)
    result_df = result_dfd.data
    return json.dumps(result_df.to_dict("list"))
For Wide & Deep Recommender and Vowpal Wabbit models, you can configure the scoring mode parameter by using the following methods:
- The parameter names are the lowercase and underscore combinations of parameter names for Score Vowpal Wabbit Model and Score Wide and Deep Recommender.
- Mode-type parameter values are strings of the corresponding option names. Take Recommender prediction kind in the preceding codes as an example, the value can be
'Rating Prediction'or'Item Recommendation'. Other values aren't allowed.
For SVD Recommender trained model, the parameter names and values might be less obvious, and you can look up the following tables to decide how to set parameters.
| Parameter name in Score SVD Recommender | Parameter name in the entry script file |
|---|---|
| Recommender prediction kind | prediction_kind |
| Recommended item selection | recommended_item_selection |
| Minimum size of the recommendation pool for a single user | min_recommendation_pool_size |
| Maximum number of items to recommend to a user | max_recommended_item_count |
| Whether to return the predicted ratings of the items along with the labels | return_ratings |
The following code shows how to set parameters for an SVD Recommender, which uses all six parameters to recommend rated items with predicted ratings attached.
score_params = dict(
        learner=model,
        test_data=DataTable.from_dfd(data_frame_directory),
        training_data=None,
        # RecommenderPredictionKind has 2 members, 'RatingPrediction' and 'ItemRecommendation'. You
        # can specify prediction_kind parameter with one of them.
        prediction_kind=RecommenderPredictionKind.ItemRecommendation,
        # RecommendedItemSelection has 3 members, 'FromAllItems', 'FromRatedItems', 'FromUndatedItems'.
        # You can specify recommended_item_selection parameter with one of them.
        recommended_item_selection=RecommendedItemSelection.FromRatedItems,
        min_recommendation_pool_size=1,
        max_recommended_item_count=3,
        return_ratings=True,
    )
