Note
Access to this page requires authorization. You can try signing in or changing directories.
Access to this page requires authorization. You can try changing directories.
APPLIES TO:  Azure Machine Learning SDK v1 for Python
Important
This article provides information on using the Azure Machine Learning SDK v1. SDK v1 is deprecated as of March 31, 2025. Support for it will end on June 30, 2026. You can install and use SDK v1 until that date. Your existing workflows using SDK v1 will continue to operate after the end-of-support date. However, they could be exposed to security risks or breaking changes in the event of architectural changes in the product.
We recommend that you transition to the SDK v2 before June 30, 2026. For more information on SDK v2, see What is Azure Machine Learning CLI and Python SDK v2? and the SDK v2 reference.
Data drift(preview) will be retired at 09/01/2025, and you can start to use Model Monitor for your data drift tasks. Please check the content below to understand the replacement, feature gaps and manual change steps.
Learn how to monitor data drift and set alerts when drift is high.
Note
Azure Machine Learning model monitoring (v2) provides improved capabilities for data drift along with additional functionalities for monitoring signals and metrics. To learn more about the capabilities of model monitoring in Azure Machine Learning (v2), see Model monitoring with Azure Machine Learning.
With Azure Machine Learning dataset monitors (preview), you can:
- Analyze drift in your data to understand how it changes over time.
- Monitor model data for differences between training and serving datasets. Start by collecting model data from deployed models.
- Monitor new data for differences between any baseline and target dataset.
- Profile features in data to track how statistical properties change over time.
- Set up alerts on data drift for early warnings to potential issues.
- Create a new dataset version when you determine the data has drifted too much.
An Azure Machine Learning dataset is used to create the monitor. The dataset must include a timestamp column.
You can view data drift metrics with the Python SDK or in Azure Machine Learning studio. Other metrics and insights are available through the Azure Application Insights resource associated with the Azure Machine Learning workspace.
Important
Data drift detection for datasets is currently in public preview. The preview version is provided without a service level agreement, and it's not recommended for production workloads. Certain features might not be supported or might have constrained capabilities. For more information, see Supplemental Terms of Use for Microsoft Azure Previews.
Prerequisites
To create and work with dataset monitors, you need:
- An Azure subscription. If you don't have an Azure subscription, create a free account before you begin. Try the free or paid version of Azure Machine Learning today.
- An Azure Machine Learning workspace.
- The Azure Machine Learning SDK for Python installed, which includes the azureml-datasets package.
- Structured (tabular) data with a timestamp specified in the file path, file name, or column in the data.
Prerequisites (Migrate to Model Monitor)
When you migrate to Model Monitor, please check the prerequisites as mentioned in this article Prerequisites of Azure Machine Learning model monitoring.
What is data drift?
Model accuracy degrades over time, largely because of data drift. For machine learning models, data drift is the change in model input data that leads to model performance degradation. Monitoring data drift helps detect these model performance issues.
Causes of data drift include:
- Upstream process changes, such as a sensor being replaced that changes the units of measurement from inches to centimeters.
- Data quality issues, such as a broken sensor always reading 0.
- Natural drift in the data, such as mean temperature changing with the seasons.
- Change in relation between features, or covariate shift.
Azure Machine Learning simplifies drift detection by computing a single metric abstracting the complexity of datasets being compared. These datasets may have hundreds of features and tens of thousands of rows. Once drift is detected, you drill down into which features are causing the drift. You then inspect feature level metrics to debug and isolate the root cause for the drift.
This top down approach makes it easy to monitor data instead of traditional rules-based techniques. Rules-based techniques such as allowed data range or allowed unique values can be time consuming and error prone.
In Azure Machine Learning, you use dataset monitors to detect and alert for data drift.
Dataset monitors
With a dataset monitor you can:
- Detect and alert to data drift on new data in a dataset.
- Analyze historical data for drift.
- Profile new data over time.
The data drift algorithm provides an overall measure of change in data and indication of which features are responsible for further investigation. Dataset monitors produce many other metrics by profiling new data in the timeseries dataset.
Custom alerting can be set up on all metrics generated by the monitor through Azure Application Insights. Dataset monitors can be used to quickly catch data issues and reduce the time to debug the issue by identifying likely causes.
Conceptually, there are three primary scenarios for setting up dataset monitors in Azure Machine Learning.
| Scenario | Description |
|---|---|
| Monitor serving data of a model for drift from the training data | Results from this scenario can be interpreted as monitoring a proxy for the model's accuracy, since model accuracy degrades when the serving data drifts from the training data. |
| Monitor a time series dataset for drift from a previous time period. | This scenario is more general, and can be used to monitor datasets involved upstream or downstream of model building. The target dataset must have a timestamp column. The baseline dataset can be any tabular dataset that has features in common with the target dataset. |
| Perform analysis on past data. | This scenario can be used to understand historical data and inform decisions in settings for dataset monitors. |
Dataset monitors depend on the following Azure services.
| Azure service | Description |
|---|---|
| Dataset | Drift uses Machine Learning datasets to retrieve training data and compare data for model training. Generating profile of data is used to generate some of the reported metrics such as min, max, distinct values, distinct values count. |
| Azure Machine Learning pipeline and compute | The drift calculation job is hosted in an Azure Machine Learning pipeline. The job is triggered on demand or by schedule to run on a compute configured at drift monitor creation time. |
| Application insights | Drift emits metrics to Application Insights belonging to the machine learning workspace. |
| Azure blob storage | Drift emits metrics in json format to Azure blob storage. |
Baseline and target datasets
You monitor Azure Machine Learning datasets for data drift. When you create a dataset monitor, you reference your:
- Baseline dataset - usually the training dataset for a model.
- Target dataset - usually model input data - is compared over time to your baseline dataset. This comparison means that your target dataset must have a timestamp column specified.
The monitor compares the baseline and target datasets.
Migrate to Model Monitor
In Model Monitor, you can find corresponding concepts as following, and you can find more details in this article Set up model monitoring by bringing in your production data to Azure Machine Learning:
- Reference dataset: similar to your baseline dataset for data drift detection, it is set as the recent past production inference dataset.
- Production inference data: similar to your target dataset in data drift detection, the production inference data can be collected automatically from models deployed in production. It can also be inference data you store.
Create target dataset
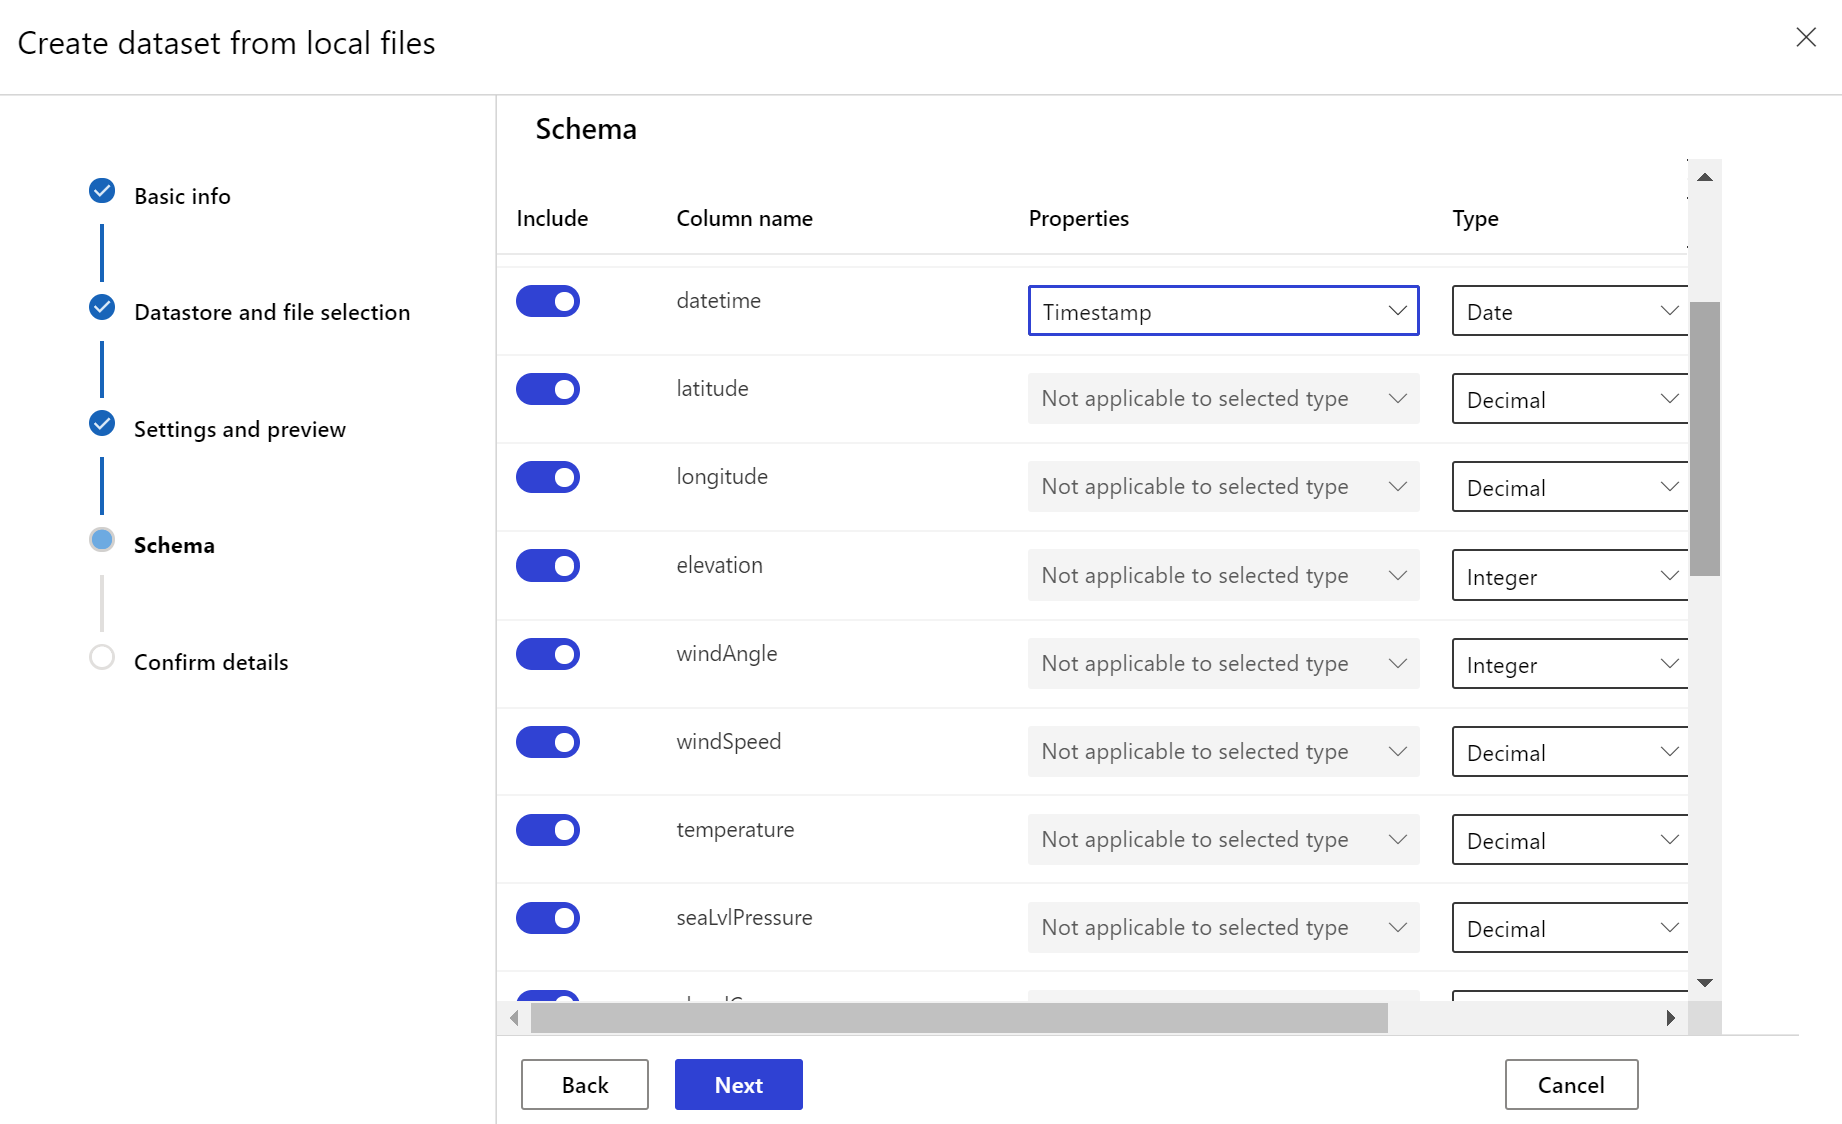
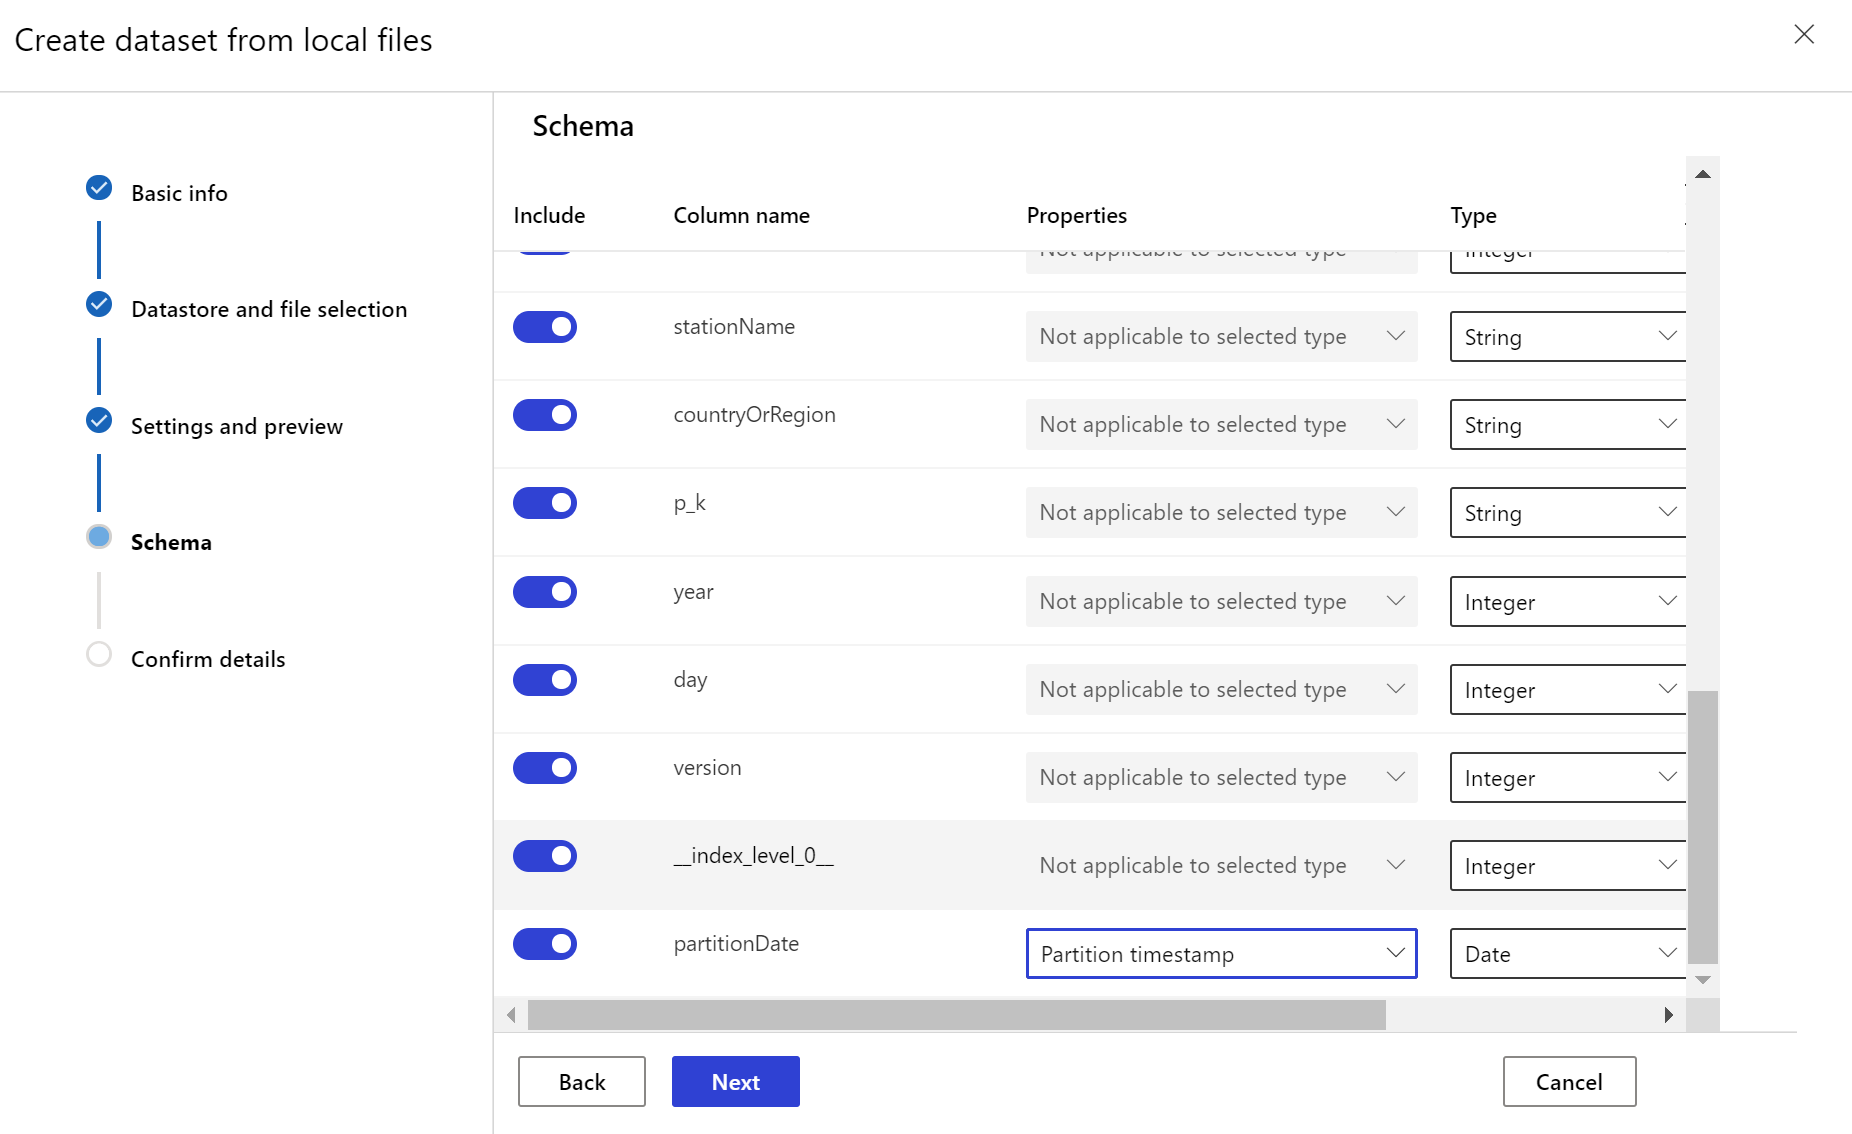
The target dataset needs the timeseries trait set on it by specifying the timestamp column either from a column in the data or a virtual column derived from the path pattern of the files. Create the dataset with a timestamp through the Python SDK or Azure Machine Learning studio. A column representing a "timestamp" must be specified to add timeseries trait to the dataset. If your data is partitioned into folder structure with time info, such as '{yyyy/MM/dd}', create a virtual column through the path pattern setting and set it as the "partition timestamp" to enable time series API functionality.
APPLIES TO:
Azure Machine Learning SDK v1 for Python
The Dataset class with_timestamp_columns() method defines the time stamp column for the dataset.
from azureml.core import Workspace, Dataset, Datastore

# get workspace object
ws = Workspace.from_config()

# get datastore object
dstore = Datastore.get(ws, 'your datastore name')

# specify datastore paths
dstore_paths = [(dstore, 'weather/*/*/*/*/data.parquet')]

# specify partition format
partition_format = 'weather/{state}/{date:yyyy/MM/dd}/data.parquet'

# create the Tabular dataset with 'state' and 'date' as virtual columns
dset = Dataset.Tabular.from_parquet_files(path=dstore_paths, partition_format=partition_format)

# assign the timestamp attribute to a real or virtual column in the dataset
dset = dset.with_timestamp_columns('date')

# register the dataset as the target dataset
dset = dset.register(ws, 'target')
Tip
For a full example of using the timeseries trait of datasets, see the example notebook or the datasets SDK documentation.

Create dataset monitor
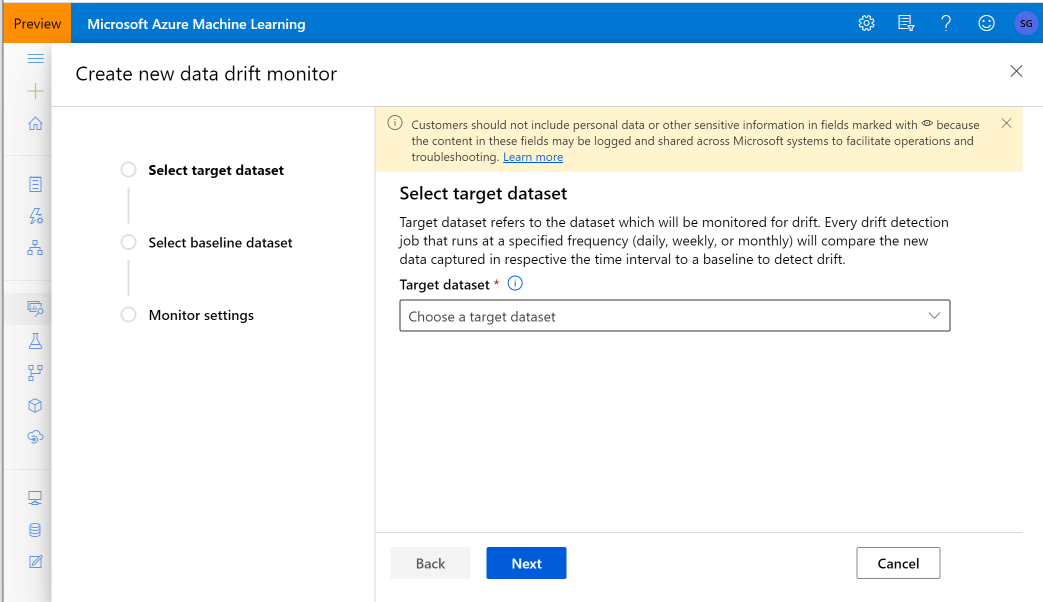
Create a dataset monitor to detect and alert to data drift on a new dataset. Use either the Python SDK or Azure Machine Learning studio.
As described later, a dataset monitor runs at a set frequency (daily, weekly, monthly) intervals. It analyzes new data available in the target dataset since its last run. In some cases, such analysis of the most recent data may not suffice:
- The new data from the upstream source was delayed due to a broken data pipeline, and this new data wasn't available when the dataset monitor ran.
- A time series dataset had only historical data, and you want to analyze drift patterns in the dataset over time. For example: compare traffic flowing to a website, in both winter and summer seasons, to identify seasonal patterns.
- You're new to Dataset Monitors. You want to evaluate how the feature works with your existing data before you set it up to monitor future days. In such scenarios, you can submit an on-demand run, with a specific target dataset set date range, to compare with the baseline dataset.
The backfill function runs a backfill job, for a specified start and end date range. A backfill job fills in expected missing data points in a data set, as a way to ensure data accuracy and completeness.
Note
Azure Machine Learning model monitoring doesn't support manual backfill function, if you want to redo the model monitor for a specific time range, you can create another model monitor for that specific time range.
APPLIES TO:
Azure Machine Learning SDK v1 for Python
See the Python SDK reference documentation on data drift for full details.
The following example shows how to create a dataset monitor using the Python SDK:
from azureml.core import Workspace, Dataset
from azureml.datadrift import DataDriftDetector
from datetime import datetime

# get the workspace object
ws = Workspace.from_config()

# get the target dataset
target = Dataset.get_by_name(ws, 'target')

# set the baseline dataset
baseline = target.time_before(datetime(2019, 2, 1))

# set up feature list
features = ['latitude', 'longitude', 'elevation', 'windAngle', 'windSpeed', 'temperature', 'snowDepth', 'stationName', 'countryOrRegion']

# set up data drift detector
monitor = DataDriftDetector.create_from_datasets(ws, 'drift-monitor', baseline, target,
                                                      compute_target='cpu-cluster',
                                                      frequency='Week',
                                                      feature_list=None,
                                                      drift_threshold=.6,
                                                      latency=24)

# get data drift detector by name
monitor = DataDriftDetector.get_by_name(ws, 'drift-monitor')

# update data drift detector
monitor = monitor.update(feature_list=features)

# run a backfill for January through May
backfill1 = monitor.backfill(datetime(2019, 1, 1), datetime(2019, 5, 1))

# run a backfill for May through today
backfill1 = monitor.backfill(datetime(2019, 5, 1), datetime.today())

# disable the pipeline schedule for the data drift detector
monitor = monitor.disable_schedule()

# enable the pipeline schedule for the data drift detector
monitor = monitor.enable_schedule()
Tip
For a full example of setting up a timeseries dataset and data drift detector, see our example notebook.
Create Model Monitor (Migrate to Model Monitor)
When you migrate to Model Monitor, if you have deployed your model to production in an Azure Machine Learning online endpoint and enabled data collection at deployment time, Azure Machine Learning collects production inference data, and automatically stores it in Microsoft Azure Blob Storage. You can then use Azure Machine Learning model monitoring to continuously monitor this production inference data, and you can directly choose the model to create target dataset (production inference data in Model Monitor).
When you migrate to Model Monitor, if you didn't deploy your model to production in an Azure Machine Learning online endpoint, or you don't want to use data collection, you can also set up model monitoring with custom signals and metrics.
Following sections contain more details on how to migrate to Model Monitor.
Create Model Monitor via automatically collected production data (Migrate to Model Monitor)
If you have deployed your model to production in an Azure Machine Learning online endpoint and enabled data collection at deployment time.
You can use the following code to set up the out-of-box model monitoring:
from azure.identity import DefaultAzureCredential
from azure.ai.ml import MLClient
from azure.ai.ml.entities import (
    AlertNotification,
    MonitoringTarget,
    MonitorDefinition,
    MonitorSchedule,
    RecurrencePattern,
    RecurrenceTrigger,
    ServerlessSparkCompute
)

# get a handle to the workspace
ml_client = MLClient(
    DefaultAzureCredential(),
    subscription_id="subscription_id",
    resource_group_name="resource_group_name",
    workspace_name="workspace_name",
)

# create the compute
spark_compute = ServerlessSparkCompute(
    instance_type="standard_e4s_v3",
    runtime_version="3.3"
)

# specify your online endpoint deployment
monitoring_target = MonitoringTarget(
    ml_task="classification",
    endpoint_deployment_id="azureml:credit-default:main"
)


# create alert notification object
alert_notification = AlertNotification(
    emails=['abc@example.com', 'def@example.com']
)

# create the monitor definition
monitor_definition = MonitorDefinition(
    compute=spark_compute,
    monitoring_target=monitoring_target,
    alert_notification=alert_notification
)

# specify the schedule frequency
recurrence_trigger = RecurrenceTrigger(
    frequency="day",
    interval=1,
    schedule=RecurrencePattern(hours=3, minutes=15)
)

# create the monitor
model_monitor = MonitorSchedule(
    name="credit_default_monitor_basic",
    trigger=recurrence_trigger,
    create_monitor=monitor_definition
)

poller = ml_client.schedules.begin_create_or_update(model_monitor)
created_monitor = poller.result()


Create Model Monitor via custom data preprocessing component (Migrate to Model Monitor)
When you migrate to Model Monitor, if you didn't deploy your model to production in an Azure Machine Learning online endpoint, or you don't want to use data collection, you can also set up model monitoring with custom signals and metrics.
If you don't have a deployment, but you have production data, you can use the data to perform continuous model monitoring. To monitor these models, you must be able to:
- Collect production inference data from models deployed in production.
- Register the production inference data as an Azure Machine Learning data asset, and ensure continuous updates of the data.
- Provide a custom data preprocessing component and register it as an Azure Machine Learning component.
You must provide a custom data preprocessing component if your data isn't collected with the data collector. Without this custom data preprocessing component, the Azure Machine Learning model monitoring system won't know how to process your data into tabular form with support for time windowing.
Your custom preprocessing component must have these input and output signatures:
| Input/Output | Signature name | Type | Description | Example value |
|---|---|---|---|---|
| input | data_window_start |
literal, string | data window start-time in ISO8601 format. | 2023-05-01T04:31:57.012Z |
| input | data_window_end |
literal, string | data window end-time in ISO8601 format. | 2023-05-01T04:31:57.012Z |
| input | input_data |
uri_folder | The collected production inference data, which is registered as an Azure Machine Learning data asset. | azureml:myproduction_inference_data:1 |
| output | preprocessed_data |
mltable | A tabular dataset, which matches a subset of the reference data schema. |
For an example of a custom data preprocessing component, see custom_preprocessing in the azuremml-examples GitHub repo.
Understand data drift results
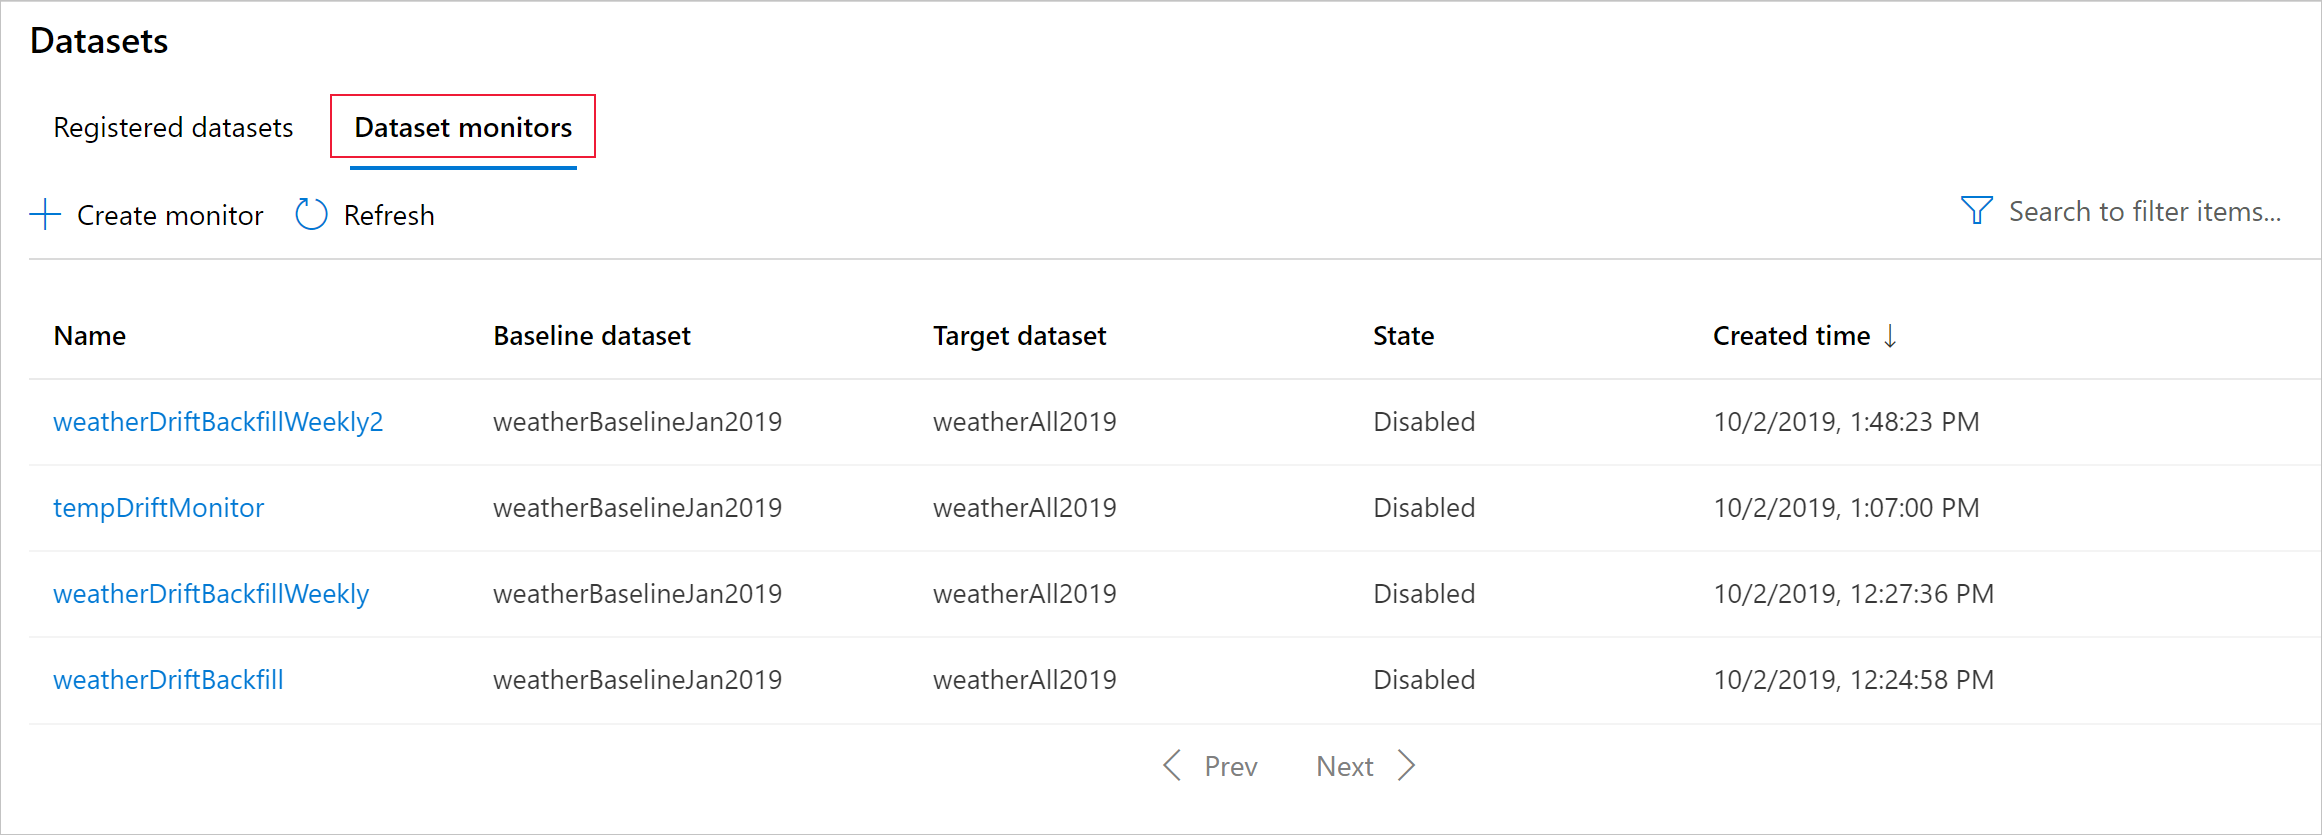
This section shows you the results of monitoring a dataset, found in the Datasets / Dataset monitors page in Azure studio. You can update the settings, and analyze existing data for a specific time period on this page.
Start with the top-level insights into the magnitude of data drift and a highlight of features to be further investigated.
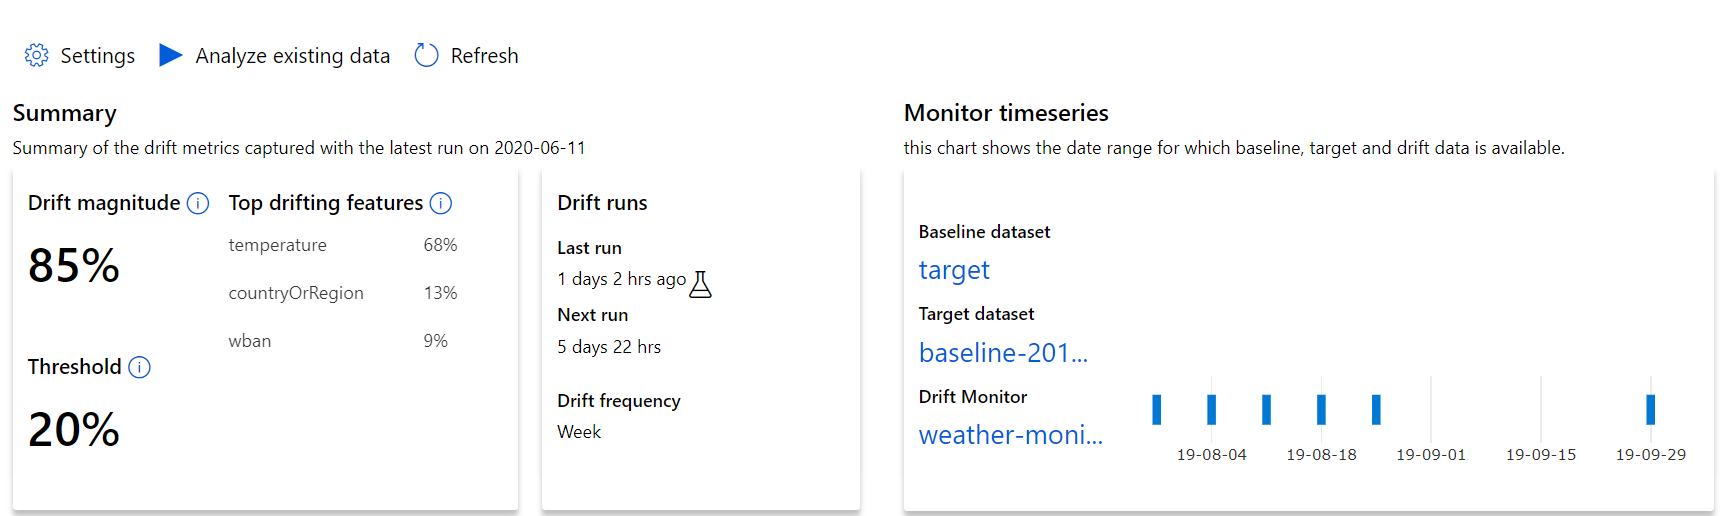
| Metric | Description |
|---|---|
| Data drift magnitude | A percentage of drift between the baseline and target dataset over time. This percentage ranges from 0 to 100, 0 indicates identical datasets and 100 indicates the Azure Machine Learning data drift model can completely tell the two datasets apart. Noise in the precise percentage measured is expected due to machine learning techniques being used to generate this magnitude. |
| Top drifting features | Shows the features from the dataset that have drifted the most and are therefore contributing the most to the Drift Magnitude metric. Due to covariate shift, the underlying distribution of a feature doesn't necessarily need to change to have relatively high feature importance. |
| Threshold | Data Drift magnitude beyond the set threshold triggers alerts. Configure the threshold value in the monitor settings. |
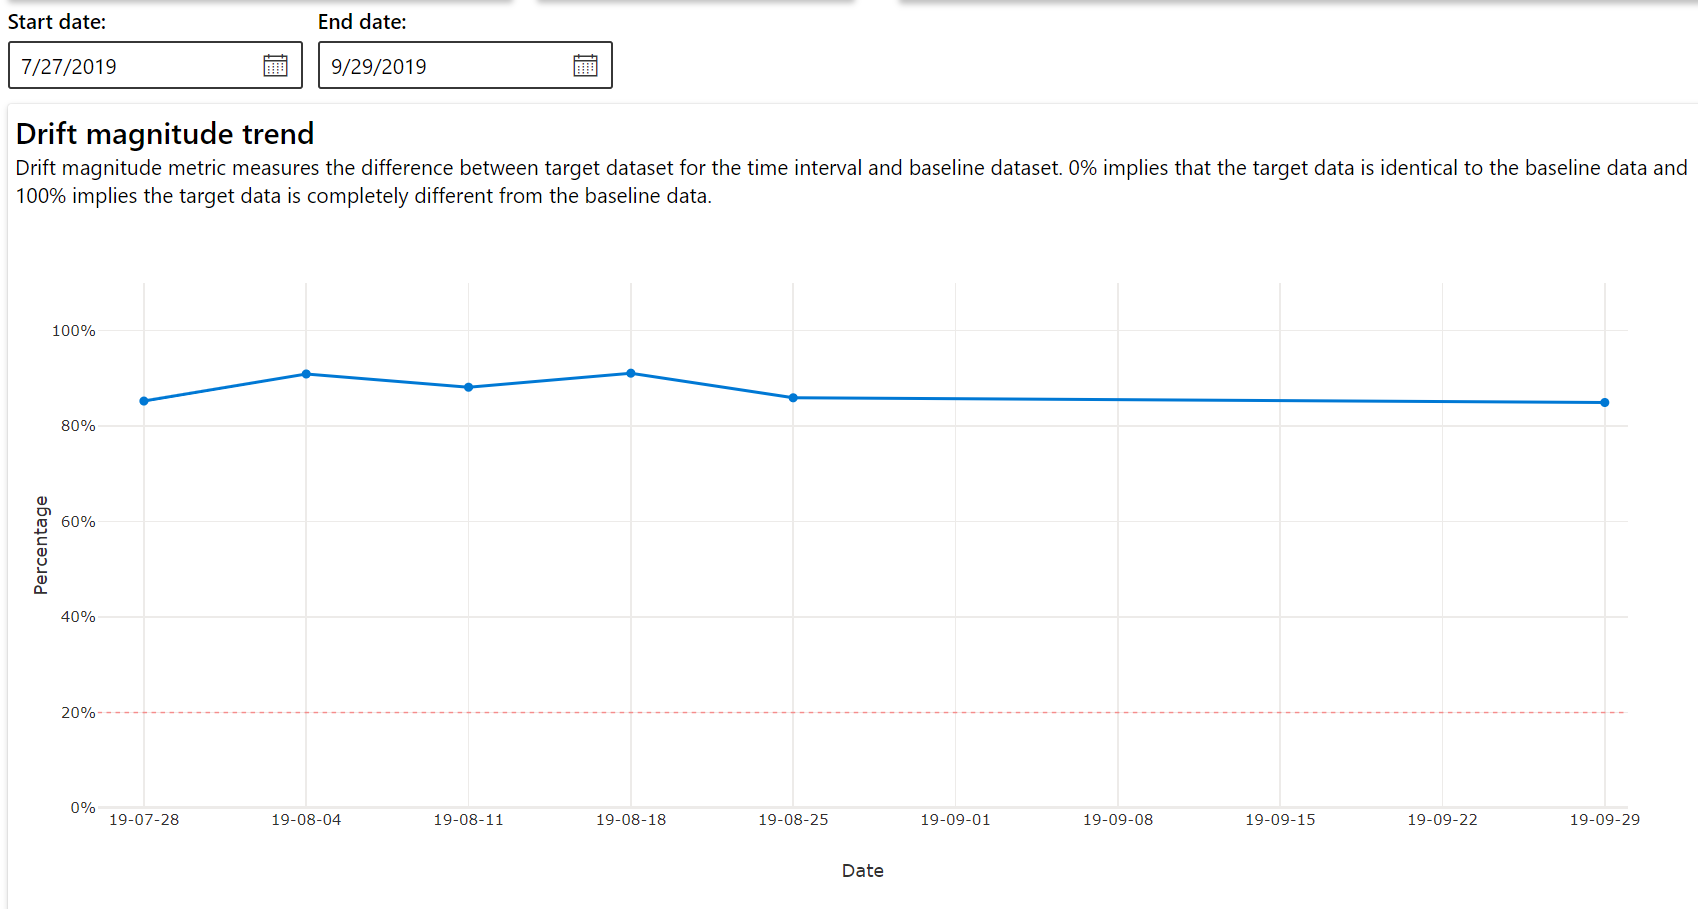
Drift magnitude trend
See how the dataset differs from the target dataset in the specified time period. The closer to 100%, the more the two datasets differ.
Drift magnitude by features
This section contains feature-level insights into the change in the selected feature's distribution, and other statistics, over time.
The target dataset is also profiled over time. The statistical distance between the baseline distribution of each feature is compared with the target dataset's over time. Conceptually, this resembles the data drift magnitude. However this statistical distance is for an individual feature rather than all features. Min, max, and mean are also available.
In the Azure Machine Learning studio, select a bar in the graph to see the feature-level details for that date. By default, you see the baseline dataset's distribution and the most recent job's distribution of the same feature.
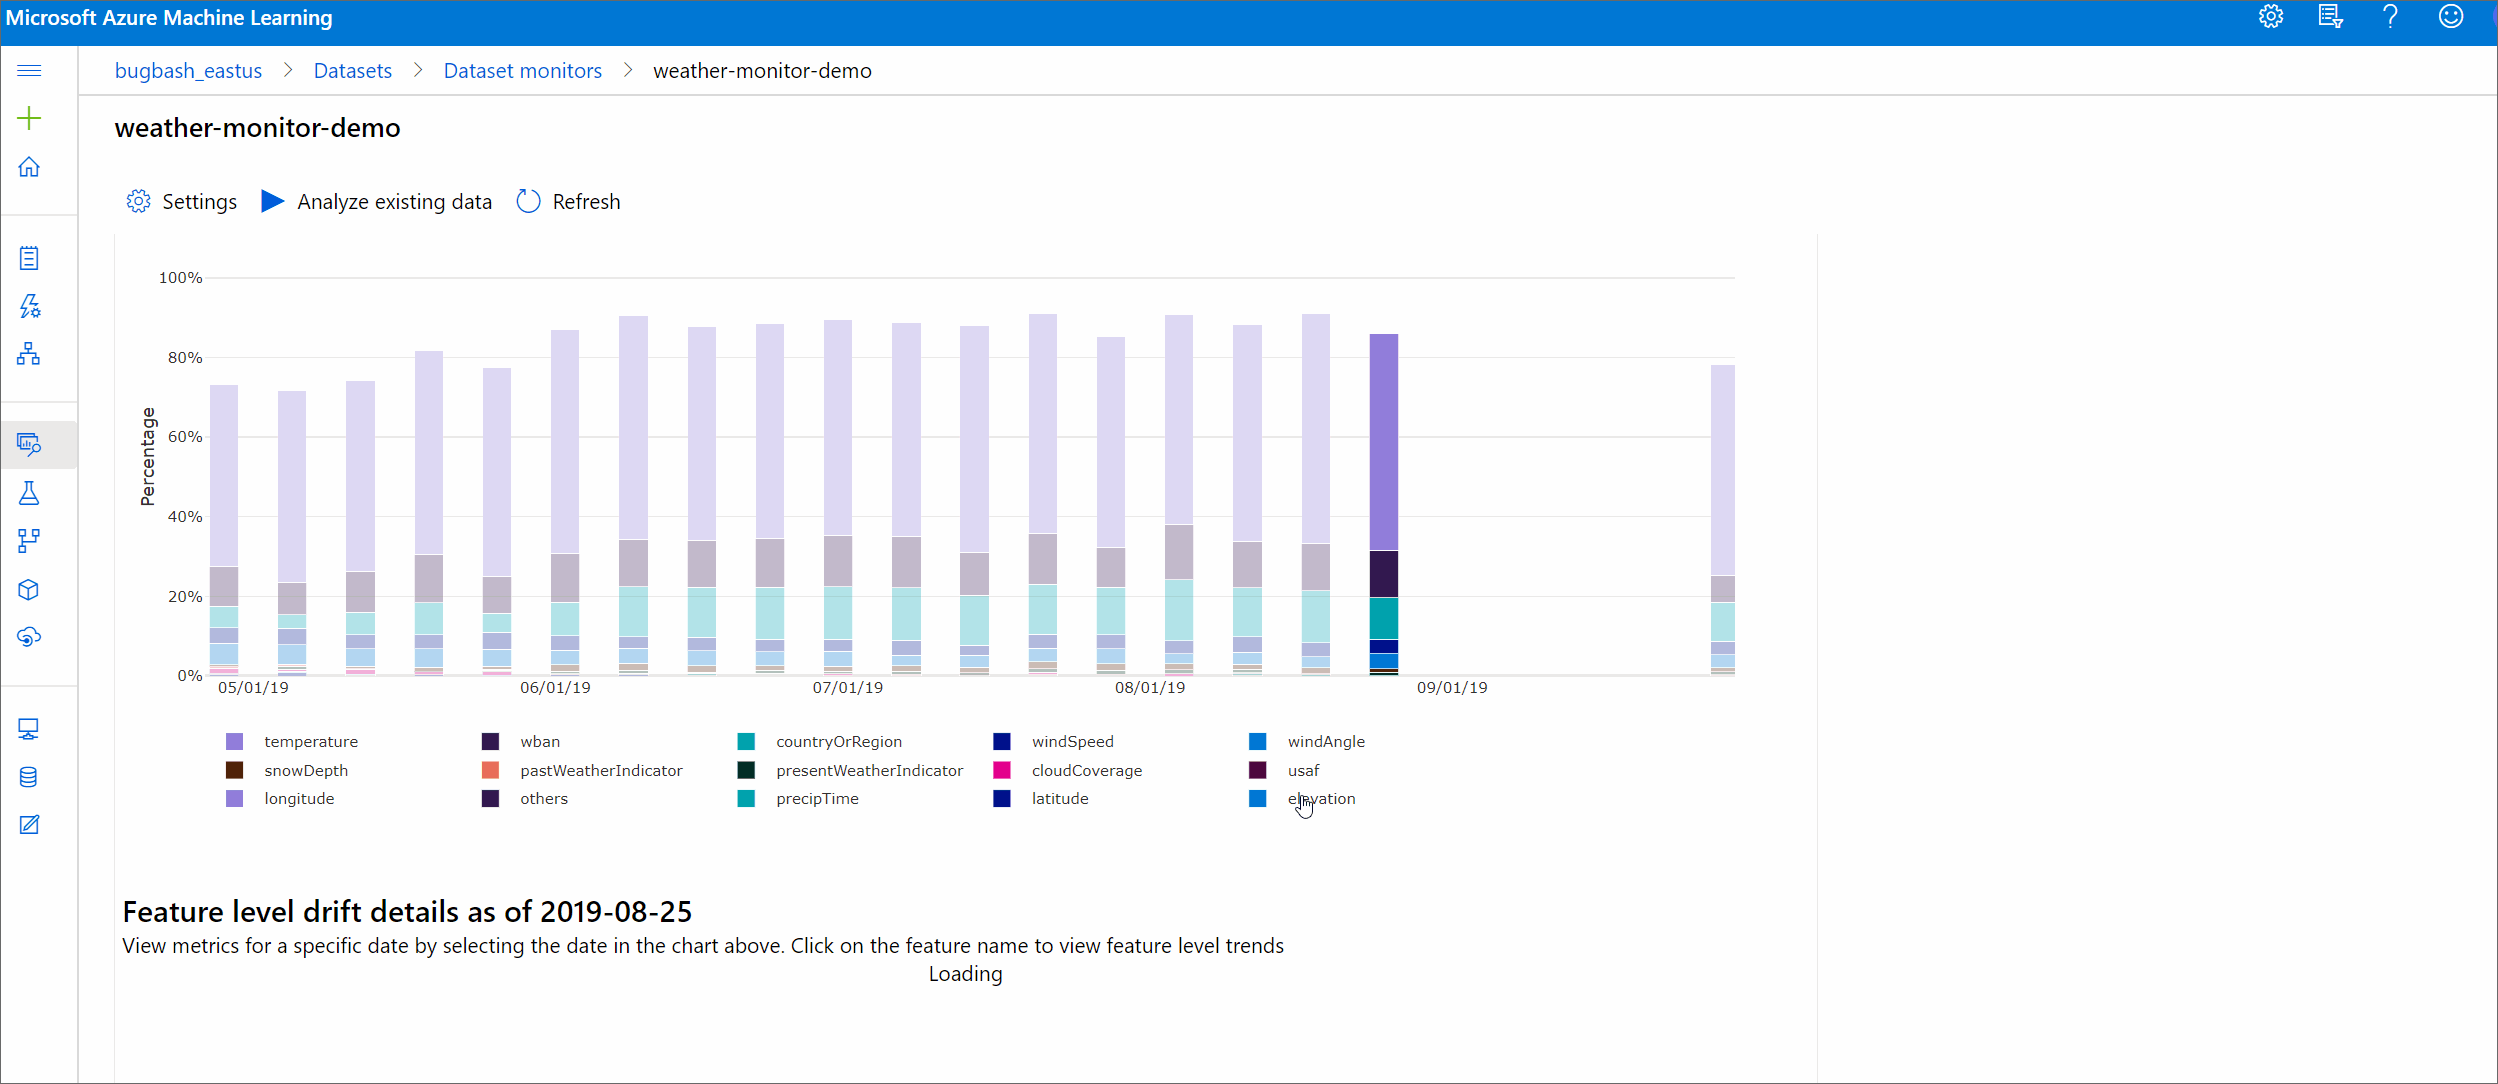
These metrics can also be retrieved in the Python SDK through the get_metrics() method on a DataDriftDetector object.
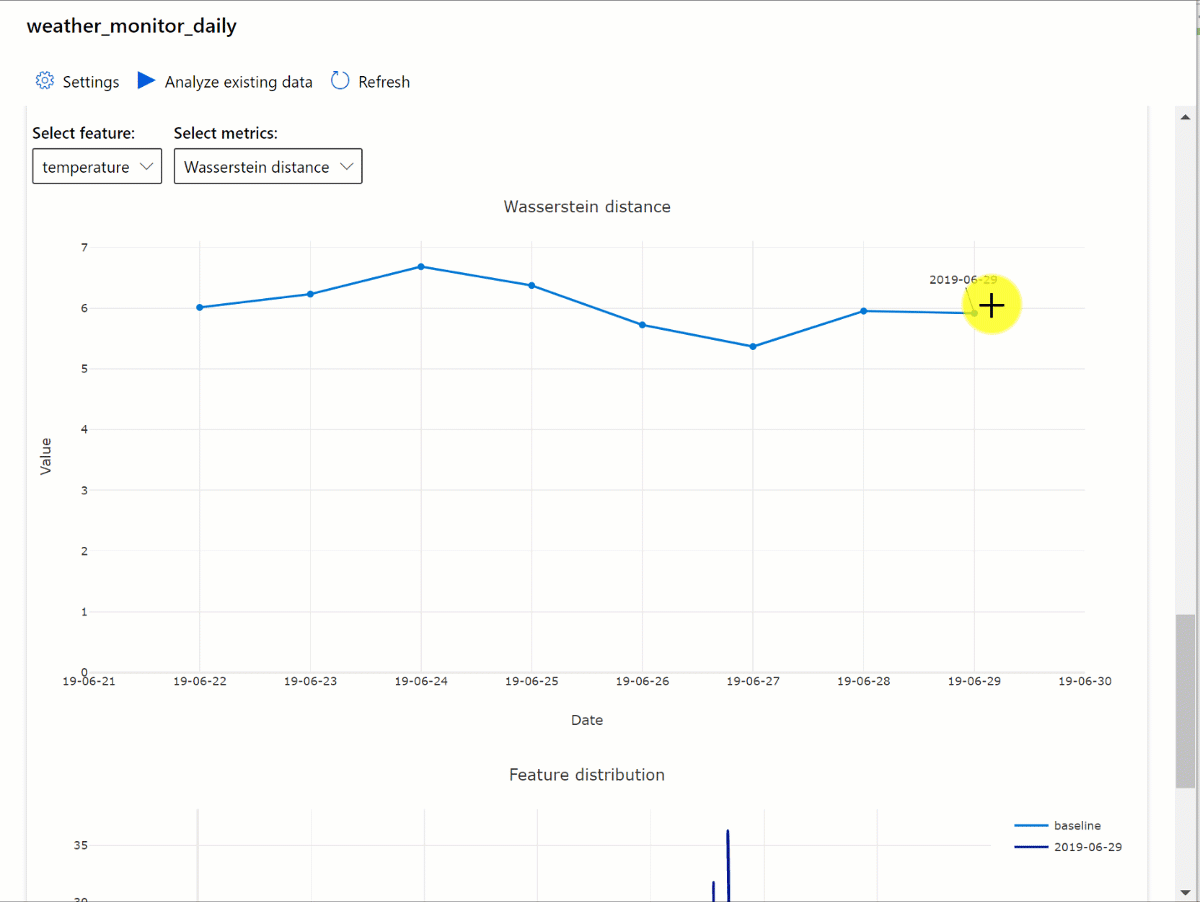
Feature details
Finally, scroll down to view details for each individual feature. Use the dropdowns above the chart to select the feature, and additionally select the metric you want to view.
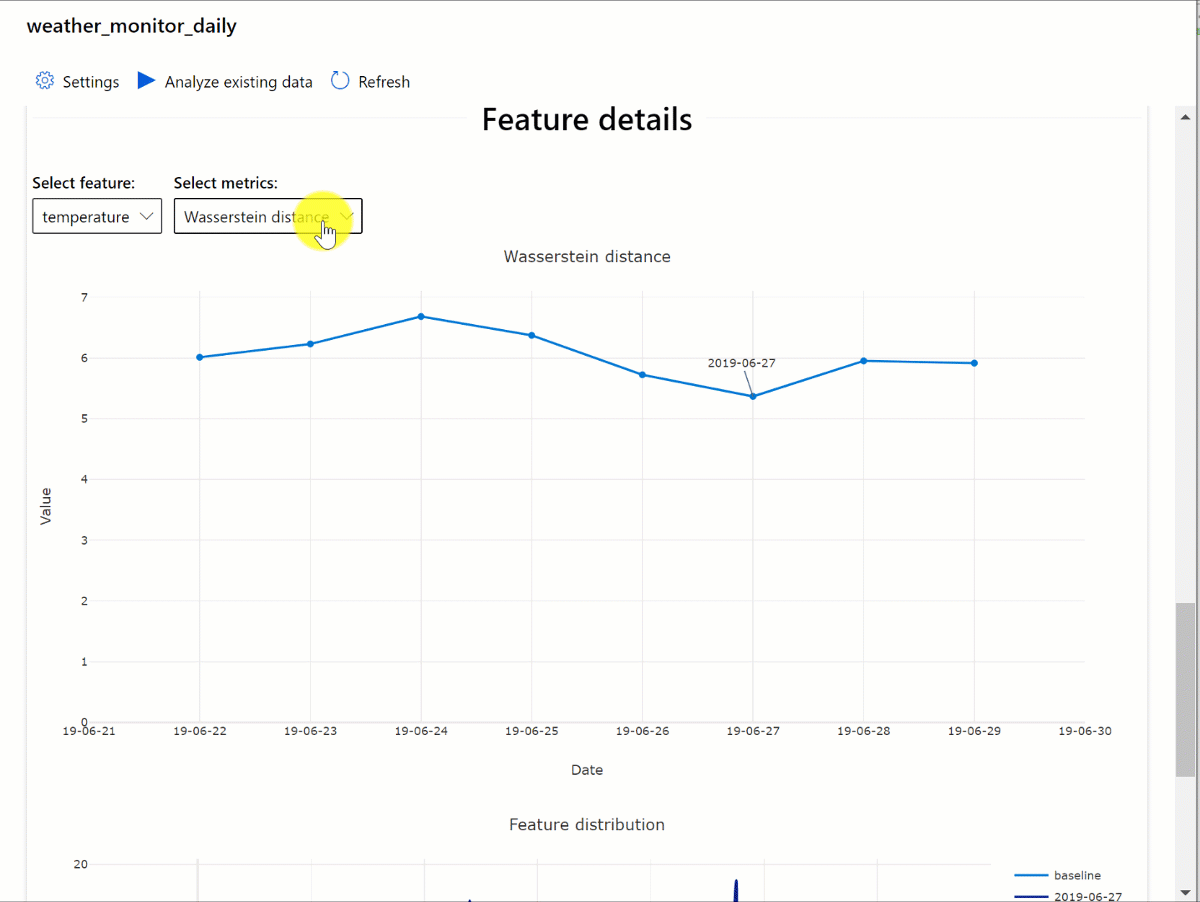
Metrics in the chart depend on the type of feature.
Numeric features
Metric Description Wasserstein distance Minimum amount of work to transform baseline distribution into the target distribution. Mean value Average value of the feature. Min value Minimum value of the feature. Max value Maximum value of the feature. Categorical features
Metric Description Euclidian distance Computed for categorical columns. Euclidean distance is computed on two vectors, generated from empirical distribution of the same categorical column from two datasets. 0 indicates no difference in the empirical distributions. The more it deviates from 0, the more this column has drifted. Trends can be observed from a time series plot of this metric and can be helpful in uncovering a drifting feature. Unique values Number of unique values (cardinality) of the feature.
On this chart, select a single date to compare the feature distribution between the target and this date for the displayed feature. For numeric features, this shows two probability distributions. If the feature is numeric, a bar chart is shown.
Metrics, alerts, and events
Metrics can be queried in the Azure Application Insights resource associated with your machine learning workspace. You have access to all features of Application Insights including set up for custom alert rules and action groups to trigger an action such as an Email/SMS/Push/Voice or Azure Function. Refer to the complete Application Insights documentation for details.
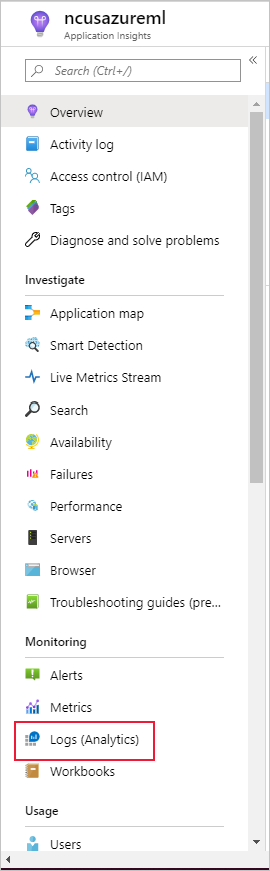
To get started, navigate to the Azure portal and select your workspace's Overview page. The associated Application Insights resource is on the far right:

Select Logs (Analytics) under Monitoring on the left pane:
The dataset monitor metrics are stored as customMetrics. You can write and run a query after setting up a dataset monitor to view them:

After identifying metrics to set up alert rules, create a new alert rule:
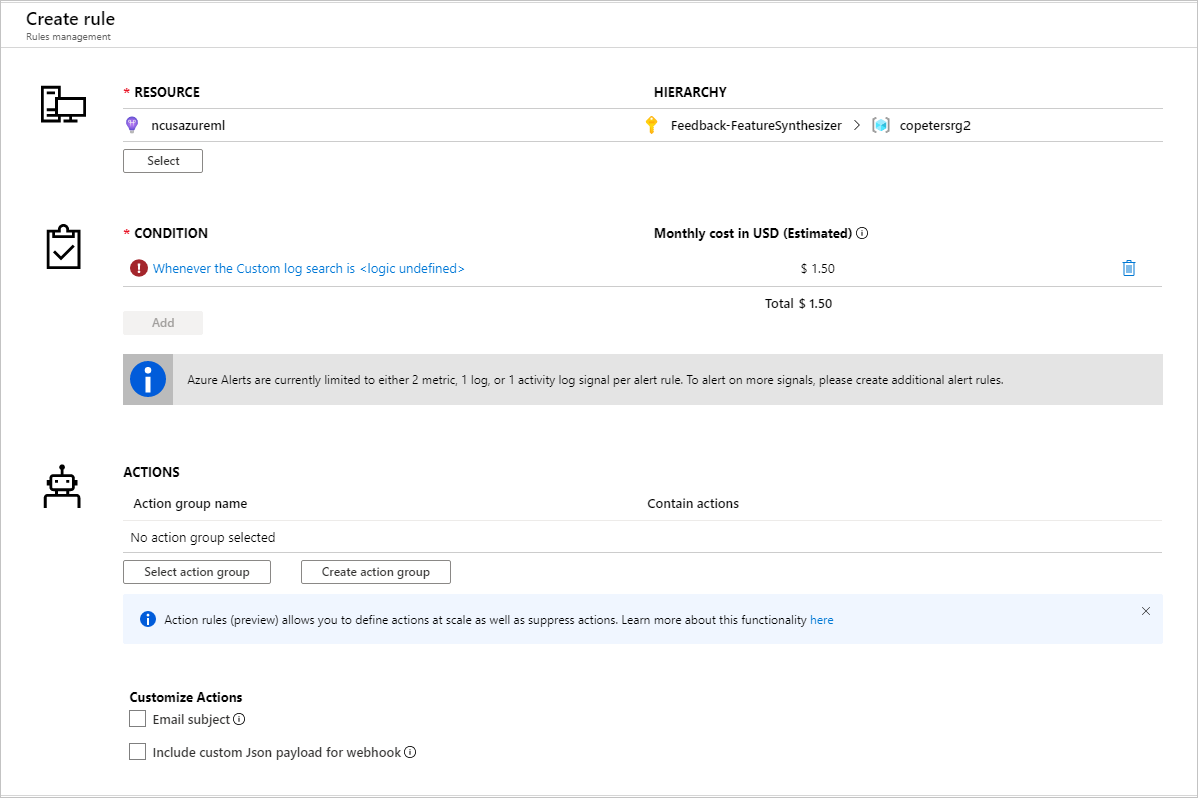
You can use an existing action group, or create a new one to define the action to be taken when the set conditions are met:

Troubleshooting
Limitations and known issues for data drift monitors:
The time range when analyzing historical data is limited to 31 intervals of the monitor's frequency setting.
Limitation of 200 features, unless a feature list is not specified (all features used).
Compute size must be large enough to handle the data.
Ensure your dataset has data within the start and end date for a given monitor job.
Dataset monitors only work on datasets that contain 50 rows or more.
Columns, or features, in the dataset are classified as categorical or numeric based on the conditions in the following table. If the feature doesn't meet these conditions - for instance, a column of type string with >100 unique values - the feature is dropped from our data drift algorithm, but is still profiled.
Feature type Data type Condition Limitations Categorical string The number of unique values in the feature is less than 100 and less than 5% of the number of rows. Null is treated as its own category. Numerical int, float The values in the feature are of a numerical data type, and don't meet the condition for a categorical feature. Feature dropped if >15% of values are null. When you have created a data drift monitor but can't see data on the Dataset monitors page in Azure Machine Learning studio, try the following.
- Check if you have selected the right date range at the top of the page.
- On the Dataset Monitors tab, select the experiment link to check job status. This link is on the far right of the table.
- If the job completed successfully, check the driver logs to see how many metrics have been generated or if there's any warning messages. Find driver logs in the Output + logs tab after you select an experiment.
If the SDK
backfill()function doesn't generate the expected output, it may be due to an authentication issue. When you create the compute to pass into this function, don't useRun.get_context().experiment.workspace.compute_targets. Instead, use ServicePrincipalAuthentication such as the following to create the compute that you pass into thatbackfill()function:
Note
Do not hard code the service principal password in your code. Instead, retrieve it from the Python environment, key store, or other secure method of accessing secrets.
 auth = ServicePrincipalAuthentication(
        tenant_id=tenant_id,
        service_principal_id=app_id,
        service_principal_password=client_secret
        )
 ws = Workspace.get("xxx", auth=auth, subscription_id="xxx", resource_group="xxx")
 compute = ws.compute_targets.get("xxx")
From the Model Data Collector, it can take up to 10 minutes for data to arrive in your blob storage account. However, it usually takes less time. In a script or Notebook, wait 10 minutes to ensure that the cells below successfully run.
import time
time.sleep(600)
Next steps
- Head to the Azure Machine Learning studio or the Python notebook to set up a dataset monitor.
- See how to set up data drift on models deployed to Azure Kubernetes Service.
- Set up dataset drift monitors with Azure Event Grid.