Note
Access to this page requires authorization. You can try signing in or changing directories.
Access to this page requires authorization. You can try changing directories.
APPLIES TO:  Azure Machine Learning SDK v1 for Python
Important
This article provides information on using the Azure Machine Learning SDK v1. The SDK v1 is deprecated as of March 31, 2025 and support for it will end on June 30, 2026. You're able to install and use the SDK v1 until that date.
We recommend that you transition to the SDK v2 before June 30, 2026. For more information on the SDK v2, see What is the Azure Machine Learning Python SDK v2 and the SDK v2 reference.
In this article, you'll learn how to programmatically schedule a pipeline to run on Azure. You can create a schedule based on elapsed time or on file-system changes. You can use time-based schedules to accomplish routine tasks, such as monitoring for data drift. You can use change-based schedules to react to irregular or unpredictable changes, such as new data being uploaded or old data being edited.
After you learn how to create schedules, you'll learn how to retrieve and deactivate them. Finally, you'll learn how to use other Azure services, Azure Logic Apps and Azure Data Factory, to run pipelines. A logic app enables more complex triggering logic or behavior. Azure Data Factory pipelines allow you to call a machine learning pipeline as part of a larger data orchestration pipeline.
Prerequisites
An Azure subscription. If you don’t have an Azure subscription, create a free account.
A Python environment in which the Azure Machine Learning SDK for Python is installed. For more information, see Create and manage reusable environments for training and deployment with Azure Machine Learning.
A Machine Learning workspace with a published pipeline. You can use the one that's created in Create and run machine learning pipelines with Azure Machine Learning SDK.
Get required values
To schedule a pipeline, you'll need a reference to your workspace, the identifier of your published pipeline, and the name of the experiment in which you want to create the schedule. You can get these values by using the following code:
import azureml.core
from azureml.core import Workspace
from azureml.pipeline.core import Pipeline, PublishedPipeline
from azureml.core.experiment import Experiment

ws = Workspace.from_config()

experiments = Experiment.list(ws)
for experiment in experiments:
    print(experiment.name)

published_pipelines = PublishedPipeline.list(ws)
for published_pipeline in  published_pipelines:
    print(f"{published_pipeline.name},'{published_pipeline.id}'")

experiment_name = "MyExperiment"
pipeline_id = "aaaaaaaaa-bbbb-cccc-dddd-eeeeeeeeeeee"
Create a schedule
To run a pipeline on a recurring basis, you create a schedule. A Schedule associates a pipeline, an experiment, and a trigger. The trigger can either be a ScheduleRecurrence that defines the wait time between jobs or a datastore path that specifies a directory to watch for changes. In either case, you need the pipeline identifier and the name of the experiment in which to create the schedule.
At the top of your Python file, import the Schedule and ScheduleRecurrence classes:
from azureml.pipeline.core.schedule import ScheduleRecurrence, Schedule
Create a time-based schedule
The ScheduleRecurrence constructor has a required frequency argument that must be set to one of the following strings: "Minute", "Hour", "Day", "Week", or "Month". It also requires an integer interval argument that specifies how many frequency units should elapse between start times. Optional arguments allow you to be more specific about starting times, as described in the ScheduleRecurrence documentation.
Create a Schedule that begins a job every 15 minutes:
recurrence = ScheduleRecurrence(frequency="Minute", interval=15)
recurring_schedule = Schedule.create(ws, name="MyRecurringSchedule",
                            description="Based on time",
                            pipeline_id=pipeline_id,
                            experiment_name=experiment_name,
                            recurrence=recurrence)
Create a change-based schedule
Pipelines that are triggered by file changes might be more efficient than time-based schedules. When you want to do something before a file is changed, or when a new file is added to a data directory, you can preprocess that file. You can monitor any changes to a datastore or changes in a specific directory within the datastore. If you monitor a specific directory, changes within subdirectories of that directory won't trigger a job.
Note
Change-based schedules support monitoring Azure Blob Storage only.
To create a file-reactive Schedule, you need to set the datastore parameter in the call to Schedule.create. To monitor a folder, set the path_on_datastore argument.
The polling_interval argument enables you to specify, in minutes, the frequency at which the datastore is checked for changes.
If the pipeline was constructed with a DataPath PipelineParameter, you can set that variable to the name of the changed file by setting the data_path_parameter_name argument.
datastore = Datastore(workspace=ws, name="workspaceblobstore")

reactive_schedule = Schedule.create(ws, name="MyReactiveSchedule", description="Based on input file change.",
                            pipeline_id=pipeline_id, experiment_name=experiment_name, datastore=datastore, data_path_parameter_name="input_data")
Optional arguments for creating a schedule
In addition to the arguments discussed previously, you can set the status argument to "Disabled" to create an inactive schedule. The continue_on_step_failure enables you to pass a Boolean value that overrides the pipeline's default failure behavior.
View your scheduled pipelines
In a browser, go to Azure Machine Learning studio. In the left pane, select the Endpoints icon. In the Endpoints pane, select Real-time endpoints. This takes you to a list of the pipelines that are published in the workspace.

On this page, you can see summary information about all the pipelines in the workspace: names, descriptions, status, and so on. You can get more information by selecting the name of a pipeline. On the resulting page, you can also get information about individual jobs.
Deactivate the pipeline
If you have a Pipeline that's published but not scheduled, you can disable it by using this code:
pipeline = PublishedPipeline.get(ws, id=pipeline_id)
pipeline.disable()
If the pipeline is scheduled, you need to cancel the schedule first. Retrieve the schedule's identifier from the portal or by running this code:
ss = Schedule.list(ws)
for s in ss:
    print(s)
After you have the schedule_id of the schedule that you want to disable, run this code:
def stop_by_schedule_id(ws, schedule_id):
    s = next(s for s in Schedule.list(ws) if s.id == schedule_id)
    s.disable()
    return s

stop_by_schedule_id(ws, schedule_id)
If you then run Schedule.list(ws) again, you should get an empty list.
Use Logic Apps for complex triggers
You can create more complex trigger rules or behavior by using Logic Apps.
To use a logic app to trigger a Machine Learning pipeline, you need the REST endpoint for a published Machine Learning pipeline. Create and publish your pipeline. Then find the REST endpoint of your PublishedPipeline by using the pipeline ID:
# You can find the pipeline ID in Azure Machine Learning studio

published_pipeline = PublishedPipeline.get(ws, id="<pipeline-id-here>")
published_pipeline.endpoint
Create a logic app in Azure
Now create a logic app. After your logic app is provisioned, use these steps to configure a trigger for your pipeline:
Create a system-assigned managed identity to give the app access to your Azure Machine Learning workspace.
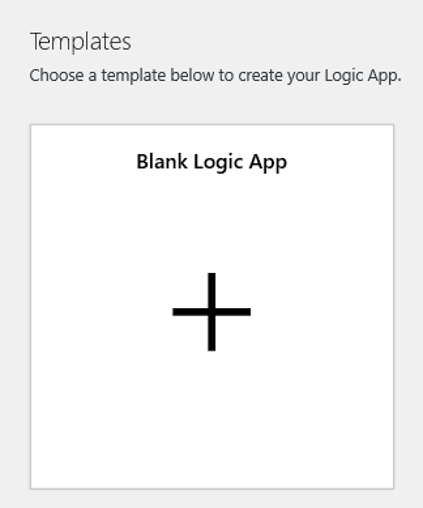
In the left pane, select Logic app templates in the Development Tools section.
Select the Blank workflow template:
In the designer, select Add a trigger.
In the Add a trigger pane, search for blob. Select the When a blob is added or modified (properties only) trigger.
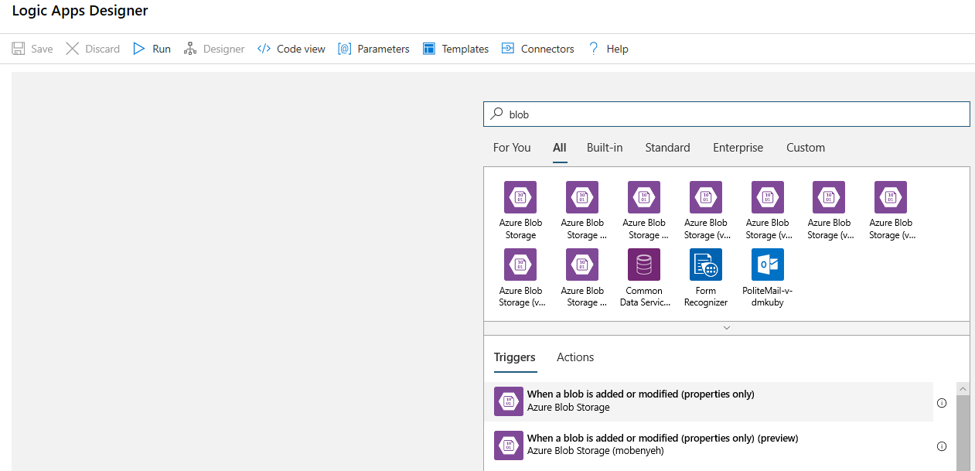
In the Create connection pane, supply the connection information for the Blob Storage account that you want to monitor for blob additions or modifications and then select Create new. Select the container to monitor.
Select Interval and Frequency values that work for you.
Note
This trigger will monitor the selected container but won't monitor subfolders.
Add an HTTP action that will run when a blob is changed or a new blob is detected. Select the plus sign (+) under the trigger and then select Add an action.
In the Add an action pane, select the HTTP action. You can search for it if you don't see it.
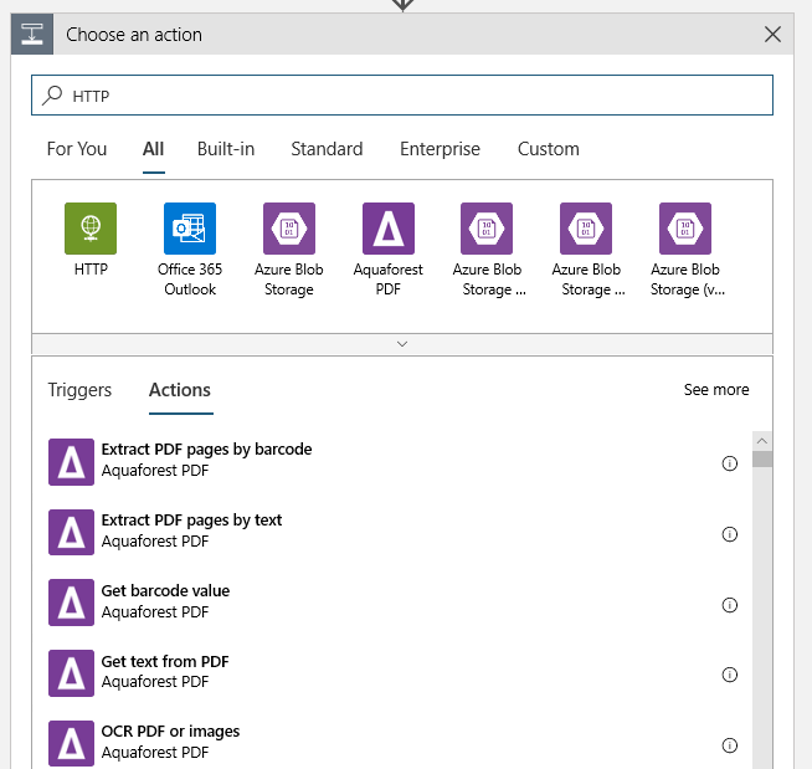
In the resulting pane, select HTTP.
Use the following settings to configure your action:
Setting Value URI The endpoint of the published pipeline. See Prerequisites. Method POST Authentication type (under Advanced settings) Managed Identity Configure your schedule to set the values of any DataPath PipelineParameters that you have:
{
  "DataPathAssignments": {
    "input_datapath": {
      "DataStoreName": "<datastore-name>",
      "RelativePath": "@{triggerBody()?['Name']}"
    }
  },
  "ExperimentName": "MyRestPipeline",
  "ParameterAssignments": {
    "input_string": "sample_string3"
  },
  "RunSource": "SDK"
}
Use the
DataStoreNamethat you added to your workspace as a prerequisite.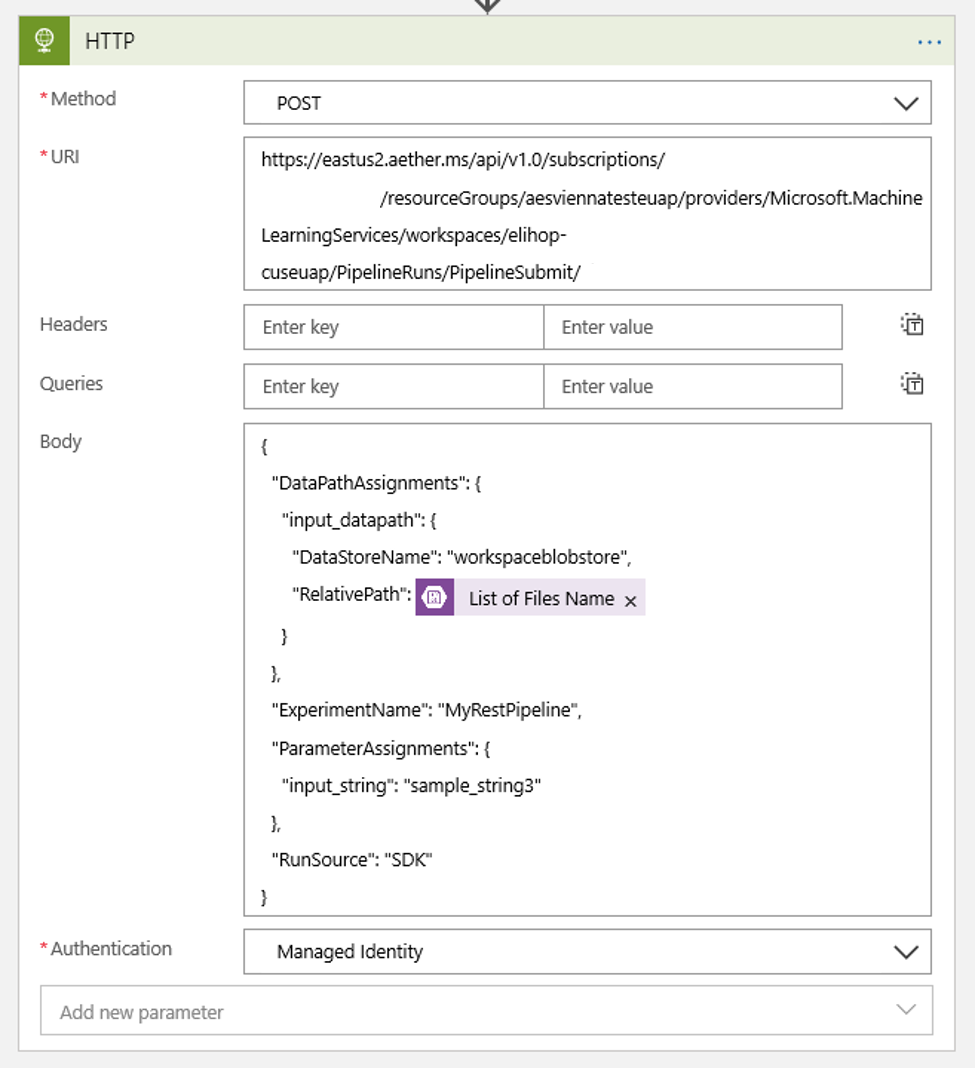
Select Save.

Important
If you use Azure role-based access control (Azure RBAC) to manage access to your pipeline, set the permissions for your pipeline scenario (training or scoring).
Call machine learning pipelines from Azure Data Factory pipelines
In an Azure Data Factory pipeline, the Machine Learning Execute Pipeline activity runs an Azure Machine Learning pipeline. You can find this activity on the Azure Data Factory authoring page under Machine Learning in the menu:

Next steps
In this article, you used the Azure Machine Learning SDK for Python to schedule a pipeline in two different ways. One schedule is triggered based on elapsed clock time. The other schedule is triggered if a file is modified on a specified Datastore or within a directory on that store. You saw how to use the portal to examine the pipeline and individual jobs. You learned how to disable a schedule so that the pipeline stops running. Finally, you created an Azure logic app to trigger a pipeline.
These articles provide more information:
- Use Azure Machine Learning Pipelines for batch scoring
- Learn more about pipelines
- Learn more about exploring Azure Machine Learning with Jupyter