Run batch endpoints from Event Grid events in storage
APPLIES TO:
 Azure CLI ml extension v2 (current)
Python SDK azure-ai-ml v2 (current)
Azure CLI ml extension v2 (current)
Python SDK azure-ai-ml v2 (current)
Event Grid is a fully managed service that you can use to easily manage events across many different Azure services and applications. The service simplifies the way that you build event-driven and serverless applications. This tutorial shows you how to trigger a batch endpoint's job to process files as soon as they're created in a storage account. The architecture uses a logic app workflow to subscribe to those events and trigger the endpoint.
The following diagram shows the architecture for this solution:
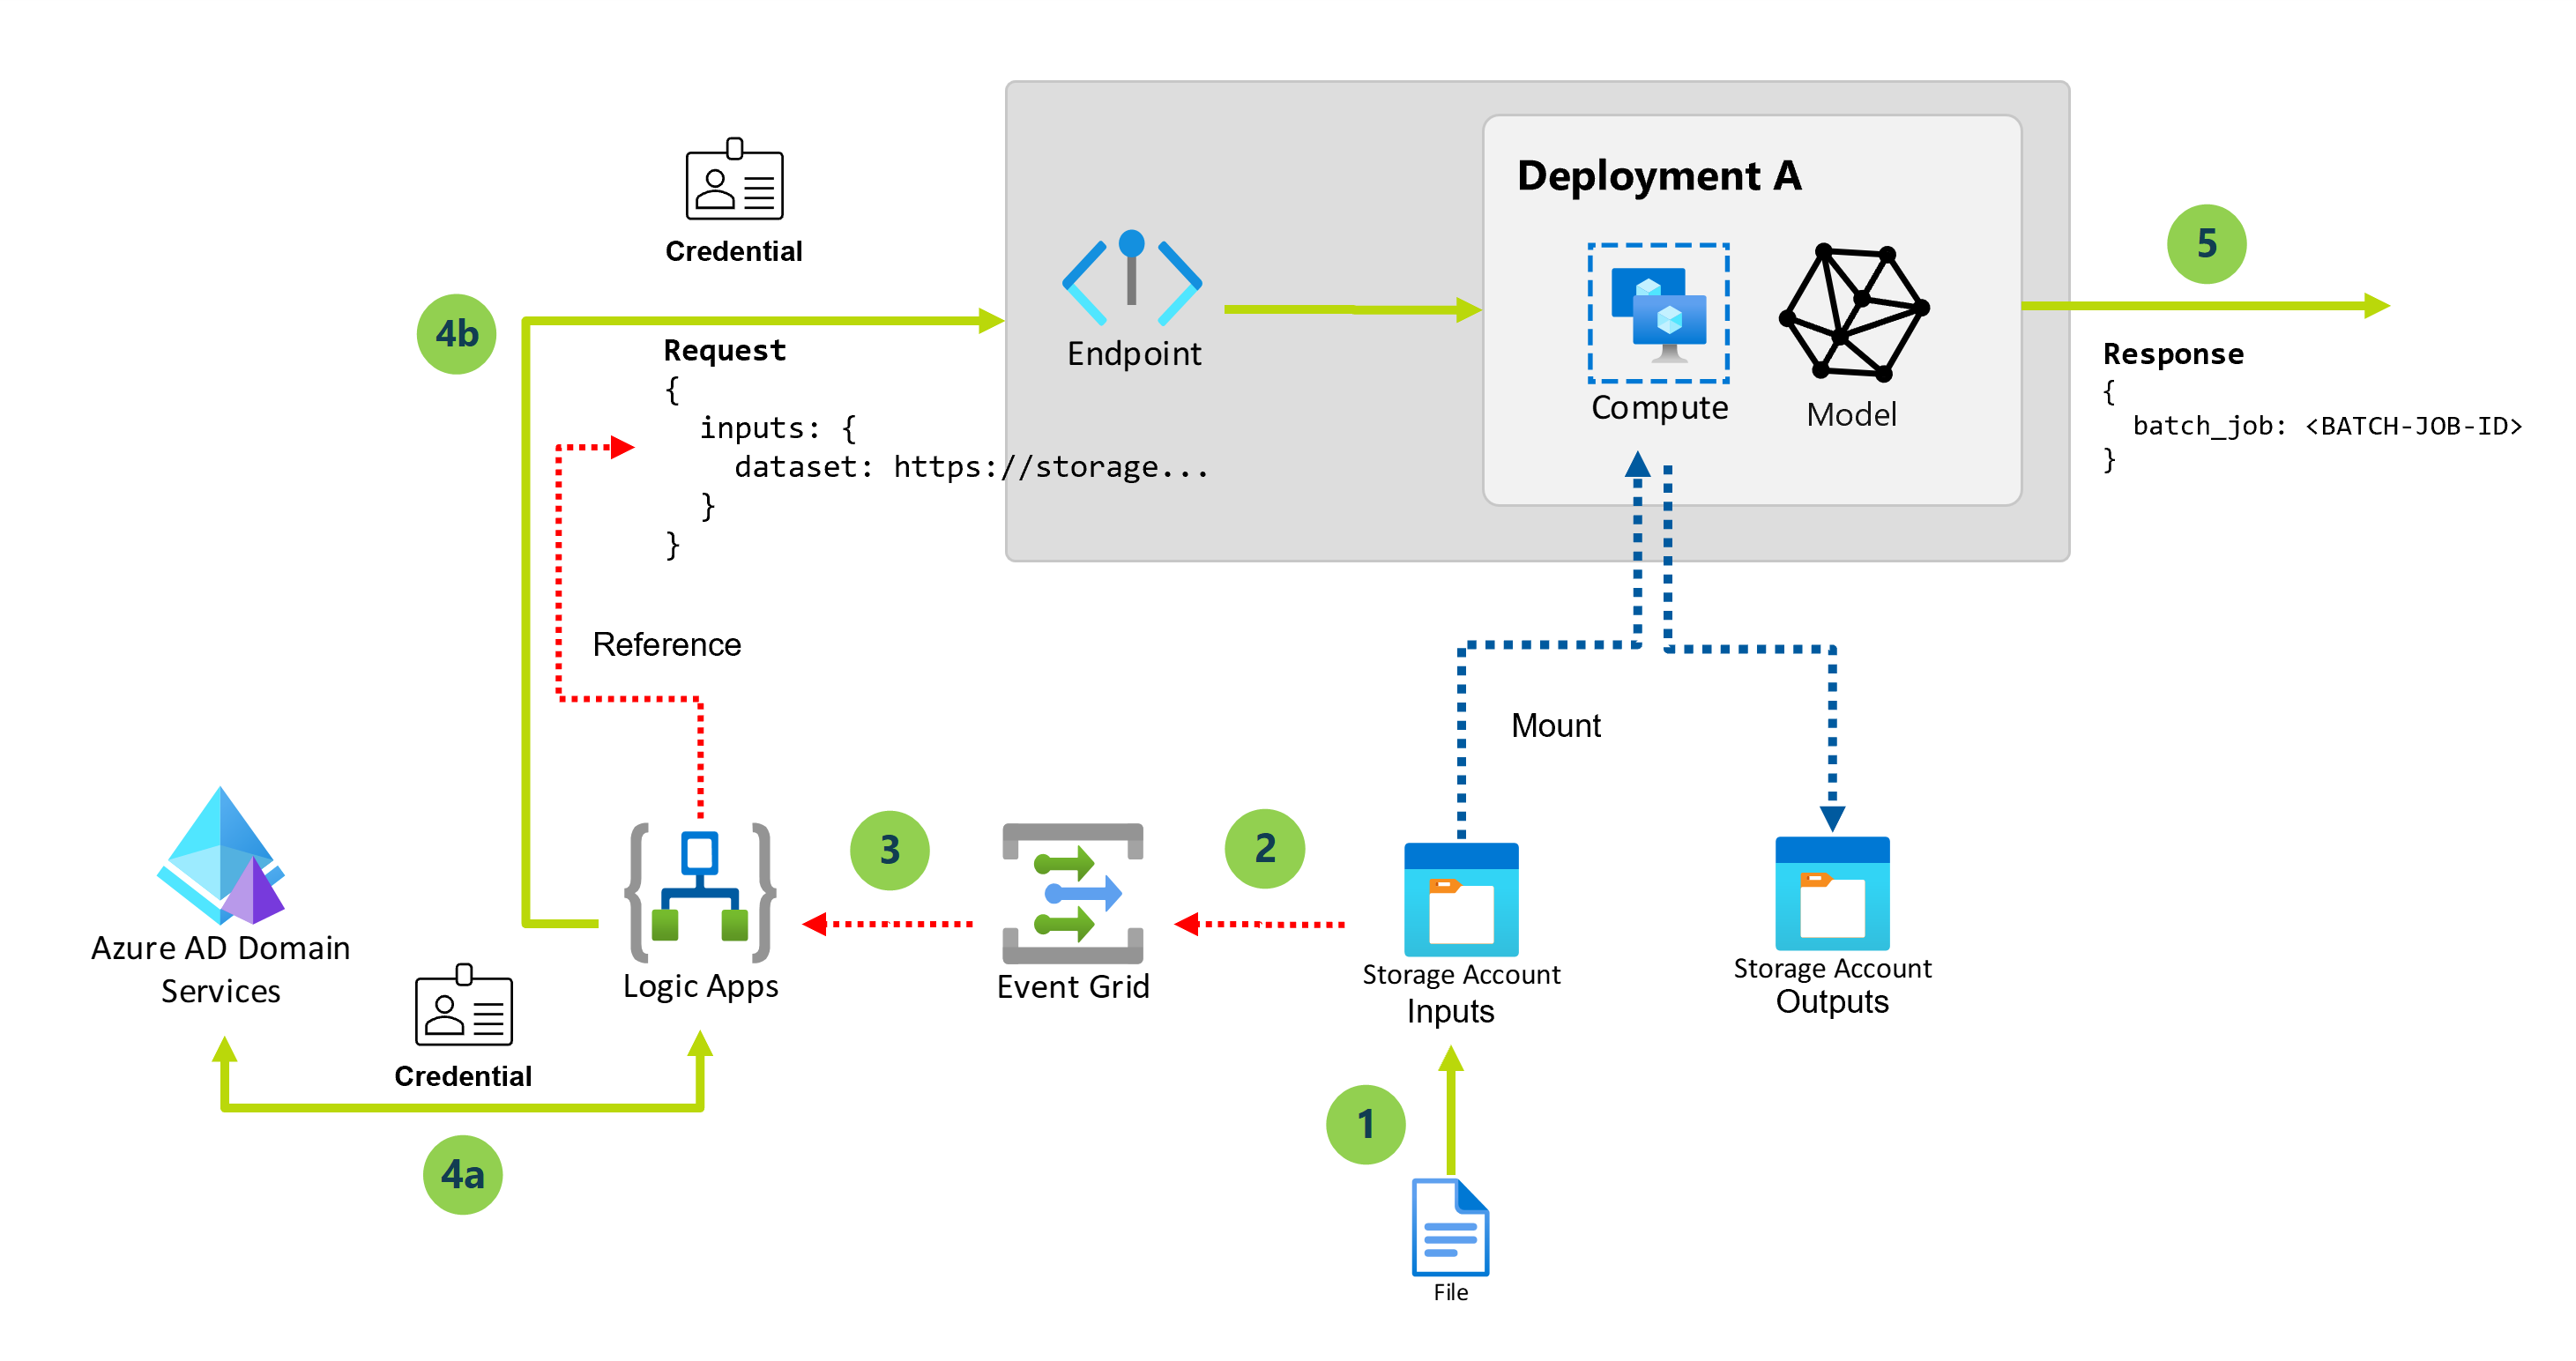
The following steps describe the high-level steps in this solution:
When a new blob is created in a specific storage account, a file created event is triggered.
The event is sent to Event Grid to get processed to all the subscribers.
The logic app workflow subscribes and listens to those events.
The storage account can contain multiple data assets, so event filtering is applied to react only to events happening in a specific folder in the storage account. Further filtering can be done if needed, for example, based on file extensions.
The logic app workflow triggers, and performs the following actions:
Gets an authorization token to invoke batch endpoints using the credentials from a service principal.
Triggers the batch endpoint (default deployment) using the newly created file as input.
The batch endpoint returns the name of the job that was created to process the file.
Important
When you use a logic app workflow that connects with Event Grid to invoke batch endpoint, you generate one job per each blob file created in the storage account. Keep in mind that batch endpoints distribute the work at the file level, so no parallelization happens. Instead, you use the batch endpoints's capability to execute multiple jobs on the same compute cluster. If you need to run jobs on entire folders in an automatic fashion, we recommend that you to switch to Invoking batch endpoints from Azure Data Factory.
Prerequisites
You have a model correctly deployed as a batch endpoint. You can extend this architecture to work with Pipeline component deployments if needed.
Your batch deployment runs in a compute cluster called
batch-cluster.The logic app that you create communicates with Azure Machine Learning batch endpoints using REST.
For more information about how to use the REST API for batch endpoints, see Create jobs and input data for batch endpoints.
Authenticate against batch endpoints
Azure Logic Apps can invoke the REST APIs of batch endpoints by using the HTTP action. Batch endpoints support Microsoft Entra ID for authorization and hence the request made to the APIs require a proper authentication handling.
This tutorial uses a service principal for authentication and interaction with batch endpoints in this scenario.
Create a service principal by following Register an application with Microsoft Entra ID and create a service principal.
Create a secret to use for authentication by following Option 3: Create a new client secret.
Make sure to save the generated client secret Value, which appears only once.
Make sure to save the
client IDand thetenant idin the application's Overview pane.Grant your service principal access to your workspace by following Grant access. For this example, the service principal requires the following:
- Permission in the workspace to read batch deployments and perform actions over them.
- Permissions to read/write in data stores.
Enable data access
To indicate the input data that you want to send to the deployment job, this tutorial uses cloud URIs provided by Event Grid. Batch endpoints use the identity of the compute to mount the data, while keeping the identity of the job to read the mounted data. So, you have to assign a user-assigned managed identity to the compute cluster, and make sure the cluster has access to mount the underlying data. To ensure data access, follow these steps:
Create a managed identity resource:
Update the compute cluster to use the managed identity that we created:
Note
This examples assumes that you have a compute cluster created named
cpu-clusterthat is used for the default deployment in the endpoint.In the Azure portal, make sure the managed identity has the correct permissions to read the data.
To access storage services, you must have at least Storage Blob Data Reader access to the storage account. Only storage account owners can change your access level via the Azure portal.
Create a logic app
In the Azure portal, on the Azure home page, select Create a resource.
On the Azure Marketplace menu, select Integration > Logic App.

On the Create Logic App pane, on the Basics tab, provide the following information about your logic app resource.
Property Required Value Description Subscription Yes <Azure-subscription-name> Your Azure subscription name. This example uses Pay-As-You-Go. Resource Group Yes LA-TravelTime-RG The Azure resource group where you create your logic app resource and related resources. This name must be unique across regions and can contain only letters, numbers, hyphens ( -), underscores (_), parentheses ((,)), and periods (.).Name Yes LA-TravelTime Your logic app resource name, which must be unique across regions and can contain only letters, numbers, hyphens ( -), underscores (_), parentheses ((,)), and periods (.).
Before you continue making selections, go to the Plan section. For Plan type, select Consumption to show only the settings for a Consumption logic app workflow, which runs in multitenant Azure Logic Apps.
Important
For private-link enabled workspaces, you need to use the Standard plan for Azure Logic Apps with allow private networking configuration.
The Plan type property also specifies the billing model to use.
Plan type Description Standard This logic app type is the default selection and runs in single-tenant Azure Logic Apps and uses the Standard pricing model. Consumption This logic app type runs in global, multitenant Azure Logic Apps and uses the Consumption pricing model. Now continue with the following selections:
Property Required Value Description Region Yes West US The Azure datacenter region for storing your app's information. This example deploys the sample logic app to the West US region in Azure.
Note: If your subscription is associated with an integration service environment, this list includes those environments.Enable log analytics Yes No This option appears and applies only when you select the Consumption logic app type. Change this option only when you want to enable diagnostic logging. For this tutorial, keep the default selection. When you're done, select Review + create. After Azure validates the information about your logic app resource, select Create.
After Azure deploys your app, select Go to resource.
Azure opens the workflow designer for your logic app.
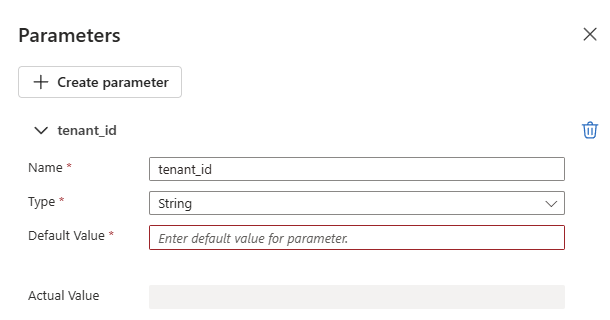
Configure the workflow parameters
This logic app workflow uses parameters to store specific pieces of information that you need to run the batch deployment.
On the workflow designer toolbar, select Parameters.

On the Parameters pane, select Create parameter, and provide the following information about each parameter to create:
Tip
Use the values configured at Authenticating against batch endpoints.
Parameter name Description Sample value tenant_idThe tenant ID where the endpoint is deployed. 00000000-0000-0000-00000000client_idThe client ID for the service principal used to invoke the endpoint. 00000000-0000-0000-00000000client_secretThe client secret of the service principal used to invoke the endpoint. ABCDEFGhijkLMNOPQRstUVwzendpoint_uriThe endpoint scoring URI.
Important: This URI is for the endpoint that you want to execute. The endpoint must have a default deployment configured.https://<endpoint_name>.<region>.inference.ml.azure.com/jobsThe following example shows a sample parameter:
For more information, see Create cross-environment parameters for workflow inputs in Azure Logic Apps.
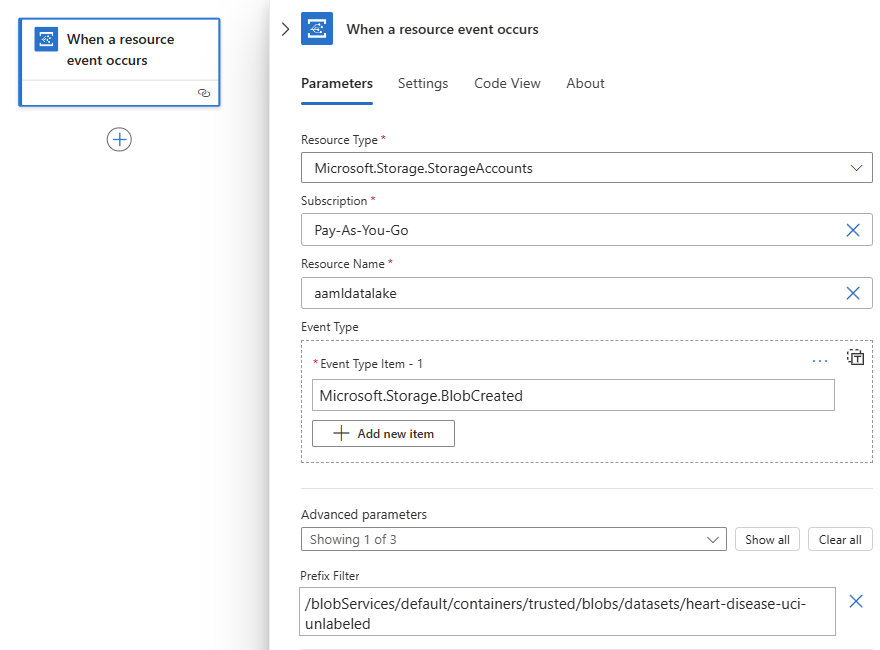
Add the trigger
We want to trigger the logic app workflow each time a new file is created in a specific folder (data asset) of a storage account. The logic app uses the information from the event to invoke the batch endpoint and pass the specific file to process.
On the workflow designer, follow these general steps to add an Event Grid trigger named When a resource event occurs.
In the connection information box, select the authentication type to use, and then select Sign in.
In the trigger box, provide the following information:
Property Value Description Resource Type Microsoft.Storage.StorageAccountsThe resource type emitting the events. Subscription Your subscription name The subscription for the storage account. Resource Name Your storage account name The name of the storage account where the files are generated. Event Type Item Microsoft.Storage.BlobCreatedThe event type. From the Advanced parameters list, select Prefix Filter, and provide the following value:
/blobServices/default/containers/<container-name>/blobs/<path-to-data-folder>
Important
The Prefix Filter property allows Event Grid to only notify the workflow when a blob is created in the specific path we indicated. In this case, we assume that files are created by some external process in the folder specified by <path-to-data-folder> inside the container <container-name>, which is in the selected storage account. Configure this parameter to match the location of your data. Otherwise, the event is fired for any file created at any location of the storage account. For more information, see Event filtering for Event Grid.
The following example shows how the trigger appears:
Configure the actions
Under the When a resource event occurs trigger, follow these general steps to add the HTTP action. Rename the action to Authorize.
In the Authorize action, provide the following information:
Property Value Notes Method POSTThe HTTP method URI concat('https://login.microsoftonline.com/', parameters('tenant_id'), '/oauth2/token')To enter this expression, select inside the URI box. From the options that appear, select the expression editor (formula icon). Headers Content-Typewith valueapplication/x-www-form-urlencodedBody concat('grant_type=client_credentials&client_id=', parameters('client_id'), '&client_secret=', parameters('client_secret'), '&resource=https://ml.azure.com')To enter this expression, select inside the Body box. From the options that appear, select the expression editor (formula icon). The following example shows a sample Authorize action:
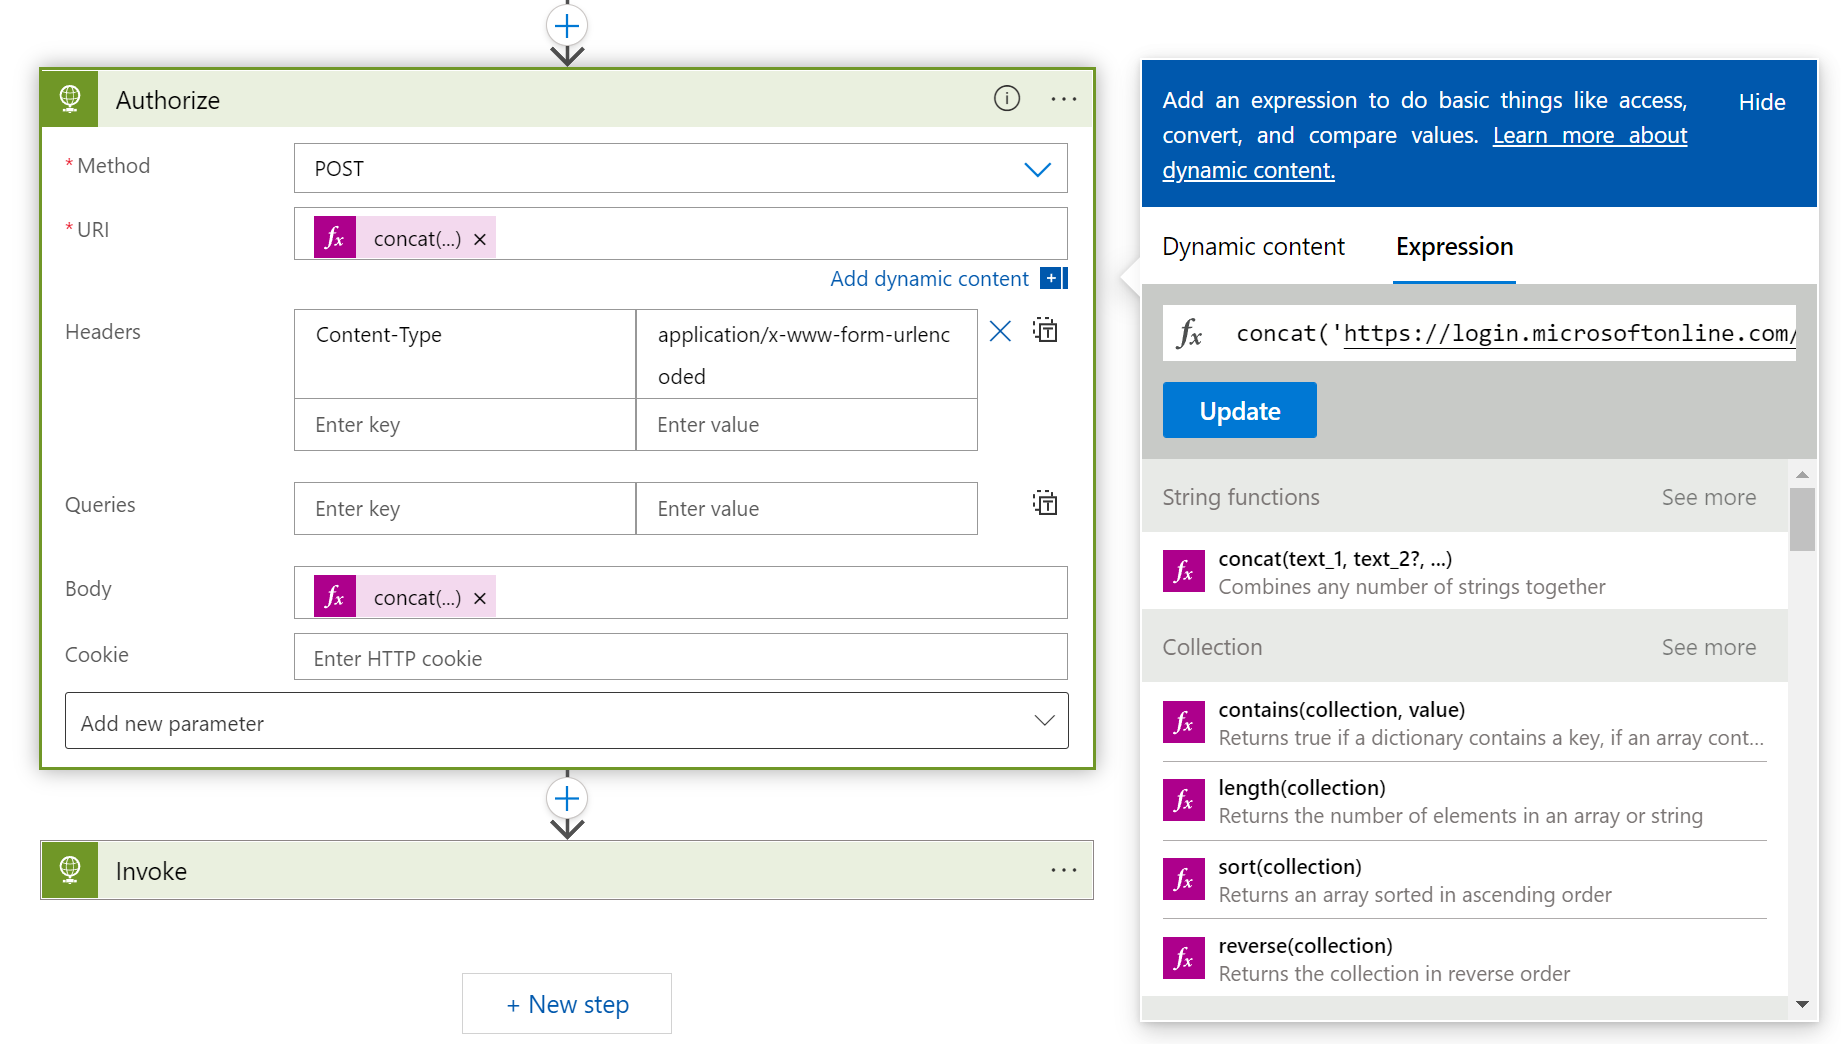
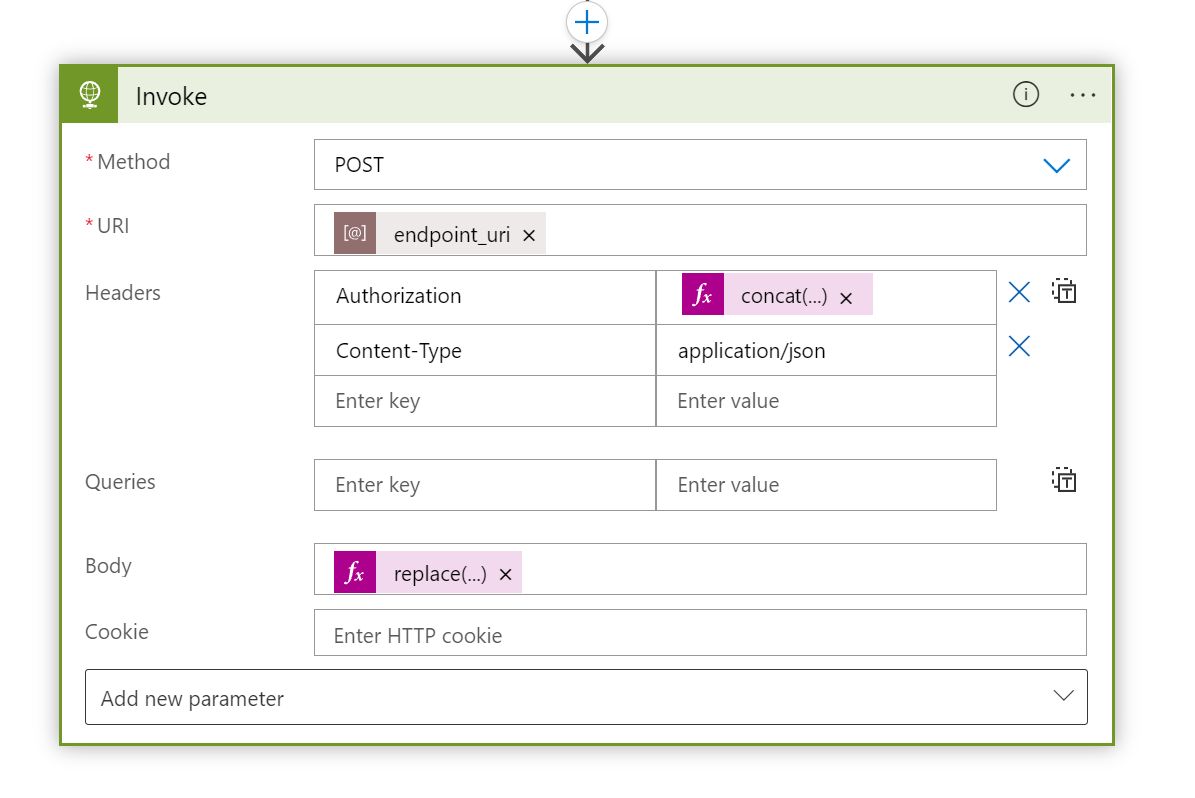
Under the Authorize action, add another HTTP action, and rename the title to Invoke.
In the Invoke action, provide the following information:
Property Value Notes Method POSTThe HTTP method URI endpoint_uriSelect inside the URI box, and then under Parameters, select endpoint_uri. Headers Content-Typewith valueapplication/jsonHeaders Authorizationwith valueconcat('Bearer ', body('Authorize')['access_token'])To enter this expression, select inside the Headers box. From the options that appear, select the expression editor (formula icon). Select inside the Body box, and from the options that appear, select the expression editor (formula icon) to enter the following expression:
replace('{
 "properties": {
   "InputData": {
     "mnistinput": {
        "JobInputType" : "UriFile",
        "Uri" : "<JOB_INPUT_URI>"
     }
   }
  }
}', '<JOB_INPUT_URI>', triggerBody()?[0]['data']['url'])
Tip
The previous payload corresponds to a Model deployment. If you're working with a Pipeline component deployment, adapt the format according to the expectations of the pipeline's inputs. For more information about how to structure the input in REST calls, see Create jobs and input data for batch endpoints (REST).
The following example shows a sample Invoke action:
Note
The Invoke action triggers the batch job, but the action won't wait for its completion. By default, Azure Logic Apps isn't set up for long-running applications. If you need to wait for the job to complete, we recommend you to switch to Run batch endpoints from Azure Data Factory.
When you're done, save your workflow.
The logic app workflow is ready to execute and automatically triggers each time a new file is created under the indicated path.
To confirm that the app successfully received an event, check the app's Runs history:

Next steps
Feedback
Coming soon: Throughout 2024 we will be phasing out GitHub Issues as the feedback mechanism for content and replacing it with a new feedback system. For more information see: https://aka.ms/ContentUserFeedback.
Submit and view feedback for