Customize environment for runtime
Customize environment with docker context for runtime
This section assumes you have knowledge of Docker and Azure Machine Learning environments.
Step-1: Prepare the docker context
Create image_build folder
In your local environment, create a folder contains following files, the folder structure should look like this:
|--image_build
|  |--requirements.txt
|  |--Dockerfile
|  |--environment.yaml
Define your required packages in requirements.txt
Optional: Add packages in private pypi repository.
Using the following command to download your packages to local: pip wheel <package_name> --index-url=<private pypi> --wheel-dir <local path to save packages>
Open the requirements.txt file and add your extra packages and specific version in it. For example:
###### Requirements with Version Specifiers ######
langchain == 0.0.149        # Version Matching. Must be version 0.0.149
keyring >= 4.1.1            # Minimum version 4.1.1
coverage != 3.5             # Version Exclusion. Anything except version 3.5
Mopidy-Dirble ~= 1.1        # Compatible release. Same as >= 1.1, == 1.*
<path_to_local_package>     # reference to local pip wheel package
For more information about structuring the requirements.txt file, see Requirements file format in the pip documentation.
Note
Don't pin the version of promptflow and promptflow-tools in requirements.txt, because we already include them in the runtime base image.
Define the Dockerfile
Create a Dockerfile and add the following content, then save the file:
FROM <Base_image>
COPY ./* ./
RUN pip install -r requirements.txt
Note
This docker image should be built from prompt flow base image that is mcr.microsoft.com/azureml/promptflow/promptflow-runtime:<newest_version>. If possible use the latest version of the base image.
Step 2: Create custom Azure Machine Learning environment
Define your environment in environment.yaml
In your local compute, you can use the CLI (v2) to create a customized environment based on your docker image.
Note
- Make sure to meet the prerequisites for creating environment.
- Ensure you have connected to your workspace.
az login # if not already authenticated

az account set --subscription <subscription ID>
az configure --defaults workspace=<Azure Machine Learning workspace name> group=<resource group>
Open the environment.yaml file and add the following content. Replace the <environment_name> placeholder with your desired environment name.
$schema: https://azuremlschemas.azureedge.net/latest/environment.schema.json
name: <environment_name>
build:
  path: .
Create an environment
cd image_build
az ml environment create -f environment.yaml --subscription <sub-id> -g <resource-group> -w <workspace>
Note
Building the environment image may take several minutes.
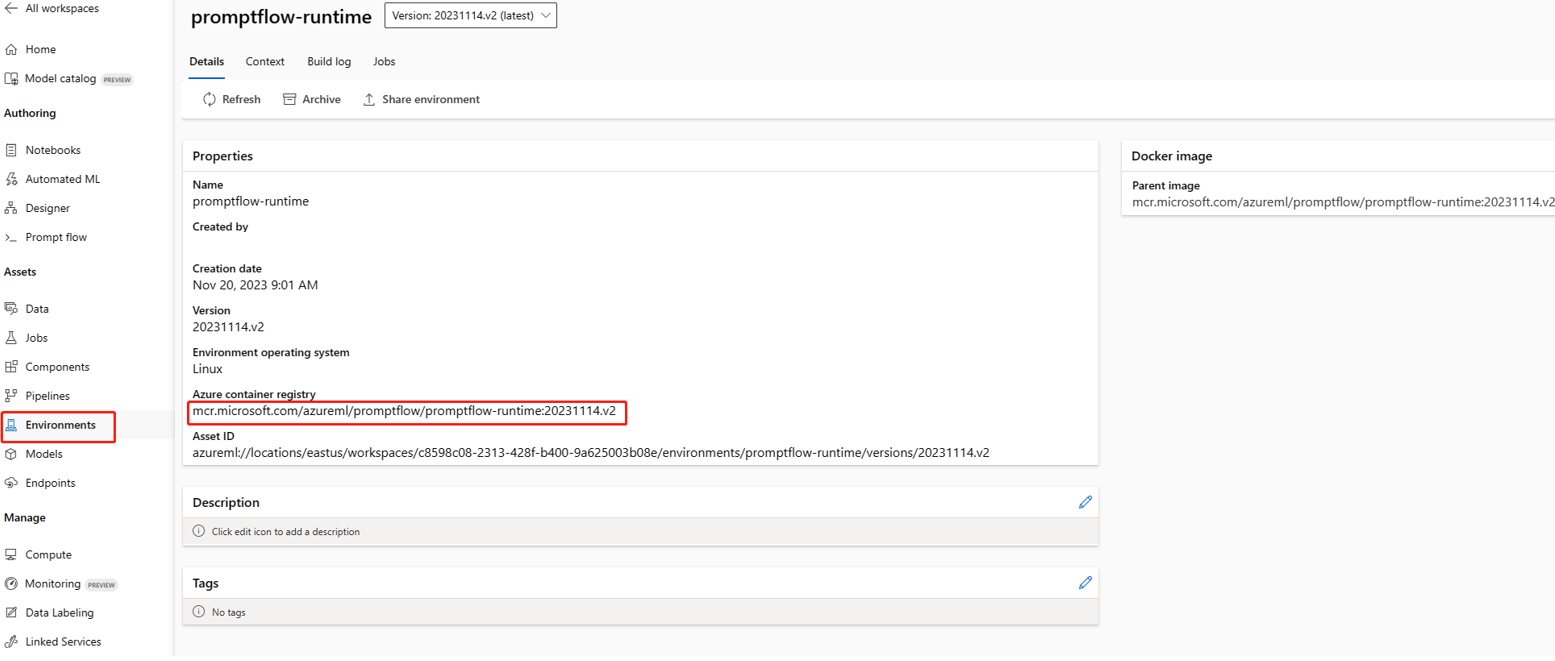
Go to your workspace UI page, then go to the environment page, and locate the custom environment you created. You can now use it to create a compute instance runtime in your prompt flow. To learn more, see Create compute instance runtime in UI.
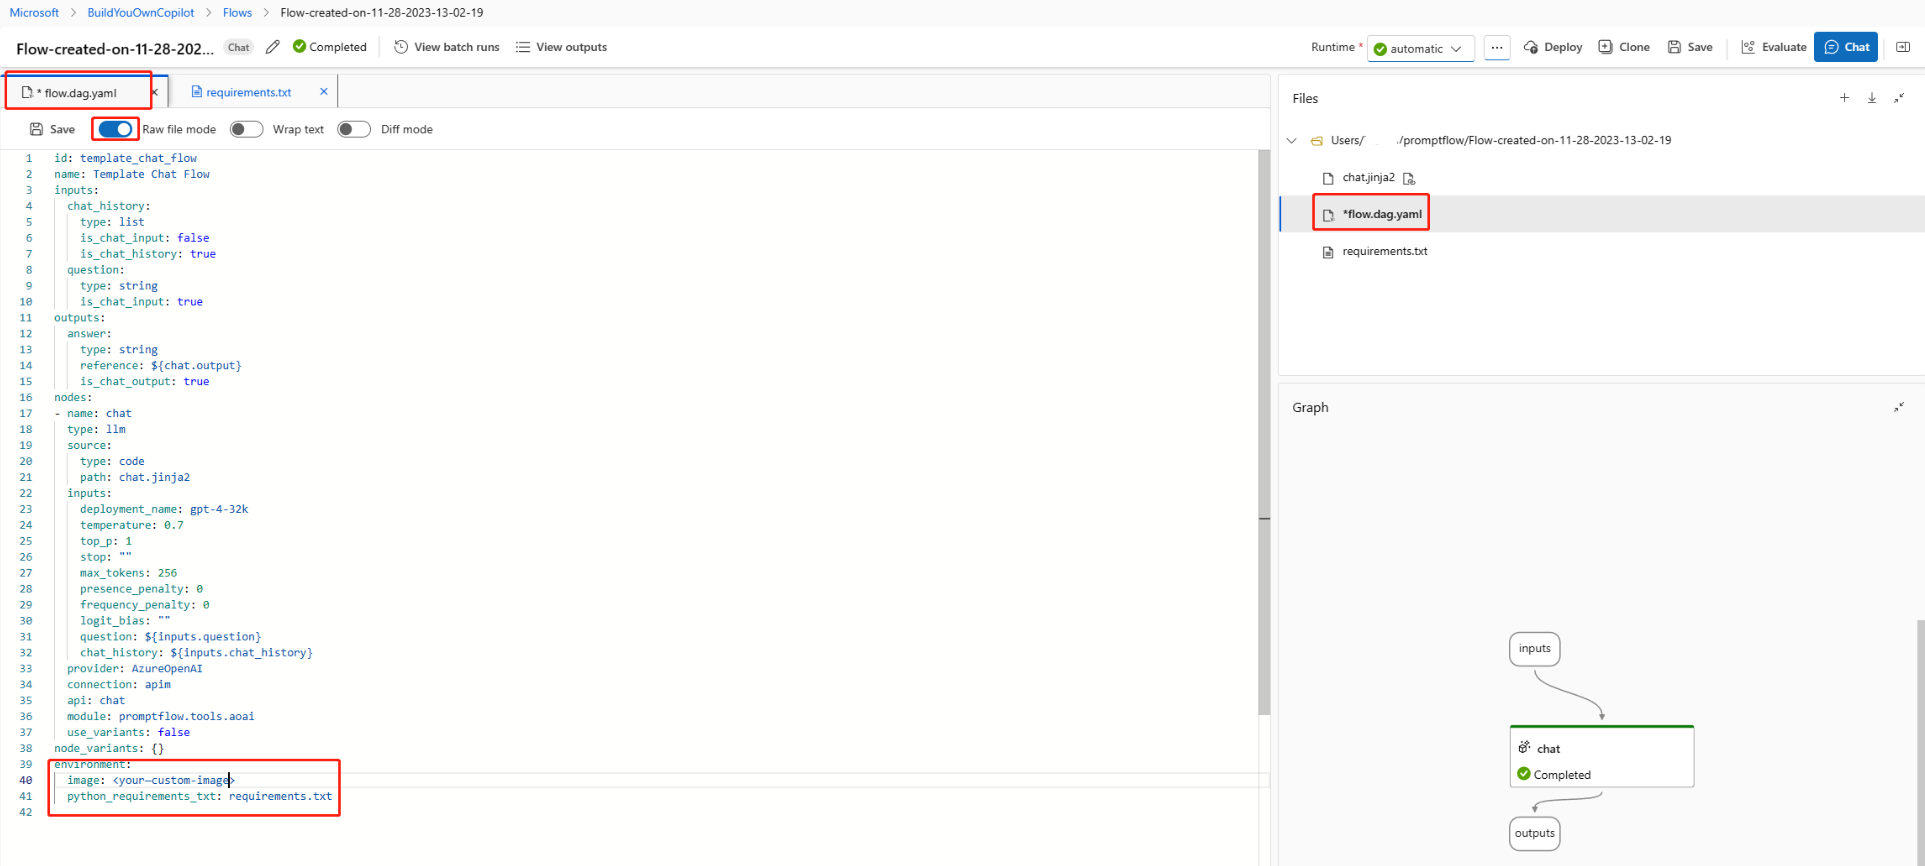
You can also find the image in environment detail page and use it as base image in automatic runtime (preview) in flow.dag.yaml file in prompt flow folder. This image will also be used to build environment for flow deployment from UI.
To learn more about environment CLI, see Manage environments.
Customize environment with flow folder for automatic runtime (preview)
In flow.dag.yaml file in prompt flow folder, you can use environment section we can define the environment for the flow. It includes two parts:
- image: which is the base image for the flow, if omitted, it uses the latest version of prompt flow base image
mcr.microsoft.com/azureml/promptflow/promptflow-runtime:<newest_version>. If you want to customize the environment, you can use the image you created in previous section. - You can also specify packages
requirements.txt, Both automatic runtime and flow deployment from UI will use the environment defined inflow.dag.yamlfile.
If you want to use private feeds in Azure devops, see Add packages in private feed in Azure devops.
Create a custom application on compute instance that can be used as prompt flow compute instance runtime
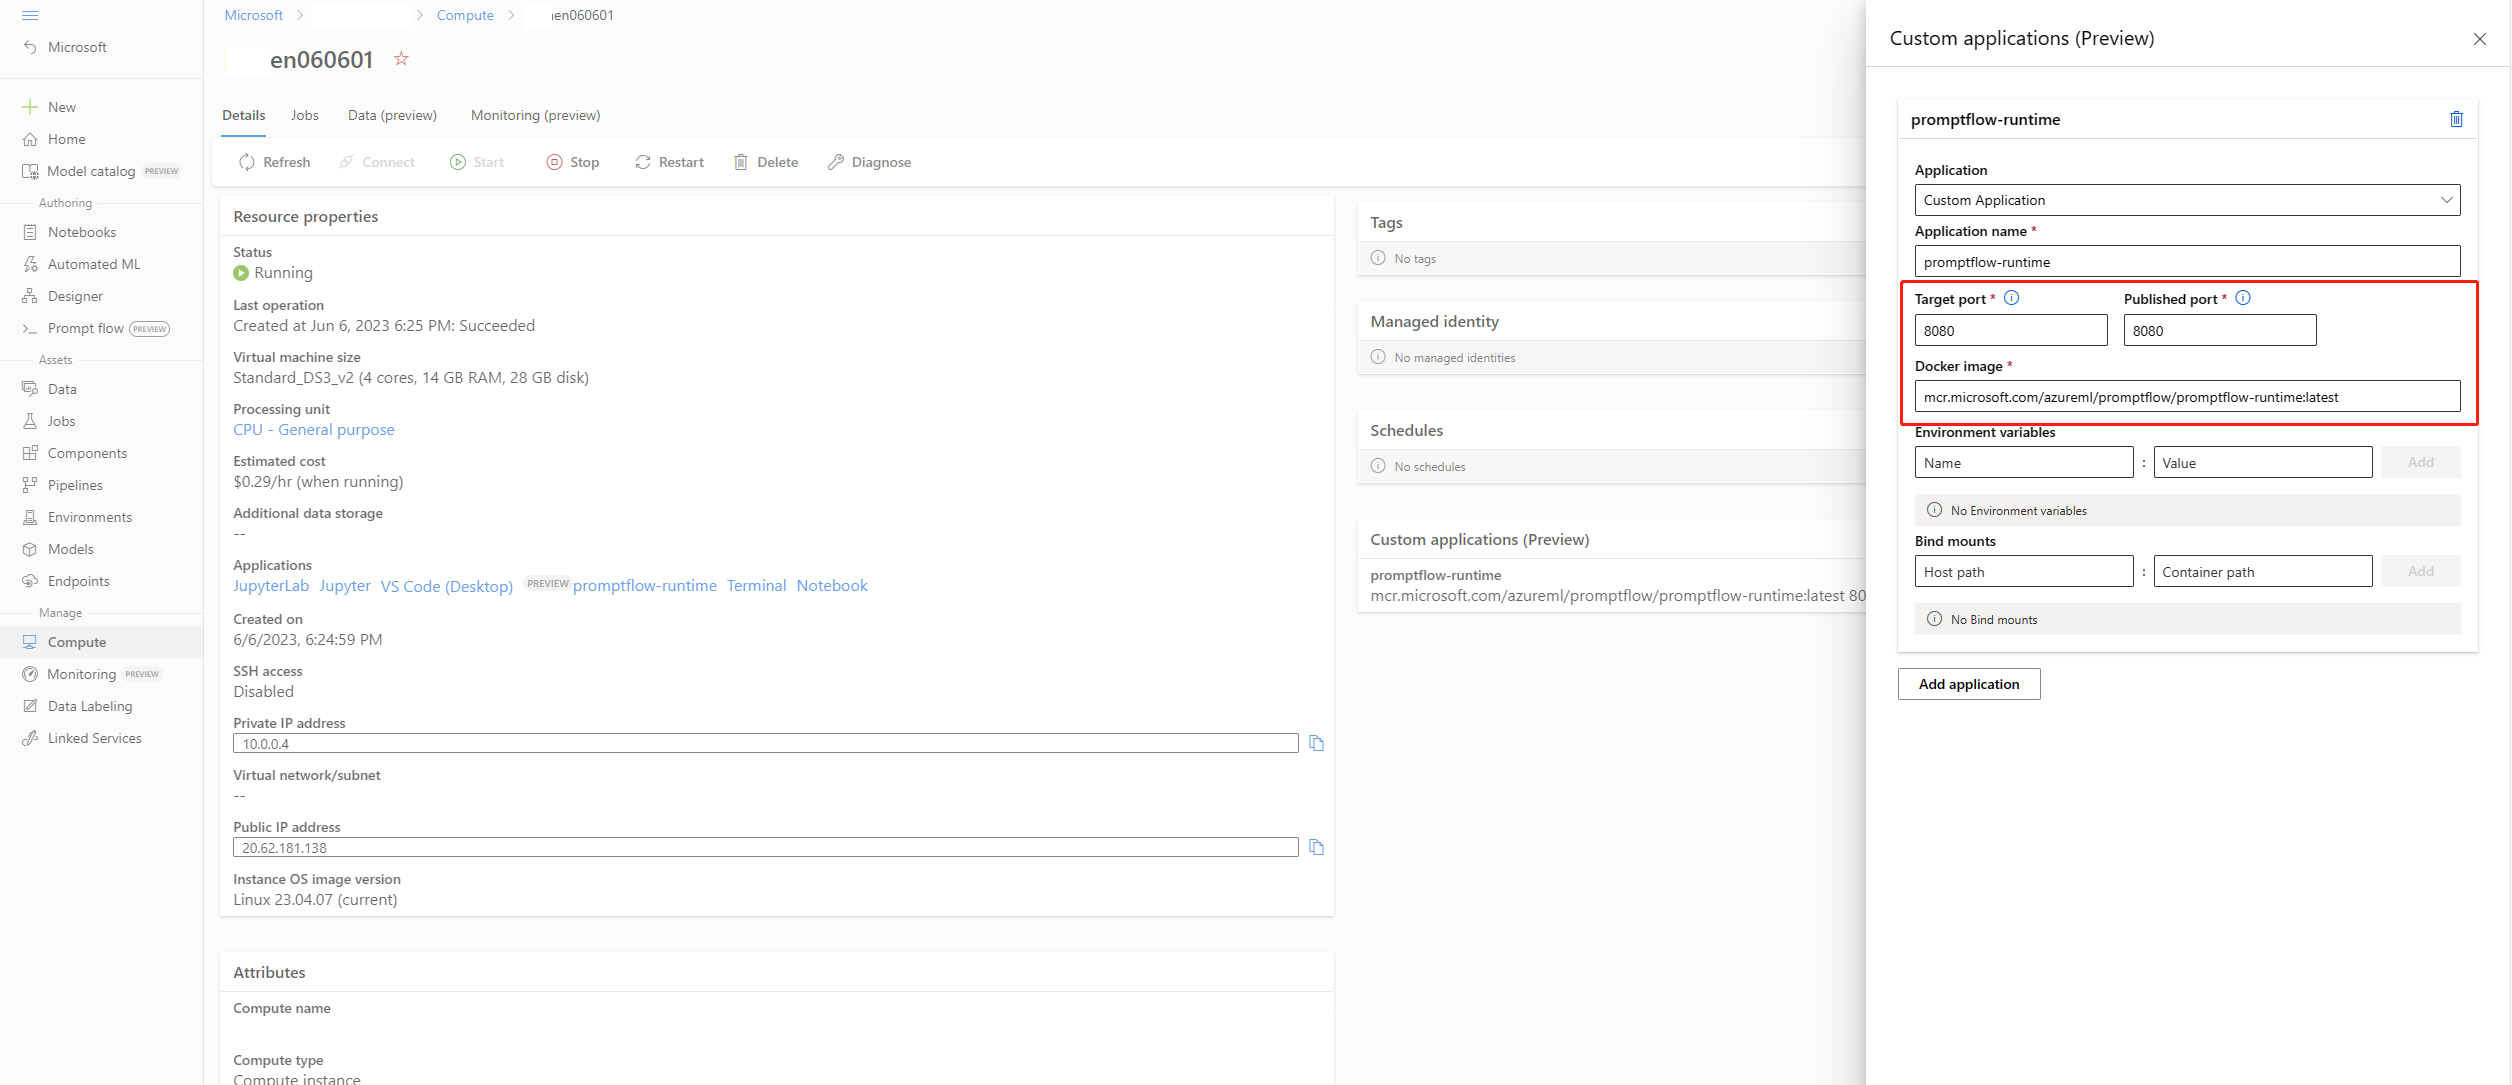
A compute instance runtime is a custom application that runs on a compute instance. You can create a custom application on a compute instance and then use it as a prompt flow runtime. To create a custom application for this purpose, you need to specify the following properties:
| UI | SDK | Note |
|---|---|---|
| Docker image | ImageSettings.reference | Image used to build this custom application |
| Target port | EndpointsSettings.target | Port where you want to access the application, the port inside the container |
| published port | EndpointsSettings.published | Port where your application is running in the image, the publicly exposed port |
Create custom application as prompt flow compute instance runtime via SDK v2
import os
from azure.ai.ml import MLClient
from azure.ai.ml.entities import ComputeInstance, CustomApplications, EndpointsSettings, ImageSettings, VolumeSettings, WorkspaceConnection
from azure.identity import DefaultAzureCredential, InteractiveBrowserCredential

try:
    credential = DefaultAzureCredential()
    # Check if given credential can get token successfully.
    credential.get_token("https://management.azure.com/.default")
except Exception as ex:
    # Fall back to InteractiveBrowserCredential in case DefaultAzureCredential not work
    credential = InteractiveBrowserCredential()

ml_client = MLClient.from_config(credential=credential)

image = ImageSettings(reference='mcr.microsoft.com/azureml/promptflow/promptflow-runtime-stable:<newest_version>')
endpoints = [EndpointsSettings(published=8081, target=8080)]

app = CustomApplications(name='promptflow-runtime',endpoints=endpoints,bind_mounts=[],image=image,environment_variables={})

ci_basic_name = "<compute_instance_name>"
ci_basic = ComputeInstance(name=ci_basic_name, size="<instance_type>",custom_applications=[app])

ml_client.begin_create_or_update(ci_basic)
Note
Change newest_version, compute_instance_name and instance_type to your own value.
Create custom application as compute instance runtime via Azure Resource Manager template
You can use this Azure Resource Manager template to create compute instance with custom application.
To learn more, see Azure Resource Manager template for custom application as prompt flow runtime on compute instance.
Create custom application as prompt flow compute instance runtime via Compute instance UI
Follow this document to add custom application.
Next steps
Feedback
Coming soon: Throughout 2024 we will be phasing out GitHub Issues as the feedback mechanism for content and replacing it with a new feedback system. For more information see: https://aka.ms/ContentUserFeedback.
Submit and view feedback for


