Note
Access to this page requires authorization. You can try signing in or changing directories.
Access to this page requires authorization. You can try changing directories.
After you build a flow and test it properly, you might want to deploy it as an endpoint so that you can invoke the endpoint for real-time inference.
In this article, you'll learn how to deploy a flow as a managed online endpoint for real-time inference. The steps you'll take are:
- Test your flow and get it ready for deployment
- Create an online deployment
- Grant permissions to the endpoint
- Test the endpoint
- Consume the endpoint
Important
Items marked (preview) in this article are currently in public preview. The preview version is provided without a service level agreement, and it's not recommended for production workloads. Certain features might not be supported or might have constrained capabilities. For more information, see Supplemental Terms of Use for Microsoft Azure Previews.
Prerequisites
Have basic understanding on managed online endpoints. Managed online endpoints work with powerful CPU and GPU machines in Azure in a scalable, fully managed way that frees you from the overhead of setting up and managing the underlying deployment infrastructure. For more information on managed online endpoints, see Online endpoints and deployments for real-time inference.
Azure role-based access controls (Azure RBAC) are used to grant access to operations in Azure Machine Learning. To be able to deploy an endpoint in prompt flow, your user account must be assigned the AzureML Data scientist or role with more privileges for the Azure Machine Learning workspace.
Have basic understanding on managed identities. Learn more about managed identities.
Note
Managed online endpoint only supports managed virtual network. If your workspace is in custom vnet, you need to try other deployment options, such as deploy to Kubernetes online endpoint using CLI/SDK, or deploy to other platforms such as Docker.
Build the flow and get it ready for deployment
If you already completed the get started tutorial, you've already tested the flow properly by submitting batch run and evaluating the results.
If you didn't complete the tutorial, you need to build a flow. Testing the flow properly by batch run and evaluation before deployment is a recommended best practice.
We'll use the sample flow Web Classification as example to show how to deploy the flow. This sample flow is a standard flow. Deploying chat flows is similar. Evaluation flow doesn't support deployment.
Define the environment used by deployment
When you deploy prompt flow to managed online endpoint in UI, by default the deployment will use the environment created based on the latest prompt flow image and dependencies specified in the requirements.txt of the flow. You can specify extra packages you needed in requirements.txt. You can find requirements.txt in the root folder of your flow folder.

Note
If you are using private feeds in Azure devops, you need build the image with private feeds first and select custom environment to deploy in UI.
Create an online deployment
Now that you have built a flow and tested it properly, it's time to create your online endpoint for real-time inference.
The prompt flow supports you to deploy endpoints from a flow, or a batch run. Testing your flow before deployment is recommended best practice.
In the flow authoring page or run detail page, select Deploy.
Flow authoring page:

Run detail page:

A wizard for you to configure the endpoint occurs and include following steps.
Basic settings

This step allows you to configure the basic settings of the deployment.
| Property | Description |
|---|---|
| Endpoint | You can select whether you want to deploy a new endpoint or update an existing endpoint. If you select New, you need to specify the endpoint name. |
| Deployment name | - Within the same endpoint, deployment name should be unique. - If you select an existing endpoint, and input an existing deployment name, then that deployment will be overwritten with the new configurations. |
| Virtual machine | The VM size to use for the deployment. For the list of supported sizes, see Managed online endpoints SKU list. |
| Instance count | The number of instances to use for the deployment. Specify the value on the workload you expect. For high availability, we recommend that you set the value to at least 3. We reserve an extra 20% for performing upgrades. For more information, see managed online endpoints quotas |
| Inference data collection | If you enable this, the flow inputs and outputs will be auto collected in an Azure Machine Learning data asset, and can be used for later monitoring. To learn more, see how to monitor generative ai applications. |
After you finish the basic settings, you can directly Review+Create to finish the creation, or you can select Next to configure Advanced settings.
Advanced settings - Endpoint
You can specify the following settings for the endpoint.

Authentication type
The authentication method for the endpoint. Key-based authentication provides a primary and secondary key that doesn't expire. Azure Machine Learning token-based authentication provides a token that periodically refreshes automatically. For more information on authenticating, see Authenticate to an online endpoint.
Identity type
The endpoint needs to access Azure resources such as the Azure Container Registry or your workspace connections for inferencing. You can allow the endpoint permission to access Azure resources via giving permission to its managed identity.
System-assigned identity will be autocreated after your endpoint is created, while user-assigned identity is created by user. Learn more about managed identities.
System-assigned
You'll notice there is an option whether Enforce access to connection secrets (preview). If your flow uses connections, the endpoint needs to access connections to perform inference. The option is by default enabled, the endpoint will be granted Azure Machine Learning Workspace Connection Secrets Reader role to access connections automatically if you have connection secrets reader permission. If you disable this option, you need to grant this role to the system-assigned identity manually by yourself or ask help from your admin. Learn more about how to grant permission to the endpoint identity.
User-Assigned
When creating the deployment, Azure tries to pull the user container image from the workspace Azure Container Registry (ACR) and mount the user model and code artifacts into the user container from the workspace storage account.
If you created the associated endpoint with User Assigned Identity, user-assigned identity must be granted following roles before the deployment creation; otherwise, the deployment creation will fail.
| Scope | Role | Why it's needed |
|---|---|---|
| Azure Machine Learning Workspace | Azure Machine Learning Workspace Connection Secrets Reader role OR a customized role with "Microsoft.MachineLearningServices/workspaces/connections/listsecrets/action" | Get workspace connections |
| Workspace container registry | ACR pull | Pull container image |
| Workspace default storage | Storage Blob Data Reader | Load model from storage |
| (Optional) Azure Machine Learning Workspace | Workspace metrics writer | After you deploy then endpoint, if you want to monitor the endpoint related metrics like CPU/GPU/Disk/Memory utilization, you need to give this permission to the identity. |
See detailed guidance about how to grant permissions to the endpoint identity in Grant permissions to the endpoint.
Important
If your flow uses Microsoft Entra ID based authentication connections, no matter you use system-assigned identity or user-assigned identity, you always need to grant the managed identity appropriate roles of the corresponding resources so that it can make API calls to that resource. For example, if your Azure OpenAI connection uses Microsoft Entra ID based authentication, you need to grant your endpoint managed identity Cognitive Services OpenAI User or Cognitive Services OpenAI Contributor role of the corresponding Azure OpenAI resources.
Advanced settings - Deployment
In this step, except tags, you can also specify the environment used by the deployment.

Use environment of current flow definition
By default the deployment will use the environment created based on the base image specified in the flow.dag.yaml and dependencies specified in the requirements.txt.
You can specify the base image in the
flow.dag.yamlby selectingRaw file modeof the flow. If there is no image specified, the default base image is the latest prompt flow base image.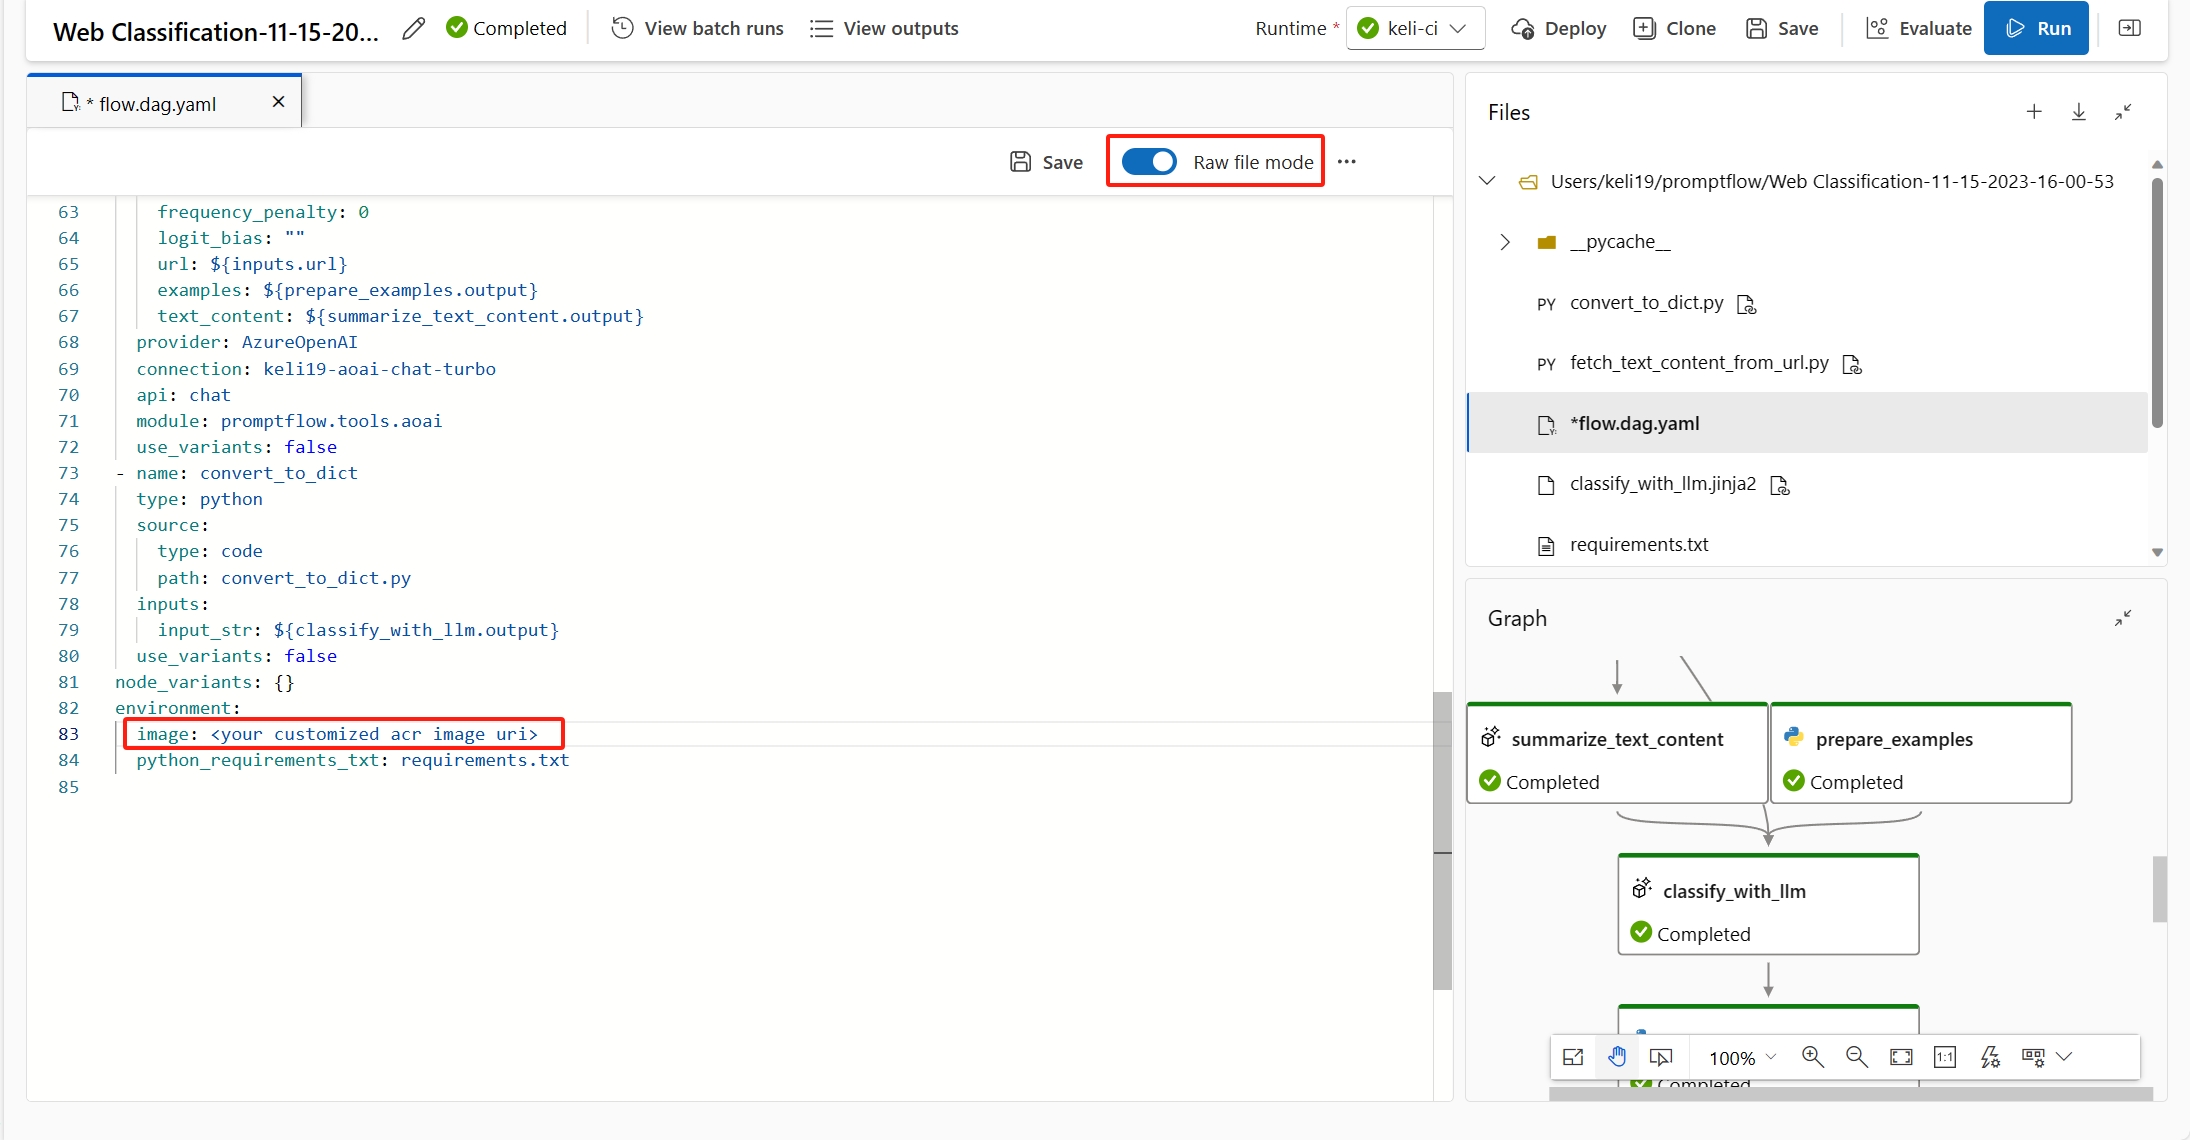
You can find
requirements.txtin the root folder of your flow folder, and add dependencies within it.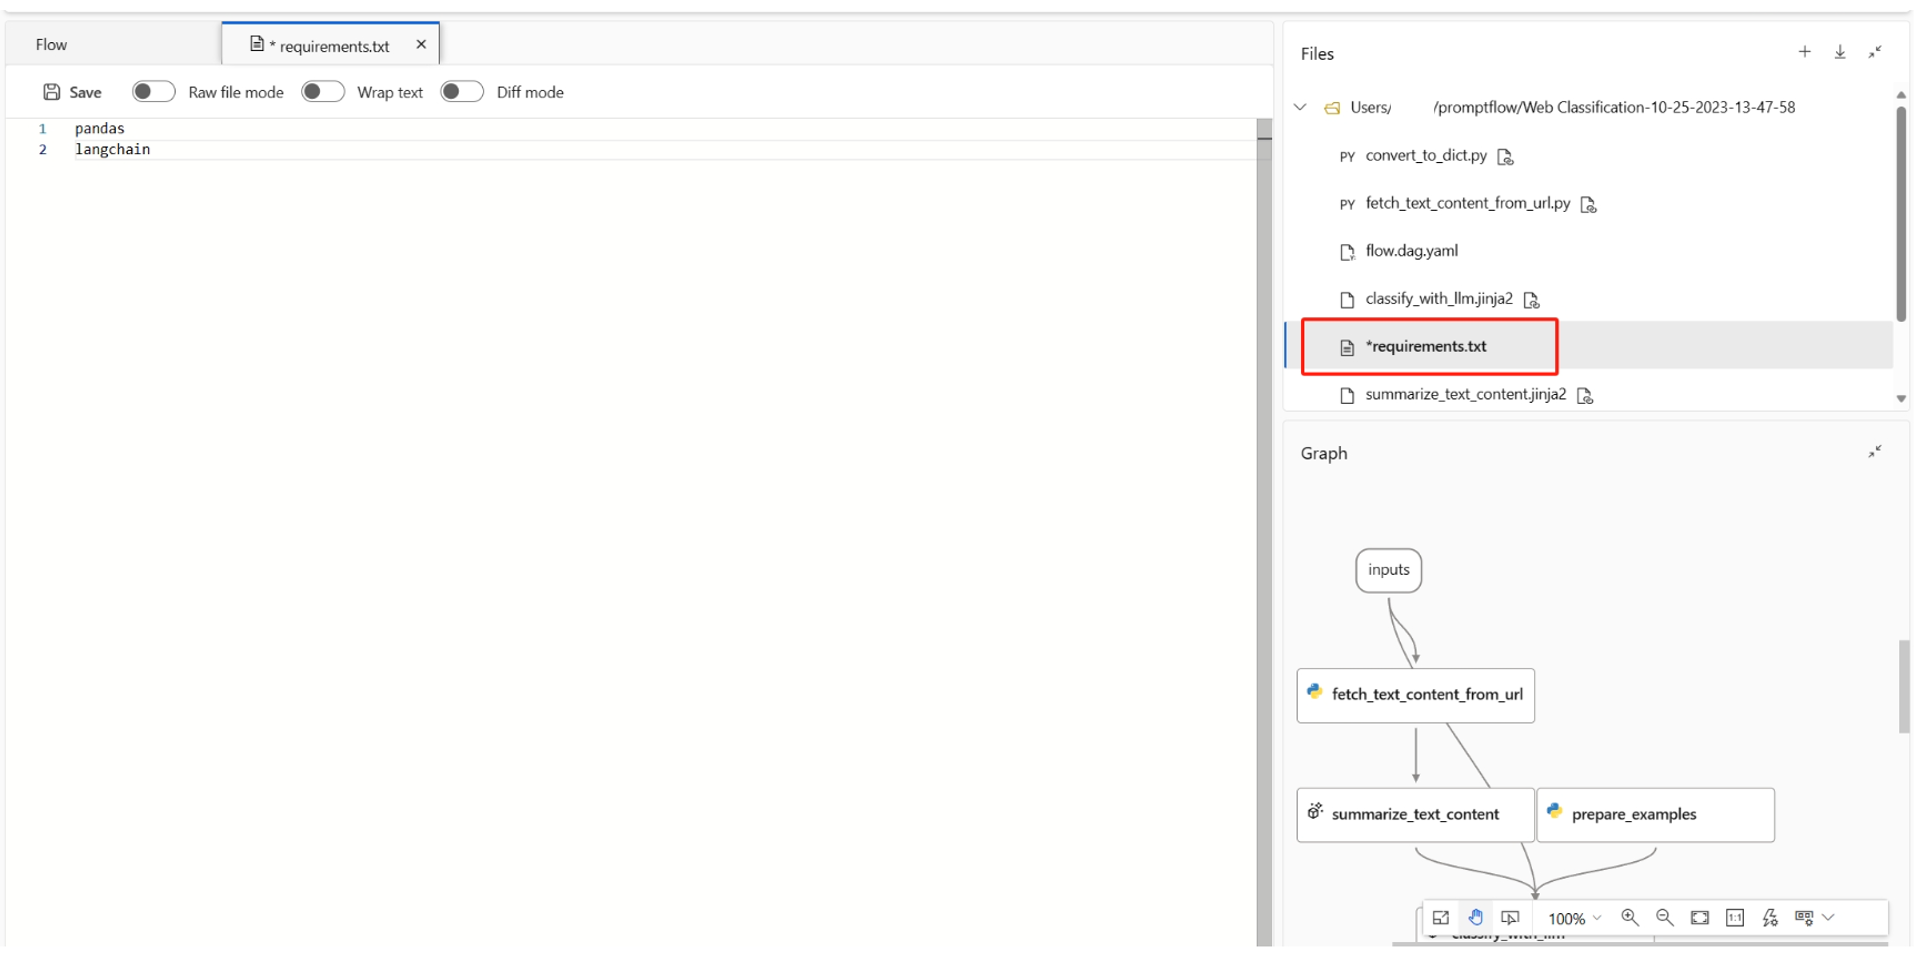

Use customized environment
You can also create customized environment and use it for the deployment.
Note
Your custom environment must satisfy following requirements:
- the docker image must be created based on prompt flow base image,
mcr.microsoft.com/azureml/promptflow/promptflow-runtime-stable:<newest_version>. You can find the newest version here. - the environment definition must include the
inference_config.
Following is an example of customized environment definition.
$schema: https://azuremlschemas.azureedge.net/latest/environment.schema.json
name: pf-customized-test
build:
  path: ./image_build
  dockerfile_path: Dockerfile
description: promptflow customized runtime
inference_config:
  liveness_route:
    port: 8080
    path: /health
  readiness_route:
    port: 8080
    path: /health
  scoring_route:
    port: 8080
    path: /score
Enable tracing by turning-on Application Insights diagnostics (preview)
If you enable this, tracing data and system metrics during inference time (such as token count, flow latency, flow request, and etc.) will be collected into workspace linked Application Insights. To learn more, see prompt flow serving tracing data and metrics.
If you want to specify a different Application Insights other than the workspace linked one, you can configure by CLI.
Advanced settings - Outputs & Connections
In this step, you can view all flow outputs, and specify which outputs will be included in the response of the endpoint you deploy. By default all flow outputs are selected.
You can also specify the connections used by the endpoint when it performs inference. By default they're inherited from the flow.
Once you configured and reviewed all the steps above, you can select Review+Create to finish the creation.
Note
Expect the endpoint creation to take approximately more than 15 minutes, as it contains several stages including creating endpoint, registering model, creating deployment, etc.
You can understand the deployment creation progress via the notification starts by Prompt flow deployment.

Grant permissions to the endpoint
Important
Granting permissions (adding role assignment) is only enabled to the Owner of the specific Azure resources. You might need to ask your IT admin for help. It's recommended to grant roles to the user-assigned identity before the deployment creation. It maight take more than 15 minutes for the granted permission to take effect.
You can grant all permissions in Azure portal UI by following steps.
Go to the Azure Machine Learning workspace overview page in Azure portal.
Select Access control, and select Add role assignment.
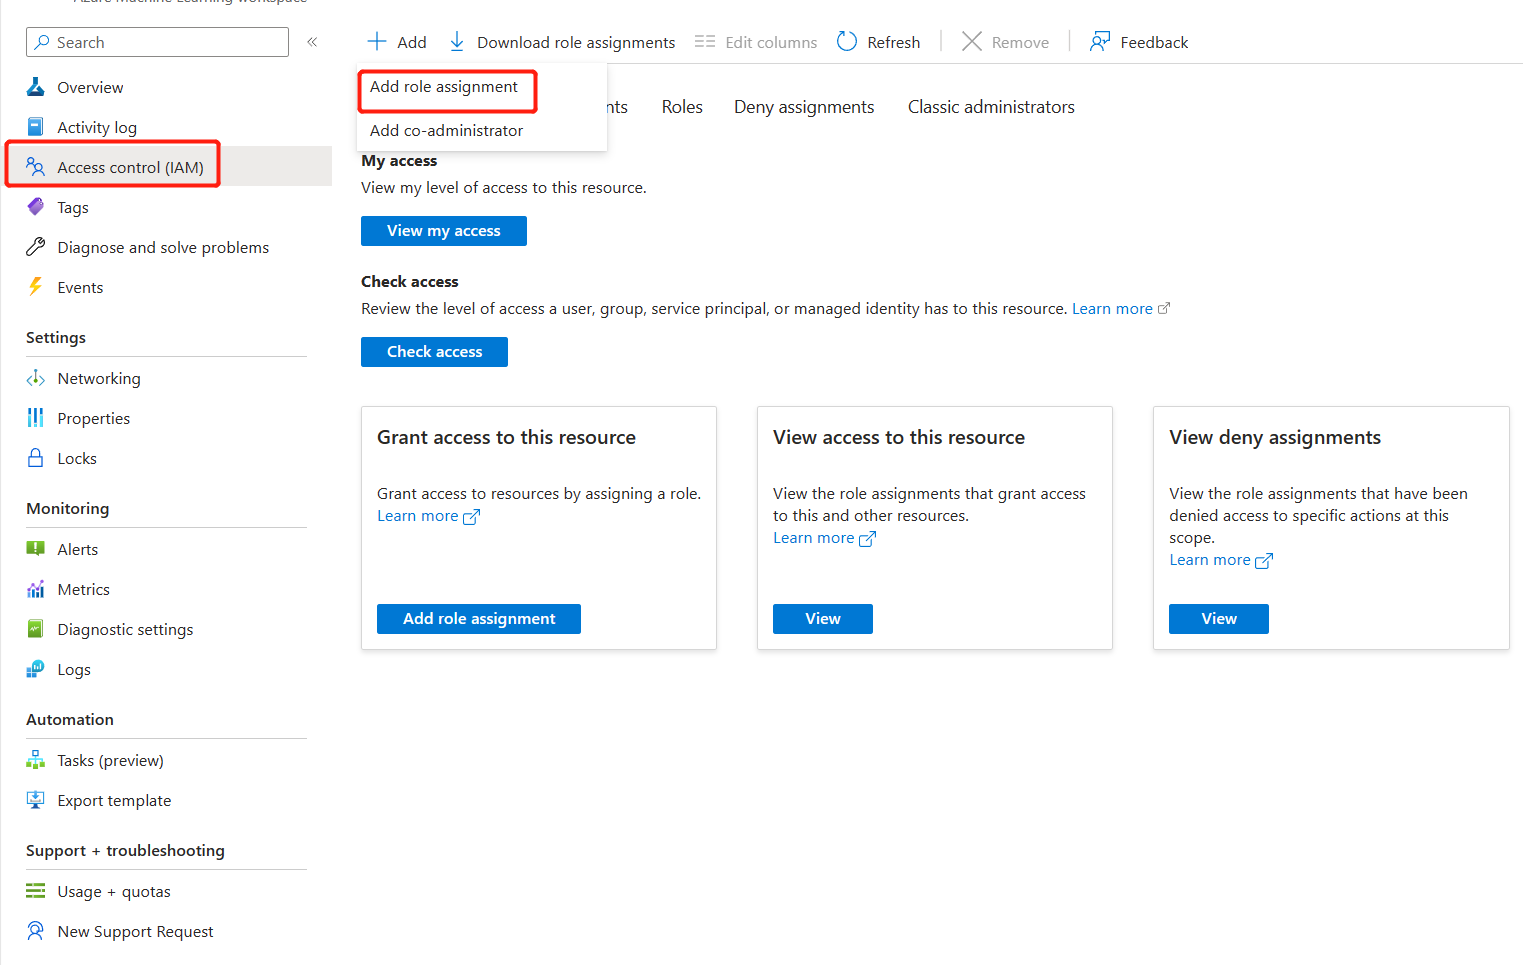
Select Azure Machine Learning Workspace Connection Secrets Reader, go to Next.
Note
Azure Machine Learning Workspace Connection Secrets Reader is a built-in role which has permission to get workspace connections.
If you want to use a customized role, make sure the customized role has the permission of "Microsoft.MachineLearningServices/workspaces/connections/listsecrets/action". Learn more about how to create custom roles.
Select Managed identity and select members.
For system-assigned identity, select Machine learning online endpoint under System-assigned managed identity, and search by endpoint name.
For user-assigned identity, select User-assigned managed identity, and search by identity name.
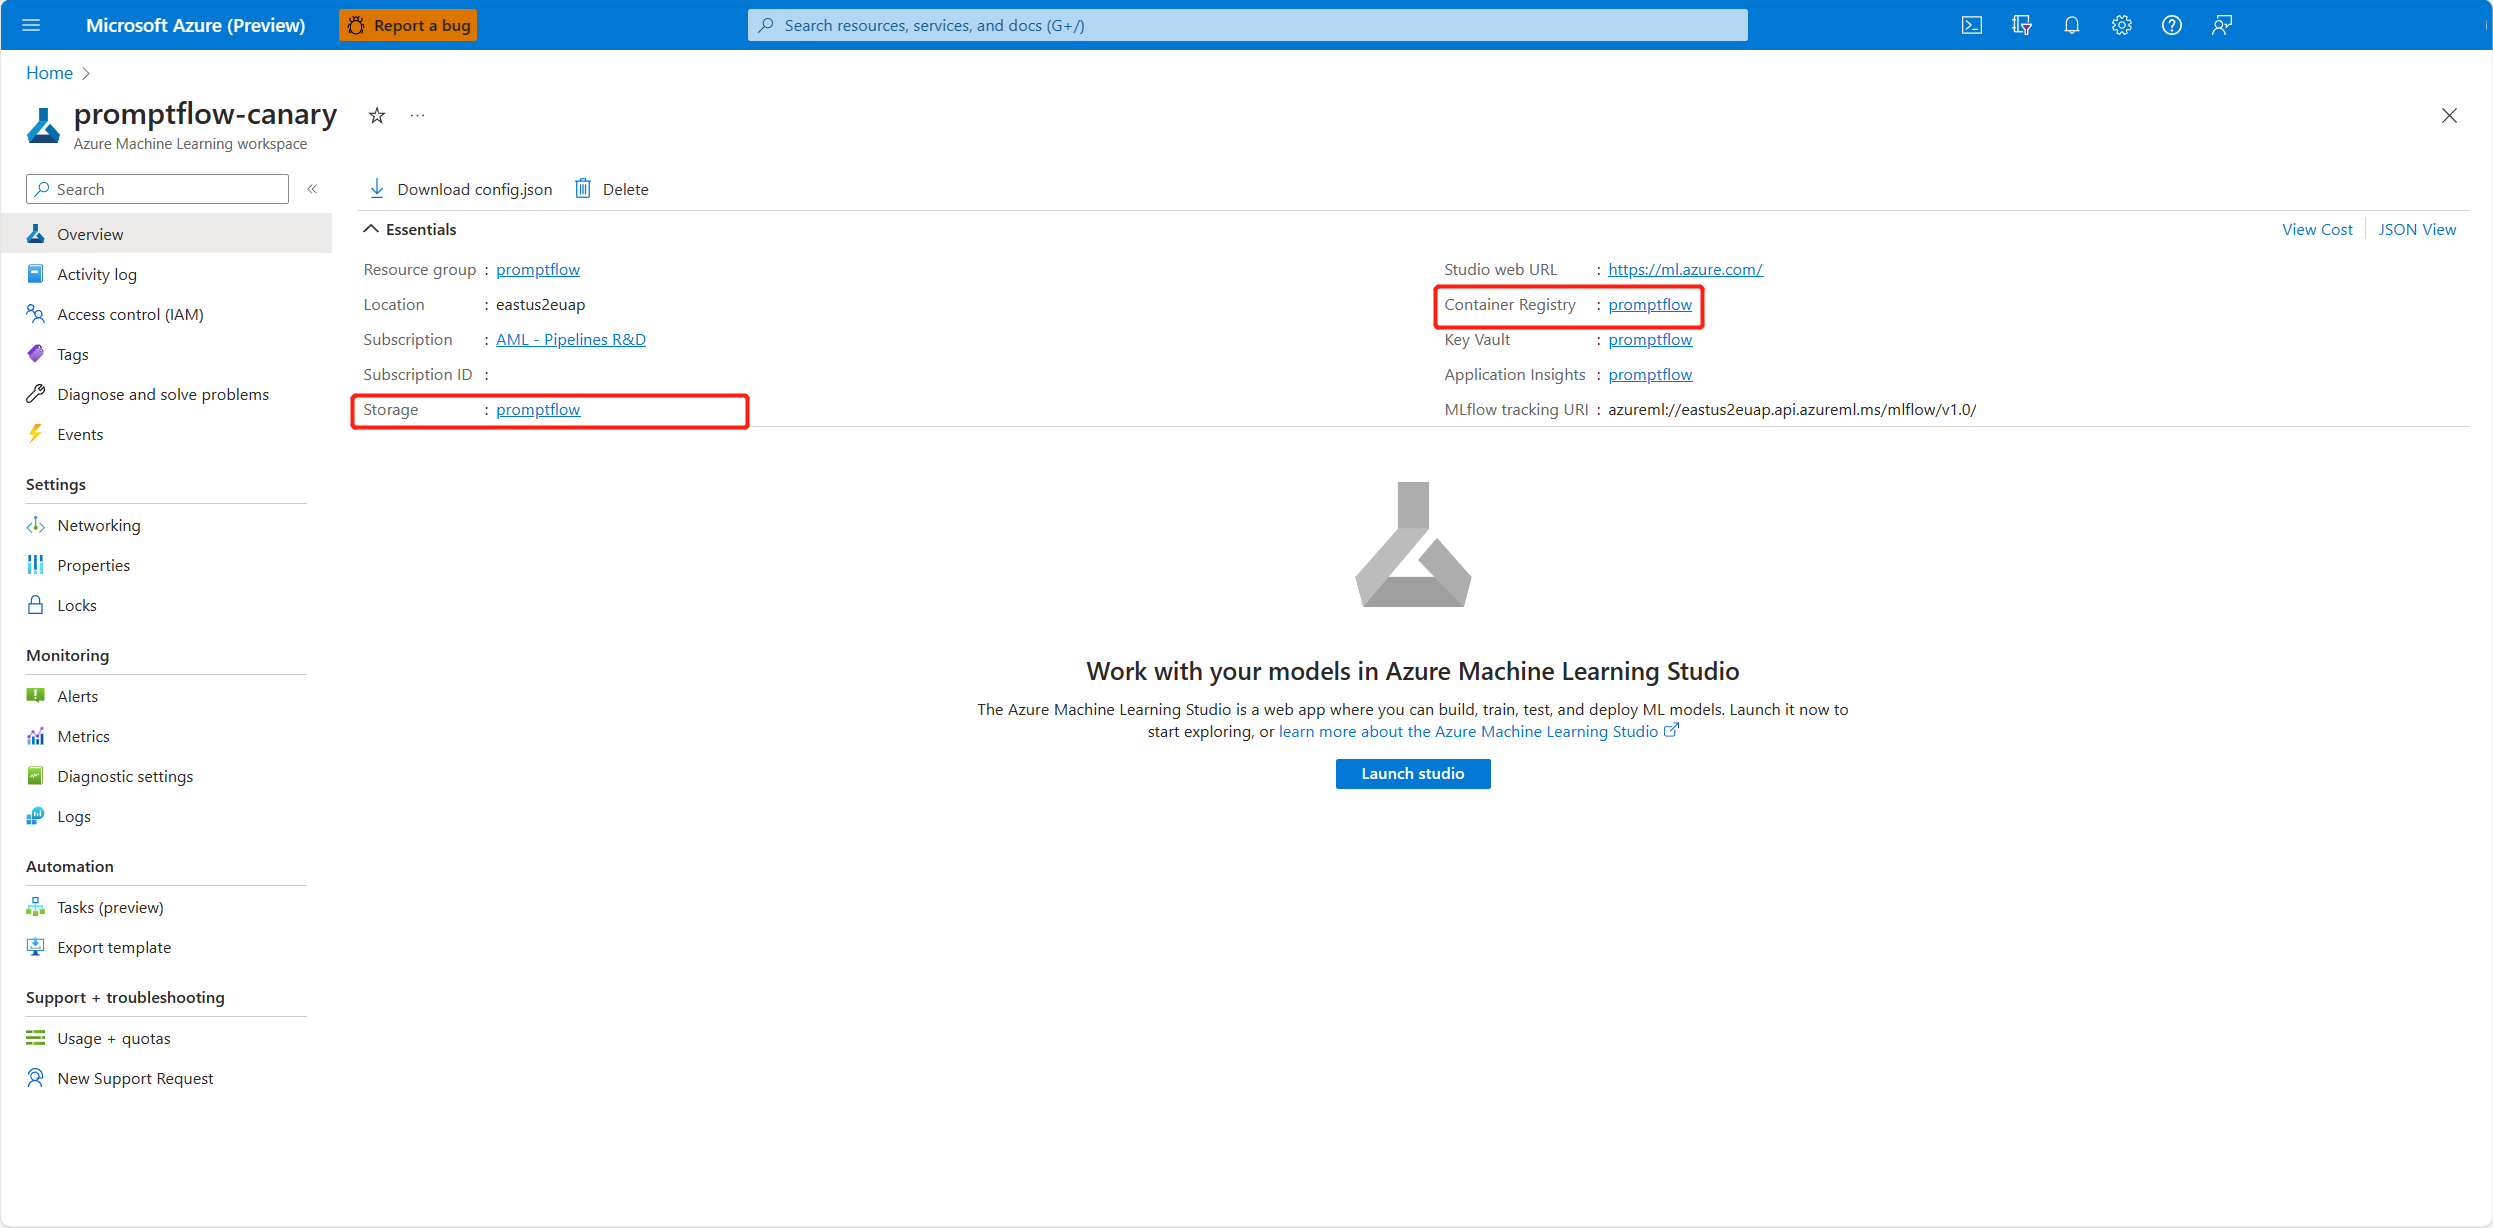
For user-assigned identity, you need to grant permissions to the workspace container registry and storage account as well. You can find the container registry and storage account in the workspace overview page in Azure portal.
Go to the workspace container registry overview page, select Access control, and select Add role assignment, and assign ACR pull |Pull container image to the endpoint identity.
Go to the workspace default storage overview page, select Access control, and select Add role assignment, and assign Storage Blob Data Reader to the endpoint identity.
(optional) For user-assigned identity, if you want to monitor the endpoint related metrics like CPU/GPU/Disk/Memory utilization, you need to grant Workspace metrics writer role of workspace to the identity as well.


Check the status of the endpoint
There will be notifications after you finish the deploy wizard. After the endpoint and deployment are created successfully, you can select Deploy details in the notification to endpoint detail page.
You can also directly go to the Endpoints page in the studio, and check the status of the endpoint you deployed.

Test the endpoint with sample data
In the endpoint detail page, switch to the Test tab.
You can input the values and select Test button.
The Test result shows as following:

Test the endpoint deployed from a chat flow
For endpoints deployed from chat flow, you can test it in an immersive chat window.

The chat_input was set during development of the chat flow. You can input the chat_input message in the input box. The Inputs panel on the right side is for you to specify the values for other inputs besides the chat_input. Learn more about how to develop a chat flow.
Consume the endpoint
In the endpoint detail page, switch to the Consume tab. You can find the REST endpoint and key/token to consume your endpoint. There is also sample code for you to consume the endpoint in different languages.
Note that you need to fill the data values according to your flow inputs. Take the sample flow used in this article Web Classification as example, you need to specify data = {"url": "<the_url_to_be_classified>"} and fill the key or token in the sample consumption code.

Monitor endpoints
View managed online endpoints common metrics using Azure Monitor (optional)
You can view various metrics (request numbers, request latency, network bytes, CPU/GPU/Disk/Memory utilization, and more) for an online endpoint and its deployments by following links from the endpoint's Details page in the studio. Following these links take you to the exact metrics page in the Azure portal for the endpoint or deployment.
Note
If you specify user-assigned identity for your endpoint, make sure that you have assigned Workspace metrics writer of Azure Machine Learning Workspace to your user-assigned identity. Otherwise, the endpoint will not be able to log the metrics.

For more information on how to view online endpoint metrics, see Monitor online endpoints.
View prompt flow endpoints specific metrics and tracing data (optional)
If you enable Application Insights diagnostics in the UI deploy wizard, tracing data and prompt flow specific metrics will be collect to workspace linked Application Insights. See details about enabling tracing for your deployment.
Troubleshoot endpoints deployed from prompt flow
Lack authorization to perform action "Microsoft.MachineLearningService/workspaces/datastores/read"
If your flow contains Index Look Up tool, after deploying the flow, the endpoint needs to access workspace datastore to read MLIndex yaml file or FAISS folder containing chunks and embeddings. Hence, you need to manually grant the endpoint identity permission to do so.
You can either grant the endpoint identity AzureML Data Scientist on workspace scope, or a custom role which contains "MachineLearningService/workspace/datastore/reader" action.
MissingDriverProgram Error
If you deploy your flow with custom environment and encounter the following error, it might be because you didn't specify the inference_config in your custom environment definition.
'error':
{
    'code': 'BadRequest',
    'message': 'The request is invalid.',
    'details':
         {'code': 'MissingDriverProgram',
          'message': 'Could not find driver program in the request.',
          'details': [],
          'additionalInfo': []
         }
}
There are 2 ways to fix this error.
(Recommended) You can find the container image uri in your custom environment detail page, and set it as the flow base image in the flow.dag.yaml file. When you deploy the flow in UI, you just select Use environment of current flow definition, and the backend service will create the customized environment based on this base image and
requirement.txtfor your deployment. Learn more about the environment specified in the flow definition.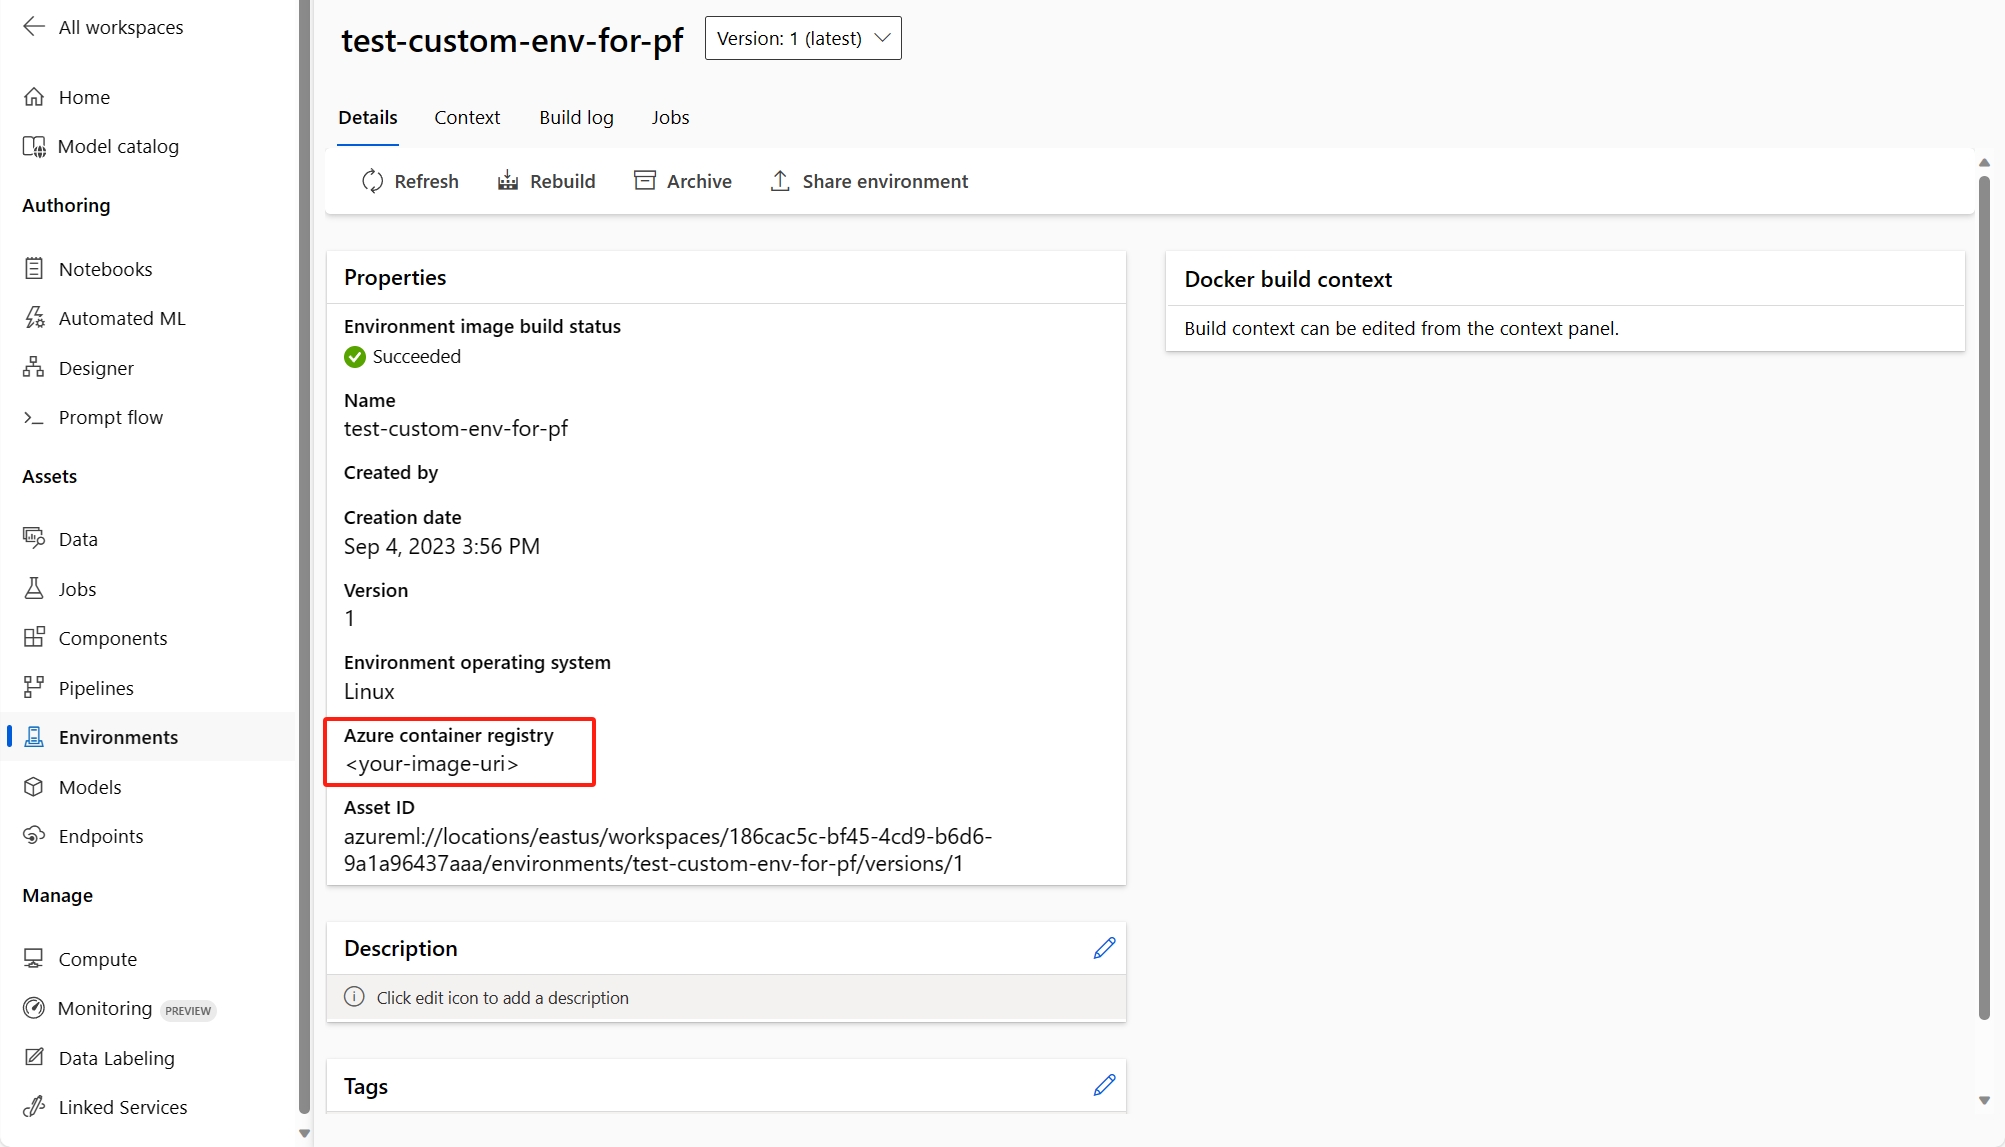
You can fix this error by adding
inference_configin your custom environment definition. Learn more about how to use customized environment.Following is an example of customized environment definition.

$schema: https://azuremlschemas.azureedge.net/latest/environment.schema.json
name: pf-customized-test
build:
  path: ./image_build
  dockerfile_path: Dockerfile
description: promptflow customized runtime
inference_config:
  liveness_route:
    port: 8080
    path: /health
  readiness_route:
    port: 8080
    path: /health
  scoring_route:
    port: 8080
    path: /score
Model response taking too long
Sometimes, you might notice that the deployment is taking too long to respond. There are several potential factors for this to occur.
- Model is not powerful enough (ex. use gpt over text-ada)
- Index query is not optimized and taking too long
- Flow has many steps to process
Consider optimizing the endpoint with above considerations to improve the performance of the model.
Unable to fetch deployment schema
After you deploy the endpoint and want to test it in the Test tab in the endpoint detail page, if the Test tab shows Unable to fetch deployment schema like following, you can try the following 2 methods to mitigate this issue:

- Make sure you have granted the correct permission to the endpoint identity. Learn more about how to grant permission to the endpoint identity.
Access denied to list workspace secret
If you encounter an error like "Access denied to list workspace secret", check whether you have granted the correct permission to the endpoint identity. Learn more about how to grant permission to the endpoint identity.
Clean up resources
If you aren't going use the endpoint after completing this tutorial, you should delete the endpoint.
Note
The complete deletion can take approximately 20 minutes.