Note
Access to this page requires authorization. You can try signing in or changing directories.
Access to this page requires authorization. You can try changing directories.
An Azure Machine Learning managed feature store lets you discover, create, and operationalize features. Features serve as the connective tissue in the machine learning lifecycle, starting from the prototyping phase, where you experiment with various features. That lifecycle continues to the operationalization phase, where you deploy your models, and inference steps look up the feature data. For more information about feature stores, visit the feature store concepts resource.
Important
Azure Cache for Redis announced its retirement timeline for all SKUs. We recommend moving your existing Azure Cache for Redis instances to Azure Managed Redis as soon as you can.
Migration guidance:
- Migrate Basic, Standard, and Premium tiers to Azure Managed Redis
- Migrate Enterprise tier to Azure Managed Redis
For more details about the retirement:
Part 1 of this tutorial series showed how to create a feature set specification with custom transformations, and use that feature set to generate training data. Part 2 of the series showed how to enable materialization, and perform a backfill. Additionally, Part 2 showed how to experiment with features, as a way to improve model performance. Part 3 showed how a feature store increases agility in the experimentation and training flows. Part 3 also described how to run batch inference.
In this tutorial, you
- Set up an Azure Cache for Redis
- Attach a cache to a feature store as the online materialization store, and grant the necessary permissions
- Materialize a feature set to the online store
- Test an online deployment with mock data
Prerequisites
Note
This tutorial uses a Azure Machine Learning notebook with Serverless Spark Compute.
- Be sure to complete parts 1 through 4 of this tutorial series. This tutorial reuses the feature store and other resources created in those earlier tutorials.
Set up
This tutorial uses the Python feature store core SDK (azureml-featurestore). The Python SDK is used for create, read, update, and delete (CRUD) operations, on feature stores, feature sets, and feature store entities.
You don't need to explicitly install these resources for this tutorial, because in the set-up instructions shown here, the online.yml file covers them.
Configure the Azure Machine Learning Spark notebook.
You can create a new notebook and execute the instructions in this tutorial step by step. You can also open and run the existing notebook featurestore_sample/notebooks/sdk_only/4.Enable-online-store-run-inference.ipynb. Keep this tutorial open and refer to it for documentation links and more explanation.
In the Compute dropdown list in the top nav, select Serverless Spark Compute.
Configure the session:
- Download the azureml-examples/sdk/python/featurestore-sample/project/env/online.yml file to your local machine
- In configure session in the top nav, select Python packages
- Select Upload Conda file
- Upload the online.yml file from your local machine, with the same steps as described in uploading conda.yml file in the first tutorial
- Optionally, increase the session time-out (idle time) to avoid frequent prerequisite reruns
This code cell starts the Spark session. It needs about 10 minutes to install all dependencies and start the Spark session.
# Run this cell to start the spark session (any code block will start the session ). This can take approximately 10 mins.
print("start spark session")
Set up the root directory for the samples
import os

# Please update the dir to ./Users/<your_user_alias> (or any custom directory you uploaded the samples to).
# You can find the name from the directory structure in the left navigation panel.
root_dir = "./Users/<your_user_alias>/featurestore_sample"

if os.path.isdir(root_dir):
    print("The folder exists.")
else:
    print("The folder does not exist. Please create or fix the path")
Initialize the
MLClientfor the project workspace where the tutorial notebook runs. TheMLClientis used for the create, read, update, and delete (CRUD) operations.import os from azure.ai.ml import MLClient from azure.ai.ml.identity import AzureMLOnBehalfOfCredential project_ws_sub_id = os.environ["AZUREML_ARM_SUBSCRIPTION"] project_ws_rg = os.environ["AZUREML_ARM_RESOURCEGROUP"] project_ws_name = os.environ["AZUREML_ARM_WORKSPACE_NAME"] # Connect to the project workspace ws_client = MLClient( AzureMLOnBehalfOfCredential(), project_ws_sub_id, project_ws_rg, project_ws_name )Initialize the
MLClientfor the feature store workspace, for the create, read, update, and delete (CRUD) operations on the feature store workspace.from azure.ai.ml import MLClient from azure.ai.ml.identity import AzureMLOnBehalfOfCredential # Feature store featurestore_name = ( "<FEATURESTORE_NAME>" # use the same name from part #1 of the tutorial ) featurestore_subscription_id = os.environ["AZUREML_ARM_SUBSCRIPTION"] featurestore_resource_group_name = os.environ["AZUREML_ARM_RESOURCEGROUP"] # Feature store MLClient fs_client = MLClient( AzureMLOnBehalfOfCredential(), featurestore_subscription_id, featurestore_resource_group_name, featurestore_name, )Note
A feature store workspace supports feature reuse across projects. A project workspace - the current workspace in use - leverages features from a specific feature store, to train and inference models. Many project workspaces can share and reuse the same feature store workspace.
As mentioned earlier, this tutorial uses the Python feature store core SDK (
azureml-featurestore). This initialized SDK client is used for create, read, update, and delete (CRUD) operations, on feature stores, feature sets, and feature store entities.from azureml.featurestore import FeatureStoreClient from azure.ai.ml.identity import AzureMLOnBehalfOfCredential featurestore = FeatureStoreClient( credential=AzureMLOnBehalfOfCredential(), subscription_id=featurestore_subscription_id, resource_group_name=featurestore_resource_group_name, name=featurestore_name, )
Prepare Azure Cache for Redis
This tutorial uses Azure Cache for Redis as the online materialization store. You can create a new Redis instance, or reuse an existing instance.
Set values for the Azure Cache for Redis resource, to use as online materialization store. In this code cell, define the name of the Azure Cache for Redis resource to create or reuse. You can override other default settings.
ws_location = ws_client.workspaces.get(ws_client.workspace_name).location

redis_subscription_id = os.environ["AZUREML_ARM_SUBSCRIPTION"]
redis_resource_group_name = os.environ["AZUREML_ARM_RESOURCEGROUP"]
redis_name = "<REDIS_NAME>"
redis_location = ws_location
You can create a new Redis instance. You would select the appropriate Redis Cache tier (basic, standard, premium, or enterprise). Choose an SKU family available for the cache tier you select. For more information about tiers and cache performance, visit this resource. For more information about SKU tiers and Azure cache families, visit this resource.
Execute this code cell to create an Azure Cache for Redis with premium tier, SKU family
P, and cache capacity 2. It might take between 5 and 10 minutes to prepare the Redis instance.from azure.mgmt.redis import RedisManagementClient from azure.mgmt.redis.models import RedisCreateParameters, Sku, SkuFamily, SkuName management_client = RedisManagementClient( AzureMLOnBehalfOfCredential(), redis_subscription_id ) # It usually takes about 5 - 10 min to finish the provision of the Redis instance. # If the following begin_create() call still hangs for longer than that, # please check the status of the Redis instance on the Azure portal and cancel the cell if the provision has completed. # This sample uses a PREMIUM tier Redis SKU from family P, which may cost more than a STANDARD tier SKU from family C. # Please choose the SKU tier and family according to your performance and pricing requirements. redis_arm_id = ( management_client.redis.begin_create( resource_group_name=redis_resource_group_name, name=redis_name, parameters=RedisCreateParameters( location=redis_location, sku=Sku(name=SkuName.PREMIUM, family=SkuFamily.P, capacity=2), ), ) .result() .id ) print(redis_arm_id)Optionally, this code cell reuses an existing Redis instance with the previously defined name.
redis_arm_id = "/subscriptions/{sub_id}/resourceGroups/{rg}/providers/Microsoft.Cache/Redis/{name}".format(
    sub_id=redis_subscription_id,
    rg=redis_resource_group_name,
    name=redis_name,
)
Attach online materialization store to the feature store
The feature store needs the Azure Cache for Redis as an attached resource, for use as the online materialization store. This code cell handles that step.
from azure.ai.ml.entities import (
    ManagedIdentityConfiguration,
    FeatureStore,
    MaterializationStore,
)

online_store = MaterializationStore(type="redis", target=redis_arm_id)

ml_client = MLClient(
    AzureMLOnBehalfOfCredential(),
    subscription_id=featurestore_subscription_id,
    resource_group_name=featurestore_resource_group_name,
)

fs = FeatureStore(
    name=featurestore_name,
    online_store=online_store,
)

fs_poller = ml_client.feature_stores.begin_create(fs)
print(fs_poller.result())
Note
During a feature store update, setting grant_materiaization_permissions=True alone will not grant the required RBAC permissions to the UAI. The role assignments to UAI will happen only when one of the following is updated:
- Materialization identity
- Offline store target
- Online store target
For an example that shows how to do this with the SDK, visit the Tutorial: Different Approaches for Provisioning a Managed Feature Store resource.
Materialize the accounts feature set data to online store
Enable materialization on the accounts feature set
Earlier in this tutorial series, you did not materialize the accounts feature set, because it had precomputed features, and only batch inference scenarios used it. This code cell enables online materialization so that the features become available in the online store, with low latency access. For consistency, it also enables offline materialization. Enabling offline materialization is optional.
from azure.ai.ml.entities import (
    MaterializationSettings,
    MaterializationComputeResource,
)

# Turn on both offline and online materialization on the "accounts" featureset.

accounts_fset_config = fs_client._featuresets.get(name="accounts", version="1")

accounts_fset_config.materialization_settings = MaterializationSettings(
    offline_enabled=True,
    online_enabled=True,
    resource=MaterializationComputeResource(instance_type="standard_e8s_v3"),
    spark_configuration={
        "spark.driver.cores": 4,
        "spark.driver.memory": "36g",
        "spark.executor.cores": 4,
        "spark.executor.memory": "36g",
        "spark.executor.instances": 2,
    },
    schedule=None,
)

fs_poller = fs_client.feature_sets.begin_create_or_update(accounts_fset_config)
print(fs_poller.result())
Backfill the account feature set
The begin_backfill function backfills data to all the materialization stores enabled for this feature set. Here, offline and online materialization are both enabled. This code cell backfills the data to both online and offline materialization stores.
from datetime import datetime, timedelta

# Trigger backfill on the "accounts" feature set.
# Backfill from 01/01/2020 to all the way to 3 hours ago.

st = datetime(2020, 1, 1, 0, 0, 0, 0)
et = datetime.now() - timedelta(hours=3)

poller = fs_client.feature_sets.begin_backfill(
    name="accounts",
    version="1",
    feature_window_start_time=st,
    feature_window_end_time=et,
    data_status=["None"],
)
print(poller.result().job_ids)
Tip
- The
feature_window_start_timeandfeature_window_end_timegranularily is limited to seconds. Any millisecond value provided in thedatetimeobject will be ignored. - A materialization job will only be submitted if there is data in the feature window that matches the
data_statusdefined while submitting the backfill job.
This code cell tracks completion of the backfill job. With the Azure Cache for Redis premium tier provisioned earlier, this step might need approximately 10 minutes to complete.
# Get the job URL, and stream the job logs.
# With PREMIUM Redis SKU, SKU family "P", and cache capacity 2,
# it takes approximately 10 minutes to complete.
fs_client.jobs.stream(poller.result().job_ids[0])
Materialize transactions feature set data to the online store
Earlier in this tutorial series, you materialized transactions feature set data to the offline materialization store.
This code cell enables the
transactionsfeature set online materialization.# Enable materialization to online store for the "transactions" feature set. transactions_fset_config = fs_client._featuresets.get(name="transactions", version="1") transactions_fset_config.materialization_settings.online_enabled = True fs_poller = fs_client.feature_sets.begin_create_or_update(transactions_fset_config) print(fs_poller.result())This code cell backfills the data to both the online and offline materialization store, to ensure that both stores have the latest data. The recurrent materialization job, which you set up in Tutorial 3 of this series, now materializes data to both online and offline materialization stores.
# Trigger backfill on the "transactions" feature set to fill in the online/offline store.
# Backfill from 01/01/2020 to all the way to 3 hours ago.

from datetime import datetime, timedelta
from azure.ai.ml.entities import DataAvailabilityStatus

st = datetime(2020, 1, 1, 0, 0, 0, 0)
et = datetime.now() - timedelta(hours=3)


poller = fs_client.feature_sets.begin_backfill(
    name="transactions",
    version="1",
    feature_window_start_time=st,
    feature_window_end_time=et,
    data_status=[DataAvailabilityStatus.NONE],
)
print(poller.result().job_ids)
This code cell tracks completion of the backfill job. Using the premium tier Azure Cache for Redis provisioned earlier, this step might need approximately five minutes to complete.
# Get the job URL, and stream the job logs.
# With PREMIUM Redis SKU, SKU family "P", and cache capacity 2,
# it takes approximately 5 minutes to complete.
fs_client.jobs.stream(poller.result().job_ids[0])
Further explore online feature materialization
You can explore the feature materialization status for a feature set from the Materialization jobs UI.
Select Feature stores in the left pane
From the list of accessible feature stores, select the feature store for which you performed the backfill
Select the Materialization jobs tab
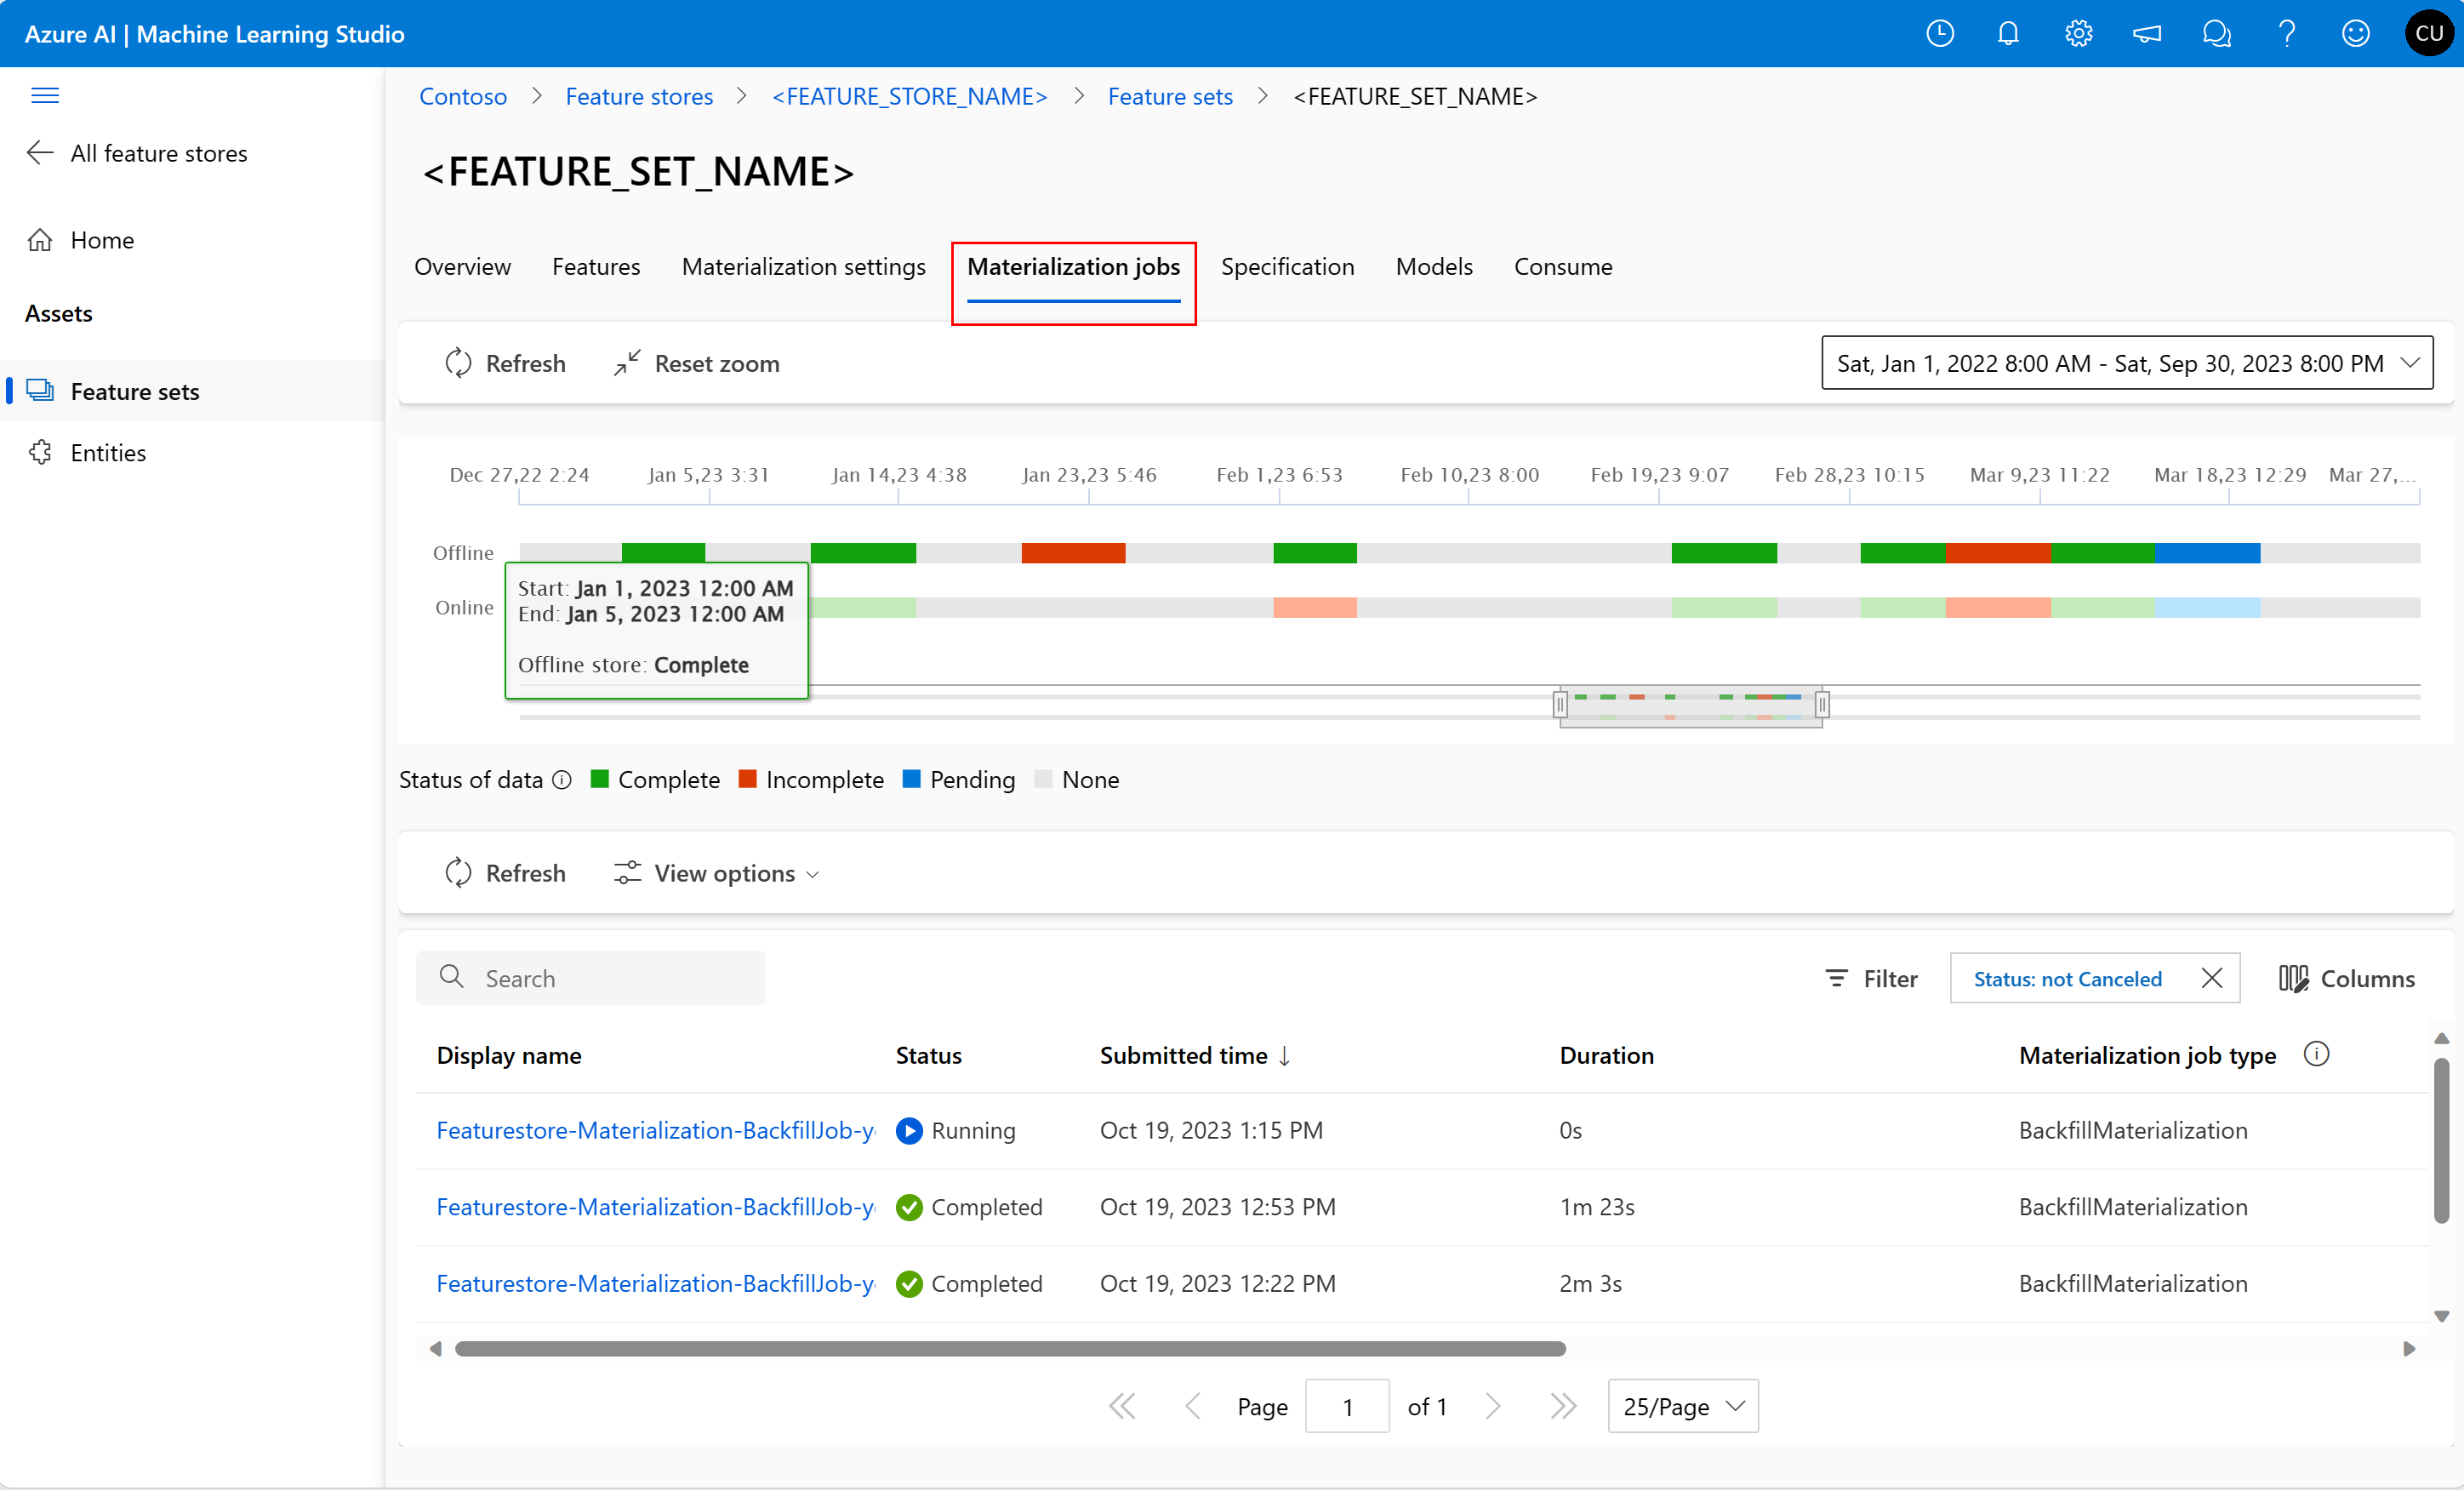

- The data materialization status can be
- Complete (green)
- Incomplete (red)
- Pending (blue)
- None (gray)
- A data interval represents a contiguous portion of data with same data materialization status. For example, the earlier snapshot has 16 data intervals in the offline materialization store.
- Your data can have a maximum of 2,000 data intervals. If your data contains more than 2,000 data intervals, create a new feature set version.
- You can provide a list of more than one data statuses (for example,
["None", "Incomplete"]) in a single backfill job. - During backfill, a new materialization job is submitted for each data interval that falls in the defined feature window.
- A new job isn't submitted for a data interval if a materialization job is already pending, or if it's running for a data interval that hasn't yet been backfilled.
Updating online materialization store
- To update an online materialization store at the feature store level, all feature sets in the feature store should have online materialization disabled.
- If online materialization is disabled on a feature set, the materialization status of the already-materialized data in the online materialization store is reset. This renders the already-materialized data unusable. You must resubmit your materialization jobs after you enable online materialization.
- If only offline materialization was initially enabled for a feature set, and online materialization is then enabled later:
- The default data materialization status of the data in the online store will be
None. - When the first online materialization job is submitted, the data already materialized in the offline store, if available, is used to calculate online features.
- If the data interval for online materialization partially overlaps the data interval of already materialized data located in the offline store, separate materialization jobs are submitted for the overlapping and nonoverlapping parts of the data interval.
- The default data materialization status of the data in the online store will be
Test locally
Now, use your development environment to look up features from the online materialization store. The tutorial notebook attached to Serverless Spark Compute serves as the development environment.
This code cell parses the list of features from the existing feature retrieval specification.
# Parse the list of features from the existing feature retrieval specification.
feature_retrieval_spec_folder = root_dir + "/project/fraud_model/feature_retrieval_spec"

features = featurestore.resolve_feature_retrieval_spec(feature_retrieval_spec_folder)

features
This code retrieves feature values from the online materialization store.
from azureml.featurestore import init_online_lookup
import time

# Initialize the online store client.
init_online_lookup(features, AzureMLOnBehalfOfCredential())
Prepare some observation data for testing, and use that data to look up features from the online materialization store. During the online look-up, the keys (accountID) defined in the observation sample data might not exist in the Redis (due to TTL). In this case:
Open the Azure portal
Navigate to the Redis instance
Open the console for the Redis instance, and check for existing keys with the
KEYS *commandReplace the
accountIDvalues in the sample observation data with the existing keysimport pyarrow from azureml.featurestore import get_online_features # Prepare test observation data obs = pyarrow.Table.from_pydict( {"accountID": ["A985156952816816", "A1055521248929430", "A914800935560176"]} ) # Online lookup: # It may happen that the keys defined in the observation sample data above does not exist in the Redis (due to TTL). # If this happens, go to Azure portal and navigate to the Redis instance, open its console and check for existing keys using command "KEYS *" # and replace the sample observation data with the existing keys. df = get_online_features(features, obs) df
These steps looked up features from the online store. In the next step, you'll test online features, with an Azure Machine Learning managed online endpoint.
Test online features from Azure Machine Learning managed online endpoint
A managed online endpoint deploys and scores models for online/realtime inference. You can use any available inference technology - for example, Kubernetes.
This step involves these actions:
- Create an Azure Machine Learning managed online endpoint.
- Grant required role-based access control (RBAC) permissions.
- Deploy the model that you trained in the tutorial 3 of this tutorial series. The scoring script used in this step has the code to look up online features.
- Score the model with sample data.
Create Azure Machine Learning managed online endpoint
Visit this resource to learn more about managed online endpoints. With the managed feature store API, you can also look up online features from other inference platforms.
This code cell defines the fraud-model managed online endpoint.
from azure.ai.ml.entities import (
    ManagedOnlineDeployment,
    ManagedOnlineEndpoint,
    Model,
    CodeConfiguration,
    Environment,
)


endpoint_name = "<ENDPOINT_NAME>"

endpoint = ManagedOnlineEndpoint(name=endpoint_name, auth_mode="key")
This code cell creates the managed online endpoint defined in the previous code cell.
ws_client.online_endpoints.begin_create_or_update(endpoint).result()Grant required RBAC permissions
Here, you grant required RBAC permissions to the managed online endpoint on the Redis instance and feature store. The scoring code in the model deployment needs these RBAC permissions to successfully search for features in the online store, with the managed feature store API.
Get managed identity of the managed online endpoint
This code cell retrieves the managed identity of the managed online endpoint:
# Get managed identity of the managed online endpoint.
endpoint = ws_client.online_endpoints.get(endpoint_name)

model_endpoint_msi_principal_id = endpoint.identity.principal_id
model_endpoint_msi_principal_id
Grant the Contributor role to the online endpoint managed identity on the Azure Cache for Redis
This code cell grants the Contributor role to the online endpoint managed identity on the Redis instance. This RBAC permission is needed to materialize data into the Redis online store.
from azure.core.exceptions import ResourceExistsError
from azure.mgmt.msi import ManagedServiceIdentityClient
from azure.mgmt.msi.models import Identity
from azure.mgmt.authorization import AuthorizationManagementClient
from azure.mgmt.authorization.models import RoleAssignmentCreateParameters
from uuid import uuid4

auth_client = AuthorizationManagementClient(
    AzureMLOnBehalfOfCredential(), redis_subscription_id
)

scope = f"/subscriptions/{redis_subscription_id}/resourceGroups/{redis_resource_group_name}/providers/Microsoft.Cache/Redis/{redis_name}"


# The role definition ID for the "contributor" role on the redis cache
# You can find other built-in role definition IDs in the Azure documentation
role_definition_id = f"/subscriptions/{redis_subscription_id}/providers/Microsoft.Authorization/roleDefinitions/b24988ac-6180-42a0-ab88-20f7382dd24c"

# Generate a random UUID for the role assignment name
role_assignment_name = str(uuid4())

# Set up the role assignment creation parameters
role_assignment_params = RoleAssignmentCreateParameters(
    principal_id=model_endpoint_msi_principal_id,
    role_definition_id=role_definition_id,
    principal_type="ServicePrincipal",
)

# Create the role assignment
try:
    # Create the role assignment
    result = auth_client.role_assignments.create(
        scope, role_assignment_name, role_assignment_params
    )
    print(
        f"Redis RBAC granted to managed identity '{model_endpoint_msi_principal_id}'."
    )
except ResourceExistsError:
    print(
        f"Redis RBAC already exists for managed identity '{model_endpoint_msi_principal_id}'."
    )
Grant AzureML Data Scientist role to the online endpoint managed identity on the feature store
This code cell grants the AzureML Data Scientist role to the online endpoint managed identity on the feature store. This RBAC permission is required for successful deployment of the model to the online endpoint.
auth_client = AuthorizationManagementClient(
    AzureMLOnBehalfOfCredential(), featurestore_subscription_id
)

scope = f"/subscriptions/{featurestore_subscription_id}/resourceGroups/{featurestore_resource_group_name}/providers/Microsoft.MachineLearningServices/workspaces/{featurestore_name}"

# The role definition ID for the "AzureML Data Scientist" role.
# You can find other built-in role definition IDs in the Azure documentation.
role_definition_id = f"/subscriptions/{featurestore_subscription_id}/providers/Microsoft.Authorization/roleDefinitions/f6c7c914-8db3-469d-8ca1-694a8f32e121"

# Generate a random UUID for the role assignment name.
role_assignment_name = str(uuid4())

# Set up the role assignment creation parameters.
role_assignment_params = RoleAssignmentCreateParameters(
    principal_id=model_endpoint_msi_principal_id,
    role_definition_id=role_definition_id,
    principal_type="ServicePrincipal",
)

# Create the role assignment
try:
    # Create the role assignment
    result = auth_client.role_assignments.create(
        scope, role_assignment_name, role_assignment_params
    )
    print(
        f"Feature store RBAC granted to managed identity '{model_endpoint_msi_principal_id}'."
    )
except ResourceExistsError:
    print(
        f"Feature store RBAC already exists for managed identity '{model_endpoint_msi_principal_id}'."
    )
Deploy the model to the online endpoint
Review the scoring script project/fraud_model/online_inference/src/scoring.py. The scoring script
- Loads the feature metadata from the feature retrieval specification packaged with the model during model training. Tutorial 3 of this tutorial series covered this task. The specification has features from both the
transactionsandaccountsfeature sets. - Looks up the online features using the index keys from the request, when an input inference request is received. In this case, for both feature sets, the index column is
accountID. - Passes the features to the model to perform the inference, and returns the response. The response is a boolean value that represents the variable
is_fraud.
Next, execute this code cell to create a managed online deployment definition for model deployment.
deployment = ManagedOnlineDeployment(
    name="green",
    endpoint_name=endpoint_name,
    model="azureml:fraud_model:1",
    code_configuration=CodeConfiguration(
        code=root_dir + "/project/fraud_model/online_inference/src/",
        scoring_script="scoring.py",
    ),
    environment=Environment(
        conda_file=root_dir + "/project/fraud_model/online_inference/conda.yml",
        image="mcr.microsoft.com/azureml/openmpi4.1.0-ubuntu20.04",
    ),
    instance_type="Standard_DS3_v2",
    instance_count=1,
)
Deploy the model to online endpoint with this code cell. The deployment might need four to five minutes.
# Model deployment to online enpoint may take 4-5 minutes.
ws_client.online_deployments.begin_create_or_update(deployment).result()
Test online deployment with mock data
Execute this code cell to test the online deployment with the mock data. The cell should show 0 or 1 as its output.
# Test the online deployment using the mock data.
sample_data = root_dir + "/project/fraud_model/online_inference/test.json"
ws_client.online_endpoints.invoke(
    endpoint_name=endpoint_name, request_file=sample_data, deployment_name="green"
)
Clean up
The fifth tutorial in the series describes how to delete the resources.