Note
Access to this page requires authorization. You can try signing in or changing directories.
Access to this page requires authorization. You can try changing directories.
APPLIES TO:  Azure CLI ml extension v2 (current)
This article explains how to train an image classification model to recognize handwritten numbers by using TensorFlow and the Azure Machine Learning Visual Studio Code extension.
Important
This feature is currently in public preview. This preview version is provided without a service-level agreement, and we don't recommend it for production workloads. Certain features might not be supported or might have constrained capabilities.
For more information, see Supplemental Terms of Use for Microsoft Azure Previews.
In this tutorial, you learn the following tasks:
- Understand the code
- Create a workspace
- Train a model
Prerequisites
- An Azure subscription. If you don't have one, sign up for a free or paid version of Azure Machine Learning. If you're using the free subscription, only CPU clusters are supported.
- Visual Studio Code, a lightweight, cross-platform code editor.
- Python 3.10 or later.
- Azure Machine Learning Visual Studio Code extension. For installation instructions, see Setup Azure Machine Learning Visual Studio Code extension.
- CLI (v2). For installation instructions, see Install and set up the CLI (v2).
- Clone the community-driven Azure Machine Learning examples repository.
git clone https://github.com/Azure/azureml-examples.git
Understand the code
The code for this tutorial uses TensorFlow to train an image classification machine learning model that categorizes handwritten digits from 0-9. It does so by creating a neural network that takes the pixel values of 28x28-pixel images as input, and then outputs a list of 10 probabilities, one for each of the digits being classified. The following sample shows what the data looks like.

Create a workspace
To build an application in Azure Machine Learning, you first need to create a workspace. A workspace contains the resources to train models and also the trained models themselves. For more information, see What is an Azure Machine Learning workspace?
In Visual Studio Code, open the azureml-examples/cli/jobs/single-step/tensorflow/mnist directory from the examples repository.
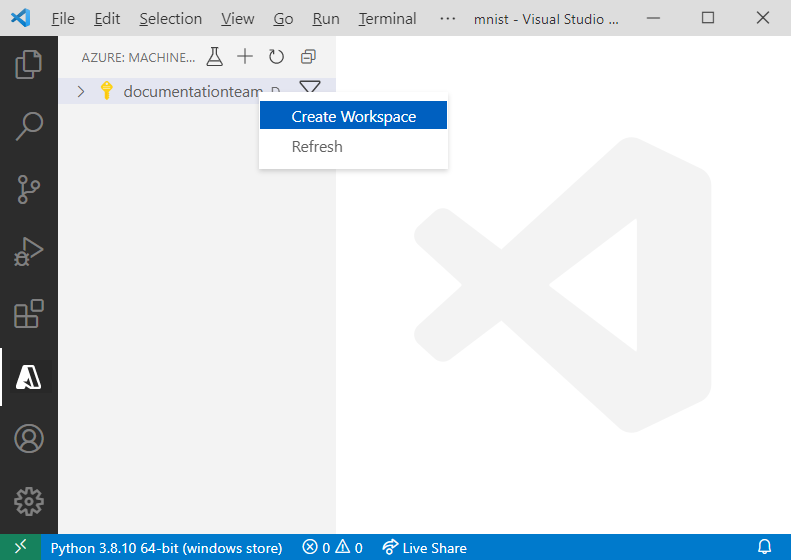
On the Visual Studio Code activity bar, select the Azure icon to open the Azure Machine Learning view.
Under Machine Learning, right-click your subscription node and select Create workspace.
A specification file appears. Configure the specification file with the following options and then save it.
$schema: https://azuremlschemas.azureedge.net/latest/workspace.schema.json
name: TeamWorkspace
location: WestUS2
display_name: team-ml-workspace
description: A workspace for training machine learning models
tags:
  purpose: training
  team: ml-team
The specification file creates a workspace called
TeamWorkspacein theWestUS2region. The rest of the options defined in the specification file provide friendly naming, descriptions, and tags for the workspace.Right-click the specification file and select AzureML: Execute YAML. Creating a resource uses the configuration options defined in the YAML specification file and submits a job by using the CLI (v2). At this point, the extension makes a request to Azure to create a new workspace and dependent resources in your account. After a few minutes, the new workspace appears in your subscription node.
Set
TeamWorkspaceas your default workspace. By setting this workspace as your default, you place resources and jobs you create in the workspace by default. Select the Set Azure Machine Learning Workspace button on the Visual Studio Code status bar and follow the prompts to setTeamWorkspaceas your default workspace.
For more information on workspaces, see Manage Azure Machine Learning resources with the VS Code extension.
Train the model
During the training process, a TensorFlow model is trained by processing the training data and learning patterns embedded within it for each of the respective digits being classified.
Like workspaces and compute targets, training jobs are defined using resource templates. For this sample, the specification is defined in the job.yml file, which is located in the azureml-examples/cli/jobs/single-step/tensorflow/mnist folder in the examples repository.
$schema: https://azuremlschemas.azureedge.net/latest/commandJob.schema.json
code: src
command: >
    python train.py
environment: azureml:AzureML-tensorflow-2.12-cuda11@latest
compute: azureml:gpu-cluster
experiment_name: tensorflow-mnist-example
description: Train a basic neural network with TensorFlow on the MNIST dataset.
This specification file submits a training job called tensorflow-mnist-example to the gpu-cluster compute target that runs the code in the train.py Python script. The environment used is one of the curated environments provided by Azure Machine Learning, which contains TensorFlow and other software dependencies required to run the training script. For more information on curated environments, see Azure Machine Learning curated environments.
To submit the training job:
- Open the job.yml file.
- Right-click the file in the text editor and select AzureML: Execute YAML.
At this point, a request is sent to Azure to run your experiment on the selected compute target in your workspace. This process takes several minutes. The amount of time to run the training job is impacted by several factors like the compute type and training data size. To track the progress of your experiment, right-click the current run node and select View Job in Azure portal.
When the dialog requesting to open an external website appears, select Open.

When the model is done training, the status label next to the run node updates to Completed.