Note
Access to this page requires authorization. You can try signing in or changing directories.
Access to this page requires authorization. You can try changing directories.
In this tutorial, you learn how to:
- Assign an Azure Managed Grafana role to the service principal of your application
- Retrieve application details
- Get an access token
- Call Grafana APIs
Prerequisites
- An Azure account with an active subscription. Create an account for free.
- An Azure Managed Grafana workspace. Create an Azure Managed Grafana workspace.
- A Microsoft Entra application with a service principal. Create a Microsoft Entra application and service principal. For simplicity, use an application located in the same Microsoft Entra tenant as your Azure Managed Grafana workspace.
Sign in to Azure
Sign in to the Azure portal at https://portal.azure.com/ with your Azure account.
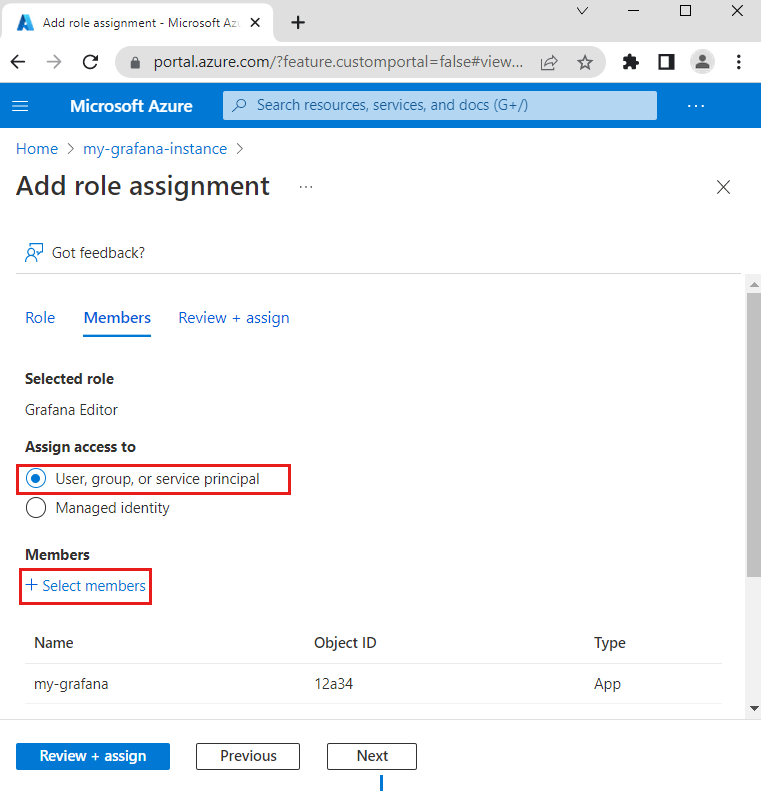
Assign an Azure Managed Grafana role to the service principal of your application
In the Azure portal, open your Azure Managed Grafana workspace.
Select Access control (IAM) in the navigation menu.
Select Add, then Add role assignment.
Select the Grafana Editor role and then Next.
Under Assign access to, select User,group, or service principal.
Select Select members, select your service principal, and hit Select.
Select Review + assign.
Retrieve application details
You now need to gather some information, which you'll use to get a Grafana API access token, and call Grafana APIs.
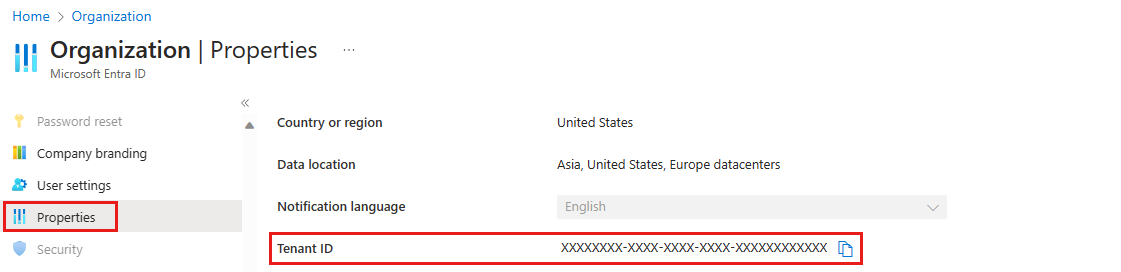
Find your tenant ID:
- In the Azure portal, enter Microsoft Entra ID in the Search resources, services, and docs (G+ /).
- Select Microsoft Entra ID.
- Select Properties from the left menu.
- Locate the field Tenant ID and save its value.
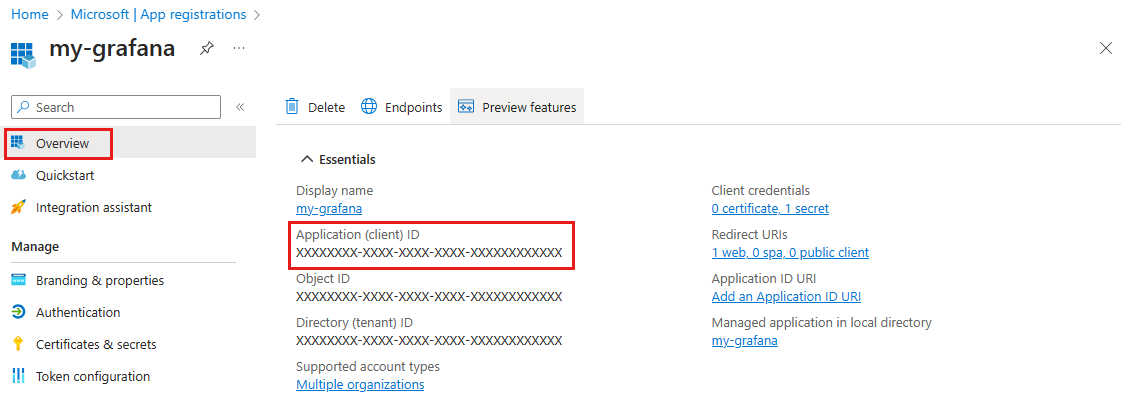
Find your client ID:
- In the Azure portal, in Microsoft Entra ID, select App registrations from the left menu.
- Select your app.
- In Overview, find the Application (client) ID field and save its value.
Create an application secret:
- In the Azure portal, in Microsoft Entra ID, select App registrations from the left menu.
- Select your app.
- Select Certificates & secrets from the left menu.
- Select New client secret.
- Create a new client secret and save its value.

Note
You can only access a secret's value immediately after creating it. Copy the value before leaving the page to use it in the next step of this tutorial.
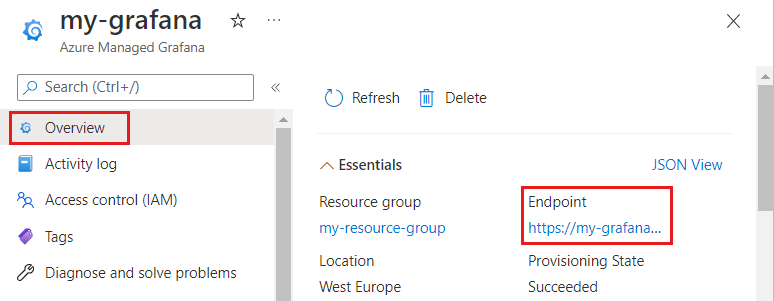
Find the Grafana endpoint URL:
- In the Azure portal, enter Azure Managed Grafana in the Search resources, services, and docs (G+ /) bar.
- Select Azure Managed Grafana and open your Azure Managed Grafana workspace.
- Select Overview from the left menu and save the Endpoint value.
Get an access token
To access Grafana APIs, you need to get an access token. You can get the access token using the Azure CLI or making a POST request.
Sign in to the Azure CLI by running the az login command and replace <client-id>, <client-secret>, and <tenant-id> with the application (client) ID, client secret, and tenant ID collected in the previous step:
az login --service-principal --username "<client-id>" --password "<client-secret>" --tenant "<tenant-id>"
Use the command az grafana api-key create to create a key. Here's an example output:
az grafana api-key create --key keyname --name <name> --resource-group <rg> --role editor --output json

{
  "id": 3,
  "key": "<redacted>",
  "name": "keyname"
}
Note
You can only view this key here once. Save it in a secure place.
Call Grafana APIs
You can now call Grafana APIs using the access token retrieved in the previous step as the Authorization header. For example:
curl -X GET \
-H 'Authorization: Bearer <access-token>' \
https://<grafana-url>/api/user
Replace <access-token> and <grafana-url> with the access token retrieved in the previous step and the endpoint URL of your Grafana workspace. For example https://my-grafana-abcd.cuse.grafana.azure.com.
Clean up resources
If you're not going to continue to use these resources, delete them with the following steps:
Delete Azure Managed Grafana:
- In the Azure portal, in Azure Managed Grafana, select Overview from the left menu.
- Select Delete.
- Enter the resource name to confirm deletion and select Delete.
Delete the Microsoft Entra application:
- In the Azure portal, in Microsoft Entra ID, select App registrations from the left menu.
- Select your app.
- In the Overview tab, select Delete.
- Select Delete.