Note
Access to this page requires authorization. You can try signing in or changing directories.
Access to this page requires authorization. You can try changing directories.
Use Azure Migrate in the Azure portal to generate, review, and configure a recommended wave plan. This article guides you through reviewing the grouping and sequence, updating proposed wave assignments to meet your requirements, and downloading the plan for offline review and stakeholder approval. After approval, commit waves for execution.
A wave plan is a recommendation for the assessment and migration path you select. Review the recommendations and make any required changes before committing waves. Migration execution and tracking take place separately after commitment.
Prerequisites
Before you configure a wave plan:
- Create an Azure Migrate project, or open an existing project.
- Complete discovery and verify that the applications and workloads you want to plan are available in the project inventory.
- Complete an assessment covering the workloads in scope. Review the assessment prerequisites and resolve any data collection issues before using the assessment for wave planning.
- Ensure that you have the Azure Migrate Owner or Azure Migrate Decide and Plan Expert role on the project.
Best practices
For more useful grouping and sequencing recommendations:
- Collect dependency data. Use dependency analysis to identify communicating workloads and the direction of their dependencies. This data helps the engine keep strongly dependent workloads together and place required services in the same or earlier waves.
- Review application mappings. Define applications and verify that their workloads are grouped correctly. Accurate mappings help the engine plan application components together and explain dependencies between applications.
- Classify workload environments. Use inventory tags to capture whether workloads belong to development, test, or production environments. Environment classification helps separate production from nonproduction workloads and sequence development and test migrations before production.
- Provide application criticality and complexity. Set these properties for individual applications in the portal, or update them at scale by exporting and importing application properties. This business context helps the engine prioritize simpler, less critical applications before more complex or business-critical applications.
- Keep assessments current. Assessments can become outdated as more inventory is discovered or additional performance data is collected. Recalculate the assessment to reflect the latest data, then regenerate the wave plan so its grouping, sequencing, and estimates use the updated assessment.
Generate or open a wave plan
- In the Azure portal, open your Azure Migrate project.
- In the project navigation, expand Plan and select Wave plan.
- In Planning based on assessment, select the assessment you want to use.
- In Selected path, select the migration path you want to review.
- Review the plan for the selected assessment and path. If a plan isn't generated yet, generate it for that selection by following the prompt on the Wave plan page.
During generation, Azure Migrate scopes the workloads, analyzes available dependencies and application mappings, evaluates planning conditions, and recommends wave composition and sequencing.
Generation typically completes within three minutes, but large estates can take longer. Wait for generation to finish, then select Refresh to review the plan.
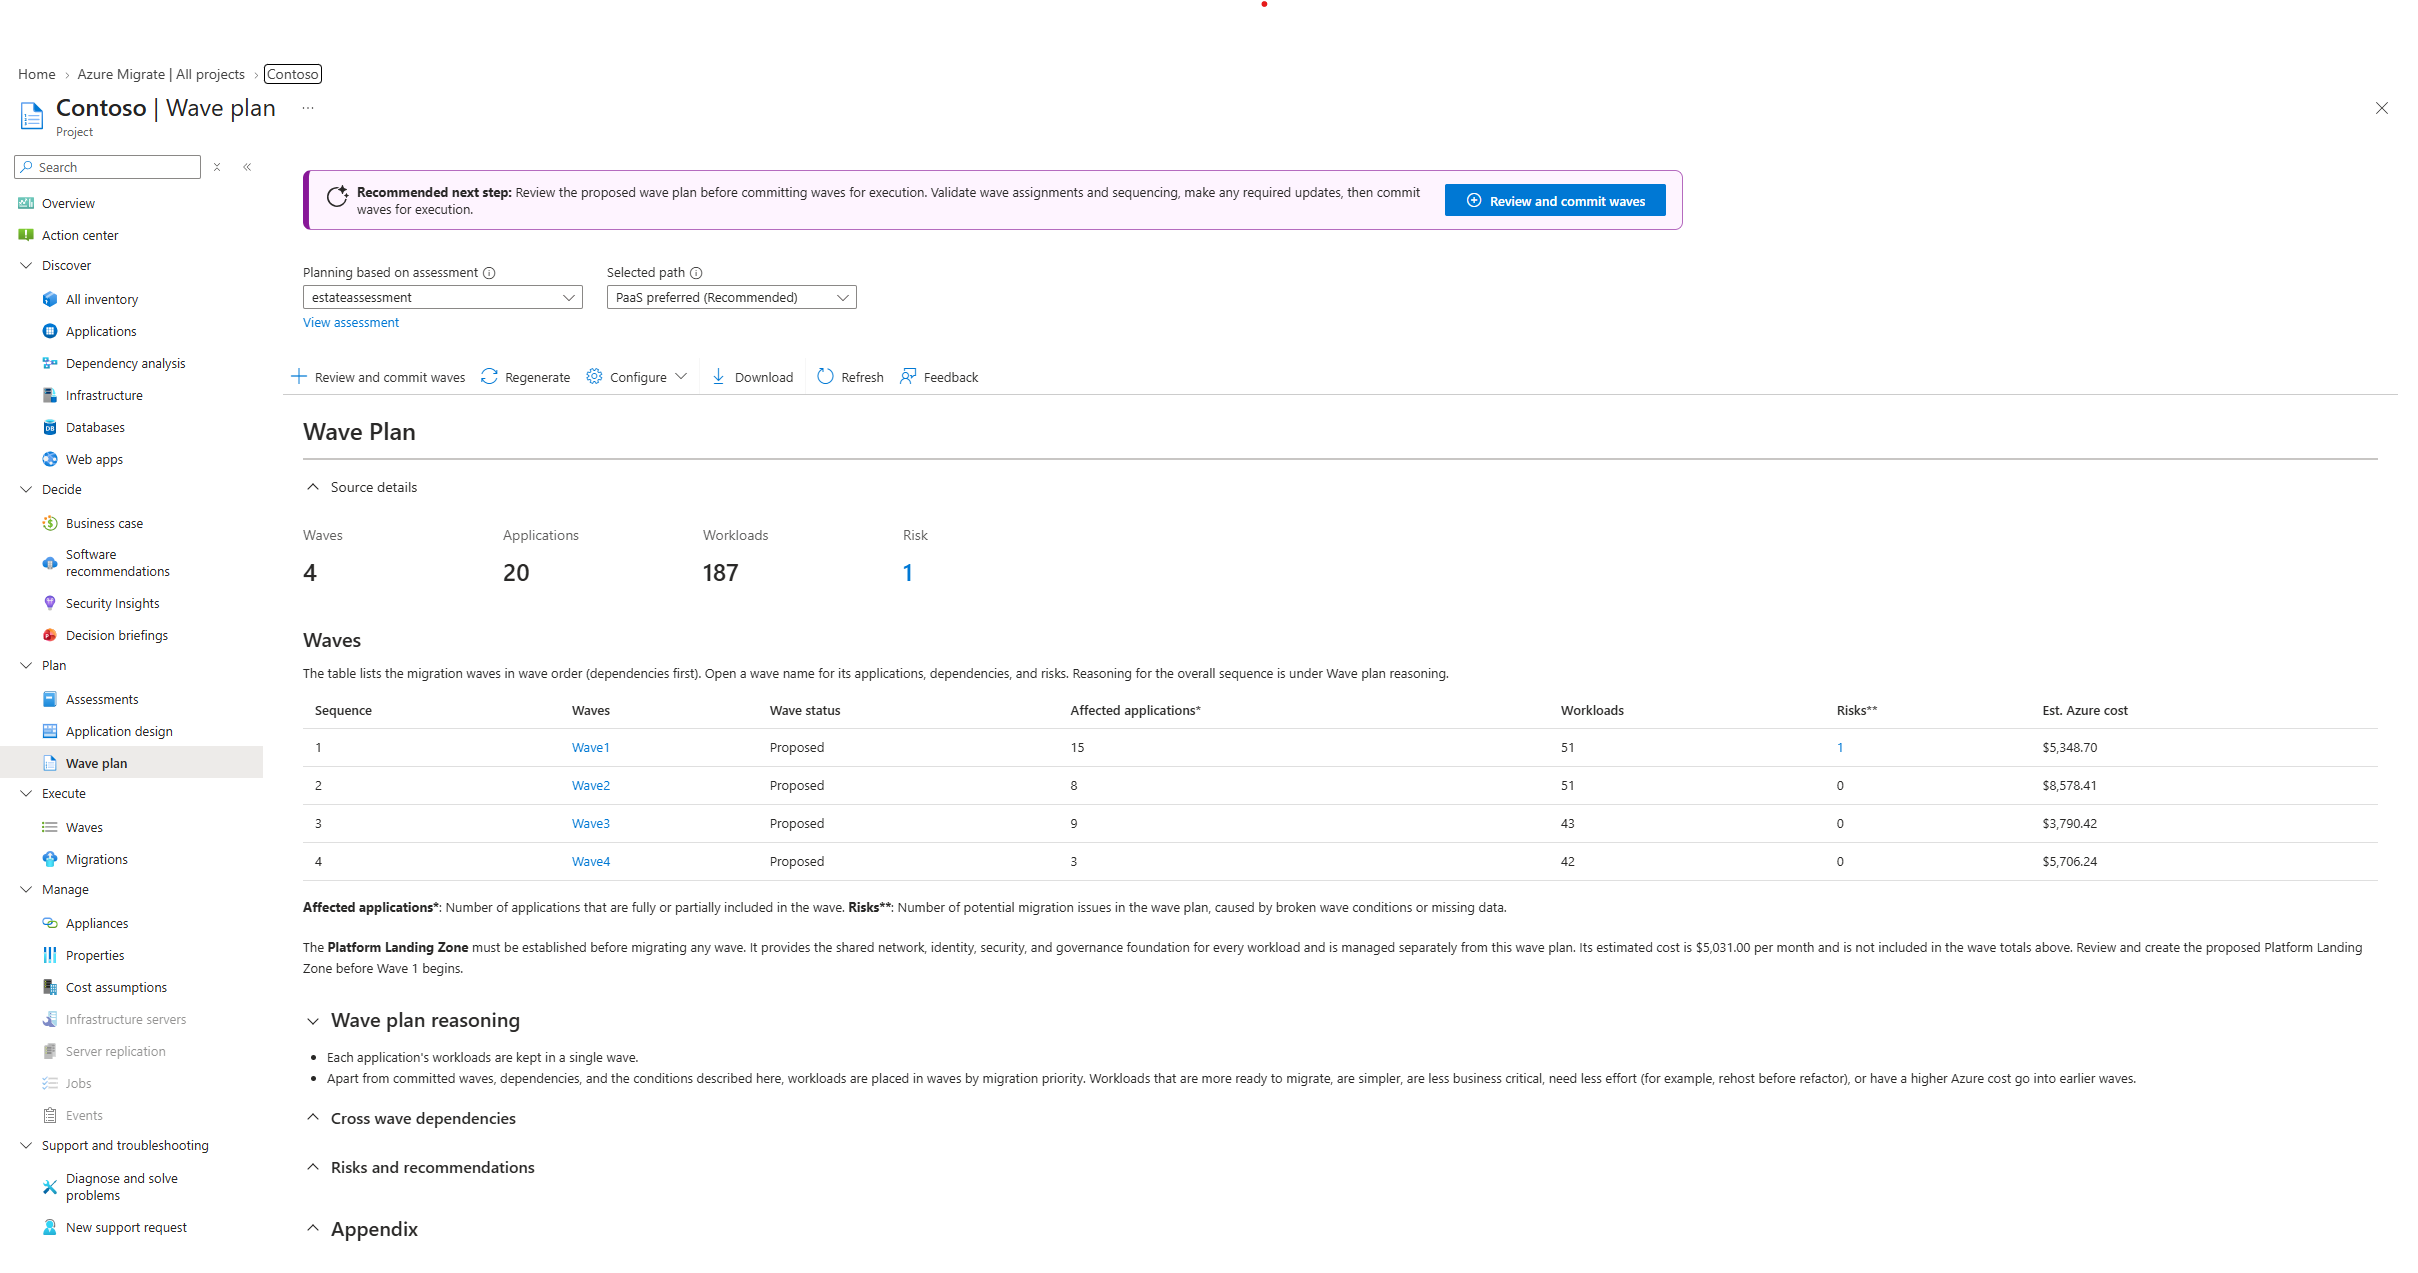
Wave plan in Azure Migrate, showing proposed waves and actions to review, configure, download, and commit them.
Review the wave plan
The wave plan includes a Waves summary table, plan reasoning, cross-wave dependencies, risks and recommendations, and individual wave reports. For an explanation of these sections and fields, see Understand the wave plan.
Before making changes:
- Confirm the selected assessment and migration path.
- Review the recommended sequence, Proposed or Committed status, application and workload counts, risks, and estimated Azure costs in the Waves table.
- Review the plan reasoning, cross-wave dependencies, and risks and recommendations. Check the explanations for any planning conditions that couldn't be satisfied.
- Open individual waves to review their applications, workloads, estimates, dependencies, and wave-specific risks.
Regenerate the wave plan
Regenerate the wave plan when the assessment is updated, new inventory or dependency data is discovered, or inventory or application details are updated. Changes to migration waves also make the plan outdated. For the selected assessment and migration path, select Regenerate on the Wave plan page to reset the proposed plan using the latest project information. When generation finishes, select Refresh and review the updated grouping, sequence, dependencies, and risks before editing or committing waves.
Note
Selecting Regenerate overwrites edits to the proposed wave plan, including assignments you previously imported. Download the current plan or export the inventory-to-wave mapping CSV file first if you need to retain reviewed assignments. Committed waves remain unchanged.
Edit the wave plan
On the Wave plan page, select Configure to open the Configure waves pane. To update proposed wave assignments in bulk, export the inventory-to-wave mapping CSV file, edit the assignments offline, then import, validate, and save the mapping file.
Step 1: Export the inventory mapping file
- In Configure waves, select Export file.
- Save the mapping file to your computer.
Use the mapping file exported from the plan you're configuring. Don't use a file from a different assessment or migration path.
Step 2: Customize the inventory mapping
- Open the exported mapping file.
- Update the Wave name column as needed to change proposed wave assignments.
- Use the Wave status column to distinguish proposed waves from committed waves.
- Save the edited mapping file in CSV (.csv) format.
Use these rules when editing the mapping file:
| Item | What to change or preserve |
|---|---|
| Wave name | Update this column to move a workload to an existing or new proposed wave. Don't leave the value blank. |
| Wave status | Use this column to identify proposed and committed waves. Don't change the status to commit a wave. |
| Workload rows | Assign each workload to one wave. Don't add, remove, or duplicate rows; preserve the assessment scope. |
| Inventory columns and file structure | Keep workload identifiers, other inventory values, and column headers unchanged. |
| Application and dependency groupings | Keep application components and strongly dependent workloads together where possible. Review the dependencies and risks after saving changes. |
Note
Configuration updates apply only to proposed waves. Changes to committed waves in the mapping file aren't applied during import.
Step 3: Import and validate the mapping
- In Configure waves, under File source, select the updated mapping file.
- Select Validate file.
- Keep the pane open while import and validation complete.
- Review the validation status and the number of workloads imported.
Validation checks that workloads match the assessment scope and that wave names are valid and not empty. If validation fails, the existing plan remains unchanged. Download the error file, correct the mapping file, and import and validate it again. Save the configuration only after validation succeeds.
Step 4: Save the configuration
- After validation succeeds, select Save configurations.
- Wait for the imported assignments to be applied and the risks to be reassessed.
- Select Refresh on the Wave plan page after processing completes.
- Review the updated assignments, sequence, dependencies, and risks before committing waves.
Saving the configuration preserves your imported proposed assignments and reassesses risks. Committed waves remain unchanged. Unlike selecting Regenerate, saving doesn't reset the proposed assignments. Validation confirms that the file can be processed. Review the updated dependencies, risks, and recommendations before commitment.
Download the wave plan
Download the current plan for offline review and stakeholder approval, or to retain a copy before regeneration. The download is a ZIP file containing CSV files, an overall wave plan report, and a separate report for each wave. The reports use AI-friendly Markdown (.md) format. You can read them offline or use them with AI tools to support review.
- Confirm the selected assessment and migration path.
- On the Wave plan page, select Download.
- Save and extract the ZIP file.
- Review the downloaded files with the stakeholders responsible for application scope, wave assignments, dependencies, and risks.
The download includes the following files:
| File | What it contains | How to use it |
|---|---|---|
| Inventory-to-wave mapping (CSV) | One row per workload with inventory data and its wave assignment. | Review assignments with application owners. Update only Wave name to propose assignment changes, then import and validate the mapping through Configure waves. |
| Wave details (CSV) | One row per wave with summary properties, such as cost, risks, and migration strategy distribution. | Use as a read-only reference when reviewing wave composition. |
| Wave plan report (Markdown) | An overall plan summary, including grouping and sequencing rationale, cross-wave dependencies, risks, and recommendations. | Share with application teams, stakeholders, and decision-makers for review and approval. |
| Individual wave reports (Markdown) | A separate Markdown file per wave with its applications, reasoning, dependencies, risks, and recommendations. | Review wave details with the responsible application teams alongside the overall plan. |
Downloading the plan doesn't apply changes or commit waves. To update proposed assignments, follow Edit the wave plan. To accept reviewed waves, follow Commit the wave plan.
Commit the wave plan
Commit waves after you review the recommendations, resolve or account for the identified risks, and obtain stakeholder approval. Commit waves and proceed with migration in the recommended sequence so that dependencies are available when later waves need them.
- On the Wave plan page, select Review and commit waves.
- Review and select the proposed waves you want to commit, following the recommended sequence.
- Commit the selected waves and wait for the operation to finish.
- Refresh the plan and verify that the selected waves show Committed status.
You can commit selected waves while continuing to review other proposed waves.
Next steps
To continue with committed waves, select Execute > Waves in the Azure Migrate project.
For more information: