Azure Pipelines for Azure Database for MySQL - Single Server
APPLIES TO:  Azure Database for MySQL - Single Server
Get started with Azure Database for MySQL by deploying a database update with Azure Pipelines. Azure Pipelines lets you build, test, and deploy with continuous integration (CI) and continuous delivery (CD) using Azure DevOps.
You'll use the Azure Database for MySQL Deployment task. The Azure Database for MySQL Deployment task only works with Azure Database for MySQL single server.
Prerequisites
Before you begin, you need:
- An Azure account with an active subscription. Create an account for free.
- An active Azure DevOps organization. Sign up for Azure Pipelines.
- A GitHub repository that you can use for your pipeline. If you don’t have an existing repository, see Create your first pipeline.
This quickstart uses the resources created in either of these guides as a starting point:
- Create an Azure Database for MySQL server using Azure portal
- Create an Azure Database for MySQL server using Azure CLI
Create your pipeline
You'll use the basic starter pipeline as a basis for your pipeline.
Sign in to your Azure DevOps organization and go to your project.
In your project, navigate to the Pipelines page. Then choose the action to create a new pipeline.
Walk through the steps of the wizard by first selecting GitHub as the location of your source code.
You might be redirected to GitHub to sign in. If so, enter your GitHub credentials.
When the list of repositories appears, select your desired repository.
Azure Pipelines will analyze your repository and offer configuration options. Select Starter pipeline.

Create a secret
You'll need to know your database server name, SQL username, and SQL password to use with the Azure Database for MySQL Deployment task.
For security, you'll want to save your SQL password as a secret variable in the pipeline settings UI for your pipeline.
Go to the Pipelines page, select the appropriate pipeline, and then select Edit.
Select Variables.
Add a new variable named
SQLpassand select Keep this value secret to encrypt and save the variable.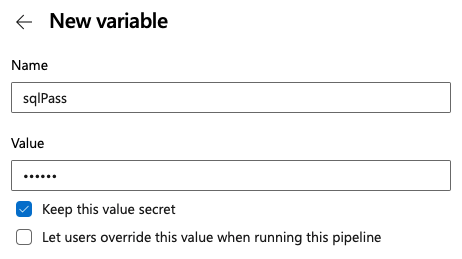
Select Ok and Save to add the variable.
Verify permissions for your database
To access your MySQL database with Azure Pipelines, you need to set your database to accept connections from all Azure resources.
In the Azure portal, open your database resource.
Select Connection security.
Toggle Allow access to Azure services to Yes.

Add the Azure Database for MySQL Deployment task
In this example, we'll create a new databases named quickstartdb and add an inventory table. The inline SQL script will:
- Delete
quickstartdbif it exists and create a newquickstartdbdatabase. - Delete the table
inventoryif it exists and creates a newinventorytable. - Insert three rows into
inventory. - Show all the rows.
- Update the value of the first row in
inventory. - Delete the second row in
inventory.
You'll need to replace the following values in your deployment task.
| Input | Description | Example |
|---|---|---|
azureSubscription |
Authenticate with your Azure Subscription with a service connection. | My Subscription |
ServerName |
The name of your Azure Database for MySQL server. | fabrikam.mysql.database.azure.com |
SqlUsername |
The user name of your Azure Database for MySQL. | mysqladmin@fabrikam |
SqlPassword |
The password for the username. This should be defined as a secret variable. | $(SQLpass) |
trigger:
- main

pool:
  vmImage: ubuntu-latest

steps:
- task: AzureMysqlDeployment@1
  inputs:
    azureSubscription: '<your-subscription>
    ServerName: '<db>.mysql.database.azure.com'
    SqlUsername: '<username>@<db>'
    SqlPassword: '$(SQLpass)'
    TaskNameSelector: 'InlineSqlTask'
    SqlInline: |
      DROP DATABASE IF EXISTS quickstartdb;
      CREATE DATABASE quickstartdb;
      USE quickstartdb;

      -- Create a table and insert rows
      DROP TABLE IF EXISTS inventory;
      CREATE TABLE inventory (id serial PRIMARY KEY, name VARCHAR(50), quantity INTEGER);
      INSERT INTO inventory (name, quantity) VALUES ('banana', 150);
      INSERT INTO inventory (name, quantity) VALUES ('orange', 154);
      INSERT INTO inventory (name, quantity) VALUES ('apple', 100);

      -- Read
      SELECT * FROM inventory;

      -- Update
      UPDATE inventory SET quantity = 200 WHERE id = 1;
      SELECT * FROM inventory;

      -- Delete
      DELETE FROM inventory WHERE id = 2;
      SELECT * FROM inventory;
    IpDetectionMethod: 'AutoDetect'
Deploy and verify resources
Select Save and run to deploy your pipeline. The pipeline job will be launched and after few minutes, the job status should indicate Success.
You can verify that your pipeline ran successfully within the AzureMysqlDeployment task in the pipeline run.
Open the task and verify that the last two entries show two rows in inventory. There are two rows because the second row has been deleted.

Clean up resources
When you’re done working with your pipeline, delete quickstartdb in your Azure Database for MySQL. You can also delete the deployment pipeline you created.
Next steps
Feedback
Coming soon: Throughout 2024 we will be phasing out GitHub Issues as the feedback mechanism for content and replacing it with a new feedback system. For more information see: https://aka.ms/ContentUserFeedback.
Submit and view feedback for