Note
Access to this page requires authorization. You can try signing in or changing directories.
Access to this page requires authorization. You can try changing directories.
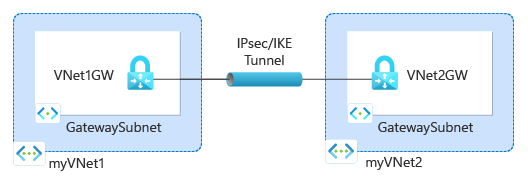
This tutorial shows you how to use Azure Network Watcher VPN troubleshoot capability to diagnose and troubleshoot a connectivity issue between two virtual networks. The virtual networks are connected via VPN gateways using VNet-to-VNet connections.
In this tutorial, you learn how to:
- Create virtual network gateways (VPN gateways)
- Create connections between VPN gateways
- Diagnose and troubleshoot a connectivity issue
- Resolve the problem
- Verify the problem is resolved
Prerequisites
- An Azure account with an active subscription. If you don't have one, create a free account before you begin.
Create VPN gateways
In this section, you create two virtual network gateways to connect two virtual networks.
Create first VPN gateway
Sign in to the Azure portal.
In the search box at the top of the portal, enter virtual network gateway. Select Virtual network gateways from the search results.

Select + Create. In Create virtual network gateway, enter or select the following values in the Basics tab:
Setting Value Project details Subscription Select your Azure subscription. Instance details Name Enter VNet1GW. Region Select East US. Gateway type Select VPN. VPN type Select Route-based. SKU Select VpnGw1. Generation Select Generation1. Virtual network Select Create virtual network. Enter myVNet1 in Name.
Select Create new for the resource group. Enter myResourceGroup and select OK.
In Address Range, enter 10.1.0.0/16.
Under Subnets, enter GatewaySubnet for Subnet name and 10.1.1.0/24 for Address range.
Select OK to close Create virtual network.Public IP address Public IP address Select Create new. Public IP address name Enter VNet1GW-ip. Enable active-active mode Select Disabled. Configure BGP Select Disabled. Select Review + create.
Review the settings, and then select Create. A gateway can take 45 minutes or more to fully create and deploy.
Create second VPN gateway
To create the second VPN gateway, repeat the previous steps you used to create the first VPN gateway with the following values:
| Setting | Value |
|---|---|
| Name | VNet2GW. |
| Resource group | myResourceGroup |
| Virtual network | myVNet2 |
| Virtual network address range | 10.2.0.0/16 |
| Gateway subnet address range | 10.2.1.0/24 |
| Public IP address name | VNet2GW-ip |
Create a storage account and a container
In this section, you create a storage account, then you create a container in it.
If you have a storage account that you want to use, you can skip the following steps and go to Create VPN gateways.
In the search box at the top of the portal, enter storage accounts. Select Storage accounts from the search results.
Select + Create. In Create a storage account, enter or select the following values in the Basics tab:
Setting Value Project details Subscription Select your Azure subscription. Resource Group Select myResourceGroup. Instance details Storage account name Enter a unique name. This tutorial uses mynwstorageaccount. Region Select (US) East US. Performance Select Standard. Redundancy Select Locally-redundant storage (LRS). Select the Review tab or select the Review button.
Review the settings, and then select Create.
Once the deployment is complete, select Go to resource to go to the Overview page of mynwstorageaccount.
Under Data storage, select Containers.
Select + Container.
In New container, enter or select the following values then select Create.
Setting Value Name Enter vpn. Public access level Select Private (no anonymous access).
Create gateway connections
After creating VNet1GW and VNet2GW virtual network gateways, you can create connections between them to allow communication over secure IPsec/IKE tunnel between VNet1 and VNet2 virtual networks. To create the IPsec/IKE tunnel, you create two connections:
- From VNet1 to VNet2
- From VNet2 to VNet1
Create first connection
Go to VNet1GW gateway.
Under Settings, select Connections.
Select + Add to create a connection from VNet1 to VNet2.
In Create connection, enter or select the following values in the Basics tab:
Setting Value Project details Subscription Select your Azure subscription. Resource Group Select myResourceGroup. Instance details Connection type Select VNet-to-VNet. Name Enter to-VNet2. Region Select East US. Select the Settings tab or select Next: Settings button.
In Settings tab, enter or select the following values:
Setting Value Virtual network gateway First virtual network gateway Select VNet1GW. Second virtual network gateway Select VNet2GW. Shared key (PSK) Enter 123. Select Review + create.
Review the settings, and then select Create.
Create second connection
Go to VNet2GW gateway.
Create the second connection by following the previous steps you used to create the first connection with the following values:
Setting Value Name to-VNet1 First virtual network gateway VNet2GW Second virtual network gateway VNet1GW Shared key (PSK) 000 Note
To successfully create an IPsec/IKE tunnel between two Azure VPN gateways, the connections between the gateways must use identical shared keys. In the previous steps, two different keys were used to create a problem with the gateway connections.
Diagnose the VPN problem
In this section, you use Network Watcher VPN troubleshoot to check the two VPN gateways and their connections.
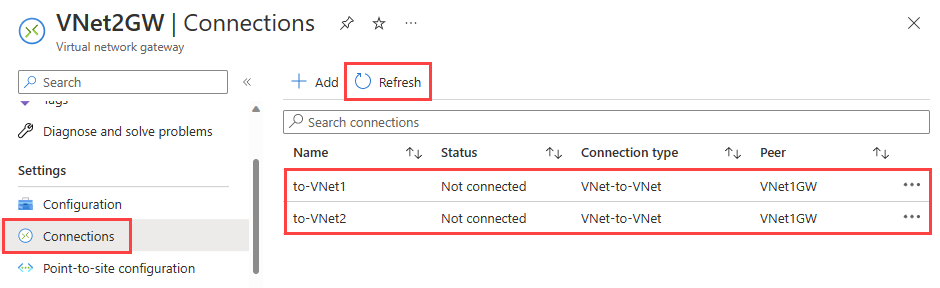
Under Settings of VNet2GW gateway, select Connection.
Select Refresh to see the connections and their current status, which is Not connected (because of mismatch between the shared keys).
Under Help of VNet2GW gateway, select VPN troubleshoot.
Select Select storage account to choose the storage account and the container that you want to save the logs to.
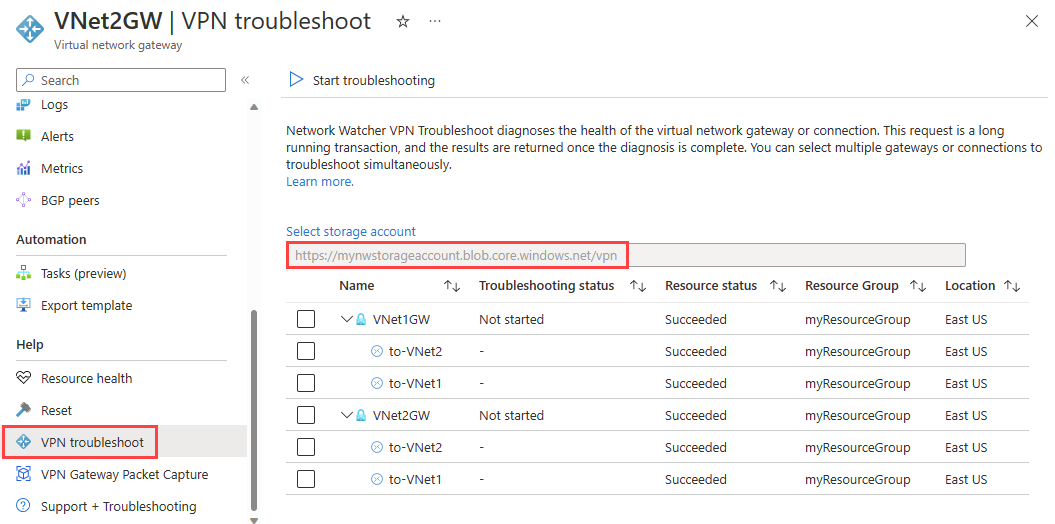
From the list, select VNet1GW and VNet2GW, and then select Start troubleshooting to start checking the gateways.
Once the check is completed, the troubleshooting status of both gateways changes to Unhealthy. Select a gateway to see more details under Status tab.

Because the VPN tunnels are disconnected, select the connections, and then select Start troubleshooting to start checking them.
Note
You can troubleshoot gateways and their connections in one step. However, checking only the gateways takes less time and based on the result, you decide if you need to check the connections.
Once the check is completed, the troubleshooting status of the connections changes to Unhealthy. Select a connection to see more details under Status tab.
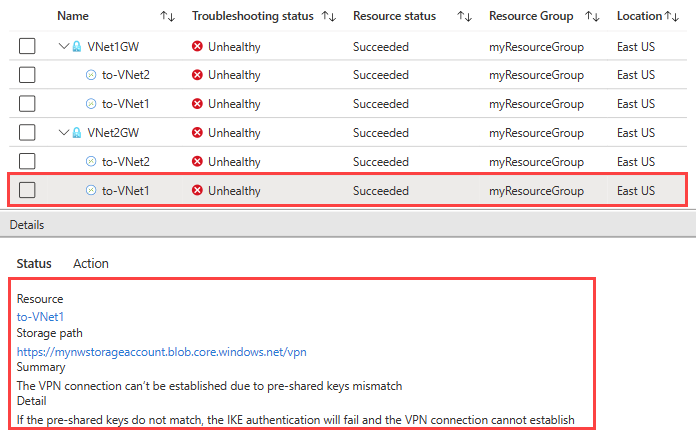
VPN troubleshoot checked the connections and found a mismatch in the shared keys.
Fix the problem and verify using VPN troubleshoot
Fix the problem
Fix the problem by correcting the key on to-VNet1 connection to match the key on to-VNet2 connection.
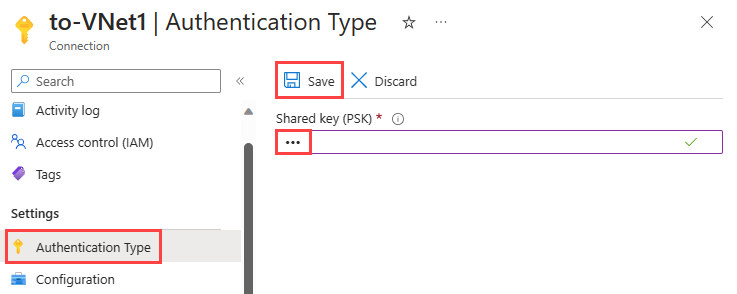
Go to to-VNet1 connection.
Under Settings, select Authentication Type.
In Shared key (PSK), enter 123 and then select Save.
Check connection status
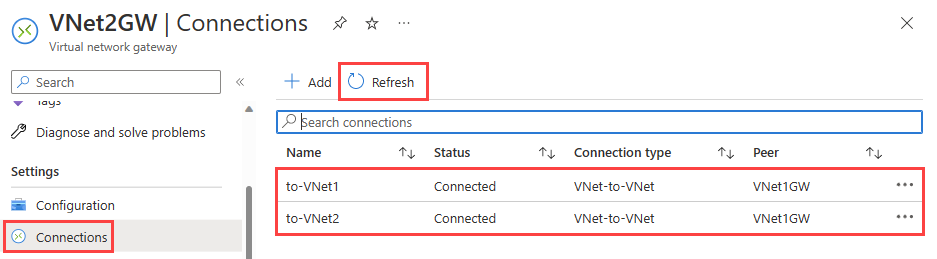
Go to VNet2GW gateway (you can check the connections status from VNet1GW gateway too).
Under Settings, select Connections.
Note
You may need to wait for a few minutes and then select Refresh to see the connections status as Connected.
Check connection health with VPN troubleshoot
Under Help of VNet2GW, select VPN troubleshoot.
Select Select storage account to choose the storage account and the container that you want to save the logs to.
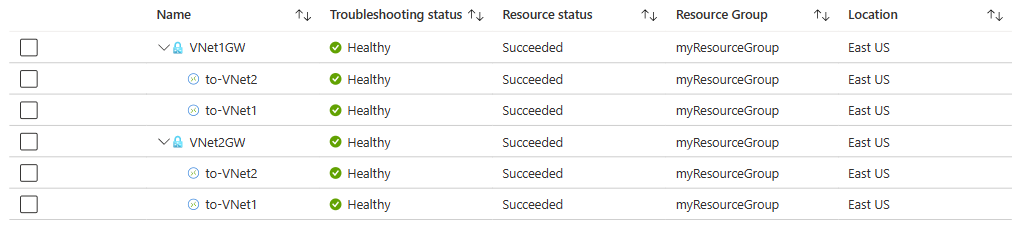
Select VNet1GW and VNet2GW, and then select Start troubleshooting to start checking the gateways
Clean up resources
When no longer needed, delete myResourceGroup resource group and all of the resources it contains:
In the search box at the top of the portal, enter myResourceGroup. Select myResourceGroup from the search results.
Select Delete resource group.
In Delete a resource group, enter myResourceGroup, and then select Delete.
Select Delete to confirm the deletion of the resource group and all its resources.
Next step
To learn how to log network communication to and from a virtual machine so that you can review the logs for anomalies, advance to the next tutorial.