In this article, you learn how to use Azure Network Watcher NSG diagnostics to check and troubleshoot security rules applied to your Azure traffic through network security groups and Azure Virtual Network Manager. NSG diagnostics checks if the traffic is allowed or denied by applied security rules.
The example in this article shows you how a misconfigured network security group can prevent you from using Azure Bastion to connect to a virtual machine.
Prerequisites
An Azure account with an active subscription. Create an account for free.
Azure Cloud Shell or Azure PowerShell.
The steps in this article run the Azure PowerShell cmdlets interactively in Azure Cloud Shell. To run the commands in the Cloud Shell, select Open Cloud Shell at the upper-right corner of a code block. Select Copy to copy the code and then paste it into Cloud Shell to run it. You can also run the Cloud Shell from within the Azure portal.
You can also install Azure PowerShell locally to run the cmdlets. This article requires the Az PowerShell module. For more information, see How to install Azure PowerShell. To find the installed version, run Get-InstalledModule -Name Az. If you run PowerShell locally, sign in to Azure using the Connect-AzAccount cmdlet.
An Azure account with an active subscription. Create an account for free.
Azure Cloud Shell or Azure CLI.
The steps in this article run the Azure CLI commands interactively in Azure Cloud Shell. To run the commands in the Cloud Shell, select Open Cloud Shell at the upper-right corner of a code block. Select Copy to copy the code, and paste it into Cloud Shell to run it. You can also run the Cloud Shell from within the Azure portal.
You can also install Azure CLI locally to run the commands. If you run Azure CLI locally, sign in to Azure using the az login command.
Create a resource group
Sign in to the Azure portal.
In the search box at the top of the portal, enter Resource group. Select Resource groups in the search results.
Select + Create.
In the Basics tab of Create a resource group, enter, or select the following information:
| Setting |
Value |
| Subscription |
Select your subscription. |
| Resource group |
Enter myResourceGroup. |
| Region |
Select East US. |
Select Review + create.
Select Create.
Create a resource group using New-AzResourceGroup. An Azure resource group is a logical container into which Azure resources are deployed and managed.
# Create a resource group.
New-AzResourceGroup -Name 'myResourceGroup' -Location 'eastus'
Create a resource group using az group create. An Azure resource group is a logical container into which Azure resources are deployed and managed.
# Create a resource group.
az group create --name 'myResourceGroup' --location 'eastus'
Create a virtual network
In this section, you create a virtual network with a subnet and a network security group applied to the subnet.
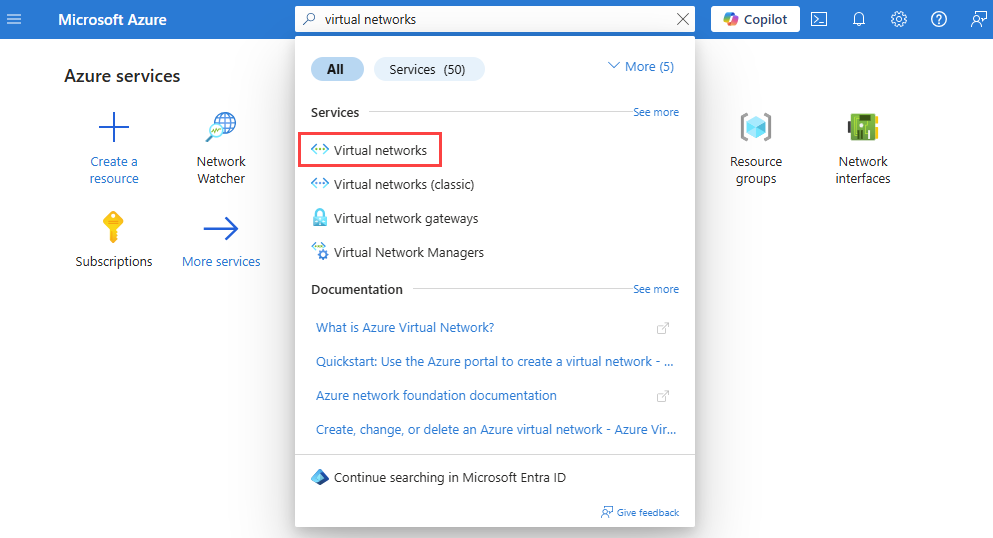
In the search box at the top of the portal, enter virtual networks. Select Virtual networks from the search results.
Select + Create. In Create virtual network, enter or select the following values in the Basics tab:
| Setting |
Value |
| Project Details |
|
| Subscription |
Select your Azure subscription. |
| Resource Group |
Select myResourceGroup. |
| Instance details |
|
| Virtual network name |
Enter myVNet. |
| Region |
Select (US) East US. |
Select Next to proceed to the Security tab.
Select Next to proceed to the IP Addresses tab.
Accept the default IP address space 10.0.0.0/16 and edit the default subnet by selecting the pencil icon. In the Edit subnet page, enter the following values:
| Setting |
Value |
| Subnet details |
|
| Name |
Enter mySubnet. |
| Security |
|
| Network security group |
Select Create new.
Enter mySubnet-nsg in Name.
Select OK. |
Select Save.
Select Review + create at the bottom of the screen, and when validation passes, select Create.
Create a default network security group using New-AzNetworkSecurityGroup.
# Create a network security group.
$networkSecurityGroup = New-AzNetworkSecurityGroup -Name 'mySubnet-nsg' -ResourceGroupName 'myResourceGroup' -Location 'eastus'
Create subnet configurations for the virtual machine subnet and Azure Bastion subnet using New-AzVirtualNetworkSubnetConfig.
# Create subnet configurations.
$firstSubnet = New-AzVirtualNetworkSubnetConfig -Name 'mySubnet' -AddressPrefix '10.0.0.0/24' -NetworkSecurityGroup $networkSecurityGroup
$secondSubnet = New-AzVirtualNetworkSubnetConfig -Name 'AzureBastionSubnet' -AddressPrefix '10.0.1.0/26'
Create a virtual network using New-AzVirtualNetwork.
# Create a virtual network.
$vnet = New-AzVirtualNetwork -Name 'myVNet' -ResourceGroupName 'myResourceGroup' -Location 'eastus' -AddressPrefix '10.0.0.0/16' -Subnet $firstSubnet,$secondSubnet
Create a default network security group using az network nsg create.
# Create a network security group.
az network nsg create --name 'mySubnet-nsg' --resource-group 'myResourceGroup' --location 'eastus'
Create a virtual network using az network vnet create.
az network vnet create --resource-group 'myResourceGroup' --name 'myVNet' --subnet-name 'mySubnet' --subnet-prefixes 10.0.0.0/24 --network-security-group 'mySubnet-nsg'
Create an Azure Bastion subnet using az network vnet subnet create.
az network vnet subnet create --resource-group 'myResourceGroup' --vnet-name 'myVNet' --name 'AzureBastionSubnet' --address-prefixes 10.0.1.0/26
Deploy Azure Bastion
Azure Bastion uses your browser to connect to virtual machines (VMs) in your virtual network over secure shell (SSH) or remote desktop protocol (RDP) by using their private IP addresses. The virtual machines don't need public IP addresses, client software, or special configuration. For more information about Azure Bastion, see Azure Bastion.
Note
Hourly pricing starts from the moment that Bastion is deployed, regardless of outbound data usage. For more information, see Pricing and SKUs. If you're deploying Bastion as part of a tutorial or test, we recommend that you delete this resource after you finish using it.
In the search box at the top of the portal, enter Bastion. Select Bastions in the search results.
Select + Create.
In the Basics tab of Create a Bastion, enter, or select the following information:
| Setting |
Value |
| Project details |
|
| Subscription |
Select your subscription. |
| Resource group |
Select myResourceGroup. |
| Instance details |
|
| Name |
Enter myVNet-Bastion. |
| Region |
Select East US. |
| Tier |
Select Developer. |
| Configure virtual networks |
|
| Virtual network |
Select myVNet. |
| Subnet |
The AzureBastionSubnet is created automatically with an address space of /26 or larger. |
Select Review + create.
Select Create.
Create a public IP address for Azure Bastion using New-AzPublicIpAddress.
# Create a public IP address for Azure Bastion.
$bastionIp = New-AzPublicIpAddress -ResourceGroupName 'myResourceGroup' -Name 'myBastionIp' -Location 'eastus' -Sku 'Standard' -AllocationMethod 'Static'
Create a Basic SKU Bastion host using New-AzBastion.
# Create an Azure Bastion host.
New-AzBastion -ResourceGroupName 'myResourceGroup' -Name 'myVNet-Bastion' -PublicIpAddressRgName 'myResourceGroup' -PublicIpAddressName 'myBastionIp' -VirtualNetworkRgName 'myResourceGroup' -VirtualNetworkName 'myVNet' -Sku 'Basic'
Create a public IP address for Azure Bastion using az network public-ip create.
az network public-ip create --resource-group 'myResourceGroup' --name 'myBastionIp' --sku 'Standard' --location 'eastus'
Create a Basic SKU Bastion host using az network bastion create.
az network bastion create --name 'myVNet-Bastion' --resource-group 'myResourceGroup' --vnet-name 'myVNet' --public-ip-address 'myBastionIp' --sku 'Basic' --location 'eastus'
Important
Hourly pricing starts from the moment Bastion host is deployed, regardless of outbound data usage. For more information, see Pricing. We recommend that you delete this resource once you've finished using it.
Create a virtual machine
In this section, you create a virtual machine and a network security group applied to its network interface.
In the search box at the top of the portal, enter virtual machines. Select Virtual machines from the search results.
Select + Create and then select Azure virtual machine.
In Create a virtual machine, enter or select the following values in the Basics tab:
| Setting |
Value |
| Project Details |
|
| Subscription |
Select your Azure subscription. |
| Resource Group |
Select myResourceGroup. |
| Instance details |
|
| Virtual machine name |
Enter myVM. |
| Region |
Select (US) East US. |
| Availability Options |
Select No infrastructure redundancy required. |
| Security type |
Select Standard. |
| Image |
Select Windows Server 2022 Datacenter: Azure Edition - x64 Gen2. |
| Size |
Choose a size or leave the default setting. |
| Administrator account |
|
| Username |
Enter a username. |
| Password |
Enter a password. |
| Confirm password |
Reenter password. |
Select the Networking tab, or select Next: Disks, then Next: Networking.
In the Networking tab, select the following values:
| Setting |
Value |
| Network interface |
|
| Virtual network |
Select myVNet. |
| Subnet |
Select mySubnet. |
| Public IP |
Select None. |
| NIC network security group |
Select Basic. |
| Public inbound ports |
Select None. |
Select Review + create.
Review the settings, and then select Create.
Create a default network security group using New-AzNetworkSecurityGroup.
# Create a default network security group.
New-AzNetworkSecurityGroup -Name 'myVM-nsg' -ResourceGroupName 'myResourceGroup' -Location  eastus
Create a virtual machine using New-AzVM. When prompted, enter a username and password.
# Create a virtual machine using the latest Windows Server 2022 image.
New-AzVm -ResourceGroupName 'myResourceGroup' -Name 'myVM' -Location 'eastus' -VirtualNetworkName 'myVNet' -SubnetName 'mySubnet' -SecurityGroupName 'myVM-nsg' -ImageName 'MicrosoftWindowsServer:WindowsServer:2022-Datacenter-azure-edition:latest'
Create a default network security group using az network nsg create.
# Create a default network security group.
az network nsg create --name 'myVM-nsg' --resource-group 'myResourceGroup' --location 'eastus'
Create a virtual machine using az vm create. When prompted, enter a username and password.
# Create a virtual machine using the latest Windows Server 2022 image.
az vm create --resource-group 'myResourceGroup' --name 'myVM' --location 'eastus' --vnet-name 'myVNet' --subnet 'mySubnet' --public-ip-address '' --nsg 'myVM-nsg' --image 'Win2022AzureEditionCore'
Add a security rule to the network security group
In this section, you add a security rule to the network security group associated with the network interface of myVM. The rule denies any inbound traffic from the virtual network.
In the search box at the top of the portal, enter network security groups. Select Network security groups from the search results.
From the list of network security groups, select myVM-nsg.
Under Settings, select Inbound security rules.
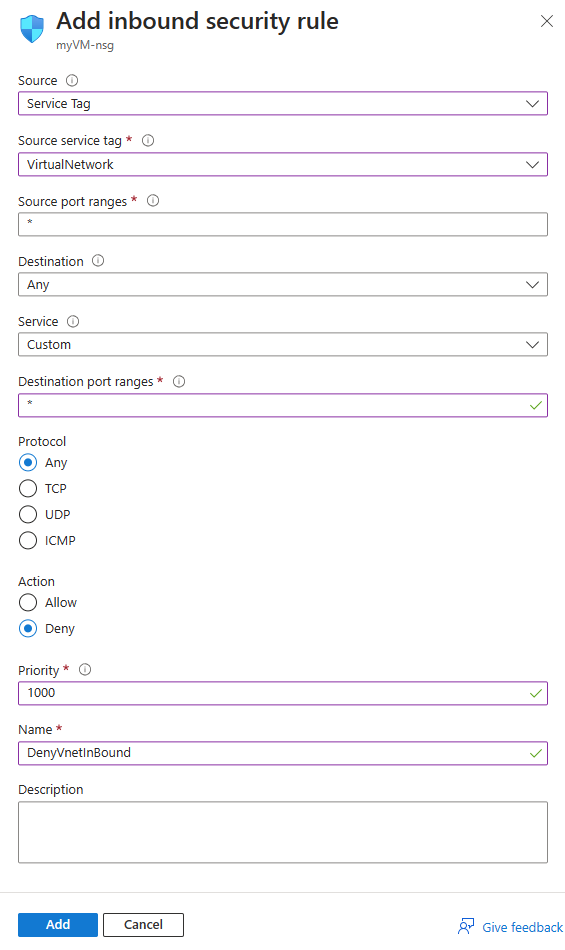
Select + Add. In the Networking tab, enter or select the following values:
| Setting |
Value |
| Source |
Select Service Tag. |
| Source service tag |
Select VirtualNetwork. |
| Source port ranges |
Enter *. |
| Destination |
Select Any. |
| Service |
Select Custom. |
| Destination port ranges |
Enter *. |
| Protocol |
Select Any. |
| Action |
Select Deny. |
| Priority |
Enter 1000. |
| Name |
Enter DenyVnetInBound. |
Select Add.
Use Add-AzNetworkSecurityRuleConfig to create a security rule that denies traffic from the virtual network. Then use Set-AzNetworkSecurityGroup to update the network security group with the new security rule.
# Place the network security group configuration into a variable.
$networkSecurityGroup = Get-AzNetworkSecurityGroup -Name 'myVM-nsg' -ResourceGroupName 'myResourceGroup'
# Create a security rule that denies inbound traffic from the virtual network service tag.
Add-AzNetworkSecurityRuleConfig -Name 'DenyVnetInBound' -NetworkSecurityGroup $networkSecurityGroup `
-Access 'Deny' -Protocol '*' -Direction 'Inbound' -Priority '1000' `
-SourceAddressPrefix 'virtualNetwork' -SourcePortRange '*' -DestinationAddressPrefix '*' -DestinationPortRange '*'
# Updates the network security group.
Set-AzNetworkSecurityGroup -NetworkSecurityGroup $networkSecurityGroup
Use az network nsg rule create to add to the network security group a security rule that denies traffic from the virtual network.
# Add to the network security group a security rule that denies inbound traffic from the virtual network service tag.
az network nsg rule create --name 'DenyVnetInBound' --resource-group 'myResourceGroup' --nsg-name 'myVM-nsg' --priority '1000' \
--access 'Deny' --protocol '*' --direction 'Inbound' --source-address-prefixes 'virtualNetwork' --source-port-ranges '*' \
--destination-address-prefixes '*' --destination-port-ranges '*'
Note
The VirtualNetwork service tag represents the address space of the virtual network, all connected on-premises address spaces, peered virtual networks, virtual networks connected to a virtual network gateway, the virtual IP address of the host, and address prefixes used on user-defined routes. For more information, see Service tags.
Check security rules applied to a virtual machine traffic
Use NSG diagnostics to check the security rules applied to the traffic originated from the Bastion subnet to the virtual machine.
In the search box at the top of the portal, search for and select Network Watcher.
Under Network diagnostic tools, select NSG diagnostics.
On the NSG diagnostics page, enter or select the following values:
| Setting |
Value |
| Target resource |
|
| Target resource type |
Select Virtual machine. |
| Virtual machine |
Select myVM virtual machine. |
| Traffic details |
|
| Protocol |
Select TCP. Other available options are: Any, UDP and ICMP. |
| Direction |
Select Inbound. Other available option is: Outbound. |
| Source type |
Select IPv4 address/CIDR. Other available option is: Service Tag. |
| IPv4 address/CIDR |
Enter 10.0.1.0/26, which is the IP address range of the Bastion subnet. Acceptable values are: single IP address, multiple IP addresses, single IP prefix, multiple IP prefixes. |
| Destination IP address |
Leave the default of 10.0.0.4, which is the IP address of myVM. |
| Destination port |
Enter * to include all ports. |
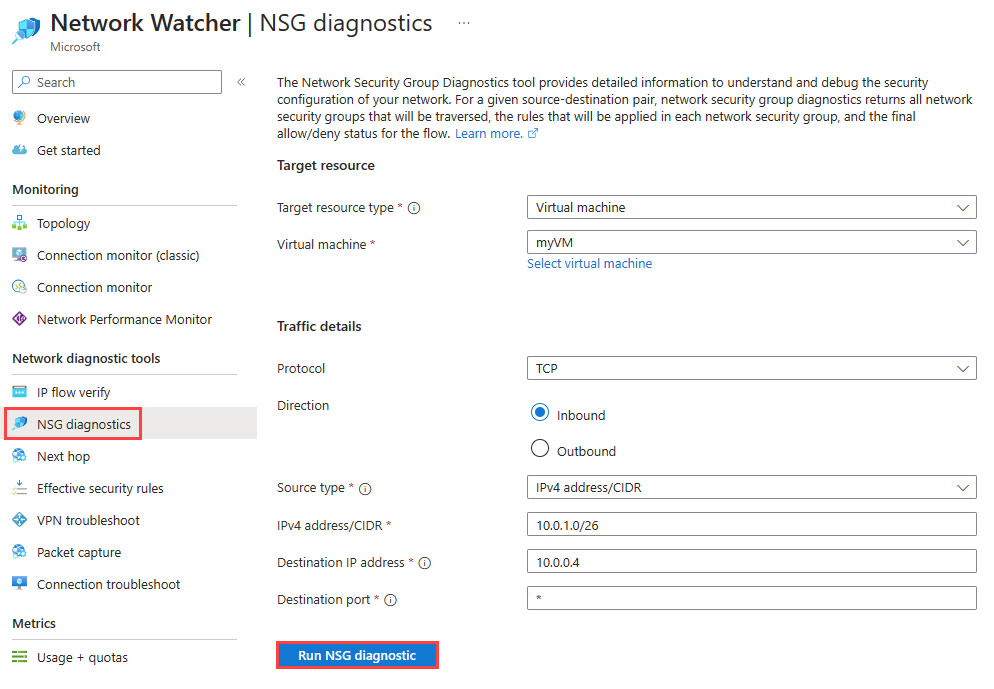
Select Run NSG diagnostics to run the test. Once NSG diagnostics completes checking all security rules, it displays the result.
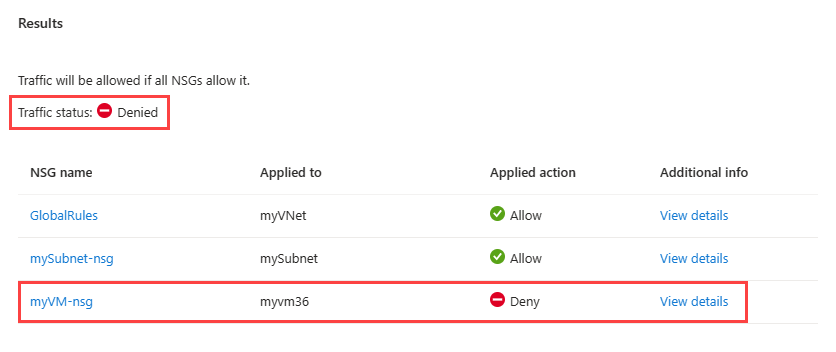
The result shows that there are three security rules assessed for the inbound connection from the Bastion subnet:
- GlobalRules: this security admin rule is applied at the virtual network level using Azure Virtual Network Manage. The rule allows inbound TCP traffic from the Bastion subnet to the virtual machine.
- mySubnet-nsg: this network security group is applied at the subnet level (subnet of the virtual machine). The rule allows inbound TCP traffic from the Bastion subnet to the virtual machine.
- myVM-nsg: this network security group is applied at the network interface (NIC) level. The rule denies inbound TCP traffic from the Bastion subnet to the virtual machine.
Select View details of myVM-nsg to see details about the security rules that this network security group has and which rule is denying the traffic.
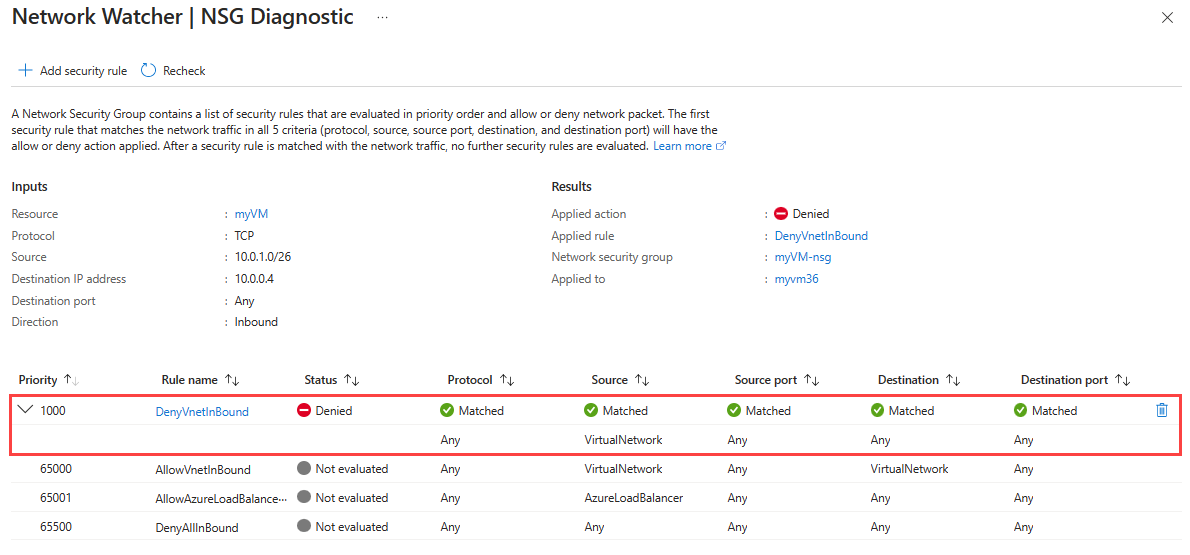
In myVM-nsg network security group, the security rule DenyVnetInBound denies any traffic coming from the address space of VirtualNetwork service tag to the virtual machine. The Bastion host uses IP addresses from the address range: 10.0.1.0/26, which is included in VirtualNetwork service tag, to connect to the virtual machine. Therefore, the connection from the Bastion host is denied by the DenyVnetInBound security rule.
Use Invoke-AzNetworkWatcherNetworkConfigurationDiagnostic to start the NSG diagnostics session.
# Create a profile for the diagnostic session.
$profile = New-AzNetworkWatcherNetworkConfigurationDiagnosticProfile -Direction Inbound -Protocol Tcp -Source 10.0.1.0/26 -Destination 10.0.0.4 -DestinationPort *
# Place the virtual machine configuration into a variable.
$vm = Get-AzVM -Name 'myVM' -ResourceGroupName 'myResourceGroup'
# Start the the NSG diagnostics session.
Invoke-AzNetworkWatcherNetworkConfigurationDiagnostic -Location 'eastus' -TargetResourceId $vm.Id -Profile $profile | Format-List
Output similar to the following example output is returned:
Results     : {Microsoft.Azure.Commands.Network.Models.PSNetworkConfigurationDiagnosticResult}
ResultsText : [
                {
                  "Profile": {
                    "Direction": "Inbound",
                    "Protocol": "Tcp",
                    "Source": "10.0.1.0/26",
                    "Destination": "10.0.0.4",
                    "DestinationPort": "*"
                  },
                  "NetworkSecurityGroupResult": {
                    "SecurityRuleAccessResult": "Deny",
                    "EvaluatedNetworkSecurityGroups": [
                      {
                        "NetworkSecurityGroupId": "/subscriptions/aaaa0a0a-bb1b-cc2c-dd3d-eeeeee4e4e4e/resourceGroups/NetworkAdmin/providers/Microsoft.Network/networkManagers/GlobalRules",
                        "MatchedRule": {
                          "RuleName": "VirtualNetwork",
                          "Action": "Allow"
                        },
                        "RulesEvaluationResult": [
                          {
                            "Name": "VirtualNetwork",
                            "ProtocolMatched": true,
                            "SourceMatched": true,
                            "SourcePortMatched": true,
                            "DestinationMatched": true,
                            "DestinationPortMatched": true
                          }
                        ]
                      },
                      {
                        "NetworkSecurityGroupId": "/subscriptions/bbbb1b1b-cc2c-dd3d-ee4e-ffffff5f5f5f/resourceGroups/myResourceGroup/providers/Microsoft.Network/networkSecurityGroups/mySubnet-nsg",
                        "MatchedRule": {
                          "RuleName": "DefaultRule_AllowVnetInBound",
                          "Action": "Allow"
                        },
                        "RulesEvaluationResult": [
                          {
                            "Name": "DefaultRule_AllowVnetInBound",
                            "ProtocolMatched": true,
                            "SourceMatched": true,
                            "SourcePortMatched": true,
                            "DestinationMatched": true,
                            "DestinationPortMatched": true
                          }
                        ]
                      },
                      {
                        "NetworkSecurityGroupId": "/subscriptions/bbbb1b1b-cc2c-dd3d-ee4e-ffffff5f5f5f/resourceGroups/myResourceGroup/providers/Microsoft.Network/networkSecurityGroups/myVM-nsg",
                        "MatchedRule": {
                          "RuleName": "UserRule_DenyVnetInBound",
                          "Action": "Deny"
                        },
                        "RulesEvaluationResult": [
                          {
                            "Name": "UserRule_DenyVnetInBound",
                            "ProtocolMatched": true,
                            "SourceMatched": true,
                            "SourcePortMatched": true,
                            "DestinationMatched": true,
                            "DestinationPortMatched": true
                          }
                        ]
                      }
                    ]
                  }
                }
              ]
The result shows that there are three security rules assessed for the inbound connection from the Bastion subnet:
- GlobalRules: this security admin rule is applied at the virtual network level using Azure Virtual Network Manage. The rule allows inbound TCP traffic from the Bastion subnet to the virtual machine.
- mySubnet-nsg: this network security group is applied at the subnet level (subnet of the virtual machine). The rule allows inbound TCP traffic from the Bastion subnet to the virtual machine.
- myVM-nsg: this network security group is applied at the network interface (NIC) level. The rule denies inbound TCP traffic from the Bastion subnet to the virtual machine.
In myVM-nsg network security group, the security rule DenyVnetInBound denies any traffic coming from the address space of VirtualNetwork service tag to the virtual machine. The Bastion host uses IP addresses from 10.0.1.0/26, which are included VirtualNetwork service tag, to connect to the virtual machine. Therefore, the connection from the Bastion host is denied by the DenyVnetInBound security rule.
Use az network watcher run-configuration-diagnostic to start the NSG diagnostics session.
# Start the the NSG diagnostics session.
az network watcher run-configuration-diagnostic --resource 'myVM' --resource-group 'myResourceGroup' --resource-type 'virtualMachines' --direction 'Inbound' --protocol 'TCP' --source '10.0.1.0/26' --destination '10.0.0.4' --port '*'
Output similar to the following example output is returned:
{
  "results": [
    {
      "networkSecurityGroupResult": {
        "evaluatedNetworkSecurityGroups": [
          {
            "appliedTo": "/subscriptions/bbbb1b1b-cc2c-dd3d-ee4e-ffffff5f5f5f/resourceGroups/myResourceGroup/providers/Microsoft.Network/virtualNetworks/myVNet",
            "matchedRule": {
              "action": "Allow",
              "ruleName": "VirtualNetwork"
            },
            "networkSecurityGroupId": "/subscriptions/aaaa0a0a-bb1b-cc2c-dd3d-eeeeee4e4e4e/resourceGroups/NetworkAdmin/providers/Microsoft.Network/networkManagers/GlobalRules",
            "rulesEvaluationResult": [
              {
                "destinationMatched": true,
                "destinationPortMatched": true,
                "name": "VirtualNetwork",
                "protocolMatched": true,
                "sourceMatched": true,
                "sourcePortMatched": true
              }
            ]
          },
          {
            "appliedTo": "/subscriptions/bbbb1b1b-cc2c-dd3d-ee4e-ffffff5f5f5f/resourceGroups/myResourceGroup/providers/Microsoft.Network/virtualNetworks/myVNet/subnets/mySubnet",
            "matchedRule": {
              "action": "Allow",
              "ruleName": "DefaultRule_AllowVnetInBound"
            },
            "networkSecurityGroupId": "/subscriptions/bbbb1b1b-cc2c-dd3d-ee4e-ffffff5f5f5f/resourceGroups/myResourceGroup/providers/Microsoft.Network/networkSecurityGroups/mySubnet-nsg",
            "rulesEvaluationResult": [
              {
                "destinationMatched": true,
                "destinationPortMatched": true,
                "name": "DefaultRule_AllowVnetInBound",
                "protocolMatched": true,
                "sourceMatched": true,
                "sourcePortMatched": true
              }
            ]
          },
          {
            "appliedTo": "/subscriptions/bbbb1b1b-cc2c-dd3d-ee4e-ffffff5f5f5f/resourceGroups/myResourceGroup/providers/Microsoft.Network/networkInterfaces/myvm36",
            "matchedRule": {
              "action": "Deny",
              "ruleName": "UserRule_DenyVnetInBound"
            },
            "networkSecurityGroupId": "/subscriptions/bbbb1b1b-cc2c-dd3d-ee4e-ffffff5f5f5f/resourceGroups/myResourceGroup/providers/Microsoft.Network/networkSecurityGroups/myVM-nsg",
            "rulesEvaluationResult": [
              {
                "destinationMatched": true,
                "destinationPortMatched": true,
                "name": "UserRule_DenyVnetInBound",
                "protocolMatched": true,
                "sourceMatched": true,
                "sourcePortMatched": true
              }
            ]
          }
        ],
        "securityRuleAccessResult": "Deny"
      },
      "profile": {
        "destination": "10.0.0.4",
        "destinationPort": "*",
        "direction": "Inbound",
        "protocol": "TCP",
        "source": "10.0.1.0/26"
      }
    }
  ]
}
The result shows that there are three security rules assessed for the inbound connection from the Bastion subnet:
- GlobalRules: this security admin rule is applied at the virtual network level using Azure Virtual Network Manage. The rule allows inbound TCP traffic from the Bastion subnet to the virtual machine.
- mySubnet-nsg: this network security group is applied at the subnet level (subnet of the virtual machine). The rule allows inbound TCP traffic from the Bastion subnet to the virtual machine.
- myVM-nsg: this network security group is applied at the network interface (NIC) level. The rule denies inbound TCP traffic from the Bastion subnet to the virtual machine.
In myVM-nsg network security group, the security rule DenyVnetInBound denies any traffic coming from the address space of VirtualNetwork service tag to the virtual machine. The Bastion host uses IP addresses from 10.0.1.0/26, which are included VirtualNetwork service tag, to connect to the virtual machine. Therefore, the connection from the Bastion host is denied by the DenyVnetInBound security rule.
Add a security rule to allow traffic from the Bastion subnet
To connect to myVM using Azure Bastion, traffic from the Bastion subnet must be allowed by the network security group. To allow traffic from 10.0.1.0/26, add a security rule with a higher priority (lower priority number) than DenyVnetInBound rule or edit the DenyVnetInBound rule to allow traffic from the Bastion subnet.
You can add the security rule to the network security group from the Network Watcher page that showed you the details about the security rule denying the traffic to the virtual machine.
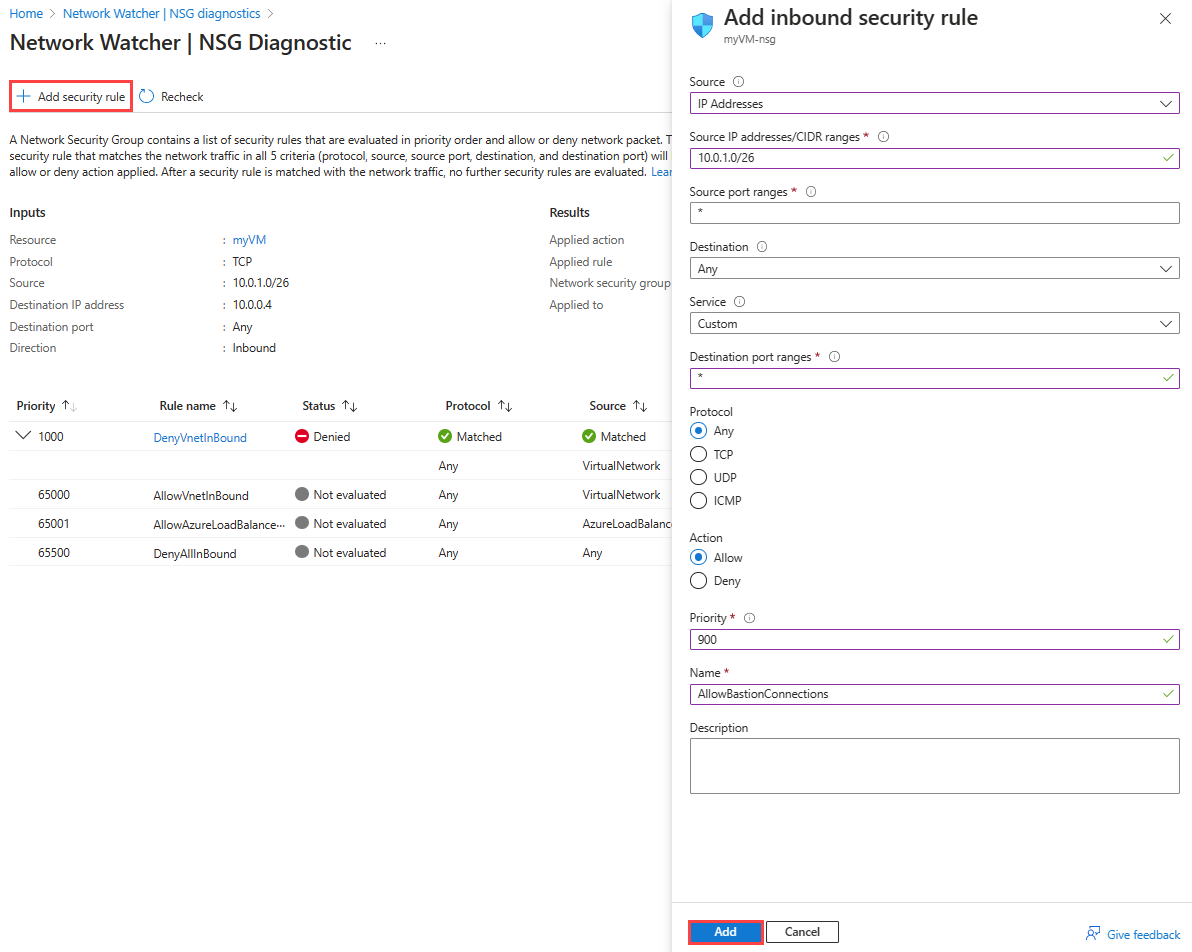
To add the security rule from within Network Watcher, select + Add security rule, and then enter or select the following values:
| Setting |
Value |
| Source |
Select IP Addresses. |
| Source IP addresses/CIDR ranges |
Enter 10.0.1.0/26, which is the IP address range of the Bastion subnet. |
| Source port ranges |
Enter *. |
| Destination |
Select Any. |
| Service |
Select Custom. |
| Destination port ranges |
Enter *. |
| Protocol |
Select Any. |
| Action |
Select Allow. |
| Priority |
Enter 900, which is higher priority than 1000 used for DenyVnetInBound rule. |
| Name |
Enter AllowBastionConnections. |
Select Recheck to run the diagnostic session again. The diagnostic session should now show that the traffic from the Bastion subnet is allowed.
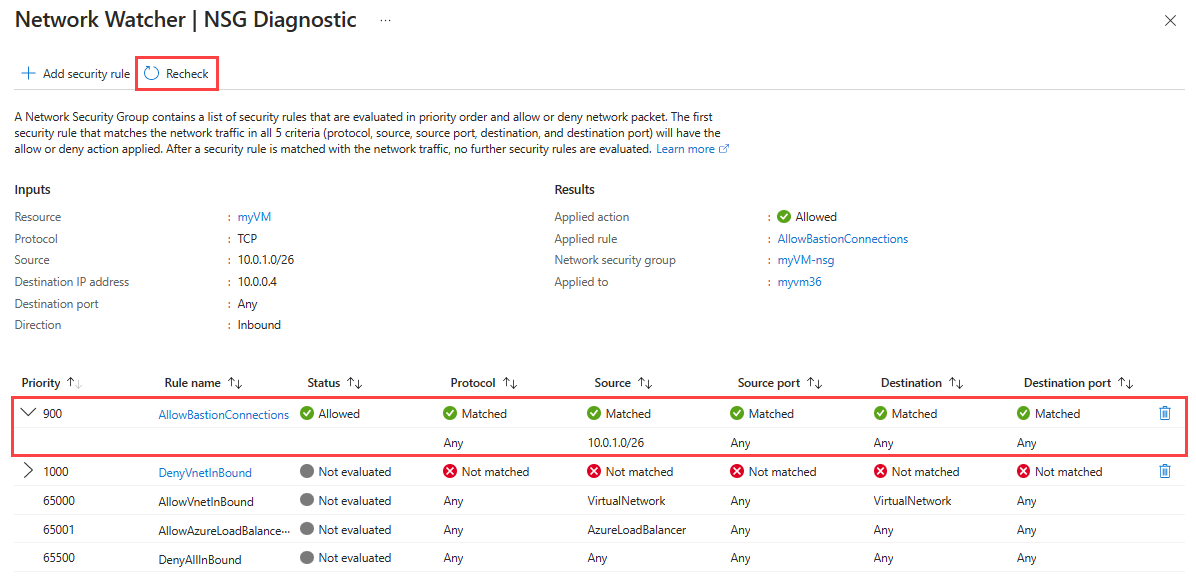
The security rule AllowBastionConnections allows the traffic from any IP address in 10.0.1.0/26 to the virtual machine. Because the Bastion host uses IP addresses from 10.0.1.0/26, its connection to the virtual machine is allowed by the AllowBastionConnections security rule.
Use Add-AzNetworkSecurityRuleConfig to create a security rule that allows traffic from the Bastion subnet. Then use Set-AzNetworkSecurityGroup to update the network security group with the new security rule.
# Place the network security group configuration into a variable.
$networkSecurityGroup = Get-AzNetworkSecurityGroup -Name 'myVM-nsg' -ResourceGroupName 'myResourceGroup'
# Create a security rule.
Add-AzNetworkSecurityRuleConfig -Name 'AllowBastionConnections' -NetworkSecurityGroup $networkSecurityGroup -Priority '900' -Access 'Allow' `
-Protocol '*' -Direction 'Inbound' -SourceAddressPrefix '10.0.1.0/26' -SourcePortRange '*' -DestinationAddressPrefix '*' -DestinationPortRange '*'
# Updates the network security group.
Set-AzNetworkSecurityGroup -NetworkSecurityGroup $networkSecurityGroup
Use Invoke-AzNetworkWatcherNetworkConfigurationDiagnostic to recheck using a new NSG diagnostics session.
# Create a profile for the diagnostic session.
$profile = New-AzNetworkWatcherNetworkConfigurationDiagnosticProfile -Direction 'Inbound' -Protocol 'Tcp' -Source '10.0.1.0/26' -Destination '10.0.0.4' -DestinationPort '*'
# Place the virtual machine configuration into a variable.
$vm = Get-AzVM -Name 'myVM' -ResourceGroupName 'myResourceGroup'
# Start the diagnostic session.
Invoke-AzNetworkWatcherNetworkConfigurationDiagnostic -Location 'eastus' -TargetResourceId $vm.Id -Profile $profile | Format-List
Output similar to the following example output is returned:
Results     : {Microsoft.Azure.Commands.Network.Models.PSNetworkConfigurationDiagnosticResult}
ResultsText : [
                {
                  "Profile": {
                    "Direction": "Inbound",
                    "Protocol": "Tcp",
                    "Source": "10.0.1.0/26",
                    "Destination": "10.0.0.4",
                    "DestinationPort": "*"
                  },
                  "NetworkSecurityGroupResult": {
                    "SecurityRuleAccessResult": "Allow",
                    "EvaluatedNetworkSecurityGroups": [
                      {
                        "NetworkSecurityGroupId": "/subscriptions/aaaa0a0a-bb1b-cc2c-dd3d-eeeeee4e4e4e/resourceGroups/NetworkAdmin/providers/Microsoft.Network/networkManagers/GlobalRules",
                        "MatchedRule": {
                          "RuleName": "VirtualNetwork",
                          "Action": "Allow"
                        },
                        "RulesEvaluationResult": [
                          {
                            "Name": "VirtualNetwork",
                            "ProtocolMatched": true,
                            "SourceMatched": true,
                            "SourcePortMatched": true,
                            "DestinationMatched": true,
                            "DestinationPortMatched": true
                          }
                        ]
                      },
                      {
                        "NetworkSecurityGroupId": "/subscriptions/bbbb1b1b-cc2c-dd3d-ee4e-ffffff5f5f5f/resourceGroups/myResourceGroup/providers/Microsoft.Network/networkSecurityGroups/mySubnet-nsg",
                        "MatchedRule": {
                          "RuleName": "DefaultRule_AllowVnetInBound",
                          "Action": "Allow"
                        },
                        "RulesEvaluationResult": [
                          {
                            "Name": "DefaultRule_AllowVnetInBound",
                            "ProtocolMatched": true,
                            "SourceMatched": true,
                            "SourcePortMatched": true,
                            "DestinationMatched": true,
                            "DestinationPortMatched": true
                          }
                        ]
                      },
                      {
                        "NetworkSecurityGroupId": "/subscriptions/bbbb1b1b-cc2c-dd3d-ee4e-ffffff5f5f5f/resourceGroups/myResourceGroup/providers/Microsoft.Network/networkSecurityGroups/myVM-nsg",
                        "MatchedRule": {
                          "RuleName": "UserRule_AllowBastionConnections",
                          "Action": "Allow"
                        },
                        "RulesEvaluationResult": [
                          {
                            "Name": "UserRule_AllowBastionConnections",
                            "ProtocolMatched": true,
                            "SourceMatched": true,
                            "SourcePortMatched": true,
                            "DestinationMatched": true,
                            "DestinationPortMatched": true
                          }
                        ]
                      }
                    ]
                  }
                }
              ]
The security rule AllowBastionConnections allows the traffic from any IP address in 10.0.1.0/26 to the virtual machine. Because the Bastion host uses IP addresses from 10.0.1.0/26, its connection to the virtual machine is allowed by the AllowBastionConnections security rule.
Use az network nsg rule create to add to the network security group a security rule that allows traffic from the Bastion subnet.
# Add a security rule to the network security group.
az network nsg rule create --name 'AllowBastionConnections' --resource-group 'myResourceGroup' --nsg-name 'myVM-nsg' --priority '900' \
--access 'Allow' --protocol '*' --direction 'Inbound' --source-address-prefixes '10.0.1.0/26' --source-port-ranges '*' \
--destination-address-prefixes '*' --destination-port-ranges '*'
Use az network watcher run-configuration-diagnostic to recheck using a new NSG diagnostics session.
# Start the the NSG diagnostics session.
az network watcher run-configuration-diagnostic --resource 'myVM' --resource-group 'myResourceGroup' --resource-type 'virtualMachines' --direction 'Inbound' --protocol 'TCP' --source '10.0.1.0/26' --destination '10.0.0.4' --port '*'
Output similar to the following example output is returned:
{
  "results": [
    {
      "networkSecurityGroupResult": {
        "evaluatedNetworkSecurityGroups": [
          {
            "appliedTo": "/subscriptions/bbbb1b1b-cc2c-dd3d-ee4e-ffffff5f5f5f/resourceGroups/myResourceGroup/providers/Microsoft.Network/virtualNetworks/myVNet",
            "matchedRule": {
              "action": "Allow",
              "ruleName": "VirtualNetwork"
            },
            "networkSecurityGroupId": "/subscriptions/aaaa0a0a-bb1b-cc2c-dd3d-eeeeee4e4e4e/resourceGroups/NetworkAdmin/providers/Microsoft.Network/networkManagers/GlobalRules",
            "rulesEvaluationResult": [
              {
                "destinationMatched": true,
                "destinationPortMatched": true,
                "name": "VirtualNetwork",
                "protocolMatched": true,
                "sourceMatched": true,
                "sourcePortMatched": true
              }
            ]
          },
          {
            "appliedTo": "/subscriptions/bbbb1b1b-cc2c-dd3d-ee4e-ffffff5f5f5f/resourceGroups/myResourceGroup/providers/Microsoft.Network/virtualNetworks/myVNet/subnets/mySubnet",
            "matchedRule": {
              "action": "Allow",
              "ruleName": "DefaultRule_AllowVnetInBound"
            },
            "networkSecurityGroupId": "/subscriptions/bbbb1b1b-cc2c-dd3d-ee4e-ffffff5f5f5f/resourceGroups/myResourceGroup/providers/Microsoft.Network/networkSecurityGroups/mySubnet-nsg",
            "rulesEvaluationResult": [
              {
                "destinationMatched": true,
                "destinationPortMatched": true,
                "name": "DefaultRule_AllowVnetInBound",
                "protocolMatched": true,
                "sourceMatched": true,
                "sourcePortMatched": true
              }
            ]
          },
          {
            "appliedTo": "/subscriptions/bbbb1b1b-cc2c-dd3d-ee4e-ffffff5f5f5f/resourceGroups/myResourceGroup/providers/Microsoft.Network/networkInterfaces/myvm36",
            "matchedRule": {
              "action": "Allow",
              "ruleName": "UserRule_AllowBastionConnections"
            },
            "networkSecurityGroupId": "/subscriptions/bbbb1b1b-cc2c-dd3d-ee4e-ffffff5f5f5f/resourceGroups/myResourceGroup/providers/Microsoft.Network/networkSecurityGroups/myVM-nsg",
            "rulesEvaluationResult": [
              {
                "destinationMatched": true,
                "destinationPortMatched": true,
                "name": "UserRule_AllowBastionConnections",
                "protocolMatched": true,
                "sourceMatched": true,
                "sourcePortMatched": true
              }
            ]
          }
        ],
        "securityRuleAccessResult": "Allow"
      },
      "profile": {
        "destination": "10.0.0.4",
        "destinationPort": "*",
        "direction": "Inbound",
        "protocol": "TCP",
        "source": "10.0.1.0/26"
      }
    }
  ]
}
The security rule AllowBastionConnections allows the traffic from any IP address in 10.0.1.0/26 to the virtual machine. Because the Bastion host uses IP addresses from 10.0.1.0/26, its connection to the virtual machine is allowed by the AllowBastionConnections security rule.
Clean up resources
When no longer needed, delete the resource group and all of the resources it contains:
In the search box at the top of the portal, enter myResourceGroup. Select myResourceGroup from the search results.
Select Delete resource group.
In Delete a resource group, enter myResourceGroup, and then select Delete.
Select Delete to confirm the deletion of the resource group and all its resources.
Use Remove-AzResourceGroup to delete the resource group and all of the resources it contains.
# Delete the resource group and all the resources it contains.
Remove-AzResourceGroup -Name 'myResourceGroup' -Force
Use az group delete to remove the resource group and all of the resources it contains
# Delete the resource group and all the resources it contains.
az group delete --name 'myResourceGroup' --yes --no-wait
Related content


