Quickstart: Diagnose a virtual machine network traffic filter problem using the Azure CLI
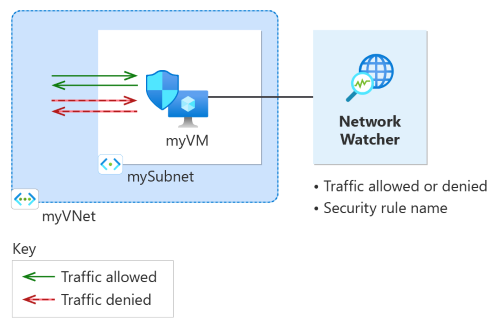
In this quickstart, you deploy a virtual machine and use Network Watcher IP flow verify to test the connectivity to and from different IP addresses. Using the IP flow verify results, you determine the security rule that's blocking the traffic and causing the communication failure and learn how you can resolve it. You also learn how to use the effective security rules for a network interface to determine why a security rule is allowing or denying traffic.
If you don't have an Azure subscription, create a free account before you begin.
Prerequisites
An Azure account with an active subscription.
Azure Cloud Shell or Azure CLI.
The steps in this article run the Azure CLI commands interactively in Azure Cloud Shell. To run the commands in the Cloud Shell, select Open Cloud Shell at the upper-right corner of a code block. Select Copy to copy the code, and paste it into Cloud Shell to run it. You can also run the Cloud Shell from within the Azure portal.
You can also install Azure CLI locally to run the commands. This quickstart requires version 2.0 or later of the Azure CLI. If you run Azure CLI locally, sign in to Azure using the az login command.
Create a virtual machine
In this section, you create a virtual network and a subnet in the East US region. Then, you create a virtual machine in the subnet with a default network security group.
Create a resource group using az group create. An Azure resource group is a logical container into which Azure resources are deployed and managed.
# Create a resource group.
az group create --name 'myResourceGroup' --location 'eastus'
Create a virtual network using az network vnet create.
# Create a virtual network and a subnet.
az network vnet create --resource-group 'myResourceGroup' --name 'myVNet' --subnet-name 'mySubnet' --subnet-prefixes 10.0.0.0/24
Create a default network security group using az network nsg create.
# Create a default network security group.
az network nsg create --name 'myVM-nsg' --resource-group 'myResourceGroup' --location 'eastus'
Create a virtual machine using az vm create. When prompted, enter a username and password.
# Create a Linux virtual machine using the latest Ubuntu 20.04 LTS image.
az vm create --resource-group 'myResourceGroup' --name 'myVM' --location 'eastus' --vnet-name 'myVNet' --subnet 'mySubnet' --public-ip-address '' --nsg 'myVM-nsg' --image 'Canonical:0001-com-ubuntu-server-focal:20_04-lts-gen2:latest'
Test network communication using IP flow verify
In this section, you use the IP flow verify capability of Network Watcher to test network communication to and from the virtual machine.
Use az network watcher test-ip-flow command to test outbound communication from myVM to 13.107.21.200 using IP flow verify (
13.107.21.200is one of the public IP addresses used bywww.bing.com):# Start the IP flow verify session to test outbound flow to www.bing.com. az network watcher test-ip-flow --direction 'outbound' --protocol 'TCP' --local '10.0.0.4:60000' --remote '13.107.21.200:80' --vm 'myVM' --nic 'myVmVMNic' --resource-group 'myResourceGroup' --out 'table'After a few seconds, you get a similar output to the following example:
Access  RuleName
------  --------
Allow   defaultSecurityRules/AllowInternetOutBound
The test result indicates that access is allowed to 13.107.21.200 because of the default security rule AllowInternetOutBound. By default, Azure virtual machines can access the internet.
Change RemoteIPAddress to 10.0.1.10 and repeat the test. 10.0.1.10 is a private IP address in myVNet address space.
# Start the IP flow verify session to test outbound flow to 10.0.1.10.
az network watcher test-ip-flow --direction 'outbound' --protocol 'TCP' --local '10.0.0.4:60000' --remote '10.0.1.10:80' --vm 'myVM' --nic 'myVmVMNic' --resource-group 'myResourceGroup' --out 'table'
After a few seconds, you get a similar output to the following example:
Access RuleName
------ --------
Allow  defaultSecurityRules/AllowVnetOutBound
The result of the second test indicates that access is allowed to 10.0.1.10 because of the default security rule AllowVnetOutBound. By default, an Azure virtual machine can access all IP addresses in the address space of its virtual network.
Change RemoteIPAddress to 10.10.10.10 and repeat the test. 10.10.10.10 is a private IP address that isn't in myVNet address space.
# Start the IP flow verify session to test outbound flow to 10.10.10.10.
az network watcher test-ip-flow --direction 'outbound' --protocol 'TCP' --local '10.0.0.4:60000' --remote '10.10.10.10:80' --vm 'myVM' --nic 'myVmVMNic' --resource-group 'myResourceGroup' --out 'table'
After a few seconds, you get a similar output to the following example:
Access RuleName
------ --------
Allow  defaultSecurityRules/DenyAllOutBound
The result of the third test indicates that access is denied to 10.10.10.10 because of the default security rule DenyAllOutBound.
Change direction to inbound, the local port to 80, and the remote port to 60000, and then repeat the test.
# Start the IP flow verify session to test inbound flow from 10.10.10.10.
az network watcher test-ip-flow --direction 'inbound' --protocol 'TCP' --local '10.0.0.4:80' --remote '10.10.10.10:6000' --vm 'myVM' --nic 'myVmVMNic' --resource-group 'myResourceGroup' --out 'table'
After a few seconds, you get similar output to the following example:
Access RuleName
------ --------
Allow  defaultSecurityRules/DenyAllInBound
The result of the fourth test indicates that access is denied from 10.10.10.10 because of the default security rule DenyAllInBound. By default, all access to an Azure virtual machine from outside the virtual network is denied.
View details of a security rule
To determine why the rules in the previous section allow or deny communication, review the effective security rules for the network interface of myVM virtual machine using the az network nic list-effective-nsg command:
# Get the effective security rules for the network interface of myVM.
az network nic list-effective-nsg --resource-group 'myResourceGroup' --name 'myVmVMNic'
The returned output includes the following information for the AllowInternetOutbound rule that allowed outbound access to www.bing.com:
{
  "access": "Allow",
  "destinationAddressPrefix": "Internet",
  "destinationAddressPrefixes": [
	"Internet"
  ],
  "destinationPortRange": "0-65535",
  "destinationPortRanges": [
	"0-65535"
  ],
  "direction": "Outbound",
  "expandedDestinationAddressPrefix": [
	"1.0.0.0/8",
	"2.0.0.0/7",
	"4.0.0.0/9",
	"4.144.0.0/12",
	"4.160.0.0/11",
	"4.192.0.0/10",
	"5.0.0.0/8",
	"6.0.0.0/7",
	"8.0.0.0/7",
	"11.0.0.0/8",
	"12.0.0.0/8",
	"13.0.0.0/10",
	"13.64.0.0/11",
	"13.104.0.0/13",
	"13.112.0.0/12",
	"13.128.0.0/9",
	"14.0.0.0/7",
	...
	...
	...
	"200.0.0.0/5",
	"208.0.0.0/4"
  ],
  "name": "defaultSecurityRules/AllowInternetOutBound",
  "priority": 65001,
  "protocol": "All",
  "sourceAddressPrefix": "0.0.0.0/0",
  "sourceAddressPrefixes": [
	"0.0.0.0/0",
	"0.0.0.0/0"
  ],
  "sourcePortRange": "0-65535",
  "sourcePortRanges": [
	"0-65535"
  ]
},
You can see in the output that address prefix 13.104.0.0/13 is among the address prefixes of AllowInternetOutBound rule. This prefix encompasses the IP address 13.107.21.200, which you utilized to test outbound communication to www.bing.com.
Similarly, you can check the other rules to see the source and destination IP address prefixes under each rule.
Clean up resources
When no longer needed, use az group delete to delete myResourceGroup resource group and all of the resources it contains:
# Delete the resource group and all resources it contains.
az group delete --name 'myResourceGroup' --yes
Next steps
In this quickstart, you created a VM and diagnosed inbound and outbound network traffic filters. You learned that network security group rules allow or deny traffic to and from a VM. Learn more about security rules and how to create security rules.
Even with the proper network traffic filters in place, communication to a virtual machine can still fail, due to routing configuration. To learn how to diagnose virtual machine routing problems, see Diagnose a virtual machine network routing problem. To diagnose outbound routing, latency, and traffic filtering problems with one tool, see Troubleshoot connections with Azure Network Watcher.
Feedback
Coming soon: Throughout 2024 we will be phasing out GitHub Issues as the feedback mechanism for content and replacing it with a new feedback system. For more information see: https://aka.ms/ContentUserFeedback.
Submit and view feedback for