Note
Access to this page requires authorization. You can try signing in or changing directories.
Access to this page requires authorization. You can try changing directories.
This article describes how to send browser push notifications to single users using Azure Notification Hubs.
At a high level, the process is:
Overview
Web push (or browser push) is a type of notification that customers get on their desktop browsers, or in some cases mobile browsers, on a per-website basis.
Azure Notification Hubs now supports browser push for all major browsers, including Microsoft Edge, Google Chrome, and Mozilla Firefox. Apple Safari isn't included. For Apple Safari, you can use existing APNS support as described in Configure Safari push notifications, with certificate-based authentication.
Browser push is supported across platforms on devices with the following operating systems and browsers.
Browser push support on laptop computers:
| Operating system | Browsers |
|---|---|
| Windows OS | Google Chrome v48+ Microsoft Edge v17+ Mozilla Firefox v44+ Safari v7+ Opera v42+ |
| macOS | Chrome v48+ Firefox v44+ Safari v7+ Opera v42+ |
| Linux OS | Chrome v48+ Firefox v44+ Safari v7+ Opera v42+ |
Browser push support on tablet PCs:
| Operating system | Browsers |
|---|---|
| Windows OS | Chrome v48+ Firefox v44+ Opera v42+ |
| iOS | Not supported. |
| Android OS | Chrome v48+ Firefox v44+ Opera v42+ |
Browser push support on mobile devices:
| Operating system | Browsers |
|---|---|
| iOS | Not supported. |
| Android OS | Chrome v48+ Firefox v44+ Opera v42+ |
Set credentials
To subscribe to browser push notifications on your web site, you can use VAPID keys. You can generate VAPID credentials by using services such as the VAPID key generator. The credentials should look similar to the following example:
{
    "location": "South Central US",
    "properties": {
        "browserCredential": {
            "properties": {
                "subject": "mailto:email@microsoft.com",
                "vapidPublicKey": "some-vapid-public-key",
                "vapidPrivateKey":"some-vapid-private-key"
            }
        }
    }
}
Set credentials in Azure portal
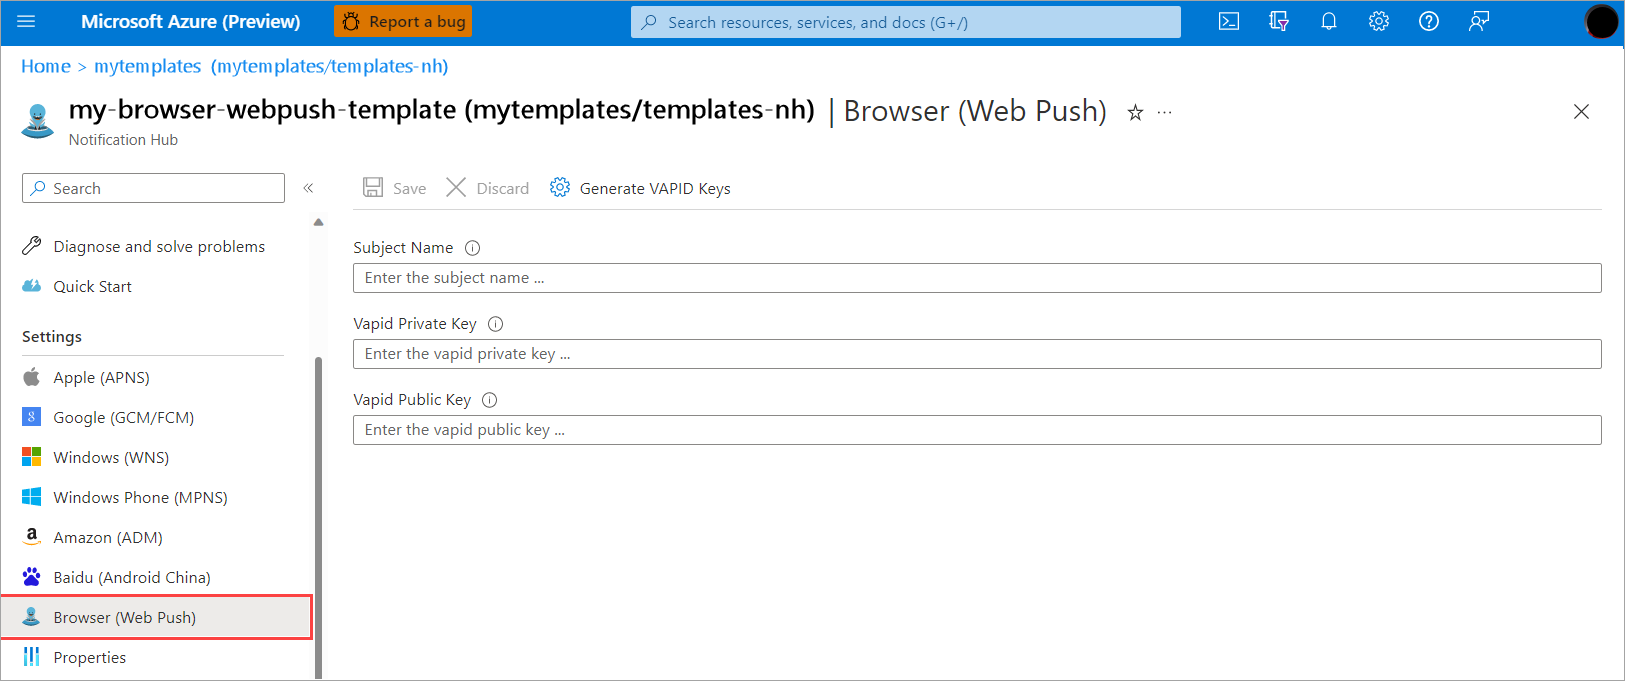
To set browser push credentials in the Azure portal, follow these steps:
In the Azure portal, open the Browser (Web Push) blade in your notification hub.
Enter your existing VAPID keys, or generate a new VAPID key pair using a service such as the VAPID key generator.
Select Save.
Set credentials using REST API
You can also set the browser credentials for browser push by using the REST API, such as using the Create or update Hub REST API method, the Azure Resource Manager API, or the V2 RP.
Enter the credentials in this format, providing the subscription ID, resource group, namespace, and notification hub:
https://management.azure.com/subscriptions/{subscription}/resourceGroups/{resource-group}/providers/Microsoft.NotificationHubs/namespaces/{namespace}/notificationHubs/{hub}api-version=2016-03-01
Set credentials using Azure SDKs
You can set the credentials for browser push using the Azure SDKs. Here's an example using the .NET SDK:
var browserCreds = new BrowserCredential
{
    Subject = "<subject>",
    VapidPublicKey = "<vapid public key>",
    VapidPrivateKey = "<vapid private key>",
}
and:
await nhManagementClient.NotificationHubs.CreateOrUpdateAsync(config.ResourceGroupName, config.NamespaceName, config.HubName, new NotificationHubCreateOrUpdateParameters(config.Location)
{
   BrowserCredential = browserCreds
});
Create registrations and installations
Bulk sends require registrations or installations. You can also use the registrations and installations in debug sends.
The following examples show the registration request body for a native registration, a template registration, and a browser installation.
Native registration request body
<?xml version="1.0" encoding="utf-8"?><entry xmlns="http://www.w3.org/2005/Atom"><content type="application/xml"><BrowserRegistrationDescription xmlns:i="http://www.w3.org/2001/XMLSchema-instance" xmlns="http://schemas.microsoft.com/netservices/2010/10/servicebus/connect"><Endpoint></Endpoint><P256DH></P256DH><Auth></Auth></BrowserRegistrationDescription></content></entry>
Browser template registration request body
<?xml version="1.0" encoding="utf-8"?>
<entry xmlns="http://www.w3.org/2005/Atom">
    <content type="application/xml">
        <BrowserTemplateRegistrationDescription xmlns:i="http://www.w3.org/2001/XMLSchema-instance" xmlns="http://schemas.microsoft.com/netservices/2010/10/servicebus/connect">
            <Endpoint></Endpoint>
            <P256DH></P256DH>
            <Auth></Auth>
            <BodyTemplate><![CDATA[{"title":"asdf","message":"xts"}]]></BodyTemplate>
        </BrowserTemplateRegistrationDescription>
    </content>
</entry>
Installation request body
{
    "installationId": "installation-id",
    "platform": "browser",
    "pushChannel": {
            "endpoint": "",
            "p256dh": "",
            "auth": ""
        }
}
Create native registrations (SDK)
await notificationHubClient.CreateBrowserNativeRegistrationAsync(subscriptionInfo, tagSet);
Create template registrations (SDK)
await notificationHubClient.CreateBrowserTemplateRegistrationAsync(subscriptionInfo, template, tagSet);
Create browser installations (SDK)
var browserPushSubscription = new BrowserPushSubscription
            {
                Endpoint = "",
                P256DH = "",
                Auth = "",
            };

var browserInstallation = new BrowserInstallation
            {
                InstallationId = installationId,
                Tags = tags,
                Subscription = browserPushSubscription,
                UserId = userId,
                ExpirationTime = DateTime.UtcNow.AddDays(1),
            };

await notificationHubClient.CreateOrUpdateInstallationAsync(browserInstallation);
Send push notifications
After you set credentials for browser push and create registrations and installations for the devices, you're ready to create push notifications. This section describes how to create a notification for a direct send|, audience send, and debug (test) send.
Create direct sends
For a direct send, you need the endpoint URI, p25DH key, and auth secret from a browser subscription. For more information about direct send notifications, see Direct send.
To create a direct send notification, follow these steps:
Set the following headers for browser push:
ServiceBusNotification-Format - browserServiceBusNotification-DeviceHandle - endpoint: theendpointfield from the subscriptionP256DH: thep256dhfield from the subscriptionAuth: theauthfield from the subscription
Create the message body. The message body is typically in this format:
{
  "title": "Some Title",
  "body": "Some body of a message"
}
You can specify other fields in the body; for example,
icon, to change the icon per message.Send the notification.
You can also use the .NET SDK to create a direct send:
var browserSubscriptionEndpoint = "";
var browserPushHeaders = new Dictionary<string, string>
            {
               { "P256DH", "" },
               { "Auth", "" },
            };

var directSendOutcome = await notificationHubClient.SendDirectNotificationAsync(new BrowserNotification("payload", browserPushHeaders), browserSubscriptionEndpoint);
Create audience sends
For an audience send, use the same ServiceBus Notification-Format header used for a direct send, and modify the message payload as desired. Optionally, specify a tag expression using the ServiceBusNotification-Tags header. For more information about creating an audience send, see Send an APNS native notification.
To create an audience send using the SDK, use the following statement:
var outcome = await notificationHubClient.SendNotificationAsync(new BrowserNotification(payload, tagExpression);
Create debug/test sends
Debug sends are created in the Azure portal and require registrations and installations.
After you create registrations for the devices, follow these steps to create a debug send notification:
In the Azure portal, open the Test Send blade in your notification hub.
In the Platform field, select Browser.
Specify Send to Tag Expression.
Modify Payload to your desired message.
Select Send.

