Quickstart: Deploy JBoss EAP on Azure Red Hat OpenShift using the Azure portal
This article shows you how to quickly stand up JBoss EAP on Azure Red Hat OpenShift (ARO) using the Azure portal.
This article uses the Azure Marketplace offer for JBoss EAP to accelerate your journey to ARO. The offer automatically provisions resources including an ARO cluster with a built-in OpenShift Container Registry (OCR), the JBoss EAP Operator, and optionally a container image including JBoss EAP and your application using Source-to-Image (S2I). To see the offer, visit the Azure portal. If you prefer manual step-by-step guidance for running JBoss EAP on ARO that doesn't utilize the automation enabled by the offer, see Deploy a Java application with Red Hat JBoss Enterprise Application Platform (JBoss EAP) on an Azure Red Hat OpenShift 4 cluster.
Prerequisites
-
If you don't have an Azure subscription, create an Azure free account before you begin.
A Red Hat account with complete profile. If you don't have one, you can sign up for a free developer subscription through the Red Hat Developer Subscription for Individuals.
A local developer command line with a UNIX command environment and Azure CLI installed. To learn how to install the Azure CLI, see How to install the Azure CLI.
The
mysqlCLI. For instructions see How To Install MySQL.
Note
You can also execute this guidance from the Azure Cloud Shell. This approach has all the prerequisite tools pre-installed.

- Ensure the Azure identity you use to sign in has either the Contributor role and the User Access Administrator role or the Owner role in the current subscription. For an overview of Azure roles, see What is Azure role-based access control (Azure RBAC)?
Note
Azure Red Hat OpenShift requires a minimum of 40 cores to create and run an OpenShift cluster. The default Azure resource quota for a new Azure subscription does not meet this requirement. To request an increase in your resource limit, see Standard quota: Increase limits by VM series. Note that the free trial subscription isn't eligible for a quota increase, upgrade to a Pay-As-You-Go subscription before requesting a quota increase.
Get a Red Hat pull secret
The Azure Marketplace offer used in this article requires a Red Hat pull secret. This section shows you how to get a Red Hat pull secret for Azure Red Hat OpenShift. To learn about what a Red Hat pull secret is and why you need it, see the Get a Red Hat pull secret section in Tutorial: Create an Azure Red Hat OpenShift 4 cluster.
Use the following steps to get the pull secret.
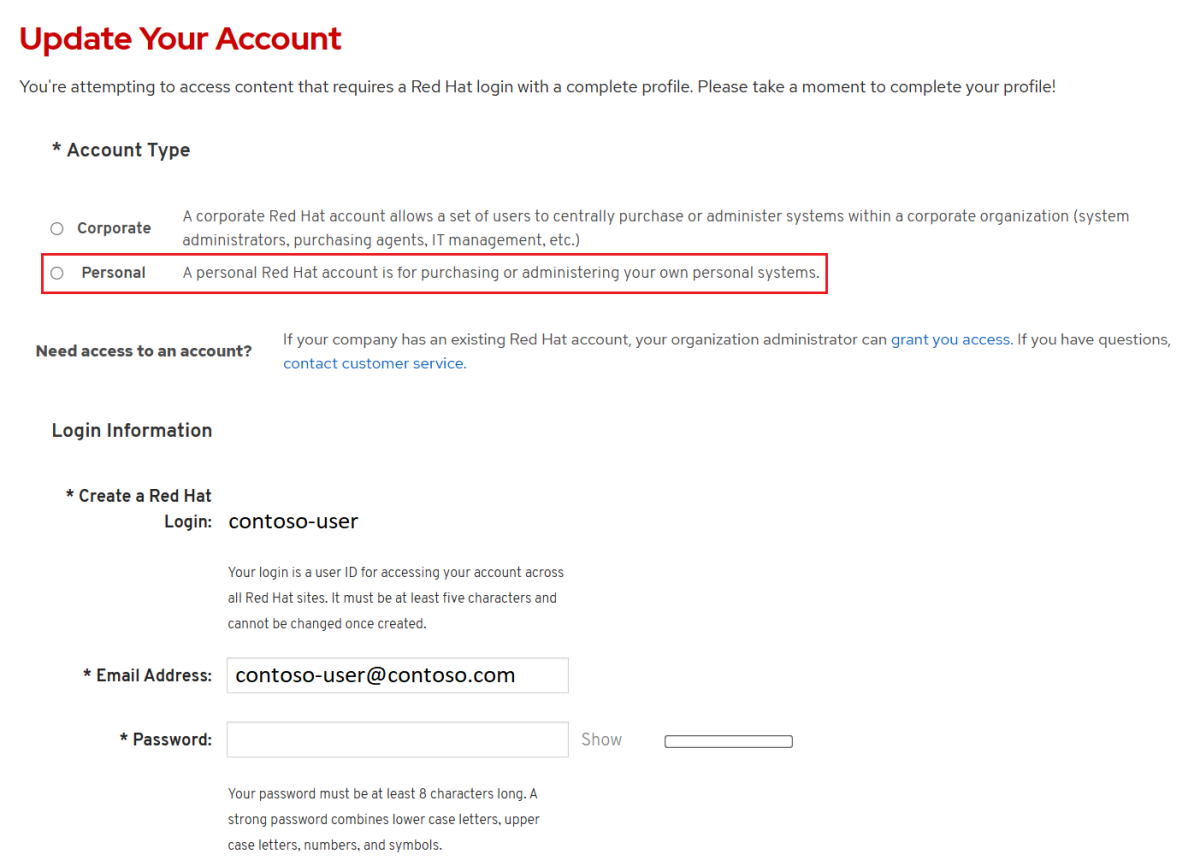
Open the Red Hat OpenShift Hybrid Cloud Console, then use your Red Hat account to sign in to the OpenShift cluster manager portal. You may need to accept more terms and update your account as shown in the following screenshot. Use the same password as when you created the account.
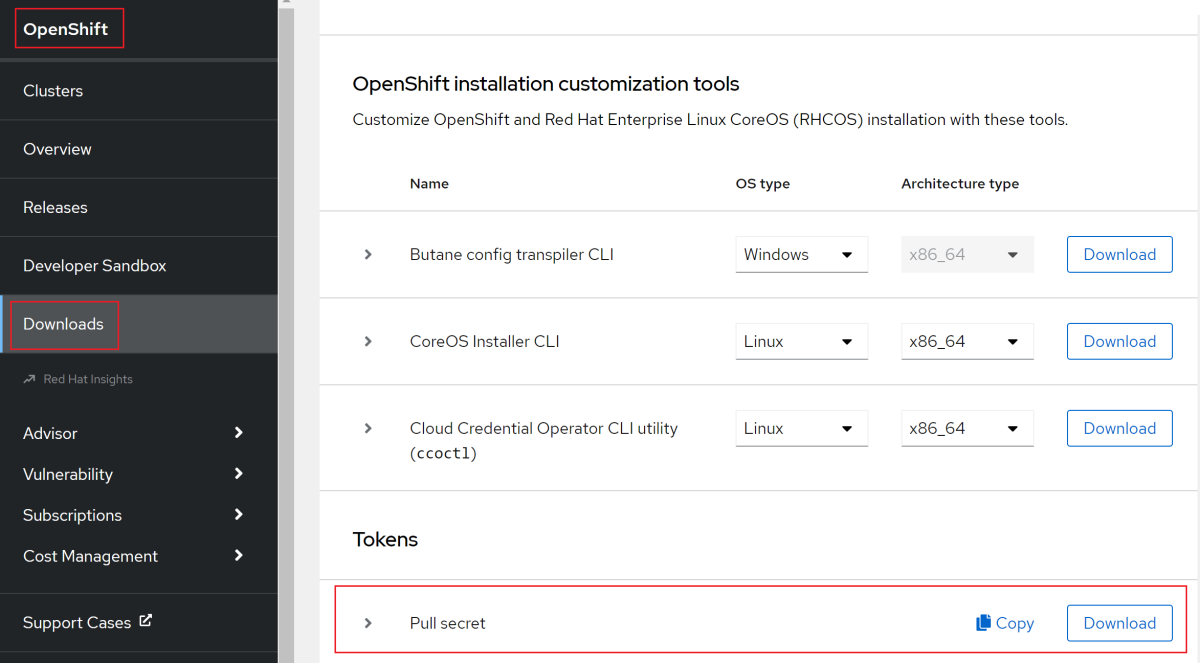
After you sign in, select OpenShift then Downloads.
Select the All categories dropdown list and then select Tokens.
Under Pull secret, select Copy or Download to get the value, as shown in the following screenshot.
The following content is an example that was copied from the Red Hat console portal, with the auth codes replaced with
xxxx...xxx.{"auths":{"cloud.openshift.com":{"auth":"xxxx...xxx","email":"contoso-user@contoso.com"},"quay.io":{"auth":"xxx...xxx","email":"contoso-user@test.com"},"registry.connect.redhat.com":{"auth":"xxxx...xxx","email":"contoso-user@contoso.com"},"registry.redhat.io":{"auth":"xxxx...xxx","email":"contoso-user@contoso.com"}}}Save the secret to a file so you can use it later.


Create a Microsoft Entra service principal from the Azure portal
The Azure Marketplace offer used in this article requires a Microsoft Entra service principal to deploy your Azure Red Hat OpenShift cluster. The offer assigns the service principal with proper privileges during deployment time, with no role assignment needed. If you have a service principal ready to use, skip this section and move on to the next section, where you create a Red Hat Container Registry service account.
Use the following steps to deploy a service principal and get its Application (client) ID and secret from the Azure portal. For more information, see Create and use a service principal to deploy an Azure Red Hat OpenShift cluster.
Note
You must have sufficient permissions to register an application with your Microsoft Entra tenant. If you run into a problem, check the required permissions to make sure your account can create the identity. For more information, see the Permissions required for registering an app section of Use the portal to create a Microsoft Entra application and service principal that can access resources.
Sign in to your Azure account through the Azure portal.
Select Microsoft Entra ID.
Select App registrations.
Select New registration.
Name the application - for example,
jboss-eap-on-aro-app. Select a supported account type, which determines who can use the application. After setting the values, select Register, as shown in the following screenshot. It takes several seconds to provision the application. Wait for the deployment to complete before proceeding.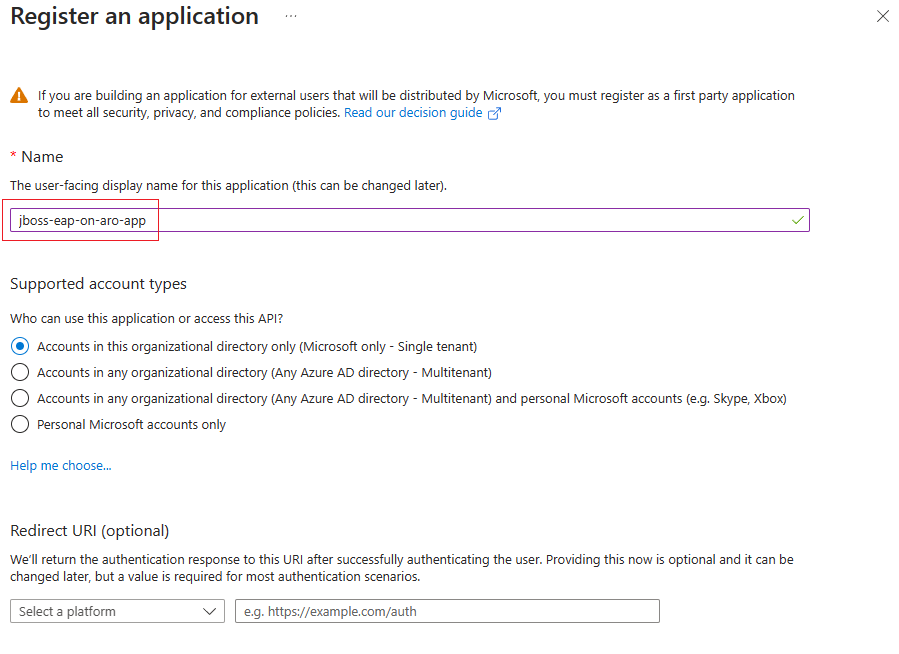
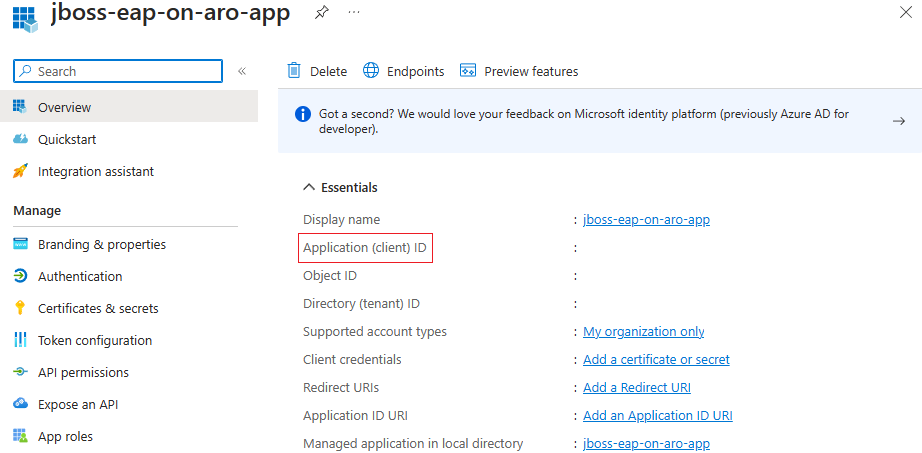
Save the Application (client) ID from the overview page, as shown in the following screenshot. Hover the pointer over the value, which is redacted in the screenshot, and select the copy icon that appears. The tooltip says Copy to clipboard. Be careful to copy the correct value, since the other values in that section also have copy icons. Save the Application ID to a file so you can use it later.
Create a new client secret by following these steps:
- Select Certificates & secrets.
- Select Client secrets, then New client secret.
- Provide a description of the secret and a duration. When you're done, select Add.
- After the client secret is added, the value of the client secret is displayed. Copy this value because you can't retrieve it later. Be sure to copy the Value and not the Secret ID.


You've created your Microsoft Entra application, service principal, and client secret.
Create a Red Hat Container Registry service account
Later, this article shows you how to manually deploy an application to OpenShift using Source-to-Image (S2I). A Red Hat Container Registry service account is necessary to pull the container image for JBoss EAP on which to run your application. If you have a Red Hat Container Registry service account ready to use, skip this section and move on to the next section, where you deploy the offer.
Use the following steps to create a Red Hat Container Registry service account and get its username and password. For more information, see Creating Registry Service Accounts in the Red Hat documentation.
- Use your Red Hat account to sign in to the Registry Service Account Management Application.
- From the Registry Service Accounts page, select New Service Account.
- Provide a name for the Service Account. The name is prepended with a fixed, random string.
- Enter a description.
- Select create.
- Navigate back to your Service Accounts.
- Select the Service Account you created.
- Note down the username, including the prepended string (that is,
XXXXXXX|username). Use this username when you sign in toregistry.redhat.io. - Note down the password. Use this password when you sign in to
registry.redhat.io.
- Note down the username, including the prepended string (that is,
You've created your Red Hat Container Registry service account.
Deploy JBoss EAP on Azure Red Hat OpenShift
The steps in this section direct you to deploy JBoss EAP on Azure Red Hat OpenShift.
The following steps show you how to find the offer and fill out the Basics pane.
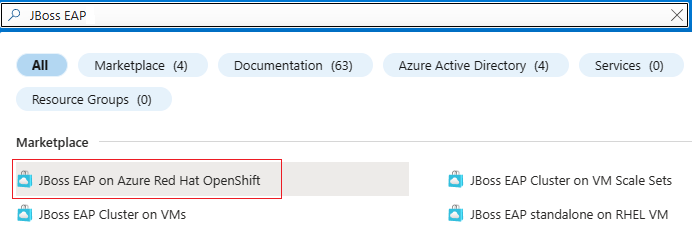
In the search bar at the top of the Azure portal, enter JBoss EAP. In the search results, in the Marketplace section, select JBoss EAP on Azure Red Hat OpenShift, as shown in the following screenshot.
You can also go directly to the JBoss EAP on Azure Red Hat OpenShift offer on the Azure portal.
On the offer page, select Create.
On the Basics pane, ensure that the value shown in the Subscription field is the same one that has the roles listed in the prerequisites section.
You must deploy the offer in an empty resource group. In the Resource group field, select Create new and fill in a value for the resource group. Because resource groups must be unique within a subscription, pick a unique name. An easy way to have unique names is to use a combination of your initials, today's date, and some identifier. For example, eaparo033123rg.
Under Instance details, select the region for the deployment. For a list of Azure regions where OpenShift operates, see Regions for Red Hat OpenShift 4.x on Azure.
Select Next: ARO.

The following steps show you how to fill out the ARO pane shown in the following screenshot:

Under Create a new cluster, select Yes.
Under Provide information to create a new cluster, for Red Hat pull secret, fill in the Red Hat pull secret that you obtained in the Get a Red Hat pull secret section. Use the same value for Confirm secret.
Fill in Service principal client ID with the service principal Application (client) ID that you obtained in the Create a Microsoft Entra service principal from the Azure portal section.
Fill in Service principal client secret with the service principal Application secret that you obtained in the Create a Microsoft Entra service principal from the Azure portal section. Use the same value for Confirm secret.
Select Next EAP Application.
The following steps show you how to fill out the EAP Application pane shown in the following screenshot, and then start the deployment.

Leave the default option of No for Deploy an application to OpenShift using Source-to-Image (S2I)?.
Note
Later, this quickstart shows you how to manually deploy an application with a database connection.
Select Next: Review + create.
Select Review + create. Ensure that the green Validation Passed message appears at the top. If the message doesn't appear, fix any validation problems, and then select Review + create again.
Select Create.
Track the progress of the deployment on the Deployment is in progress page.
Depending on network conditions and other activity in your selected region, the deployment may take up to 35 minutes to complete.
While you wait, you can set up the database.
Set up Azure Database for MySQL - Flexible Server
The following sections show you how to set up Azure Database for MySQL - Flexible Server.
Set environment variables in the command line shell
The application is a Jakarta EE application backed by a MySQL database, and is deployed to the OpenShift cluster using Source-to-Image (S2I). For more information about S2I, see the S2I Documentation.
Open a shell, or Cloud Shell, and set the following environment variables. Replace the substitutions as appropriate.
RG_NAME=<resource-group-name>
SERVER_NAME=<database-server-name>
DB_DATABASE_NAME=testdb
ADMIN_USERNAME=myadmin
ADMIN_PASSWORD=Secret123456
DB_USERNAME=testuser
DB_PASSWORD=Secret123456
PROJECT_NAME=eaparo-sample
CON_REG_SECRET_NAME=eaparo-sample-pull-secret
CON_REG_ACC_USER_NAME="<red-hat-container-registry-service-account-username>"
CON_REG_ACC_PWD="<red-hat-container-registry-service-account-password>"
APPLICATION_NAME=javaee-cafe
APP_REPLICAS=3
Replace the placeholders with the following values, which are used throughout the remainder of the article:
<resource-group-name>: The name of resource group you created previously - for example,eaparo033123rg.<database-server-name>: The name of your MySQL server, which should be unique across Azure - for example,eaparo033123mysql.ADMIN_PASSWORD: The admin password of your MySQL database server. This article was tested using the password shown. Consult the database documentation for password rules.<red-hat-container-registry-service-account-username>and<red-hat-container-registry-service-account-password>: The username and password of the Red Hat Container Registry service account you created before.
It's a good idea to save the fully filled out name/value pairs in a text file, in case the shell exits or the Azure Cloud Shell times out before you're done executing the commands. That way, you can paste them into a new instance of the shell or Cloud Shell and easily continue.
These name/value pairs are essentially "secrets." For a production-ready way to secure Azure Red Hat OpenShift, including secret management, see Security for the Azure Red Hat OpenShift landing zone accelerator.
Create and initialize the database
Next, use the following steps to create an Azure Database for MySQL - Flexible Server, and create a user with permissions to read/write from/to the specific database.
Use the following command to create an Azure Database for MySQL - Flexible Server:
az mysql flexible-server create \
    --resource-group ${RG_NAME} \
    --name ${SERVER_NAME} \
    --database-name ${DB_DATABASE_NAME} \
    --public-access 0.0.0.0  \
    --admin-user ${ADMIN_USERNAME} \
    --admin-password ${ADMIN_PASSWORD} \
    --yes
This command may take ten or more minutes to complete. When the command successfully completes, you see output similar to the following example:
{
  "connectionString": "mysql testdb --host ejb010406adb.mysql.database.azure.com --user myadmin --password=Secret#123345",
  "databaseName": "testdb",
  "firewallName": "AllowAllAzureServicesAndResourcesWithinAzureIps_2023-4-6_21-21-3",
  "host": "ejb010406adb.mysql.database.azure.com",
  "id": "/subscriptions/redacted/resourceGroups/ejb010406a/providers/Microsoft.DBforMySQL/flexibleServers/ejb010406adb",
  "location": "East US",
  "password": "Secret#123345",
  "resourceGroup": "ejb010406a",
  "skuname": "Standard_B1ms",
  "username": "myadmin",
  "version": "5.7"
}
Use the following commands to get the host of the created MySQL server:
DB_HOST=$(az mysql flexible-server show \
    --resource-group ${RG_NAME} \
    --name ${SERVER_NAME} \
    --query "fullyQualifiedDomainName" \
    --output tsv)
echo $DB_HOST
Save the name/value pair to your text file.
Use the following command to create a temporary firewall rule to allow connection to the MySQL server from the public internet:
az mysql flexible-server firewall-rule create \
    --resource-group ${RG_NAME} \
    --name ${SERVER_NAME} \
    --rule-name "AllowAllIPs" \
    --start-ip-address 0.0.0.0 \
    --end-ip-address 255.255.255.255
Use the following command to create a new database user with permissions to read and write the specific database. This command is useful to send SQL directly to the database.
mysql --host ${DB_HOST} --user ${ADMIN_USERNAME} --password=${ADMIN_PASSWORD} << EOF
CREATE USER '${DB_USERNAME}'@'%' IDENTIFIED BY '${DB_PASSWORD}';
GRANT ALL PRIVILEGES ON ${DB_DATABASE_NAME} . * TO '${DB_USERNAME}'@'%';
FLUSH PRIVILEGES;
EOF
Use the following command to delete the temporary firewall rule:
az mysql flexible-server firewall-rule delete \
    --resource-group ${RG_NAME} \
    --name ${SERVER_NAME}  \
    --rule-name "AllowAllIPs" \
    --yes
You now have a MySQL database server running and ready to connect with your app.
Verify the functionality of the deployment
The steps in this section show you how to verify that the deployment completes successfully.
If you navigated away from the Deployment is in progress page, the following steps show you how to get back to that page. If you're still on the page that shows Your deployment is complete, you can skip to step 5.
In the corner of any Azure portal page, select the hamburger menu and then select Resource groups.
In the box with the text Filter for any field, enter the first few characters of the resource group you created previously. If you followed the recommended convention, enter your initials, then select the appropriate resource group.
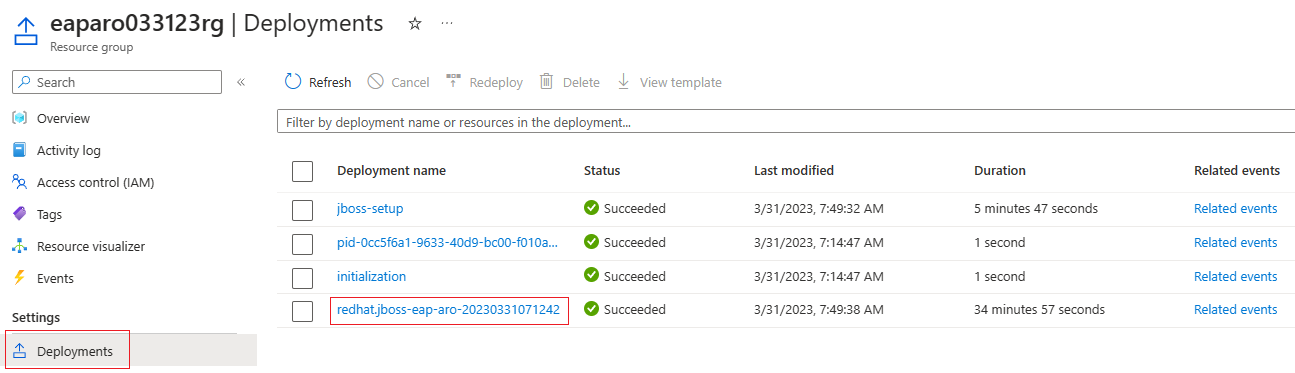
In the navigation pane, in the Settings section, select Deployments. You see an ordered list of the deployments to this resource group, with the most recent one first.
Scroll to the oldest entry in this list. This entry corresponds to the deployment you started in the preceding section. Select the oldest deployment, as shown in the following screenshot.
In the navigation pane, select Outputs. This list shows the output values from the deployment, which includes some useful information.
Open the shell or Azure Cloud Shell, paste the value from the cmdToGetKubeadminCredentials field, and execute it. You see the admin account and credential for signing in to the OpenShift cluster console portal. The following example shows an admin account:
az aro list-credentials --resource-group eaparo033123rg --name clusterf9e8b9This command produces output similar to the following example:
{
  "kubeadminPassword": "xxxxx-xxxxx-xxxxx-xxxxx",
  "kubeadminUsername": "kubeadmin"
}
Paste the value from the consoleUrl field into an Internet-connected web browser, and then press Enter. Fill in the admin user name and password, then select Log in. In the admin console of Azure Red Hat OpenShift, select Operators > Installed Operators, where you can find that the JBoss EAP operator is successfully installed, as shown in the following screenshot.


Next, use the following steps to connect to the OpenShift cluster using the OpenShift CLI:
In the shell or Azure Cloud Shell, use the following commands to download the latest OpenShift 4 CLI for GNU/Linux. If running on an OS other than GNU/Linux, download the appropriate binary for that OS.
cd ~
wget https://mirror.openshift.com/pub/openshift-v4/clients/ocp/latest/openshift-client-linux.tar.gz

mkdir openshift
tar -zxvf openshift-client-linux.tar.gz -C openshift
echo 'export PATH=$PATH:~/openshift' >> ~/.bashrc && source ~/.bashrc
Paste the value from the cmdToLoginWithKubeadmin field into the shell or Azure Cloud Shell, and execute it. You should see the
login successfulmessage and the project you're using. The following content is an example of the command to connect to the OpenShift cluster using the OpenShift CLI.oc login \ $(az aro show \ --resource-group ${RG_NAME} \ --name aro-cluster \ --query apiserverProfile.url \ --output tsv) \ -u $(az aro list-credentials \ --resource-group ${RG_NAME} \ --name aro-cluster \ --query kubeadminUsername \ --output tsv) \ -p $(az aro list-credentials \ --resource-group ${RG_NAME} \ --name aro-cluster \ --query kubeadminPassword \ --output tsv)This command produces output similar to the following example:
Login successful.

You have access to 68 projects, the list has been suppressed. You can list all projects with 'oc projects'

Using project "default".
Deploy a JBoss EAP app to the OpenShift cluster
The steps in this section show you how to deploy an app on the cluster.
Deploy the app to the cluster
Use the following steps to deploy the app to the cluster. The app is hosted in the GitHub repo rhel-jboss-templates/eap-coffee-app.
In the shell or Azure Cloud Shell, run the following commands. The commands create a project, apply a permission to enable S2I to work, image the pull secret, and link the secret to the relative service accounts in the project to enable the image pull. Disregard the git warning about "'detached HEAD' state."
git clone https://github.com/Azure/rhel-jboss-templates.git
cd rhel-jboss-templates
git checkout 20230615
cd ..
oc new-project ${PROJECT_NAME}
oc adm policy add-scc-to-user privileged -z default --namespace ${PROJECT_NAME}
w0=-w0
if [[ $OSTYPE == 'darwin'* ]]; then
  w0=
fi

CON_REG_ACC_USER_NAME_BASE64=$(echo ${CON_REG_ACC_USER_NAME} | base64 $w0)
CON_REG_ACC_PWD_BASE64=$(echo ${CON_REG_ACC_PWD} | base64 $w0)
Because the next section uses HEREDOC format, it's best to include and execute it in its own code excerpt.
cat <<EOF | oc apply -f -
apiVersion: v1
kind: Secret
metadata:
  name: ${CON_REG_SECRET_NAME}
type: Opaque
data:
  username: ${CON_REG_ACC_USER_NAME_BASE64}
  password: ${CON_REG_ACC_PWD_BASE64}
stringData:
  hostname: registry.redhat.io
EOF
You must see
secret/eaparo-sample-pull-secret createdto indicate successful creation of the secret. If you don't see this output, troubleshoot and resolve the problem before proceeding. Finally, link the secret to the default service account for downloading container images so the cluster can run them.oc secrets link default ${CON_REG_SECRET_NAME} --for=pull oc secrets link builder ${CON_REG_SECRET_NAME} --for=pullUse the following commands to pull the image stream
jboss-eap74-openjdk11-openshift. Then, start the source to image process and wait until it completes.oc apply -f https://raw.githubusercontent.com/jboss-container-images/jboss-eap-openshift-templates/eap74/eap74-openjdk11-image-stream.json oc new-build --name=${APPLICATION_NAME} --binary --image-stream=jboss-eap74-openjdk11-openshift:7.4.0 -e CUSTOM_INSTALL_DIRECTORIES=extensions oc start-build ${APPLICATION_NAME} --from-dir=rhel-jboss-templates/eap-coffee-app --follow
Successful output should end with something similar to the following example:
Writing manifest to image destination
Storing signatures
Successfully pushed image-registry.openshift-image-registry.svc:5000/eaparo-sample/javaee-cafe@sha256:754587c33c03bf42ba4f3ce5a11526bbfc82aea94961ce1179a415c2bfa73449
Push successful
If you don't see similar output, troubleshoot and resolve the problem before proceeding.
Create a secret for the database password
Next, use the following steps to create a secret:
Use the following command to create a secret for holding the password of the database:
oc create secret generic db-secret --from-literal=password=${DB_PASSWORD}Use the following commands to deploy and run three replicas of the containerized app in the cluster:
cat <<EOF | oc apply -f -
apiVersion: wildfly.org/v1alpha1
kind: WildFlyServer
metadata:
  name: ${APPLICATION_NAME}
spec:
  applicationImage: ${APPLICATION_NAME}:latest
  replicas: ${APP_REPLICAS}
  env:
    - name: DB_SERVICE_PREFIX_MAPPING
      value: TEST-MYSQL=DS1
    - name: TEST_MYSQL_SERVICE_HOST
      value: ${DB_HOST}
    - name: TEST_MYSQL_SERVICE_PORT
      value: '3306'
    - name: DS1_JNDI
      value: java:jboss/datasources/JavaEECafeDB
    - name: DS1_URL
      value: jdbc:mysql://${DB_HOST}:3306/${DB_DATABASE_NAME}
    - name: DS1_DRIVER
      value: mysql
    - name: DS1_DATABASE
      value: ${DB_DATABASE_NAME}
    - name: DS1_USERNAME
      value: ${DB_USERNAME}
    - name: DS1_PASSWORD
      valueFrom:
        secretKeyRef:
          name: db-secret
          key: password
  secrets:
    - db-secret
EOF
If the command completed successfully, you should see
wildflyserver.wildfly.org/javaee-cafe created. If you don't see this output, troubleshoot and resolve the problem before proceeding.Run
oc get pod -w | grep 1/1to monitor whether all pods of the app are running. When you see output similar to the following example, press Ctrl + C to stop the monitoring:javaee-cafe-2 1/1 Running 0 31s javaee-cafe-1 1/1 Running 0 30s javaee-cafe-0 1/1 Running 0 30sIt may take a few minutes to reach the proper state. You may even see
STATUScolumn values includingErrImagePullandImagePullBackOffbeforeRunningis shown.Run the following command to return the URL of the application. You can use this URL to access the deployed sample app. Copy the output to the clipboard.
echo http://$(oc get route ${APPLICATION_NAME}-route -o=jsonpath='{.spec.host}')/javaee-cafePaste the output into an Internet-connected web browser, and then press Enter. You should see the UI of Java EE Cafe app similar to the following screenshot:
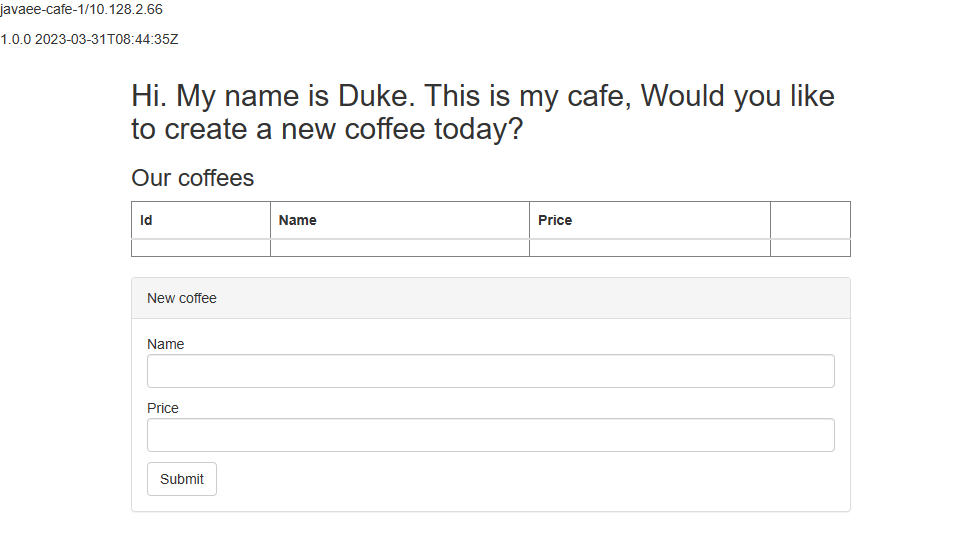
Add and delete some rows to verify the database connectivity is correctly functioning.

Clean up resources
If you're not going to continue to use the OpenShift cluster, navigate back to your working resource group. At the top of the page, under the text Resource group, select the resource group. Then, select Delete resource group.
Next steps
Learn more about deploying JBoss EAP on Azure by following these links:
Feedback
Coming soon: Throughout 2024 we will be phasing out GitHub Issues as the feedback mechanism for content and replacing it with a new feedback system. For more information see: https://aka.ms/ContentUserFeedback.
Submit and view feedback for