Note
Access to this page requires authorization. You can try signing in or changing directories.
Access to this page requires authorization. You can try changing directories.
The Instance Readiness Test (IRT) framework is an optional/add-on tool for the Nexus platform. It enables operators to verify the successful deployment and readiness of the Azure Operator Nexus instance for workload deployment. This verification applies to both initial deployment and subsequent upgrades of the Nexus. It runs a series of tests and provides the test results as an html report.
Key benefits
- Self-Service
- IRT enables users to independently initiate and execute tests.
- Repeatable
- Users can execute IRT on the Nexus instance multiple times to verify the reliability and consistency of test results.
- Abilities
- IRT provides generic functionality that all operators can use.
- It enables validation of new Nexus deployments and post-upgrade states.
- It allows testing of Network Function infrastructure components.
- It facilitates workload deployment.
- Users execute the IRT test framework using the command line and an input file. The framework then creates an Azure Container Instance in the customer's subscription.
Tests executed with IRT
- Validate that l3 domains in the fabric subscription and resource group exist after all tests on the resources under test are done.
- Validate that there are l3 networks created in the testing resource group after all tests on the resources under test are done.
- Validate that NodeOsInfo metric data for a baremetal machine is present within the last 10 minutes. Every count metric should be greater than 0.
- Validate that IdracPowerOn metric data is present within the last 10 minutes. Every count metric should be greater than 0.
- Validate that CorednsDnsRequestsTotal metric data is present within the last 10 minutes. Every average metric should be greater than 0.
- Validate that FelixClusterNumHosts metric data is present within the last 10 minutes. Every average metric should be greater than 0.
- Validate that TyphaConnectionsAccepted metric data is present within the last 10 minutes. Every average metric should be greater than 0.
- Validate that KubeDaemonsetStatusCurrentNumberScheduled metric data is present within the last 10 minutes. Every average metric should be greater than 0.
- Validate that EtcdServerIsLeader metric data is present within the last 10 minutes. Every average metric should be greater than 0.
- Validate that ApiserverAuditRequestsRejectedTotal metric data is present within the last 10 minutes. There should be at least one timeseries data entry.
- Validate that KubevirtInfo metric data is present within the last 10 minutes. Every average metric should be greater than 0.
- Validate that ContainerMemoryUsageBytes metric data is present within the last 10 minutes. Every average metric should be greater than 0.
- Validate that KubeletRunningPods metric data is present within the last 10 minutes. Every average metric should be greater than 0.
- Validate that ControllerRuntimeReconcileTotal2 metric data is present within the last 10 minutes. Every average metric should be greater than 0. This metric needs to be filtered on namespace until the deprecated metric ControllerRuntimeReconcileTotal is removed.
- Validate that CpuUtilizationMax metric data for fabric network device is present within the last 10 minutes. At least one non-zero metric should exist.
- Validate that MemoryAvailable metric data is present within the last 10 minutes. At least one non-zero metric should exist.
- Test the transmission of IPv4 TCP data between two virtual machines using iPerf3 and affinity settings in the ARM template. The test ensures that the data throughput exceeds 60 Mbps.
- Test the transmission of IPv6 TCP data between two virtual machines using iPerf3 and affinity settings in the ARM template. The test ensures that the data throughput exceeds 60 Mbps.
- Test the transmission of IPV4 UDP data between two virtual machines using iPerf3 and affinity settings in the ARM template. The test ensures that the data throughput exceeds 1 Mbps.
- Test the transmission of IPV6 UDP data between two virtual machines using iPerf3 and affinity settings in the ARM template. The test ensures that the data throughput exceeds 1 Mbps.
- Test the transmission of IPV4 TCP data between two virtual machines using iPerf3 and anti-affinity settings in the ARM template. The test ensures that the data throughput exceeds 60 Mbps.
- Test the transmission of IPV6 TCP data between two virtual machines using iPerf3 and anti-affinity settings in the ARM template. The test ensures that the data throughput exceeds 60 Mbps.
- Test the transmission of IPV4 UDP data between two virtual machines using iPerf3 and anti-affinity settings in the ARM template. The test ensures that the data throughput exceeds 1 Mbps.
- Test the transmission of IPV6 UDP data between two virtual machines using iPerf3 and anti-affinity settings in the ARM template. The test ensures that the data throughput exceeds 1 Mbps.
- Test IPv4 ping between two virtual machines with jumbo frames enabled. Stderr should be empty and no packet loss should be observed.
- Test IPv6 ping between two virtual machines with jumbo frames enabled. Stderr should be empty and no packet loss should be observed.
- Validate IPV4 routes are configured correctly.
- Validate IPV6 routes are configured correctly.
- Validate that network interfaces are configured as expected.
- Validate DNS ability to resolve Azure portal endpoint with nslookup.
- Validate dpdk-testpmd on L2 interface within NAKS cluster for vlan.
- Validate dpdk-testpmd on L2 interface within NAKS cluster, data captured for vlan.
- Validate dpdk-testpmd on trunk interface within NAKS cluster, data captured for trunk.
- Validate dpdk-testpmd on L3 interface within NAKS cluster, data captured for L3 network.
- Validate the status of all pods in NAKS cluster to be in 'Completed' or 'Running' state.
- Test IPv4 ping between a NAKS cluster pod and a VM with jumbo frames enabled. Stderr should be empty and no packet loss should be observed.
- Test IPv6 ping between a NAKS cluster pod and a VM with jumbo frames enabled. Stderr should be empty and no packet loss should be observed.
- Validate PersistentVolumeClaim is created successfully.
- Validate PersistentVolume is created successfully.
- Test creating a PVC with volumeMode Block and accessMode RWO.
- Validate that all the nexus-shared and nexus-volume volumes that were added are mounted in sts 0.
- Validate that all the nexus-shared and nexus-volume volumes that were added are mounted in sts 1.
- Validate that nfs storage mounted on sts 0 is writable.
- Validate that nfs storage file written to sts 0 can be read.
- Validate that shared nfs storage mounted on sts 0 is writable.
- Validate that shared nfs file written to sts 0 can be read.
- Validate that nfs storage mounted on sts 1 is writable.
- Validate that shared file written to sts 0 can be read in sts 1.
- Validate that shared nfs storage mounted on sts 1 is writable.
- Validate that shared file written to sts 0 and sts 1 can be read from sts 1.
- Validate that shared file written to in sts 0 and sts 1 can be read from sts 0.
- Validate that Block storage is mounted and writable.
- Validate that Block storage is mounted and can be read.
- Validate that Block storage is mounted and writable.
- Validate that Block storage is mounted and can be read.
- Validate deleting a PVC before removing the pod using it (scale down sts), remove pod naks-storage-statefulset-1.
- Validate that Block Storage PVC can be deleted.
How to run IRT
IRT requires gaining access to the software package hosted in the GitHub Nexus-Samples repository. Users should navigate to the 'Releases' section and choose the release with the 'latest' tag. A copy of this README is also available inside the release package for convenient reference in the execution environment.
Request access to nexus-samples GitHub repository
For access to the nexus-samples GitHub repository
Link your GitHub account to the Microsoft GitHub Org https://repos.opensource.microsoft.com/link
Join the Microsoft Org https://repos.opensource.microsoft.com/orgs/Microsoft/join
Send an email request to be added to nexus-samples GitHub repo to afoncamalgamatesall@microsoft.com
Environment requirements
- A Linux environment (Ubuntu suggested) capable of calling Azure APIs.
- Support for other Linux distros, for example, RedHat, Mariner, etc. depends on being able to install the necessary tooling. See Install Dependencies section.
- Any machine that has the required packages installed should be able to use the scripts.
- Knowledge of networks to use for the test.
- Networks to use for the test are specified in a "networks-blueprint.yml" file, see Input Configuration.
- A way to download the IRT release package, for example, curl, wget, etc.
- The ability to create a service principal with the correct roles.
- The ability to create a managed identity with the correct roles.
- The ability to read secrets from the KeyVault, see Service Principal section for more details.
- The ability to create security groups in your Active Directory tenant.
Input configuration
Start by building your input file. The IRT tarball provides irt-input.example.yml as an example. Download the tarball by following the instructions. The placeholder values will need to be updated with valid values for your instance to work. You need to manually change them and rename the file to irt-input.yml. We provide the example input file as a stub to help you configure new input files. The example outlines overridable values and their usage. The One Time Setup assists you in setting input values by writing key/value pairs to the config file as they execute.
You can provide the network information in a networks-blueprint.yml file, similar to the networks-blueprint.example.yml that we provide, or append it to the irt-input.yml file. The networks-blueprint.example.yml defines the schema for IRT. The test creates the networks, so provide network details that aren't in use. Currently, IRT has the following network requirements:
- Three (3) L3 Networks
- Two (2) of them with MTU 1500
- One (1) of them with MTU 9000 and shouldn't have a fabric_asn attribute
- One (1) Trunked Network
- All VLANs should be greater than 500
One time setup
Download IRT
IRT is distributed via tarball from the release section of the nexus-samples GitHub repo.
- Find the release package marked with 'Latest', download it, extract it, and navigate to the
irtdirectory. - Extract the tarball to the local file system:
mkdir -p irt && tar xf nexus-irt.tar.gz --directory ./irt. - Switch to the new directory
cd irt. - See RELEASE-CHANGELOG.md for any notable updates or changes.
Install dependencies
There are multiple dependencies expected to be available during execution. Review this list;
jqversion 1.6 or greateryqversion 4.33 or greaterazcopyversion 10 or greaterazAzure CLI, stay up to date. Minimum expected version: 2.11.0 (supports self upgrade)elinks- for viewing html files on the command line (Optional)tree- for viewing directory structuresmoreutils- for viewing progress from the Azure Container Instance (ACI) container
The setup.sh script is provided to aid with installing the listed dependencies. It installs any dependencies that aren't available in PATH. It doesn't upgrade any dependencies that don't meet the minimum required versions.
Note
setup.sh assumes a nonroot user and attempts to use sudo
All-in-One setup (recommended)
all-in-one-setup.sh is provided to create all the Azure resources required to run IRT. This process includes creating a service principal, a security group, and isolation domains. Each of the scripts called in all-in-one-setup.sh can be individually executed. These scripts write updates to your irt-input.yml file with the key-value pairs needed to utilize the resources you created. Review the irt-input.example.yml file for the inputs required by one or more scripts, regardless of your chosen approach. All of the scripts are idempotent and allow you to use existing resources if desired.
Step-By-Step setup
Note
Use this section only if you're not using all-in-one.setup.sh
If your workflow is incompatible with all-in-one-setup.sh, each resource needed for IRT can be created manually with each supplemental script. Like all-in-one-setup.sh, running these scripts writes key/value pairs to your irt-input.yml for you to use during your run. These four scripts constitute the all-in-one-setup.sh script."
IRT makes commands against your resources and needs permission to do so. IRT requires a service principal to execute. It also requires that the service principal is a member of the Azure AD Security Group that is also provided as input.
Authentication and runtime permissions
IRT requires a service principal with the correct permissions in order to interact with various Azure and NetworkCloud Resources.
Create service principal and security group
The supplemental script, create-service-principal.sh creates a service principal with the custom role NRT Roles or associates the role NRT Roles to an existing service principal.
Additionally, the script creates the necessary security group, and adds the service principal to the security group. If the security group exists, it adds the service principal to the existing security group.
Executing create-service-principal.sh requires the input yaml to have the following values. All values can be overridden by setting the corresponding environment variables:
SERVICE_PRINCIPAL:
  NAME: "<name>" # env: SERVICE_PRINCIPAL_NAME
  AAD_GROUP_NAME: "<aad-group-name>" # env: SERVICE_PRINCIPAL_AAD_GROUP_NAME
  SUBSCRIPTION: "<subscription>" # env: SERVICE_PRINCIPAL_SUBSCRIPTION
  KV_NAME: "<keyvault>" # env: SERVICE_PRINCIPAL_KV_NAME
  KV_ID: <keyvault-secret> # env: SERVICE_PRINCIPAL_KV_ID
SERVICE_PRINCIPAL.NAME- The name of the service principal, created with theaz ad sp create-for-rbaccommand.SERVICE_PRINCIPAL.AAD_GROUP_NAME- The name of the security group.SERVICE_PRINCIPAL.SUBSCRIPTION- The subscription of the service principal.SERVICE_PRINCIPAL.KV_NAME- The KeyVault to store the service principal password.SERVICE_PRINCIPAL.KV_ID- The KeyVault secret where the service principal password is stored.
Note
Please ensure that you have already created a KeyVault (KV_NAME) and/or a Secret (KV_ID) with a dummy value prior to executing create-service-principal.sh. The az login user (person executing IRT) should also be granted access to this KeyVault so secrets can be pulled at runtime.
# Example execution of the script
./create-service-principal.sh irt-input.yml
Note
If all SP_ID,SP_OBJECT_ID,SP_TENANT_ID,ADMIN_GROUP_OBJECT_ID,KV_NAME,KV_ID are set in the yaml or as an environment variable the script skips creating them. Please comment them out if you want the script to create and populate the values.
RESULT: This script prints values for ADMIN_GROUP_OBJECT_ID, SP_ID, SP_OBJECT_ID, SP_TENANT, KV_NAME, and KV_ID. The script sets the values back to the input yaml.
See Input Configuration.
SP_ID: "<generated-sp-id>"
SP_OBJECT_ID: "<generated-sp-object-id>"
SP_TENANT_ID: "<generated-sp-tenant-id>"
ADMIN_GROUP_OBJECT_ID: "<generated-aad-group-id>"
KV_NAME: "<provided-key-vault-name>" # If SP already exists please fill it in to retrieve the SP Password.
KV_ID: "<provided-key-vault-secret>" # If SP already exists please fill it in to retrieve the SP Password.
Create managed identity and security group
The supplemental script, create-user-assigned-managed-identity.sh creates a managed identity with the custom role NRT Roles associates the role NRT Roles to an existing managed identity.
Executing create-user-assigned-managed-identity.sh requires the input yaml to have the following values. All values can be overridden by setting the corresponding environment variables:
UAMI:
  NAME: "<name>" # env: UAMI_NAME
  SUBSCRIPTION: "<subscription>" # env: UAMI_SUBSCRIPTION
  RESOURCE_GROUP: "<resourcegroup" # env: UAMI_RESOURCE_GROUP
UAMI.NAME- The name of the managed identity, created with theaz identity createcommand.UAMI.SUBSCRIPTION- The subscription of the managed identity.UAMI.RESOURCE_GROUP- The Resource Group where the managed identity is created.
Note
Please ensure that you have already created a KeyVault (KV_NAME) and/or a Secret (KV_ID) with a dummy value prior to executing create-service-principal.sh. The az login user (person executing IRT) should also be granted access to this KeyVault so secrets can be pulled at runtime.
# Example execution of the script
./create-user-assigned-managed-identity.sh irt-input.yml
Note
If all UAMI_ID,UAMI_RESOURCE_ID,UAMI_TENANT_ID are set in the yaml or as an environment variable the script skips creating them. Please comment them out if you want the script to create and populate the values.
RESULT: This script prints values for UAMI_ID, UAMI_RESOURCE_ID and UAMI_TENANT_ID. The script sets the values back to the input yaml.
See Input Configuration.
UAMI_ID: "<generated-uami-id>"
UAMI_RESOURCE_ID: "<generated-uami-resource-id>"
UAMI_TENANT_ID: "<generated-uami-tenant-id>"
Creating a custom role for execution
If you have an existing managed identity and would like the convenience of only having to assign the custom roles for IRT execution, you can follow the directions in this section.
Prerequisites
- Azure Subscription
- Ensure you have access to an Azure subscription.
- Azure CLI
- Ensure Azure CLI exists on your local machine
Steps
Prepare Your Environment
- Open a Bash Shell:
- You can use any terminal that supports Bash
Sign in to Azure
- Execute the following command to sign in to your Azure account:
# Start az CLI session
az login

# Set active subscription using the UUID
az account set --subscription "<your-subscription-id>"
Deploy the Template
Deploy your ARM template by running the following command. Replacing the example variable values with your actual values:
# Set our variable values, these values are for the sake of example. Replace these values with your own as needed.
location="eastus"
deploymentName="IRTRoleDefinitionDeployment"
templatePathSPRole="service-principal-roles.jsonc" # Path to the template file assuming the PWD is the root of the artifact tar
roleName="Nexus Instance Readiness Tester"

# run deployment
az deployment sub create \
    --name "$deploymentName" \
    --location "$location" \
    --template-file "$templatePath" \
    --parameters roleName="$roleName"
Assign Role to Application Service Principal and Managed Identity used for testing
Weather created via the all-in-one setup, or using your own, assign the newly created role to your service principal and managed identity. These two roles provides all the necessary authorizations to run Instance Readiness Testing.
 # The Application ID of your Service Principal for your application
 appId="00001111-aaaa-2222-bbbb-3333cccc4444"
 # The Object(principal) ID of your Managed Identity for your application
 principalId="00001111-aaaa-2222-bbbb-3333cccc5555"
 # this MUST match the deployment name used above.
 roleName="Nexus Instance Readiness Tester"


 # This command gets the name of GUID of the role
 # az role definition list --name "$roleName" --query "[0].id" --output tsv | awk -F'/' '{print $NF}'

 # This command gets the GUID of the subscription
 # az account show --query id --output tsv --only-show-errors

 # Put together we create the role assignment;
 az role assignment create \
   --assignee "$appId" \
   --subscription "$(az account show --query id --output tsv --only-show-errors)" \
   --role "$(az role definition list --name "$roleName" --query "[0].id" --output tsv | awk -F'/' '{print $NF}')" \
   --scope "/subscriptions/$(az account show --query id --output tsv --only-show-errors)"

 az role assignment create \
   --assignee "$principalId" \
   --subscription "$(az account show --query id --output tsv --only-show-errors)" \
   --role "$(az role definition list --name "$roleName" --query "[0].id" --output tsv | awk -F'/' '{print $NF}')" \
   --scope "/subscriptions/$(az account show --query id --output tsv --only-show-errors)"
Create L3 isolation domains
The testing framework doesn't create, destroy, or manipulate isolation domains. Therefore, existing isolation domains can be used for execution. Each isolation domain requires at least one external network. The supplemental script, create-l3-isolation-domains.sh. Internal networks, for example, L3, trunked, etc. are created, manipulated, and destroyed through the course of testing.
Executing create-l3-isolation-domains.sh requires one parameter, a path to a file containing the networks requirements. You can choose either the standalone network-blueprint.yml or the input.yml based on your workflow, either can contain the information needed.
# Example of the script being invoked using networks-blueprint.yml:
./create-l3-isolation-domains.sh networks-blueprint.yml
# Example of the script being invoked using irt-input.yml:
# the network-blueprint should exist under NETWORK_BLUEPRINT node.
./create-l3-isolation-domains.sh irt-input.yml
Execution
- This example assumes irt-input.yml is in the same location as irt.sh. If your file is located in a different directory, provide the full file path.
./irt.sh irt-input.yml
How to read the IRT summary results
The IRT summary page is an html page that is generated after the execution of IRT and can be viewed from any browser.
IRT Summary Page comprises three major sections, which expand to provide more details.
Test Results
Debug Section
Extras Section
The top of the Summary Results displays the Total tests run in the IRT test suites, the number of extras sections and total number of tests that passed and failed along with percentage value.
Note
The number of total tests depends on the version of IRT being executed, different prerequisite test commands, so totals may not always be the same.

If there's any failures in the tests, the values represent accordingly.

Test results
The Test Results section provides all the tests (assertions) that IRT executes. The Asserters section expands to view the list of tests (assertions) that are run and available. Each asserter can be further expanded that loads an accordion pane, which provides more details of the asserter, including the description of the test and any thresholds to be measured and asserted against.
Display of test results
Display of Test results section with all successful tests:

If there are any failures, the assertions are highlighted in red.

Interpreting asserters
Every asserter presents a significant title of the test and the description of it under standard log.
An example of an Asserter:
*Asserters [It] res-test-dpdk-naks-84f5b - network: 'l3network-704' (*PMD) average of Rx-pps [17668558] should be greater than 8000000.
The above example of an assert reads as the Rx (receive)-pps (packets per seconds) for l3network-704 is 17668558, which is greater than the expected 8000000.
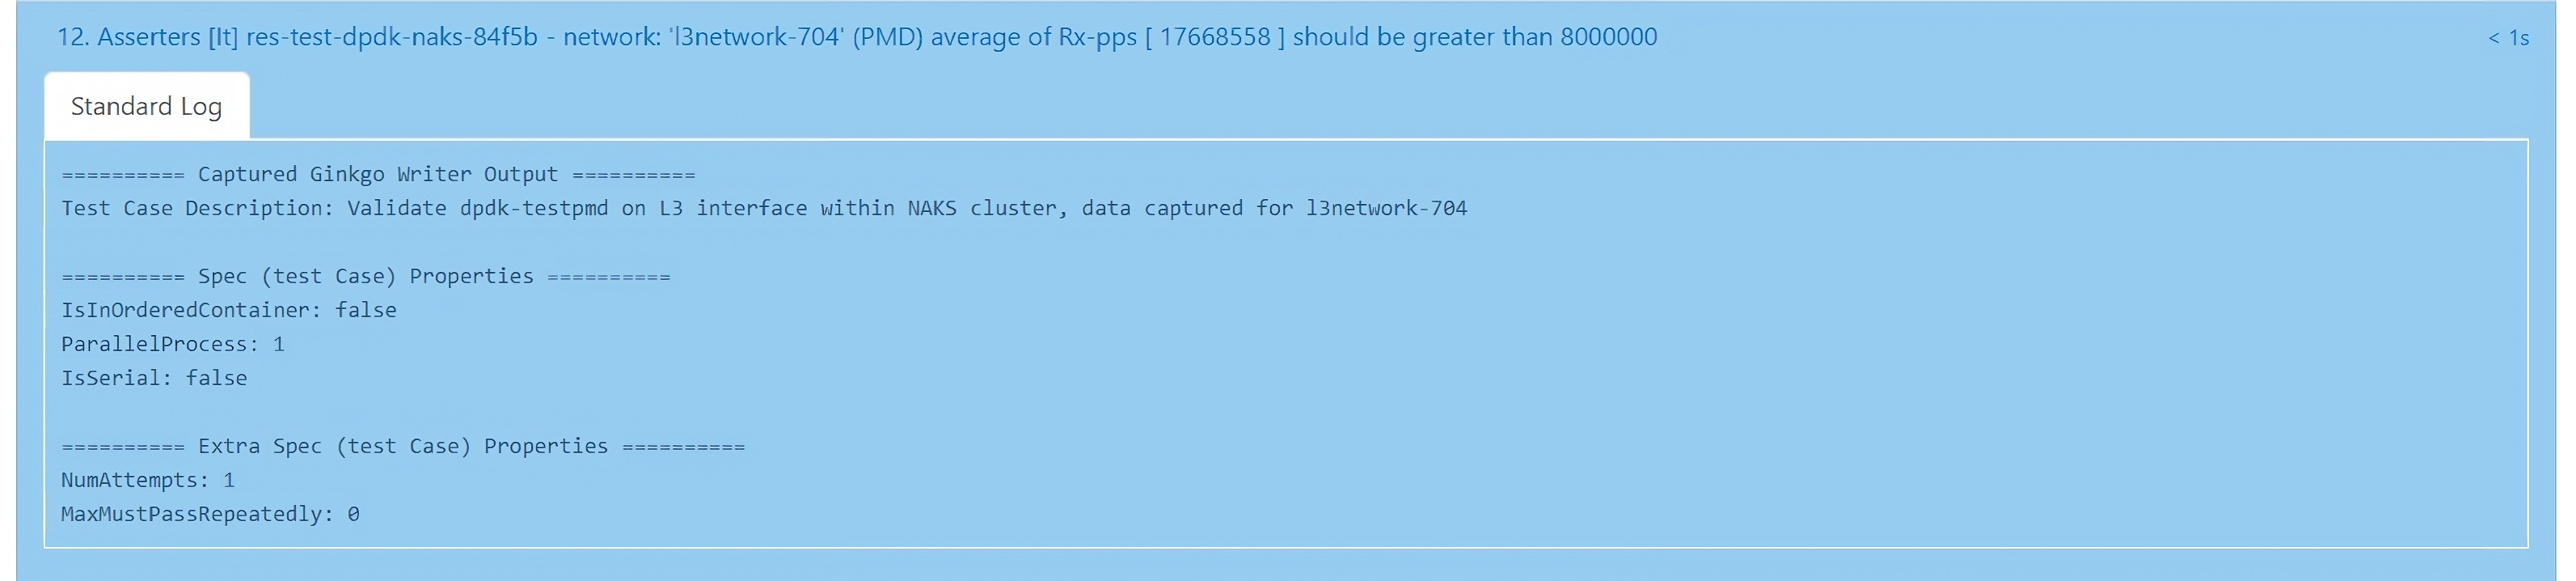
A failed asserter is displayed in red and the Rx-pps value is expected to be smaller in value than 8000000 pps received. The error is displayed under the Error Message tab.

Debug section
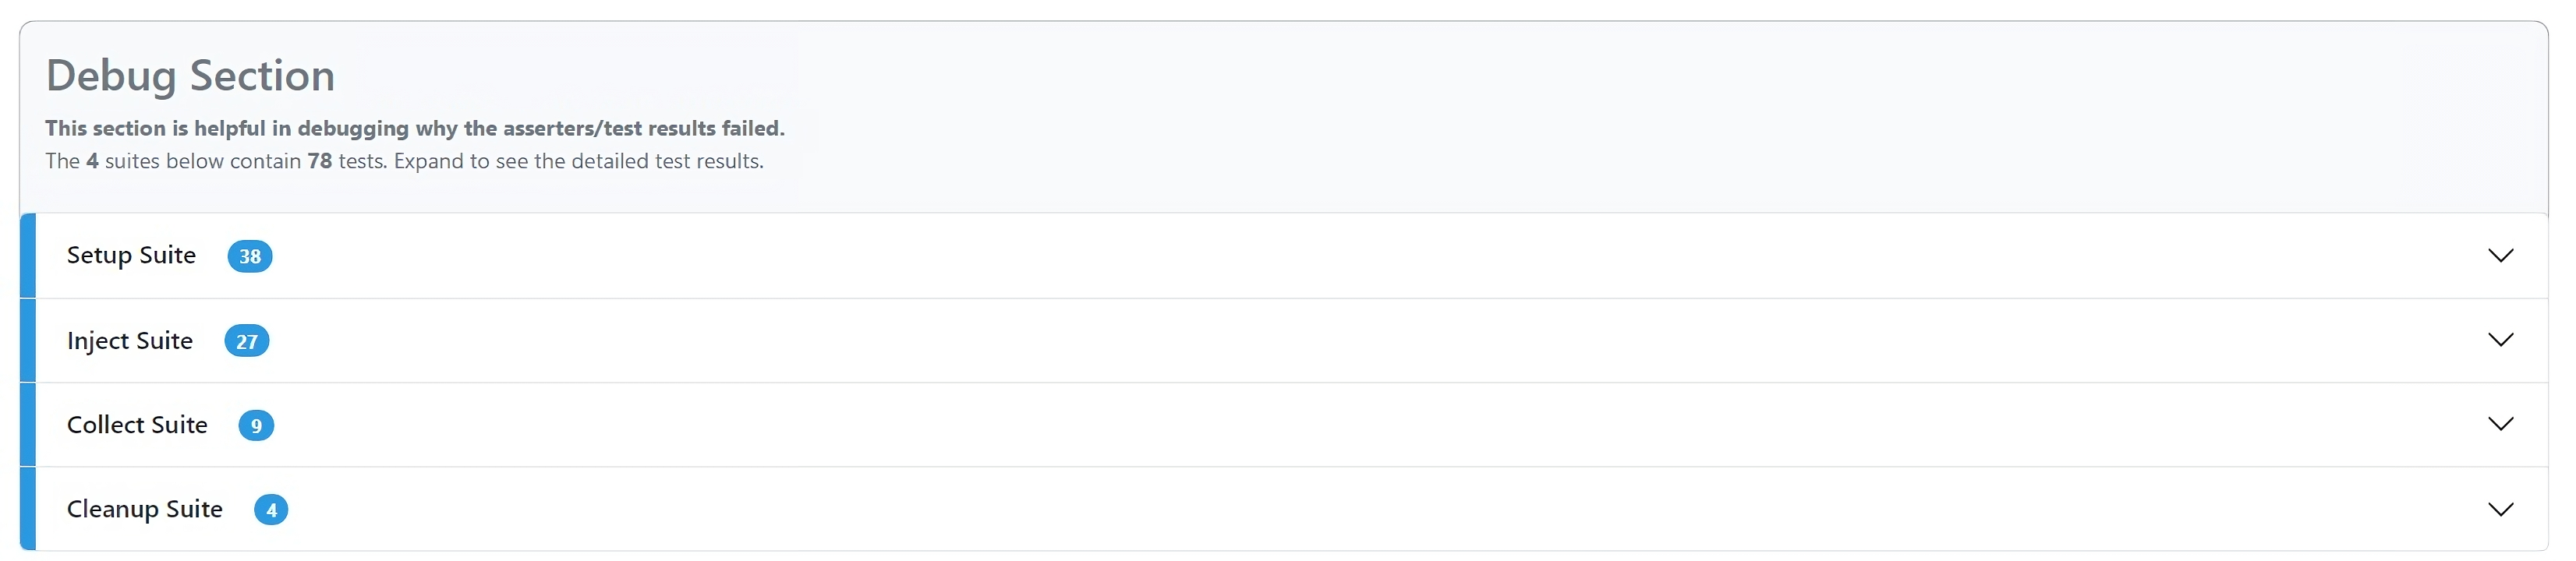
The debug section serves to pinpoint the cause of asserter/test failures for debugging purposes. It consists of four test suites and every suite consists of the suite relevant tests that expand to provide details. Failures of any specific tests are highlighted in red.
Setup Suite:
- Sets up test execution and deploys Nexus Resources as defined in the ARM Template required for the framework and tests.
Inject Suite:
- Injects the required environment variables and test data to support the testing of NAKS resources
Collect Suite:
- The collect suite collects the data published by the Setup Suite.
Cleanup Suite:
- Deletes the Nexus resources created for the tests after the data is collected.
Extras section
This section is an informational only, that provides extra details about the Nexus instance. There are no assertions/tests that represent this section. It is intended to help users check the status of underlying cluster resources and tenant resources running on the cluster after IRT is executed.
The Extras section consists of results displayed by running two different script files separately.
Platform Validation Results:
- Displays the Nexus under cloud deployed resources details and their current statuses, including Cluster Manager details and its extensions, Fabric related details, Nexus cluster and its extensions, BareMetal Machines, Arc related, and Storage appliances.
Tenant workloads Validation Results:
- Displays the Nexus tenant resources details and their current statuses running on the Nexus cluster, including displaying of L2 and L3 Isolation Domains, Cloud Service networks, default cni networks, L2 and L3 networks, trunked networks, available list of VMs.
Troubleshooting
Asserters and debug sections with failures are effective troubleshooting methods to address failures and technical problems.
If you still have questions, contact support. For more information about Support plans, see Azure Support plans.