Note
Access to this page requires authorization. You can try signing in or changing directories.
Access to this page requires authorization. You can try changing directories.
In this how-to guide, you learn to:
- Create a User Assigned Managed Identity (UAMI) to use with Azure Operator Service Manager (AOSM)
- Assign a UAMI permissions to access required resources.
- Use a UAMI when executing network function (NF) or site network service (SNS) operations.
Warning
UAMI is required where an expected SNS operation may run for four or more hours. If UAMI isn't used during long running SNS operations, the SNS may report a false failed status before component operations complete.
Prerequisites
You must create a custom role via Create a custom role. This article assumes that you named the custom role 'Custom Role - AOSM Service Operator access to Publisher.'
You must work with your Network Service Designer to understand the permissions your Managed Identity requires and which Network Function Definition Version (NFDV) your SNS uses.
You need either the 'Owner' or 'User Access Administrator' role over the Network Function Definition Version resource from your chosen Publisher. You also must have a Resource Group over which you have the 'Owner' or 'User Access Administrator' role assignment.
Create a UAMI
First, create a UAMI. Refer to Create a User Assigned Managed Identity for your SNS for details.
Create a custom role and assign to UAMI
Next, create a custom role. Start by considering the best scope-based approach, then create and assign the role to your new UAMI.
Scope considerations for UAMI custom role
The custom role must be assigned sufficient permissions to access user resources. The custom role can be scoped to individual child resources, like an NFDV, for the most granular control. Or, the custom role can be scope to a parent resource, such as the publisher resource group, which grants equal access over all child resources. For proper operations, either individually or via parent, all below resources must be assigned to the custom role:
- All the Network Function Definition Groups (NFDG) and versions.
- All the Network Function Definition (NFD) and versions.
- All the Network Service Design Groups (NSD) and versions.
- All the Configuration Group Schemas (CGS) and versions.
- All the custom locations.
Allow proper permissions for the chosen scope
The UAMI needs the following individual permissions to execute required SNS operations:
- On the NFD;
- Microsoft.HybridNetwork/publishers/networkFunctionDefinitionGroups/networkFunctionDefinitionVersions/use/action
- Microsoft.HybridNetwork/Publishers/NetworkFunctionDefinitionGroups/NetworkFunctionDefinitionVersions/read
- On the NSD;
- Microsoft.HybridNetwork/publishers/networkServiceDesignGroups/networkServiceDesignVersions/use/action
- Microsoft.HybridNetwork/publishers/networkServiceDesignGroups/networkServiceDesignVersions/read
- On the CGS;
- Microsoft.HybridNetwork/Publishers/ConfigurationGroupSchemas/read
- On the custom location;
- Microsoft.ExtendedLocation/customLocations/deploy/action
- Microsoft.ExtendedLocation/customLocations/read
- In addition, the UAMI need access on itself;
- Microsoft.ManagedIdentity/userAssignedIdentities/assign/action
If using a parent resource scope approach, then the required permissions would be applied to the parent resource.
Note
Don't provide write or delete access to any of these publisher resources.
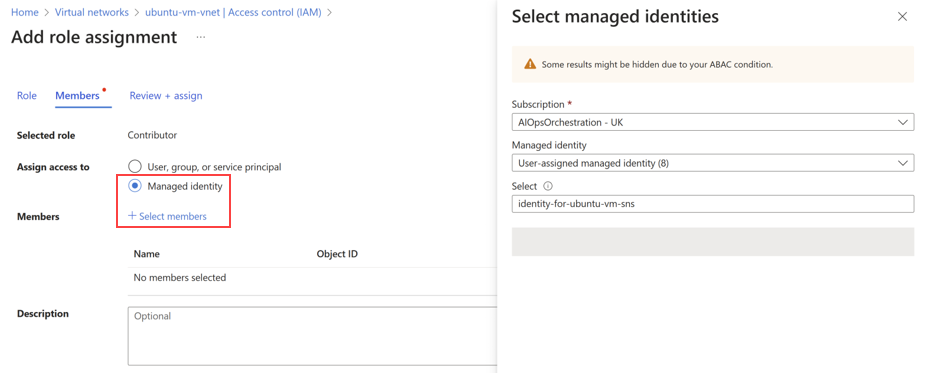
Assign custom role via portal
Access the Azure portal and open your chosen resource scope; for example, Publisher Resource Group or Network Function Definition Version.
In the side menu of this item, select Access Control (IAM).
Choose Add Role Assignment.
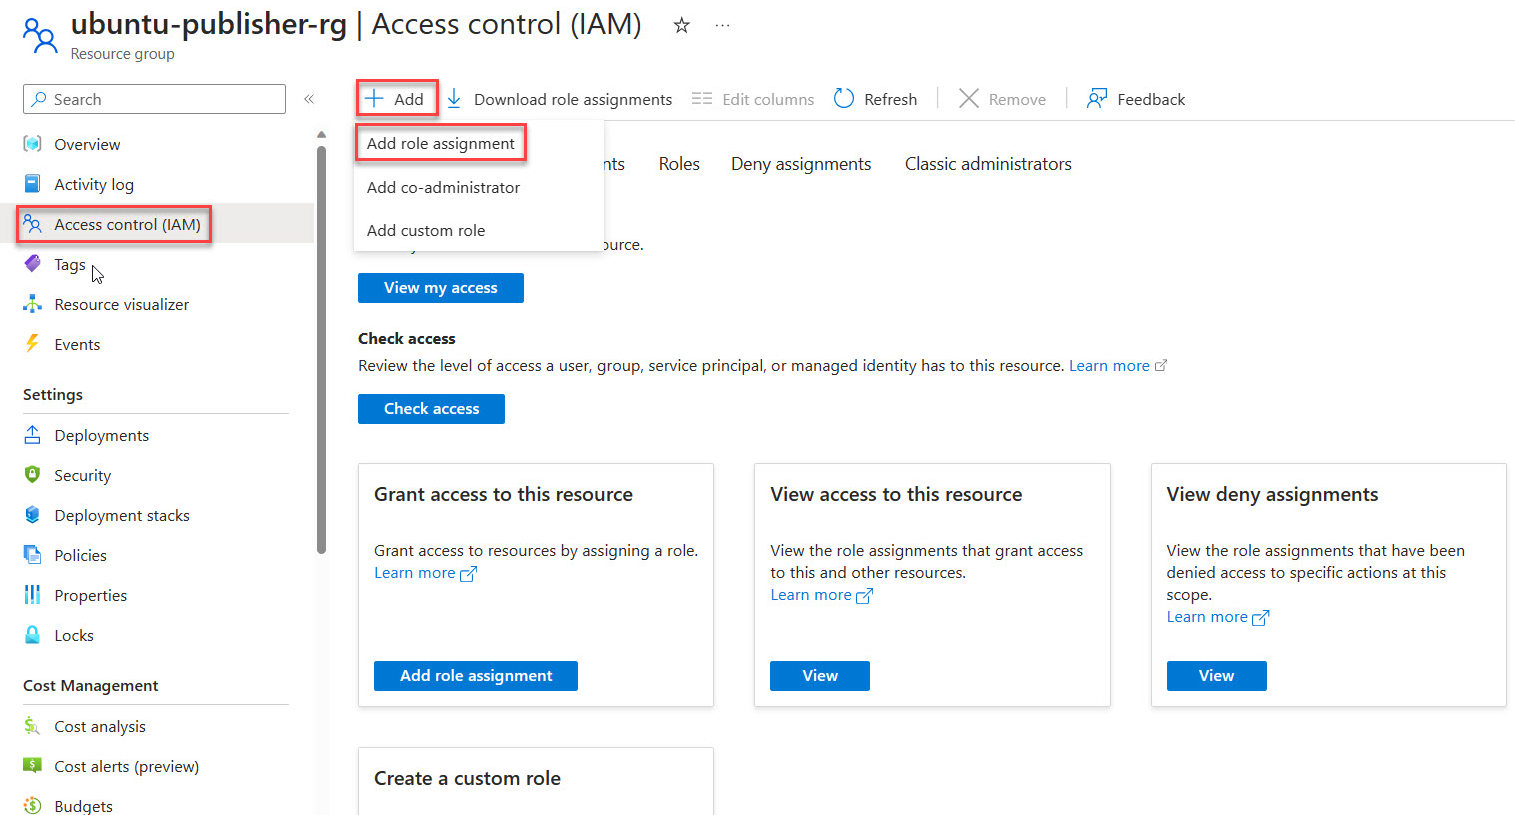
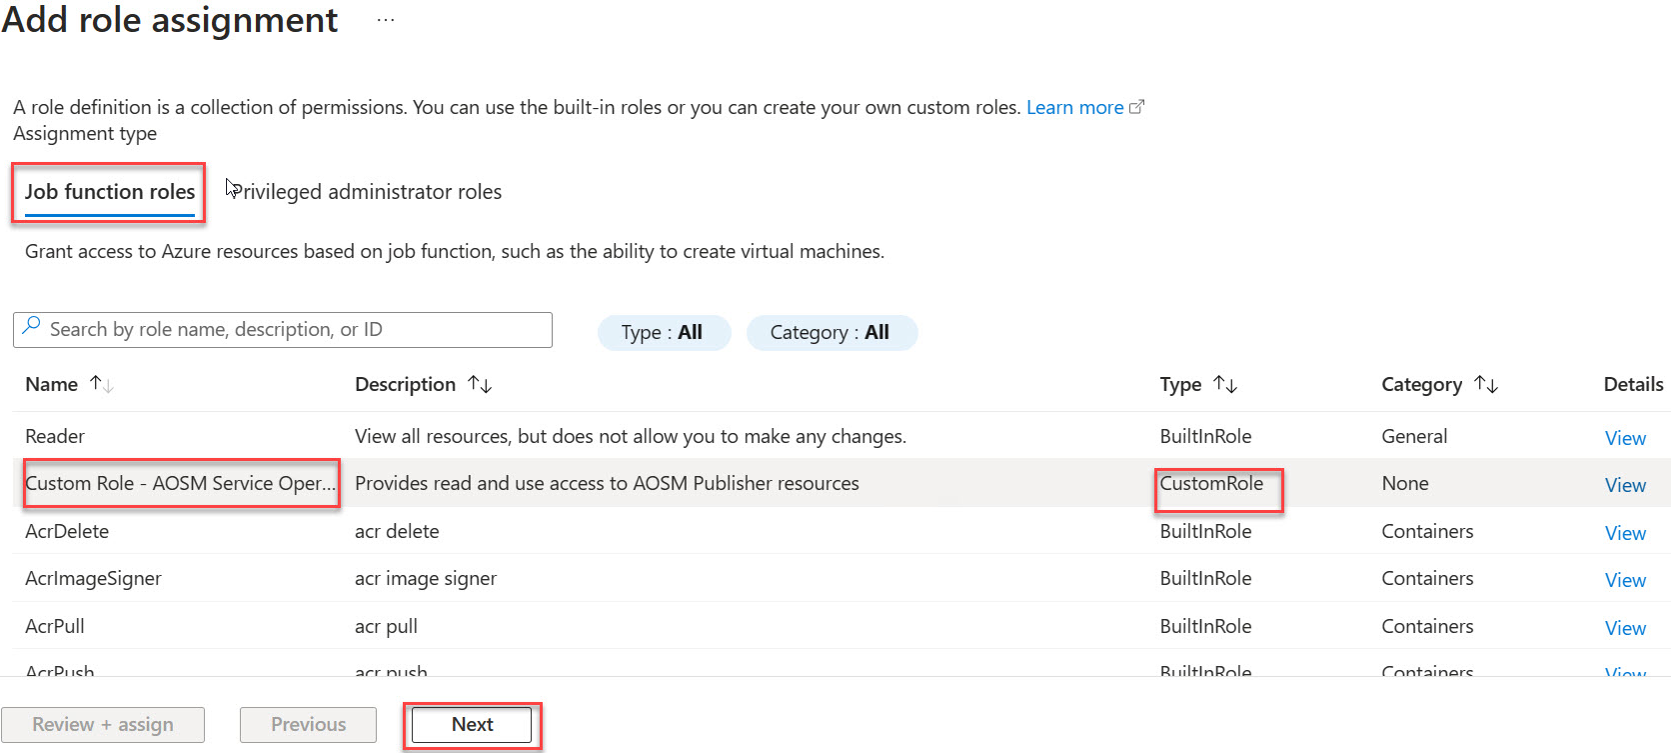
Under Job function roles find your Custom Role in the list then proceed with Next.
Select Managed Identity, then Choose + Select Members then find and choose your new managed identity. Choose Select.
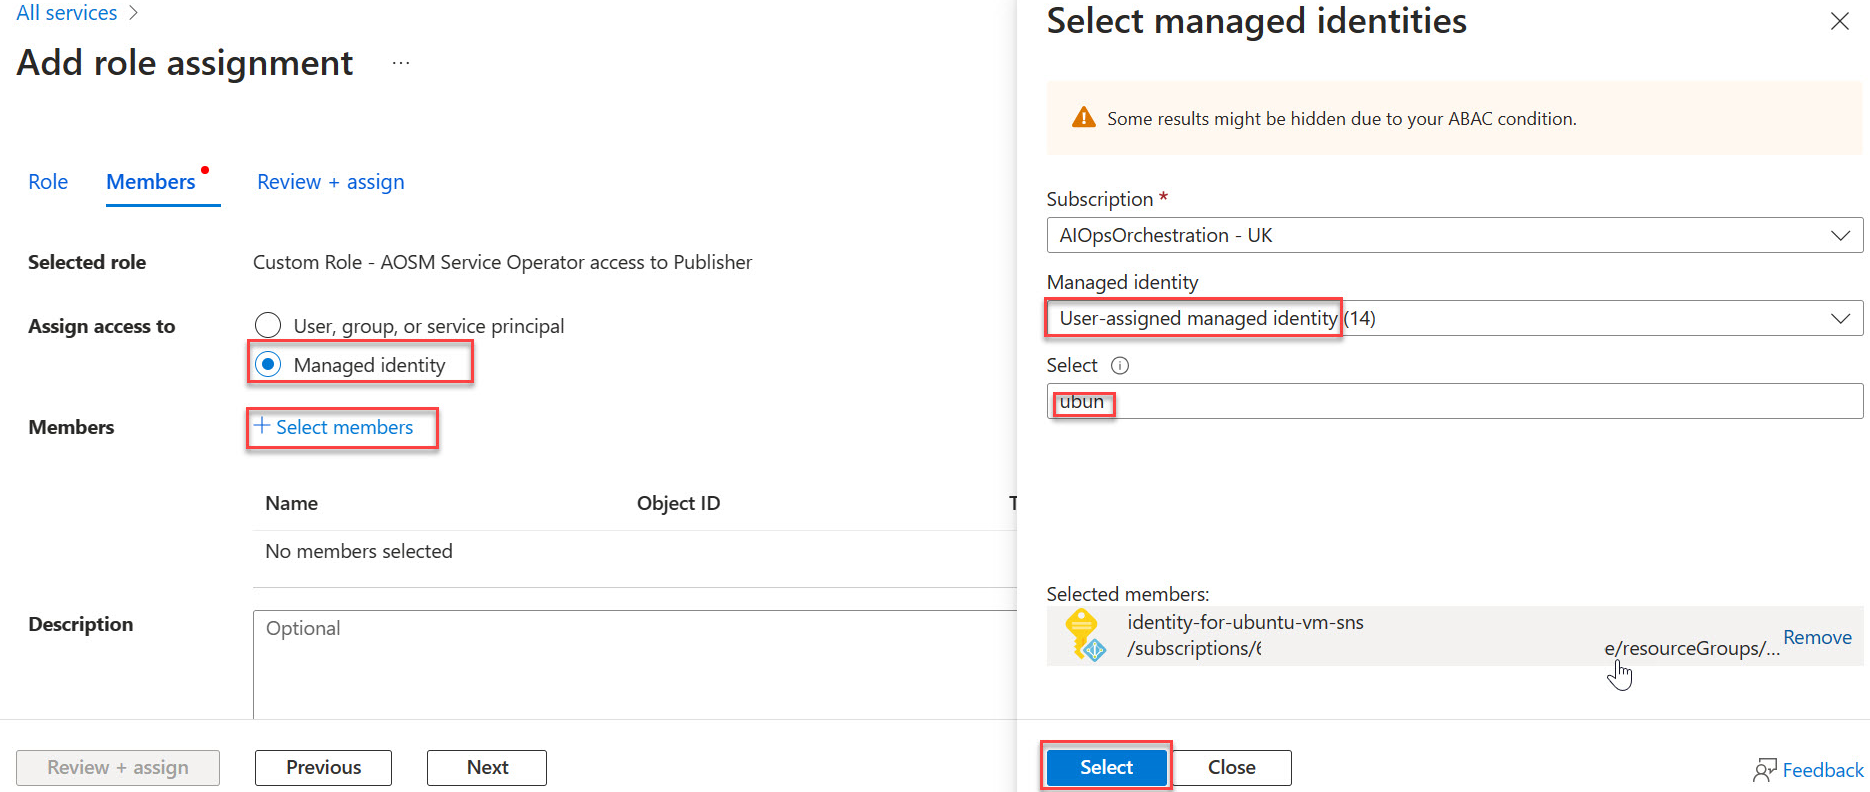
Select Review and assign.


Repeat the role assignment
Repeat the role assignment process for any remaining resources given the chosen scope approach.
Assign managed identity operator role via portal
Go to the Azure portal and search for Managed Identities.
Select your-identity from the list of Managed Identities.
On the side menu, select Access Control (IAM).
Choose Add Role Assignment and select the Managed Identity Operator role.
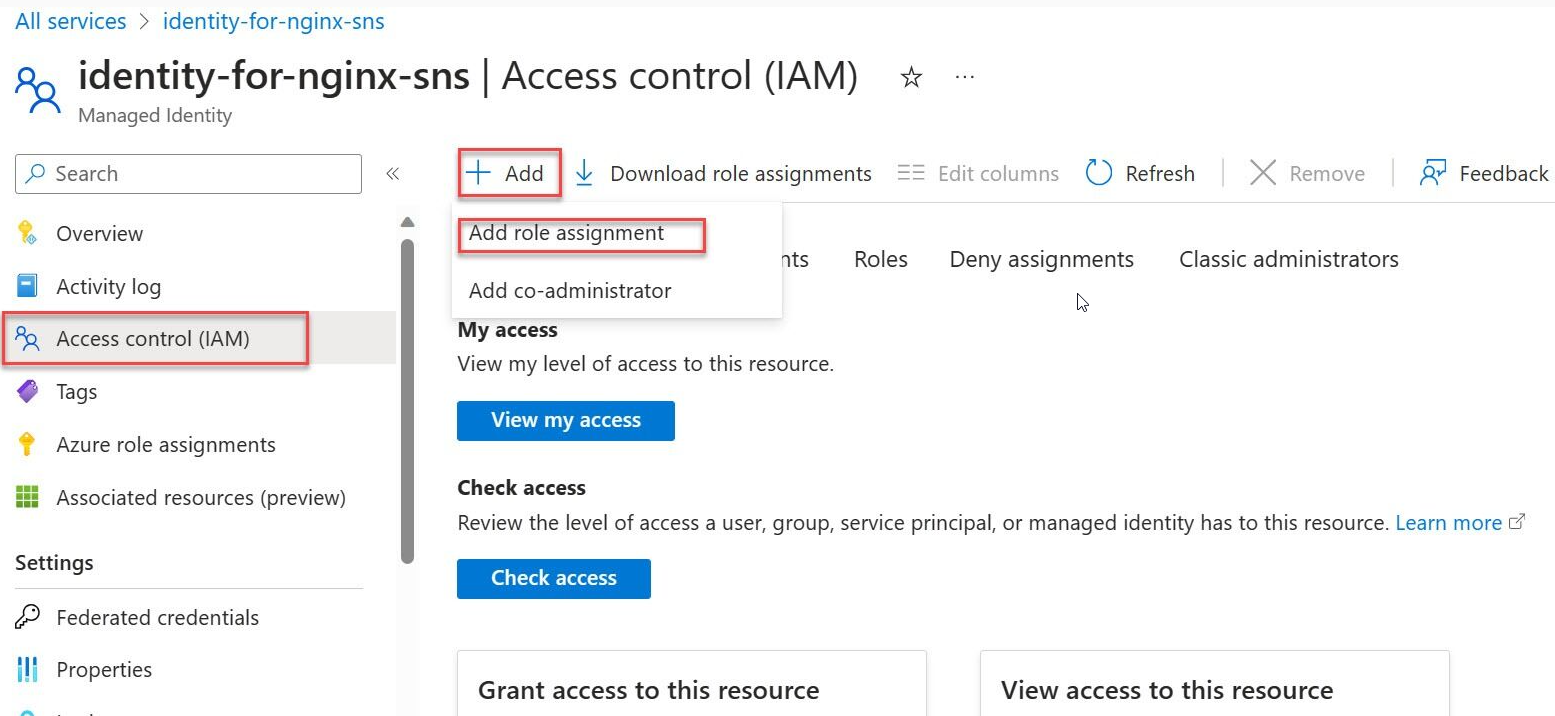
Select the Managed Identity Operator role.
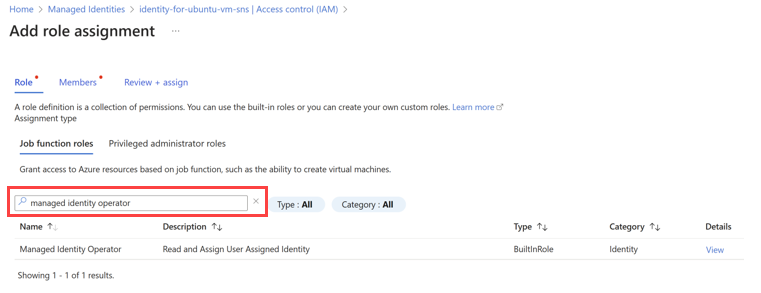
Select Managed identity.
Select + Select members and navigate to the user-assigned managed identity and proceed with the assignment.


Completion of all the tasks outlined in this article ensures that the Site Network Service (SNS) has the necessary permissions to function effectively within the specified Azure environment.
Create and assign permissions to a UAMI via bicep
The required operations to create and assign permissions are also supported via bicep scripting. This approach may work better where automation of these operations within a workflow pipeline is necessary. The following example demonstrates the bicep operations required to establish the UAMI with minimum assigned roles. Expand role assignment, as necessary, based on scope approach.
// ----------- MIO Role Definition -----------
// This role is used to assign the Managed Identity Operator role to the User Assigned Managed Identity (UAMI).
@description('This is the built-in MIO role. See https://learn.microsoft.com/en-us/azure/role-based-access-control/built-in-roles#managed-identity-operator')
resource MIORoleDefinition 'Microsoft.Authorization/roleDefinitions@2018-01-01-preview' existing = {
  scope: managedIdentity
  name: 'f1a07417-d97a-45cb-824c-7a7467783830'
}

// This role is used to assign the Contributor role to the User Assigned Managed Identity (UAMI) at the resource group level.
resource ContributorRoleDefinition 'Microsoft.Authorization/roleDefinitions@2018-01-01-preview' existing = {
  scope: subscription()
  name: 'b24988ac-6180-42a0-ab88-20f7382dd24c'
}

// Assign the Managed Identity Operator role to the User Assigned Managed Identity (UAMI) at the scope of the managed identity.
resource roleAssignment 'Microsoft.Authorization/roleAssignments@2020-04-01-preview' = {
  name: guid(resourceGroup().id, principalId, MIORoleDefinition.id)
  scope: managedIdentity
  properties: {
    roleDefinitionId: MIORoleDefinition.id
    principalId: managedIdentity.properties.principalId
    principalType: 'ServicePrincipal'
  }
}
// Get reference to the target resource group
resource targetRg 'Microsoft.Resources/resourceGroups@2022-09-01' existing = {
  name: 'publisherResourceGroupName' // Replace with the actual resource group name
  scope: subscription('subscriptionId')
}

// Assign the Contributor role to the User Assigned Managed Identity (UAMI) at the scope of the publisher resource group.
resource roleAssignmentContributor 'Microsoft.Authorization/roleAssignments@2020-04-01-preview' = {
  name: guid(resourceGroup().id, principalId, ContributorRoleDefinition.id)
  scope: targetRg
  properties: {
    roleDefinitionId: ContributorRoleDefinition.id
    principalId: managedIdentity.properties.principalId
    principalType: 'ServicePrincipal'
  }
}
Use a UAMI with NF and SNS operations
NF template considerations
The NF template must be updated to include the identityObj parameter. The following JSON example demonstrates use of this parameter with a generic NF setup:
{
  "$schema": "https://schema.management.azure.com/schemas/2019-04-01/deploymentTemplate.json#",
  "contentVersion": "1.0.0.0",
  "parameters": {
    "nameValue": {
      "type": "string",
      "defaultValue": "[concat('anf-', substring(uniqueString(deployment().name), 0, 6))]"
    },
    "locationValue": {
      "type": "string",
      "defaultValue": "eastus2euap"
    },
    "nfviTypeValue": {
      "type": "string",
      "defaultValue": "AzureArcKubernetes"
    },
    "nfviIdValue": {
      "type": "string"
    },
    "config": {
      "type": "object",
      "defaultValue": {}
    },
    "nfdvId": {
      "type": "string"
    },
    "identityObj": {
      "type": "object",
      "defaultValue": {
        "type": "UserAssigned",
        "userAssignedIdentities": {
          "/subscriptions/<subscriptionId>/resourceGroups/<rgName>/providers/Microsoft.ManagedIdentity/userAssignedIdentities/<uaminame>": {}
        }
      }
    }
  },
  "variables": {
    "deploymentValuesValue": "[string(createObject('role1releasenamespace', parameters('config').role1releasenamespace, 'role1releasename',parameters('config').role1releasename, 'role2releasenamespace', parameters('config').role2releasenamespace, 'role2releasename',parameters('config').role2releasename,'role3releasenamespace', parameters('config').role3releasenamespace, 'role3releasename',parameters('config').role3releasename))]",
    "nfName": "[concat(parameters('nameValue'), '-CNF')]"
  },
  "resources": [
    {
      "type": "Microsoft.HybridNetwork/networkFunctions",
      "apiVersion": "2024-04-15",
      "name": "[variables('nfName')]",
      "location": "[parameters('locationValue')]",
      "identity": "[parameters('identityObj')]",
      "properties": {
        "networkFunctionDefinitionVersionResourceReference": {
          "id": "[parameters('nfdvId')]",
          "idType": "Open"
        },
        "nfviType": "[parameters('nfviTypeValue')]",
        "nfviId": "[parameters('nfviIdValue')]",
        "allowSoftwareUpdate": true,
        "configurationType": "Secret",
        "secretDeploymentValues": "[string(variables('deploymentValuesValue'))]"
      }
    }
  ]
}
SNS template considerations
The SNS template must be updated to include the identity resource parameter. The following bicep example demonstrates use of this parameter with a generic SNS setup:
resource azCoreSnsUAMI 'Microsoft.HybridNetwork/sitenetworkservices@2023-09-01' = {
  name: snsNameUAMI
  location: location
  sku: {
    name: 'Standard'
  }
  identity:  {
    type: 'UserAssigned'
    userAssignedIdentities: {
     '${managedIdentity.id}': {}
    }
  }
  properties: {
    siteReference: {
      id: azCoreSite.id
    }
    networkServiceDesignVersionResourceReference: {
        id: nsdv.id
        idType: 'Open'
    }
    desiredStateConfigurationGroupValueReferences: {
      Test_Configuration: {
        id: azCoreCgv.id
      }
      Secret_Configuration:{
        id:azCoreCgvSecret.id
      }
    }
  }
}