Note
Access to this page requires authorization. You can try signing in or changing directories.
Access to this page requires authorization. You can try changing directories.
![IMPORTANT] This article describes an early preview version of SSH Posture Control. For up-to-date documentation, see What is SSH Posture Control? instead.
SSH Posture Control enables you to use the familiar workflows of Azure Policy and Machine Configuration to:
- Ensure compliance with standards in your industry or organization
- Reduce attack surface of remote management features
- Ensure consistent setup across your fleet for security and productivity
SSH Posture Control also provides detailed Reasons describing how compliance or non-compliance was determined. These Reasons make it easier to take action or to fully document compliance.
SSH Posture Control analyzes and enforces approximately 20 SSH server (sshd) parameters. By default it audits and applies best practices consistent with the Azure Compute Security Baseline for Linux. You can also customize certain parameters to suit your environment. For example, you can customize which users and groups are allowed SSH access.
Private preview limitations
Important
SSH Posture Control is in private preview-- intended to trigger dialog between you and Microsoft.
- The preview is intended for use with isolated dev/test machines where any problem (including inadvertently locking yourself out from SSH access) would not have important consequences.
- The preview involves importing the policy definition, rather than choosing it from the Azure Policy built-in list.
- Supported Linux distros are initially limited to Ubuntu Server (20.04, 22.04) and Debian (11, 12). Please let us know (contact info at end of page) which distros you would like to see enter the preview next.
Getting started example
This example is focused on getting started quickly. It makes simplifying assumptions and does not explore everything that is possible. For example, it uses default SSH settings from the PolicyDefinition, rather than customizing parameters such as allowed users and groups. More comprehensive information on SSH Posture Control including settings and behaviors is expected in the near future.
Tip
The following mental model and terminology are used throughout this article.

- PolicyDefinition : SSH Posture Control definition and metadata, as represented in the Azure Policy service.
- PolicyAssignment : Links your SSH Posture Control PolicyDefinition to a scope where that policy should be applied, such as a resource group.
- Machine : An endpoint capable of being managed by Azure Policy and Machine Configuration (aka Guest Configuration). In other words, an Arc enabled machine or an Azure VM.
A. Pre-requisites
- An Azure account with permission to create a resource group, a VM (or Arc machine), a policy definition and a policy assignment.
- For additional pre-requisites, choose your preferred experience:
- Using a web browser, sign in to Azure Portal or your local equivalent.
B. Create a resource group
- Create a resource group. In upcoming steps this will be used to scope the policy, and to contain a new test machine.
C. Create the PolicyDefinition
Note
This extra step (creating rather than just choosing the PolicyDefinition) is required during the private preview.
- Navigate to the Azure Policy Overview page. For example, you could use the URI: https://portal.azure.com/#view/Microsoft_Azure_Policy/PolicyMenuBlade/~/Overview.
- Navigate to the Definitions view.
- Click the + Policy Definition button to create a new PolicyDefinition, entering the following as inputs.
- Definition location: Choose your Azure subscription where the PolicyDefinition will live.
- Name: [Preview] SSH Posture Control policy
- Category: Use Existing, then choose Guest Configuration
- Policy rule: Delete the pre-existing JSON, and paste the PolicyDefinition JSON from Preview SSH Posture Control policy definition
- Click Save
D. Use a PolicyAssignment to apply the PolicyDefinition to your resource group
Caution
This policy modifies sshd configuration on in-scope machines. These instructions have you assigning it to an initially empty resource group, where you will later create a test machine. Take great care if you choose to assign to any broader scope.
- Navigate to the Policy | Definitions page which lists all available policy definitions.
- Select the [Preview] SSH Posture Control policy PolicyDefinition you created earlier
- Click Assign.
- For Scope choose the resource group where you will later create a new test machine.
- Proceed to the Parameters tab.
- Choose "true" for Include Arc connected machines, unless you specifically want to exclude Arc connected machines.
- NOTE: If you want to customize SSH settings, such as allowed groups, uncheck the Only show parameters... box to reveal all of the available parameters. If you do choose to specify allowed or denied users or groups, please be aware that you would enter a space delimited string, for example
userA userB.
- Proceed to the Remediation tab.
- NOTE: Although this demo focuses on a new machine, in other scenarios where you want the PolicyAssignment to apply to existing machines you can check the box for Create a remediation task.
- Choose Create a Managed Identity with System assigned and an identity location of your choice.
- Proceed to Review + create
- Choose Create to complete the PolicyAssignment.
E. Create a new machine
Although new PolicyAssignments can apply to existing machines, the process can take up to a 24 hours. For this quick-start we will focus on evaluating a new machine. In this example we will create an Azure VM, but you could create an Arc enabled machine if you prefer.
- Navigate to the Azure Virtual Machines experience.
- Create a new VM, ensuring the following properties:
- Subscription and Resource Group should match where the PolicyAssignment was scoped.
- Image should be "Unbuntu Server 22.04...".
- VM architecture should be x64.
- Other properties such as VM name, size, etc. can be whatever you prefer.
- Wait for the VM creation to complete, and then click Go to Resource to reach the machine overview page
- In the left-hand navigation, select Identity and ensure that the machine has a system managed identity
- In the left-hand navigation, select Extensions + applications, then + Add
- Choose the Azure Automanage Machine Configuration extension and select Next
- Select Review + create, then create
F. Take a break before proceeding
When new PolicyDefinitions, PolicyAssignments, and machines are involved, it can take several minutes for everything to reach steady-state. Consider waiting at least 30 minutes before proceeding to the next step.
G. Observe compliance results
The following steps enable you to see a compliance rollup at different altitudes:
- Compliance by PolicyAssignment
- Number of machines compliant and non-compliant
- Highest altitude, especially useful for large fleets
- Compliance by machine
- List of machines with yes/no per machine
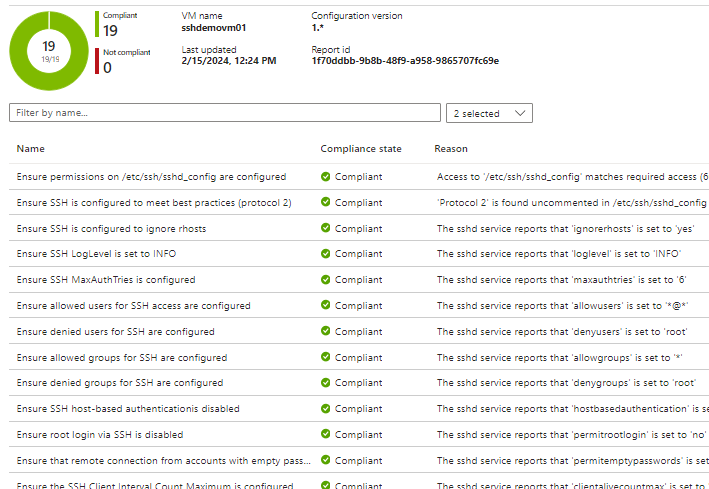
- Compliance by setting, for a specific machine
- Deepest level of detail, like the screenshot at the top of this article.
Tip
Your new machine will likely be judged as non-compliant when it encounters the policy for the first time. The default SSH settings in the policy are more strict than what many OS images have configured by default. After an additional 20 minutes or so, you should find that your machine becomes compliant thanks to the remediation logic built-in to SSH Posture Control.
- Navigate to the Policy | Compliance page.
- Select [Preview] SSH Posture Control policy.
- Observe that the number of compliant / non-compliant machines is reported
- Under Resource Compliance you can see the status for individual machines
- To drill down to the setting-by-setting details for a specific machine:
- Click the ... next to a machine, and choose View resource to reach the machine's Overview page
- In the left hand navigation under Operations, click Configuration management (not Configuration under Settings)
- Click LinuxSSHServerSecurityBaseline
- The resulting page shows each setting in the configuration with details about compliance as well as how compliance was determined.
Next step
Contact the team at Microsoft to provide feedback, features requests, etc.