Quickstart: Manage a single virtual IoT device using Azure CLI
Important
This document is no longer updated and will be removed. For up-to-date instructions on trying out OSConfig scenarios:
- First, follow the steps in Create an OSConfig (with Azure IoT) lab environment in 5 minutes
- Next, try any of the scenarios from: What can I provision and manage?
The goal of this Quickstart is to familiarize you with remote administration of IoT/Edge devices through OSConfig for IoT. In Part 1 you will set up a test environment, including the creation of a VM to act as a virtual IoT device. In Part 2 you will perform several device management actions, for example:
- Remotely retrieve the IP address of the device
- Remotely test endpoint connectivity from the device’s perspective
- Remotely reboot the device
- and more
This Quickstart uses a single example device. To use OSConfig at scale you would use Iot Hub Device Management services as the control plane, rather than individual Azure CLI commands.
Prerequisites
- You will need an Azure account with an active subscription. If needed, you can create an account for free.
- You will use the Azure Cloud Shell
bashenvironment- NOTE: If this is your first time using Azure Cloud Shell, the portal will walk you through creating some storage space prior to continuing. This is normal.
- NOTE: Azure Cloud Shell already has the latest Azure CLI tools, and is automatically signed in to your Azure account. If you prefer to use your own
bashenvironment rather than the cloud shell, you can install and configure Azure CLI in your ownbashenvironment.
- You will need the Azure IOT extension for Azure CLI, which can be added using the following command:
az extension add --name azure-iot

Verifying prerequisites
- From Azure Cloud Shell (or your alternative
bashenvironment), Ensure that Azure CLI is signed in to the Azure account and subscription context you wish to use.
az account show
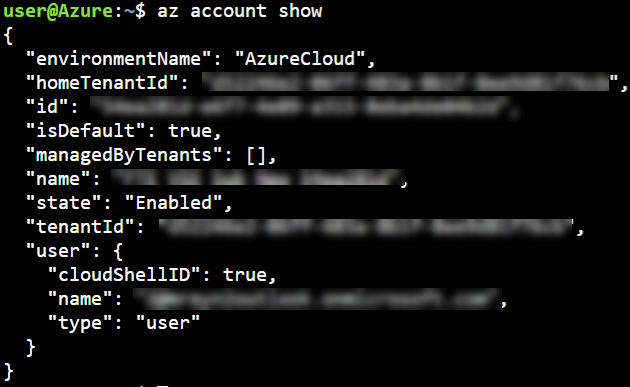
If you need to sign in with a different account or change subscriptions, you can use the az login and az account set commands.
Quickstart environment overview
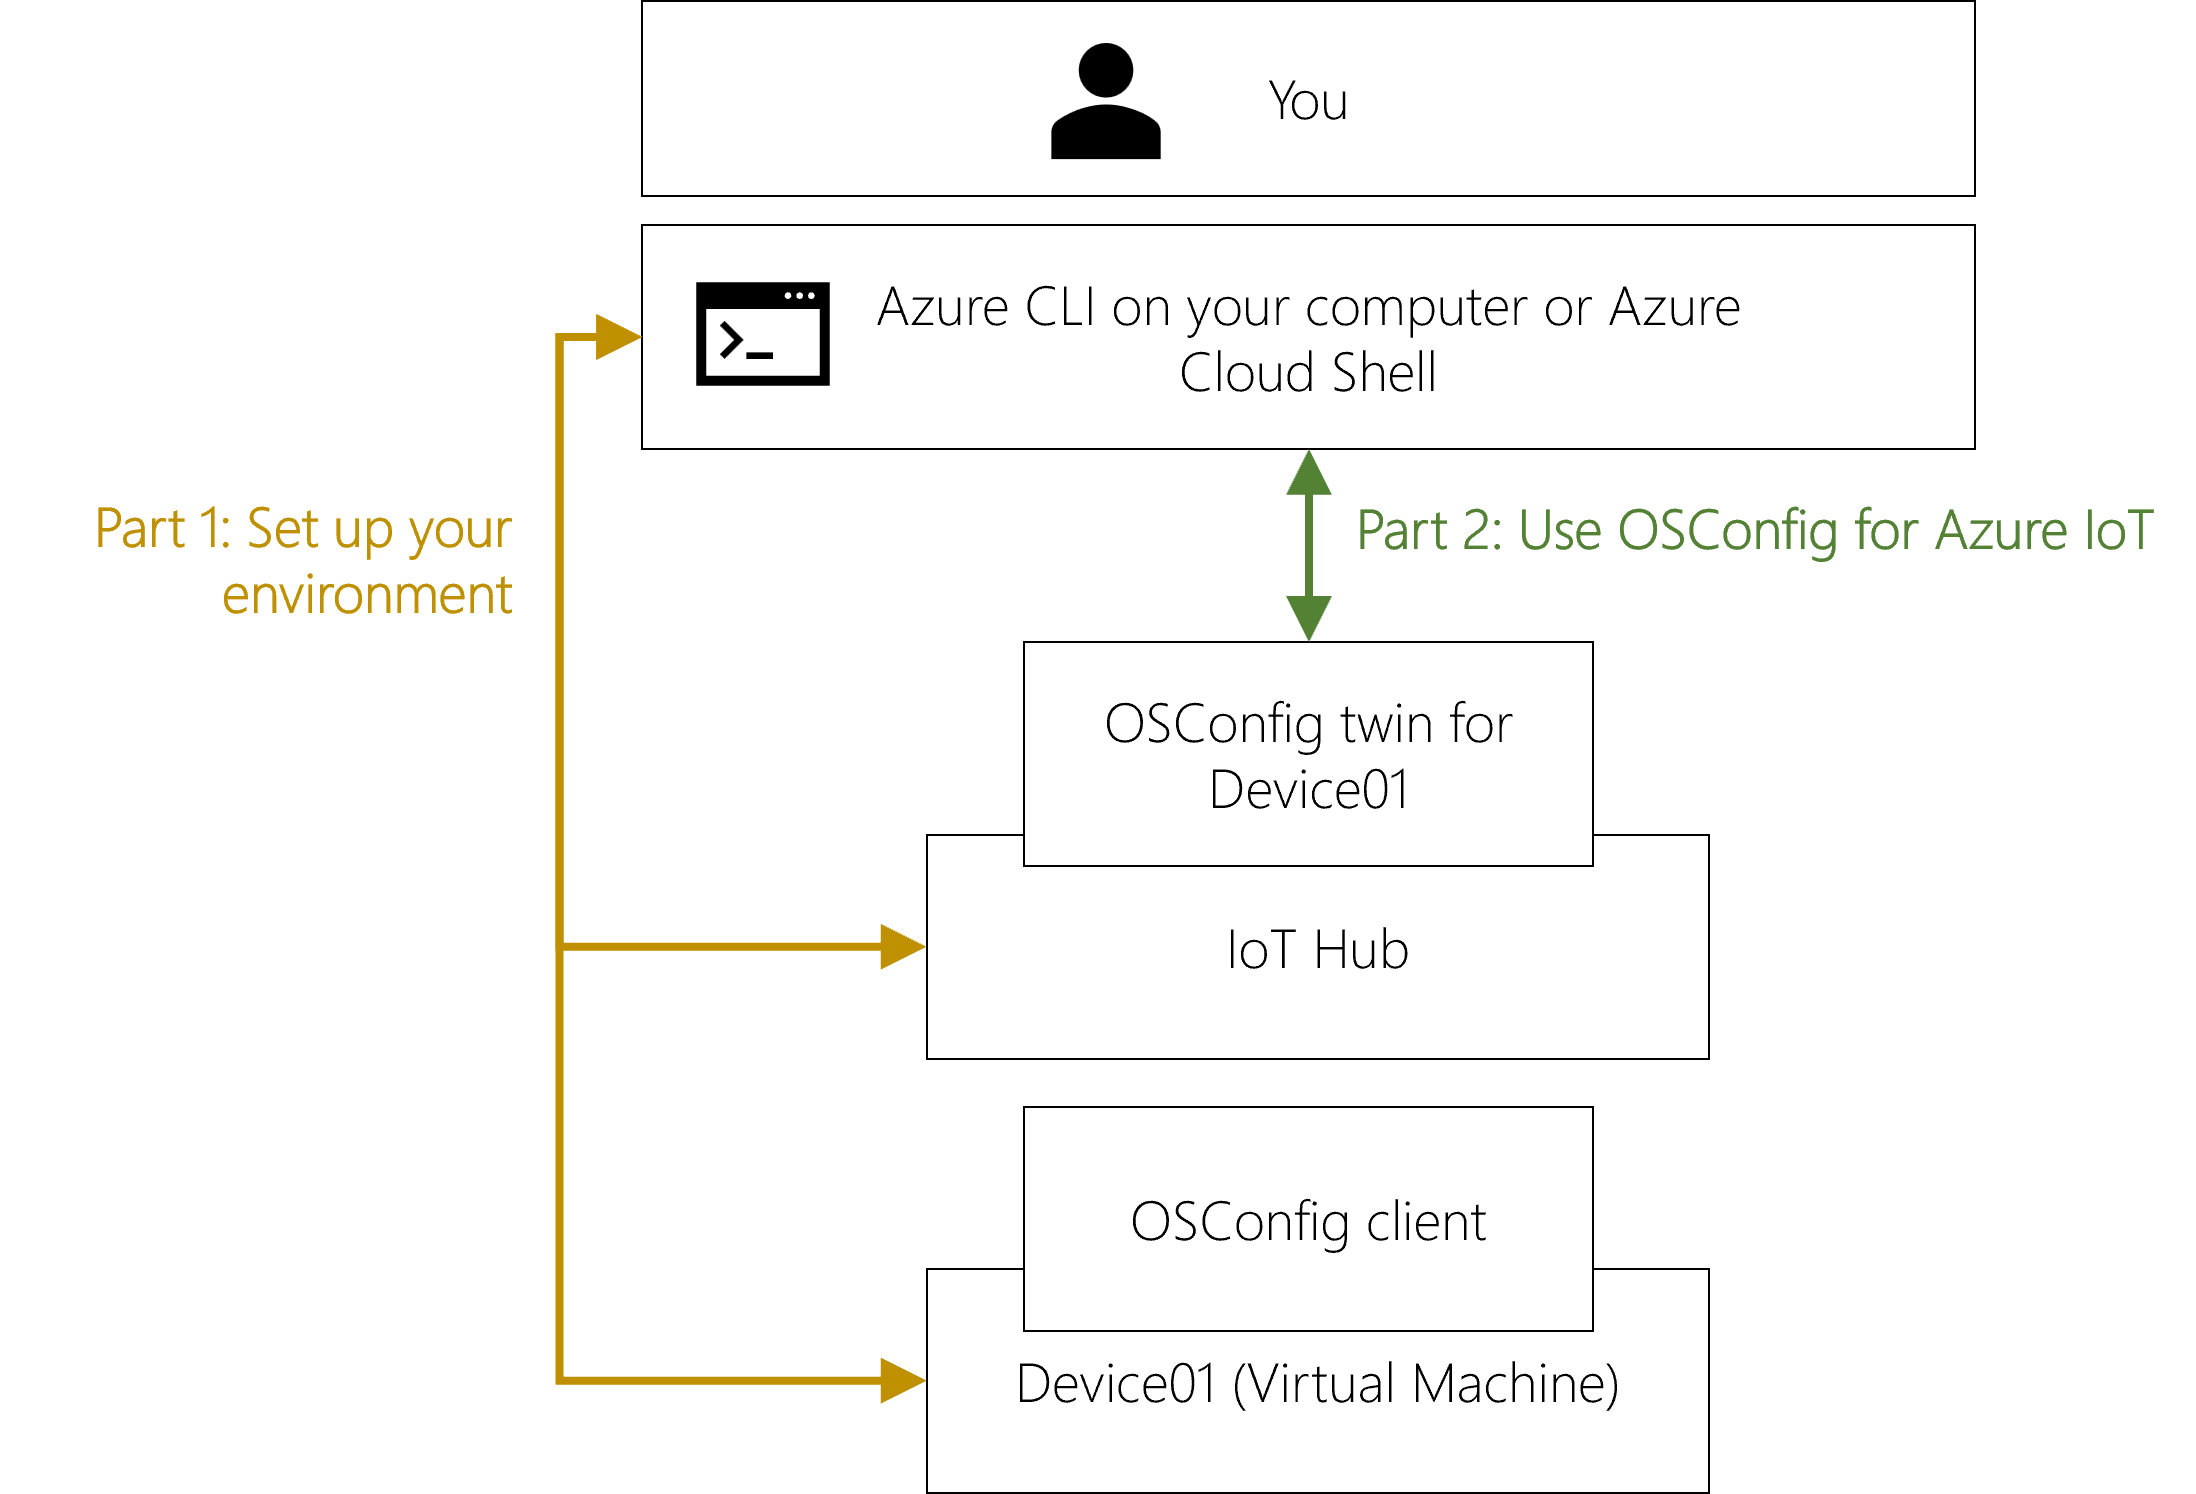
Part 1: Set up your environment
1.1: Create your Azure IoT resources
1.1.1: Define a unique name for your IoT Hub
You will need to make up a unique name for your IoT Hub, such as "QuickStart12345" or "HelloWorld98765". That name will be used repeatedly in later commands, so we will store it in a bash variable, like so:
# In the following command replace <Your_Made_Up_Name_Here>
# with your own preferred hub name, for example:
# MY_IOT_HUB_NAME="MyQuickStart54321"
MY_IOT_HUB_NAME="<Your_Made_Up_Name_Here>"

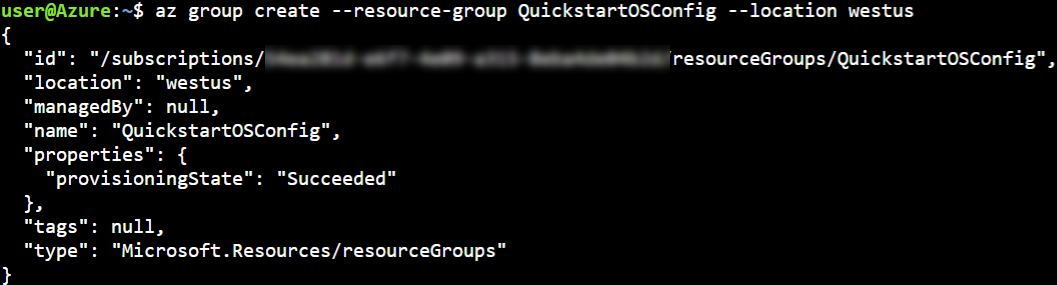
1.1.2: Create a resource group and an IoT Hub
az group create --resource-group QuickstartOSConfig --location westus
az iot hub create --resource-group QuickstartOSConfig --name "$MY_IOT_HUB_NAME" --query id

Tip
If the az iot hub create... command fails with an error that the name was not available, it means that name you chose was already in use elsewhere in Azure. To solve this, repeat the MY_IOT_HUB_NAME="<Your_Made_Up_Name_Here>" step above with a new and more unique name, then try the az iot hub create ... command again.
Tip
It is not unusual for the az iot hub create... command to take a few minutes to complete.
1.1.3: Create the device ID and get the device connection string
az iot hub device-identity create --hub-name "$MY_IOT_HUB_NAME" -d device01 --query deviceId
az iot hub device-identity connection-string show --hub-name "$MY_IOT_HUB_NAME" --device-id device01

Tip
Make note of the connectionString value returned by the last command (it starts with HostName=). You will use this connection string in a later step.
1.2: Create an Azure VM to act as the virtual IoT device
Use the following command to create a virtual machine.
az vm create --resource-group QuickstartOSConfig --name device01 --image Canonical:UbuntuServer:18.04-lts:latest --admin-username azureuser --generate-ssh-keys --query publicIpAddress

Tip
Make note of the IP address returned by of the last command. You will use this address in the following step.
1.3: Install client software on the virtual IoT device
1.3.1: Establish terminal access to the virtual device
The next few commands need to run on the VM you just created. Use SSH to connect:
# In the following command, replace <public ip address from previous step> with
# the actual IP address. For example:
# ssh azureuser@1.2.3.4
ssh azureuser@<ip address from previous step>
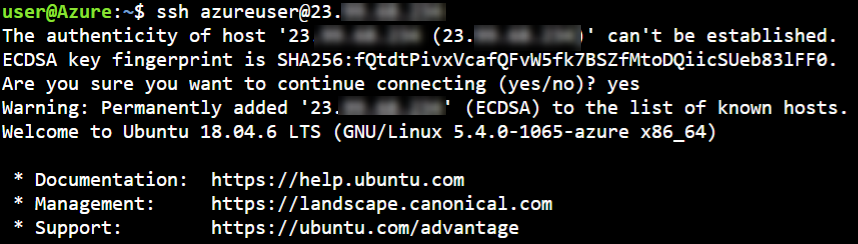
Tip
Your ssh client may require you to type yes in order to continue. This is normal.
Tip
Before proceeding, check that you are now connected to the virtual IoT device. Your command prompt should have changed from <your name>@azure: to azureuser@device01:. If your command prompt has not changed to azureuser@device01:, run the above ssh command again.
1.3.2: On the virtual device, install aziot-identity-service
sudo apt-get update
curl -sSL https://packages.microsoft.com/keys/microsoft.asc | sudo apt-key add
sudo apt-add-repository https://packages.microsoft.com/ubuntu/18.04/multiarch/prod
sudo apt-get update
sudo apt install -y aziot-identity-service


1.3.3: On the virtual device, apply the connection string
Configure the device to authenticate to Azure IoT using the following command. You will use the connection string value you obtained earlier in Create your Azure IoT resources.
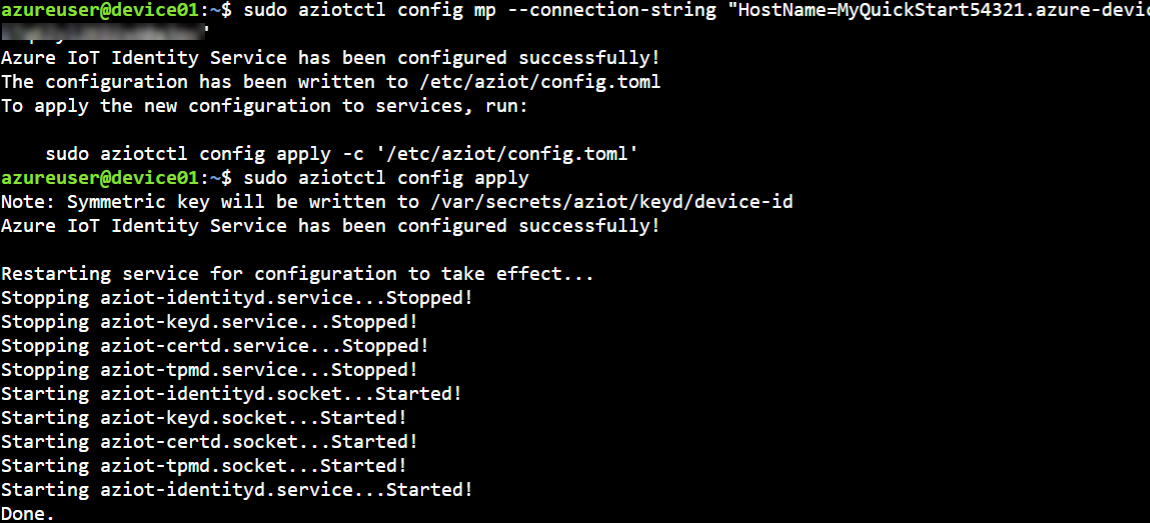
sudo aziotctl config mp --connection-string "<your connection string>"
sudo aziotctl config apply
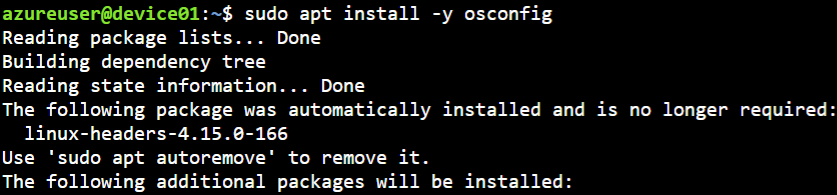
1.3.4: On the virtual device, install the OSConfig package and observe that it is running
sudo apt install -y osconfig
sudo systemctl status osconfig | grep --color=never Active
1.2.5: Exit the SSH session
exit

Part 2: Use OSConfig for IoT
You made it! Now that the environment is prepared, we can start using OSConfig to get and set host-level configuration and state through the IoT Hub. From Azure Cloud Shell or your computer, use the following Azure CLI commands to complete each example.
2.1: Is this thing on?
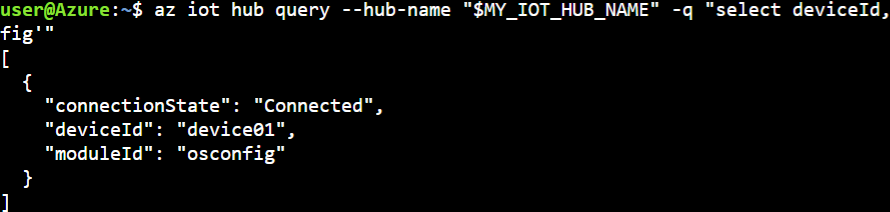
We will start by getting the device’s IoT Hub deviceId, and show that OSConfig is active.
az iot hub query --hub-name "$MY_IOT_HUB_NAME" -q "select deviceId,moduleId,connectionState from devices.modules where deviceID='device01' and moduleId='osconfig'"
2.2: Get device network state, such as IP addresses and DNS servers, for any OSConfig enabled devices in your IoT Hub
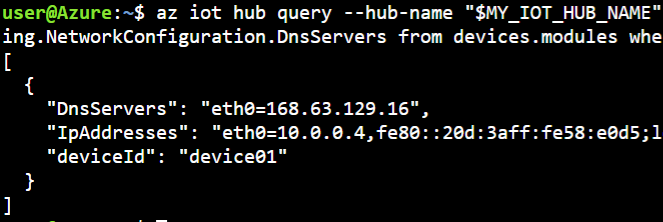
There are many use cases for reporting the network state from managed devices. For example, you might need the local IP address to connect a local IP video stream Similarly you might want to report on DNS servers in use for troubleshooting or to ensure devices are using expected network infrastructure. The following example retrieves the IP addresses and DNS servers assigned to each network adapter.
az iot hub query --hub-name "$MY_IOT_HUB_NAME" -q "select deviceId,properties.reported.Networking.NetworkConfiguration.IpAddresses,properties.reported.Networking.NetworkConfiguration.DnsServers from devices.modules where moduleId='osconfig'"
Tip
The IP information returned is from the device's perspective, matching what you would get running ifconfig or ip address locally on the device. The Azure public IP address (used earlier for SSH) is NAT routed outside the VM, so it is not seen here.
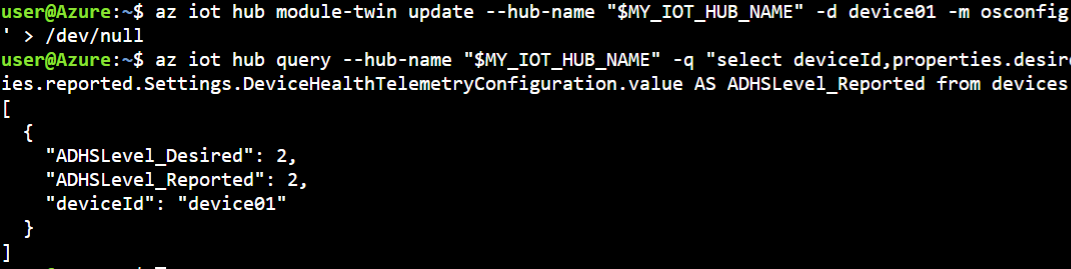
2.3: Configure Azure Device Health Service (ADHS) telemetry policy, and verify compliance
ADHS is a diagnostic agent included in some devices. The VM you just created does not have ADHS installed, but we can still set the policy proactively as an example.
The first command sets the twin desired property for ADHS to 2 (which means opt-in). The second command compares the desired (set by you, the admin) and reported (sent by the device) versions of the property to verify the device has received and applied the policy.
az iot hub module-twin update --hub-name "$MY_IOT_HUB_NAME" -d device01 -m osconfig --desired '{"Settings":{"__t":"c","DeviceHealthTelemetryConfiguration":2}}' > /dev/null
az iot hub query --hub-name "$MY_IOT_HUB_NAME" -q "select deviceId,properties.desired.Settings.DeviceHealthTelemetryConfiguration AS ADHSLevel_Desired,properties.reported.Settings.DeviceHealthTelemetryConfiguration.value AS ADHSLevel_Reported from devices.modules where moduleId='osconfig'"
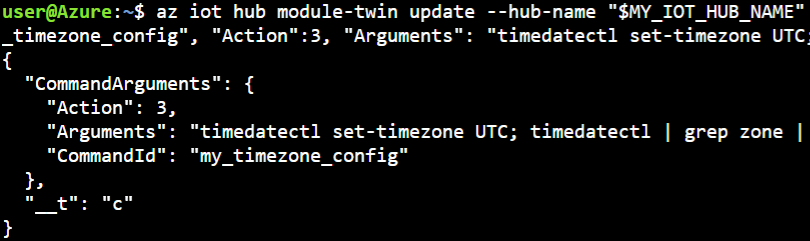
2.4: Apply a custom configuration (time zone example)
The CommandRunner feature of OSConfig enables you to get and set nearly anything on the device. This example sets the device’s OS time zone to UTC. Enforcing a uniform time zone on endpoints (regardless of their physical location) is a common practice to improve timestamp handling throughout a distributed solution.
The following Azure CLI command tells OSConfig to set the timezone using timedatectl, and to report back the resulting time zone.
az iot hub module-twin update --hub-name "$MY_IOT_HUB_NAME" -d device01 -m osconfig --desired '{"CommandRunner":{"__t":"c","CommandArguments":{"CommandId":"my_timezone_config", "Action":3, "Arguments": "timedatectl set-timezone UTC; timedatectl | grep zone | tr -d '[:space:]'"}}}' --query "properties.desired.CommandRunner"
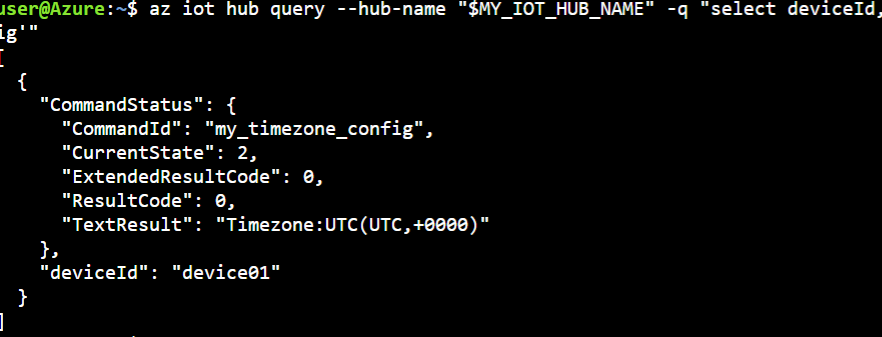
The output shows that we have set the desired command in the twin. To confirm that it worked we will take an additional step. First, we will wait at least 30 seconds giving time for the device to receive the command, process it, and update the twin with the results.
Having waited at least 30 seconds since the previous command, use the following to retrieve the output:
az iot hub query --hub-name "$MY_IOT_HUB_NAME" -q "select deviceId,properties.reported.CommandRunner.CommandStatus from devices.modules where moduleId='osconfig'"
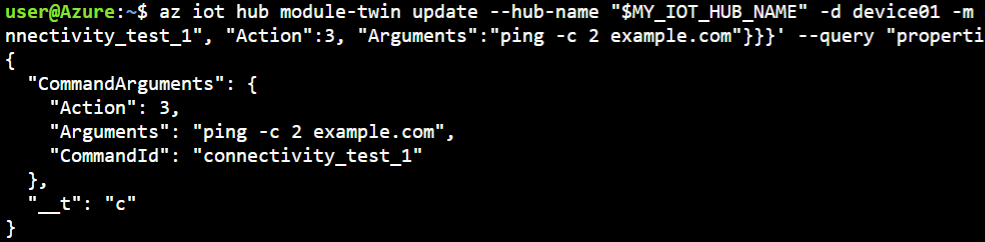
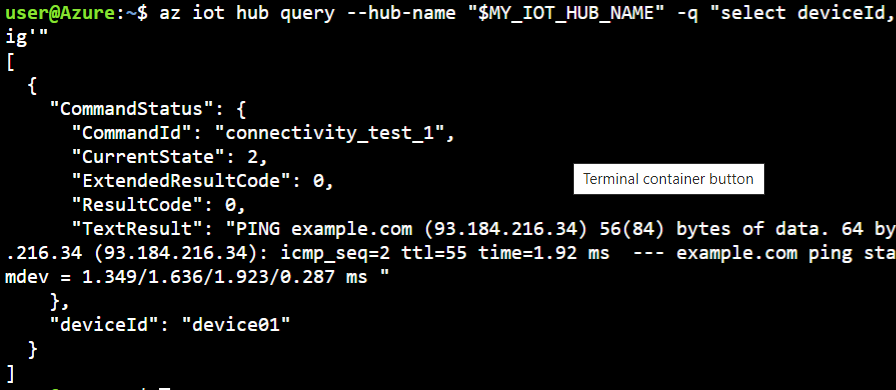
2.5: Test device connectivity (ping example)
This example uses the CommandRunner feature together with ping to test network connectivity from the device’s perspective.
az iot hub module-twin update --hub-name "$MY_IOT_HUB_NAME" -d device01 -m osconfig --desired '{"CommandRunner":{"__t":"c","CommandArguments":{"CommandId":"connectivity_test_1", "Action":3, "Arguments":"ping -c 2 example.com"}}}' --query "properties.desired.CommandRunner"
As with the previous example the output of az iot hub module-twin update shows that we have set the desired command property on the twin, and we will use a second step to retrieve the results.
Having waited at least 30 seconds since the previous command, use the following to retrieve the results:
az iot hub query --hub-name "$MY_IOT_HUB_NAME" -q "select deviceId,properties.reported.CommandRunner.CommandStatus from devices.modules where moduleId='osconfig'"
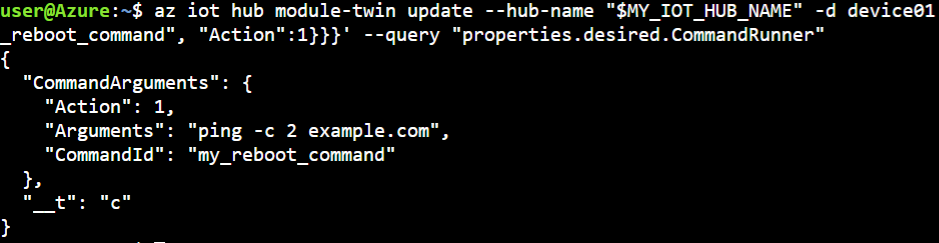
2.6: Reboot or shutdown using CommandRunner pre-defined actions
The following example reboots the device. If you would like to shut down instead, change Action: 1 to Action: 2 in the desired property value.
az iot hub module-twin update --hub-name "$MY_IOT_HUB_NAME" -d device01 -m osconfig --desired '{"CommandRunner":{"__t":"c","CommandArguments":{"CommandId":"my_reboot_command", "Action":1}}}' --query "properties.desired.CommandRunner"
Clean up resources
If you do not intend to keep any of the resources, you can delete them by deleting the resource group which you created earlier.
az group delete --resource-group QuickstartOSConfig

Next steps
- This guide used just one device to get started quickly. To configure devices at scale, you can use OSConfig together with IoT Hub Device Management with OSConfig.
- To learn more about OSConfig, see: OSConfig documentation.