Note
Access to this page requires authorization. You can try signing in or changing directories.
Access to this page requires authorization. You can try changing directories.
This article describes how to manage the settings for Pure Storage for Azure.
Resource overview
Begin by signing in to the Azure portal.
In the Azure portal search bar, enter All resources and select All resources from the results.
From the Resources list, select your resource.
The Azure portal shows the resource with the Overview page open, by default.

The Essentials details include:
- Resource group
- Location
- Subscription
- Subscription ID
- Pricing Plan
- Billing Term
To manage your resource, select the links next to corresponding details.
Below the essentials, you can navigate to other details about your resource by selecting the links.
- Get Started
- Documentation on Microsoft Learn
- Pure Storage support
Create a Storage Pool
Once you create a resource, you can create a storage pool.
Begin by signing in to the Azure portal.
In the Azure portal search bar, enter All resources and select All resources from the results.
From the Resources list, select your resource.
The Azure portal shows the resource with the Overview page open, by default.
Select Settings > Storage Pool from the service menu.
Select Create a new storage pool from the working pane's command bar.
The Create a Storage Pool window appears.
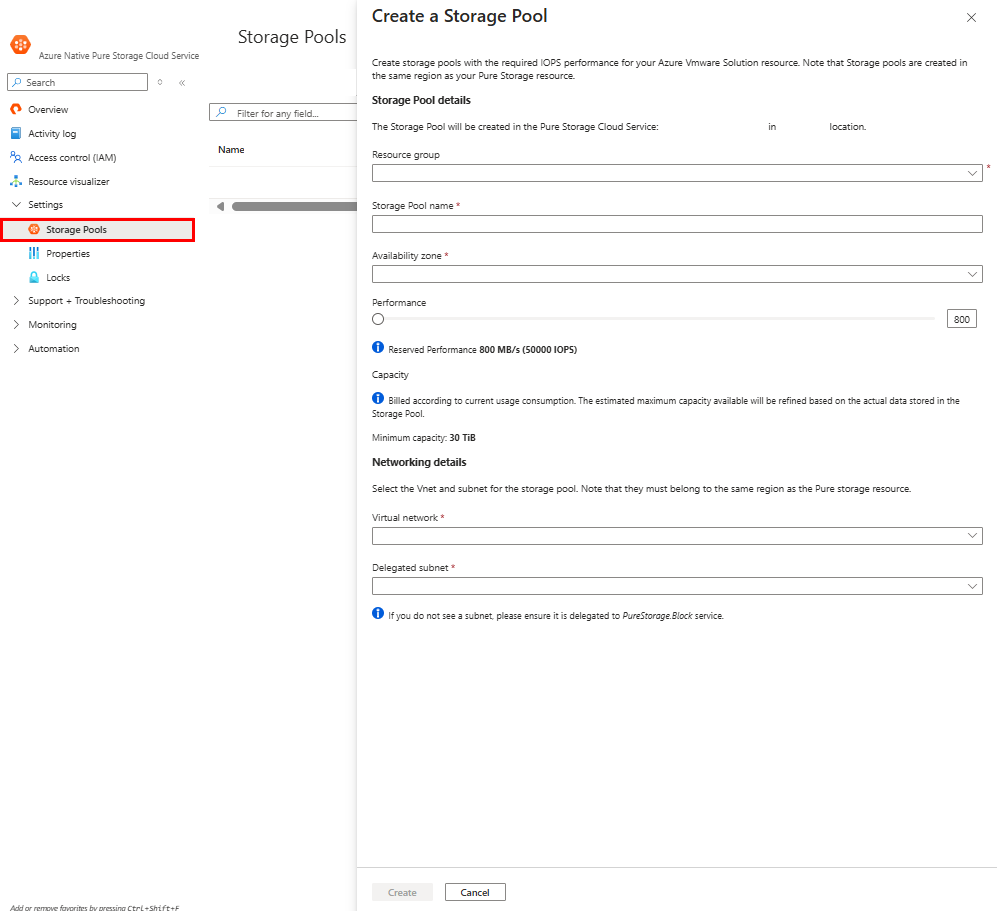
There are required fields that you need to fill out.
Note
The storage pool defaults to the same region as your Pure Storage resource.
Enter the values for each required setting.
Setting Action Resource group Choose a resource group. Storage Pool name Provide a name for your Storage Pool. Availability zone Choose an availability zone. Performance Adjust the performance slider. Virtual network Choose a virtual network. Delegated subnet Choose a delegated subnet. Select the Create button.
Note
It can take up to 1 hour for deployment to complete.
Connect a Storage Pool to an Azure VMware Solution resource
Once you create a storage pool, you can link the storage pool to an Azure VMware Solution resource from the Azure portal.
Important
In order to connect your storage pool to an Azure VMware Solution resource, you must be an Owner or RBACAdministrator in your subscription.
Begin by signing in to the Azure portal.
In the Azure portal search bar, enter All resources and select All resources from the results.
From the Resources list, select your resource.
The Azure portal shows the resource with the Overview page open, by default.
To connect a storage pool to an Azure VMware Solution resource, select the Connect Azure VMware Solution button from the working pane's command bar.