Note
Access to this page requires authorization. You can try signing in or changing directories.
Access to this page requires authorization. You can try changing directories.
Important
Microsoft Playwright Testing will be retired on March 8, 2026. To continue running your Playwright tests, create a new Playwright Workspace in Azure App Testing, now generally available. Learn how to migrate.
In this quickstart, you set up continuous end-to-end testing with Microsoft Playwright Testing Preview to validate that your web app runs correctly across different browsers and operating systems with every code commit and troubleshoot tests easily using the service dashboard. Learn how to add your Playwright tests to a continuous integration (CI) workflow, such as GitHub Actions, Azure Pipelines, or other CI platforms.
After you complete this quickstart, you have a CI workflow that runs your Playwright test suite at scale and helps you troubleshoot tests easily with Microsoft Playwright Testing.
Important
Microsoft Playwright Testing is currently in preview. For legal terms that apply to Azure features that are in beta, in preview, or otherwise not yet released into general availability, see the Supplemental Terms of Use for Microsoft Azure Previews.
Prerequisites
An Azure account with an active subscription. If you don't have an Azure subscription, create a free account before you begin.
A Microsoft Playwright Testing workspace. Complete the quickstart: run Playwright tests at scale and create a workspace.
- A GitHub account. If you don't have a GitHub account, you can create one for free.
- A GitHub repository that contains your Playwright test specifications and GitHub Actions workflow. To create a repository, see Creating a new repository.
- A GitHub Actions workflow. If you need help with getting started with GitHub Actions, see create your first workflow
- Set up authentication from GitHub Actions to Azure. See Use GitHub Actions to connect to Azure
Get the service region endpoint URL
In the service configuration, you have to provide the region-specific service endpoint. The endpoint depends on the Azure region you selected when creating the workspace.
To get the service endpoint URL and store it as a CI workflow secret, perform the following steps:
Sign in to the Playwright portal with your Azure account.
On the workspace home page, select View setup guide.
Tip
If you have multiple workspaces, you can switch to another workspace by selecting the workspace name at the top of the page, and then select Manage all workspaces.
In Add region endpoint in your setup, copy the service endpoint URL.
The endpoint URL matches the Azure region that you selected when creating the workspace.
Store the service endpoint URL in a CI workflow secret:
Secret name Value PLAYWRIGHT_SERVICE_URL Paste the endpoint URL you copied previously.
Add service configuration file
If you don't have Playwright tests configured to run with the service, add a service configuration file to your repository. In the next step, you then specify this service configuration file on the Playwright CLI.
Create a new file
playwright.service.config.tsalongside theplaywright.config.tsfile.Optionally, use the
playwright.service.config.tsfile in the sample repository.Add the following content to it:
import { defineConfig } from '@playwright/test';
import { getServiceConfig, ServiceOS } from '@azure/microsoft-playwright-testing';
import config from './playwright.config';

/* Learn more about service configuration at https://aka.ms/mpt/config */
export default defineConfig(
  config,
  getServiceConfig(config, {
    exposeNetwork: '<loopback>',
    timeout: 30000,
    os: ServiceOS.LINUX,
    useCloudHostedBrowsers: true
  }),
  {
    /*
    Playwright Testing service reporter is added by default.
    This will override any reporter options specified in the base playwright config.
    If you are using more reporters, please update your configuration accordingly.
    */
    reporter: [['list'], ['@azure/microsoft-playwright-testing/reporter']],
  }
);
By default, the service configuration enables you to:
- Accelerate build pipelines by running tests in parallel using cloud-hosted browsers.
- Simplify troubleshooting with easy access to test results and artifacts published to the service.
However, you can choose to use either of these features or both. See How to use service features and update the service configuration file as per your requirements.
Save and commit the file to your source code repository.
Update package.json file
Update the package.json file in your repository to add details about Microsoft Playwright Testing service package in devDependencies section.
"devDependencies": {
    "@azure/microsoft-playwright-testing": "^1.0.0-beta.6"
}
Enable artifacts in Playwright configuration
In the playwright.config.ts file of your project, make sure you're collecting all the required artifacts.
  use: {
    trace: 'on-first-retry',
    video:'retain-on-failure',
    screenshot:'on'
  },
Set up service configuration
Create a new file
PlaywrightServiceSetup.csin the root directory of your project. This file facilitates authentication of your client with the service.Add the following content to it:
using Azure.Developer.MicrosoftPlaywrightTesting.NUnit;
using NUnit.Framework;

namespace PlaywrightTests; // Remember to change this as per your project namespace

[SetUpFixture]
public class PlaywrightServiceSetup : PlaywrightServiceNUnit { };
Save and commit the file to your source code repository.
Install service package
In your project, install Microsoft Playwright Testing package.
dotnet add package Azure.Developer.MicrosoftPlaywrightTesting.NUnit --prerelease
This command updates your project's csproj file by adding the service package details to the ItemGroup section. Remember to commit these changes.
  <ItemGroup>
    <PackageReference Include="Azure.Developer.MicrosoftPlaywrightTesting.NUnit" Version="1.0.0-beta.2" />
  </ItemGroup>
Add or update .runsettings file for your project.
If you haven't configured your Playwright tests yet for running them with service, add .runsettings file to your repository. In the next step, you then specify this service configuration file on the Playwright CLI.
Create a new
.runsettingsfile.Optionally, use the
.runsettingsfile in the sample repository.Add the following content to it:
<?xml version="1.0" encoding="utf-8"?>
<RunSettings>
    <TestRunParameters>
        <!-- The below parameters are optional -->
        <Parameter name="Os" value="linux" />
        <!--<Parameter name="RunId" value="sample-run-id1" />-->
        <Parameter name="ServiceAuthType" value="EntraId" />
        <Parameter name="UseCloudHostedBrowsers" value="true" />
        <Parameter name="AzureTokenCredentialType" value="DefaultAzureCredential" />
        <!--<Parameter name="ManagedIdentityClientId" value="{clientId-value}" />-->
        <Parameter name="EnableGitHubSummary" value="false" />
        <!--<Parameter name="ExposeNetwork" value="*" />-->
    </TestRunParameters>
  <!-- NUnit adapter -->
  <NUnit>
    <!-- Adjust parallel workers, parallel worker would also be bound by number of unit test files -->
    <NumberOfTestWorkers>10</NumberOfTestWorkers>
  </NUnit>
  <!-- General run configuration -->
  <RunConfiguration>
    <EnvironmentVariables>
      <!-- For debugging selectors, it's recommend to set the following environment variable -->
        <!--<DEBUG>pw:api*</DEBUG>-->
    </EnvironmentVariables>
  </RunConfiguration>
  <!-- Playwright -->
  <Playwright>
    <BrowserName>chromium</BrowserName>
    <ExpectTimeout>5000</ExpectTimeout>
    <LaunchOptions>
      <Headless>false</Headless>
      <!--Channel>msedge</Channel-->
    </LaunchOptions>
  </Playwright>
    <LoggerRunSettings>
        <Loggers>
            <!--microsoft playwright testing service logger for reporting -->
            <Logger friendlyName="microsoft-playwright-testing" enabled="True" />
            <!--could enable any logger additionally -->
            <Logger friendlyName="trx" enabled="false" />
        </Loggers>
    </LoggerRunSettings>
</RunSettings>
The settings in this file enable you to:
- Accelerate build pipelines by running tests in parallel using cloud-hosted browsers.
- Publish test results and artifacts to the service for faster troubleshooting.
However, you can choose to use either of these features or both. See How to use service features and update the service configuration file as per your requirements.
Save and commit the file to your source code repository.
Enable artifacts in your Playwright setup
Set up Playwright to capture artifacts such as screenshot, videos and traces.
- For screenshots, see capture screenshots
- For videos, see record videos for your tests
- For traces, see recording a trace
Once you collect these artifacts, attach them to the TestContext to ensure they're available in your test reports. For more information, see our sample project for NUnit.
Set up authentication
The CI machine running Playwright tests must authenticate with Playwright Testing service to get the browsers to run the tests and to publish the test results and artifacts.
The service offers two authentication methods: Microsoft Entra ID and Access Tokens. We strongly recommend using Microsoft Entra ID to authenticate your pipelines.
Set up authentication using Microsoft Entra ID
If you're using GitHub Actions, you can connect to the service using GitHub OpenID Connect. Follow the steps to set up the integration:
Prerequisites
Option 1: Microsoft Entra application
Create a Microsoft Entra application with a service principal by Azure portal, Azure CLI, or Azure PowerShell.
Copy the values for Client ID, Subscription ID, and Directory (tenant) ID to use later in your GitHub Actions workflow.
Assign the
OwnerorContributorrole to the service principal created in the previous step. These roles must be assigned on the Playwright Testing workspace. For more details, see how to manage access.Configure a federated identity credential on a Microsoft Entra application to trust tokens issued by GitHub Actions to your GitHub repository.
Option 2: User-assigned managed identity
Copy the values for Client ID, Subscription ID, and Directory (tenant) ID to use later in your GitHub Actions workflow.
Assign the
OwnerorContributorrole to the user-assigned managed identity created in the previous step. These roles must be assigned on the Playwright Testing workspace. For more details, see how to manage access.Configure a federated identity credential on a user-assigned managed identity to trust tokens issued by GitHub Actions to your GitHub repository.
Create GitHub secrets
- Add the values you got in the previous step as secrets to your GitHub repository. See set up GitHub Action Secret. These variables are used in the GitHub Action workflow in subsequent steps.
| GitHub Secret | Source (Microsoft Entra Application or Managed Identity) |
|---|---|
AZURE_CLIENT_ID |
Client ID |
AZURE_SUBSCRIPTION_ID |
Subscription ID |
AZURE_TENANT_ID |
Directory (Tenant) ID |
Note
For enhanced security, it is strongly recommended to use GitHub Secrets to store sensitive values rather than including them directly in your workflow file.
Set up authentication using access tokens
Caution
We strongly recommend using Microsoft Entra ID for authentication to the service. If you're using access tokens, see How to manage access tokens
You can generate an access token from your Playwright Testing workspace and use it in your setup. However, we strongly recommend Microsoft Entra ID for authentication due to its enhanced security. Access tokens, while convenient, function like long-lived passwords and are more susceptible to being compromised.
Authentication using access tokens is disabled by default. To use, Enable access-token based authentication.
Store the access token in a CI workflow secret and use it in the GitHub Actions workflow or Azure Pipeline yaml file.
| Secret name | Value |
|---|---|
| PLAYWRIGHT_SERVICE_ACCESS_TOKEN | Paste the value of Access Token you created previously. |
Update the workflow definition
Update the CI workflow definition to run your Playwright tests with the Playwright CLI. Pass the service configuration file as an input parameter for the Playwright CLI. You configure your environment by specifying environment variables.
Open the CI workflow definition
Add the following steps to run your Playwright tests in Microsoft Playwright Testing.
The following steps describe the workflow changes for GitHub Actions or Azure Pipelines. Similarly, you can run your Playwright tests by using the Playwright CLI in other CI platforms.
  # This step is to sign-in to Azure to run tests from GitHub Action workflow.
  # Choose how to set up authentication to Azure from GitHub Actions. This is one example.
  name: Playwright Tests (Microsoft Playwright Testing)
  on:
    push:
      branches: [main, master]
    pull_request:
      branches: [main, master]

  permissions: # Required when using Microsoft Entra ID to authenticate
    id-token: write
    contents: read

  jobs:
    test:
      timeout-minutes: 60
      runs-on: ubuntu-latest
      steps:
        - uses: actions/checkout@v4

        - name: Login to Azure with AzPowershell (enableAzPSSession true)
          uses: azure/login@v2
          with:
            client-id: ${{ secrets.AZURE_CLIENT_ID }} # GitHub Open ID connect values copied in previous steps
            tenant-id: ${{ secrets.AZURE_TENANT_ID }}
            subscription-id: ${{ secrets.AZURE_SUBSCRIPTION_ID }}
            enable-AzPSSession: true

        - name: Install dependencies
          working-directory: path/to/playwright/folder # update accordingly
          run: npm ci

        - name: Run Playwright tests
          working-directory: path/to/playwright/folder # update accordingly
          env:
            # Regional endpoint for Microsoft Playwright Testing
            PLAYWRIGHT_SERVICE_URL: ${{ secrets.PLAYWRIGHT_SERVICE_URL }}
            # PLAYWRIGHT_SERVICE_ACCESS_TOKEN: ${{ secrets.PLAYWRIGHT_SERVICE_ACCESS_TOKEN }} # Not recommended, use Microsoft Entra ID authentication.
          run: npx playwright test -c playwright.service.config.ts --workers=20

        - name: Upload Playwright report
          uses: actions/upload-artifact@v3
          if: always()
          with:
            name: playwright-report
            path: path/to/playwright/folder/playwright-report/ # update accordingly
            retention-days: 10
Update the CI workflow definition to run your Playwright tests with the Playwright NUnit CLI. Pass the .runsettings file as an input parameter for the Playwright CLI. You configure your environment by specifying environment variables.
Open the CI workflow definition.
Add the following steps to run your Playwright tests in Microsoft Playwright Testing.
The following steps describe the workflow changes for GitHub Actions or Azure Pipelines. Similarly, you can run your Playwright tests by using the Playwright CLI in other CI platforms.
on:
  push:
    branches: [ main, master ]
  pull_request:
    branches: [ main, master ]
permissions: # Required when using AuthType as EntraId
  id-token: write
  contents: read
jobs:
  test:
    timeout-minutes: 60
    runs-on: ubuntu-latest
      steps:
      - uses: actions/checkout@v4
    # This step is to sign-in to Azure to run tests from GitHub Action workflow.
    # Choose how to set up authentication to Azure from GitHub Actions. This is one example.

      - name: Login to Azure with AzPowershell (enableAzPSSession true)
        uses: azure/login@v2
        with:
          client-id: ${{ secrets.AZURE_CLIENT_ID }} # GitHub Open ID connect values copied in previous steps
          tenant-id: ${{ secrets.AZURE_TENANT_ID }}
          subscription-id: ${{ secrets.AZURE_SUBSCRIPTION_ID }}
          enable-AzPSSession: true

      - name: Setup .NET
        uses: actions/setup-dotnet@v4
        with:
          dotnet-version: 8.0.x

      - name: Restore dependencies
        run: dotnet restore
        working-directory: path/to/playwright/folder # update accordingly

      - name: Build
        run: dotnet build --no-restore
        working-directory: path/to/playwright/folder # update accordingly

      - name: Run Playwright tests
          working-directory: path/to/playwright/folder # update accordingly
        env:
          # Regional endpoint for Microsoft Playwright Testing
          PLAYWRIGHT_SERVICE_URL: ${{ secrets.PLAYWRIGHT_SERVICE_URL }}
          # PLAYWRIGHT_SERVICE_ACCESS_TOKEN: ${{ secrets.PLAYWRIGHT_SERVICE_ACCESS_TOKEN }} # Not recommended, use Microsoft Entra ID authentication.
        run: dotnet test --settings:.runsettings --logger "microsoft-playwright-testing" -- NUnit.NumberOfTestWorkers=20

      - name: Upload Playwright report
        uses: actions/upload-artifact@v3
        if: always()
        with:
          name: playwright-report
          path: path/to/playwright/folder/playwright-report/ # update accordingly
          retention-days: 10
Save and commit your changes.
When the CI workflow is triggered, your Playwright tests run in your Microsoft Playwright Testing workspace on cloud-hosted browsers, across 20 parallel workers. The results and artifacts collected are published to the service and can be viewed on service portal.
The settings for your test run can be defined in .runsettings file. For more information, see how to use service package options
Note
Reporting feature is enabled by default for existing workspaces. This is being rolled out in stages and will take a few days. To avoid failures, confirm that Rich diagnostics using reporting setting is ON for your workspace before proceeding. For more information, see, Enable reporting for workspace.
Caution
With Microsoft Playwright Testing, you get charged based on the number of total test minutes consumed and test results published. If you're a first-time user or getting started with a free trial, you might start with running a single test at scale instead of your full test suite to avoid exhausting your free test minutes and test results.
After you validate that the test runs successfully, you can gradually increase the test load by running more tests with the service.
You can run a single test with the service by using the following command-line:
npx playwright test {name-of-file.spec.ts} --config=playwright.service.config.ts
View test runs and results in the Playwright portal
You can now troubleshoot the CI pipeline in the Playwright portal,
After your test run completes, a link to the Playwright Portal is generated. Open this link to view detailed test results and associated artifacts. The portal displays essential information, including:
- CI build details
- Overall test run status
- The commit ID linked to the test run
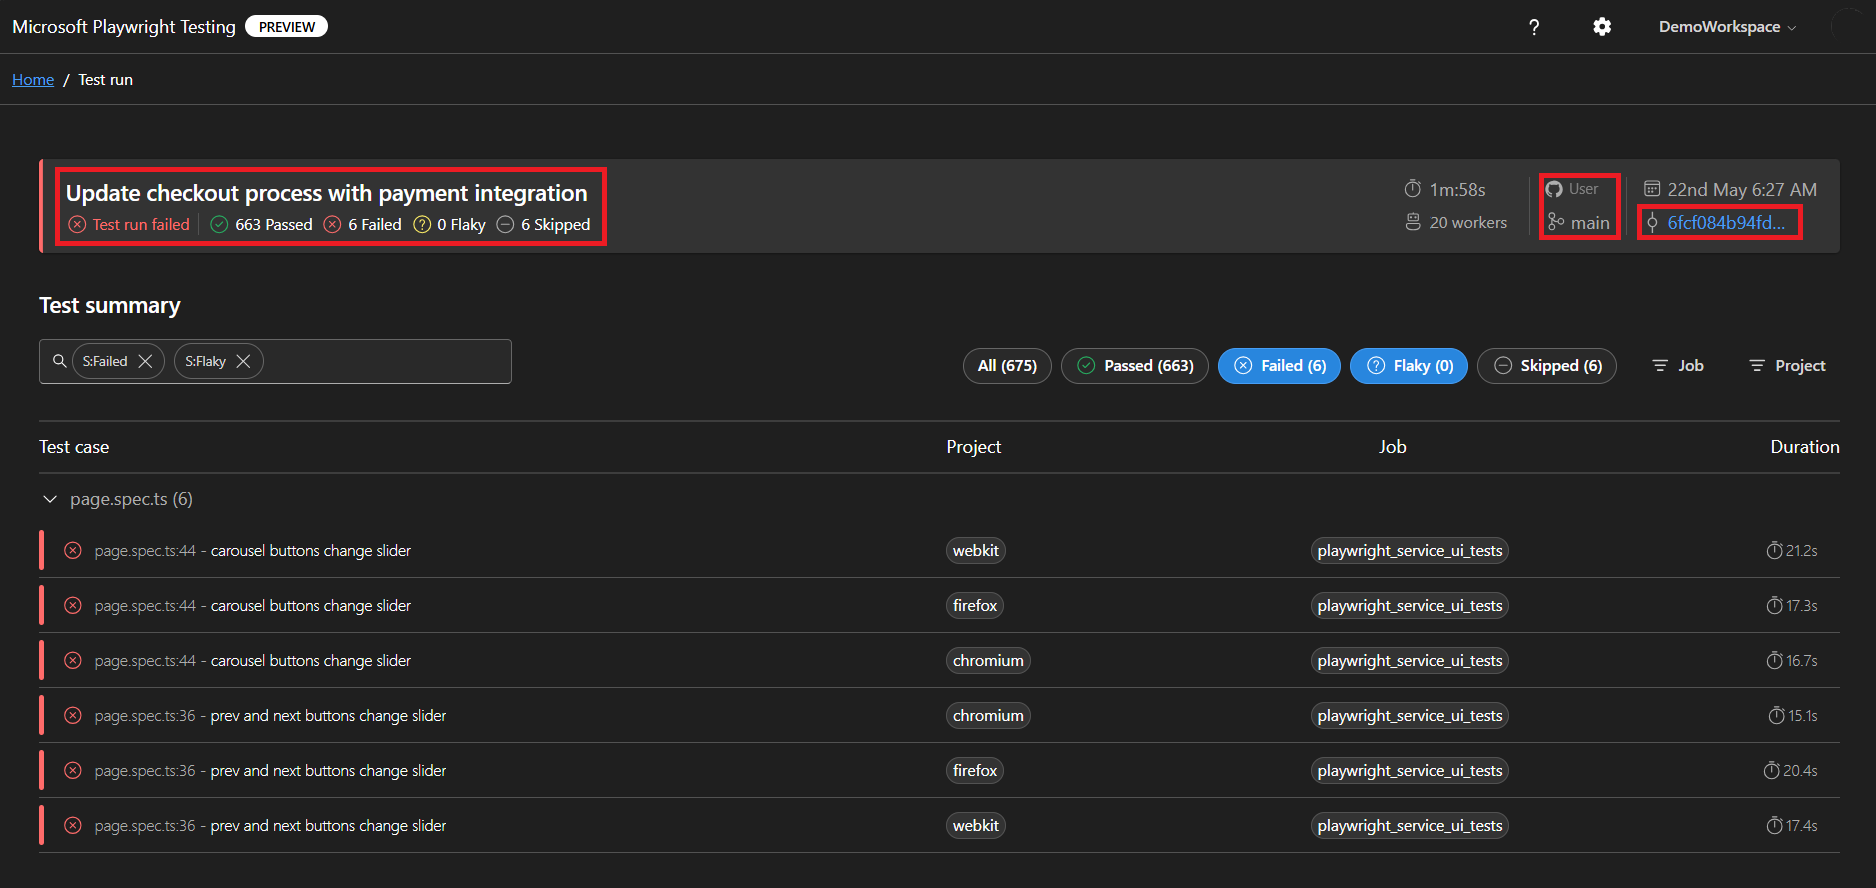
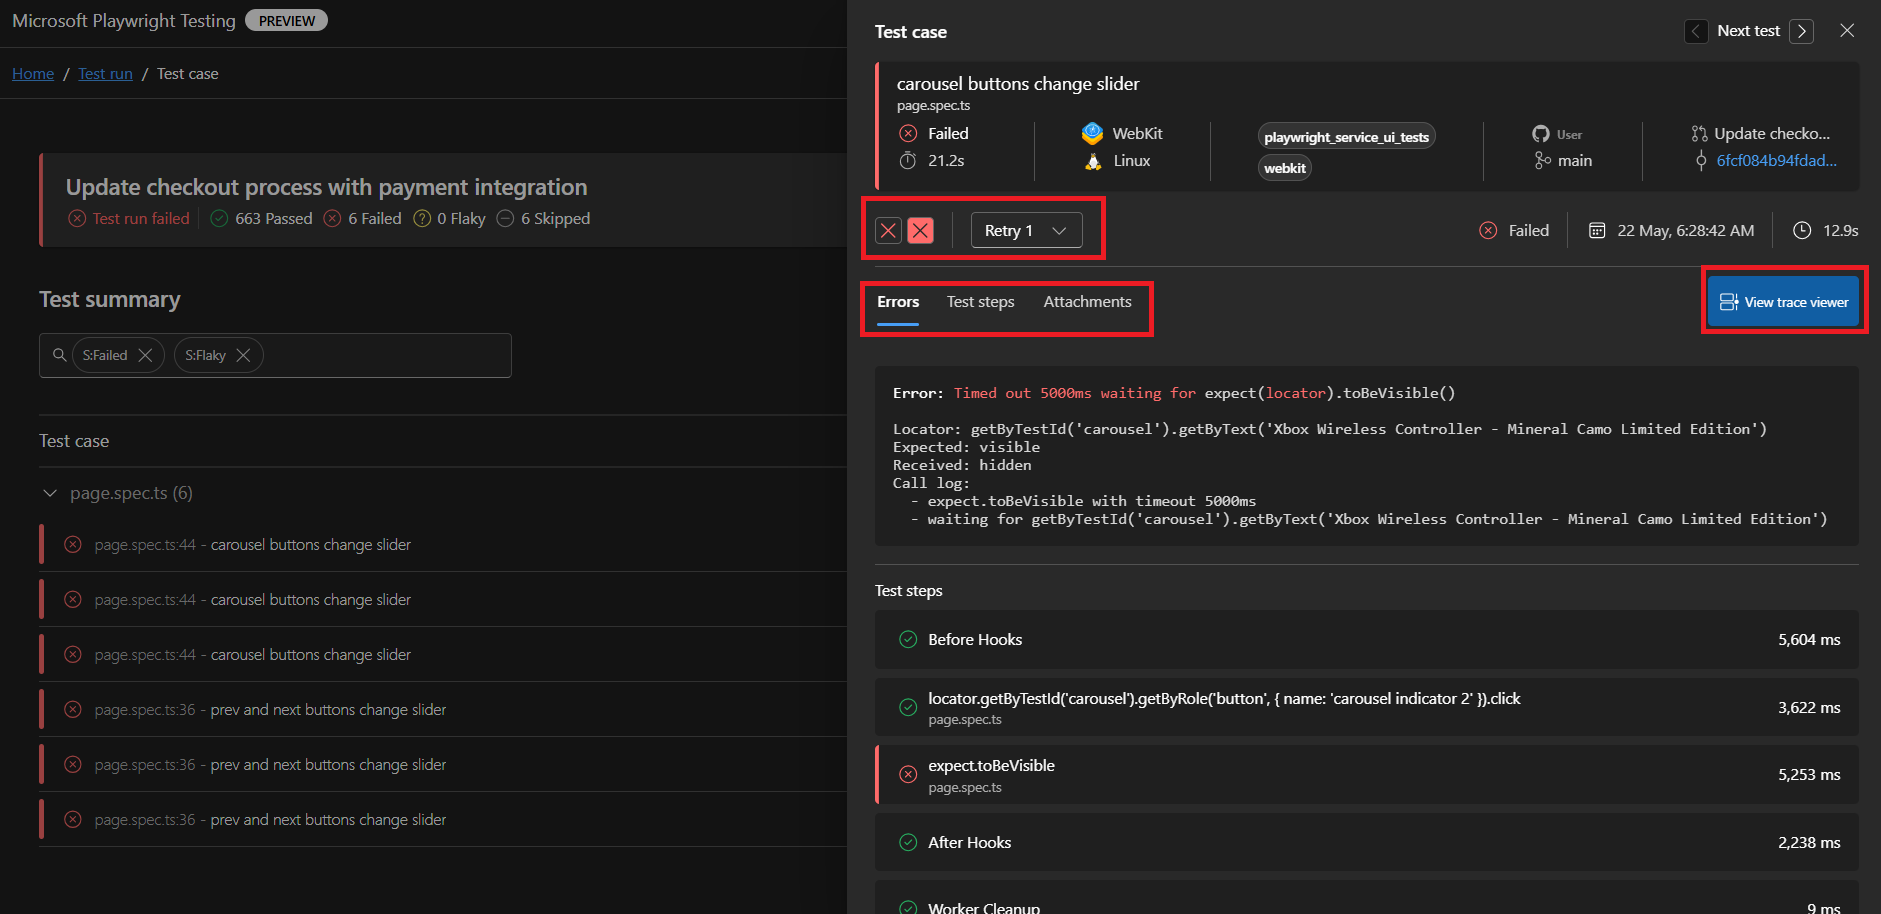
The Playwright portal provides all the necessary information for troubleshooting. You can:
- Switch between retries.
- View detailed error logs, test steps, and attached artifacts such as screenshots or videos.
- Navigate directly to the Trace Viewer for deeper analysis.
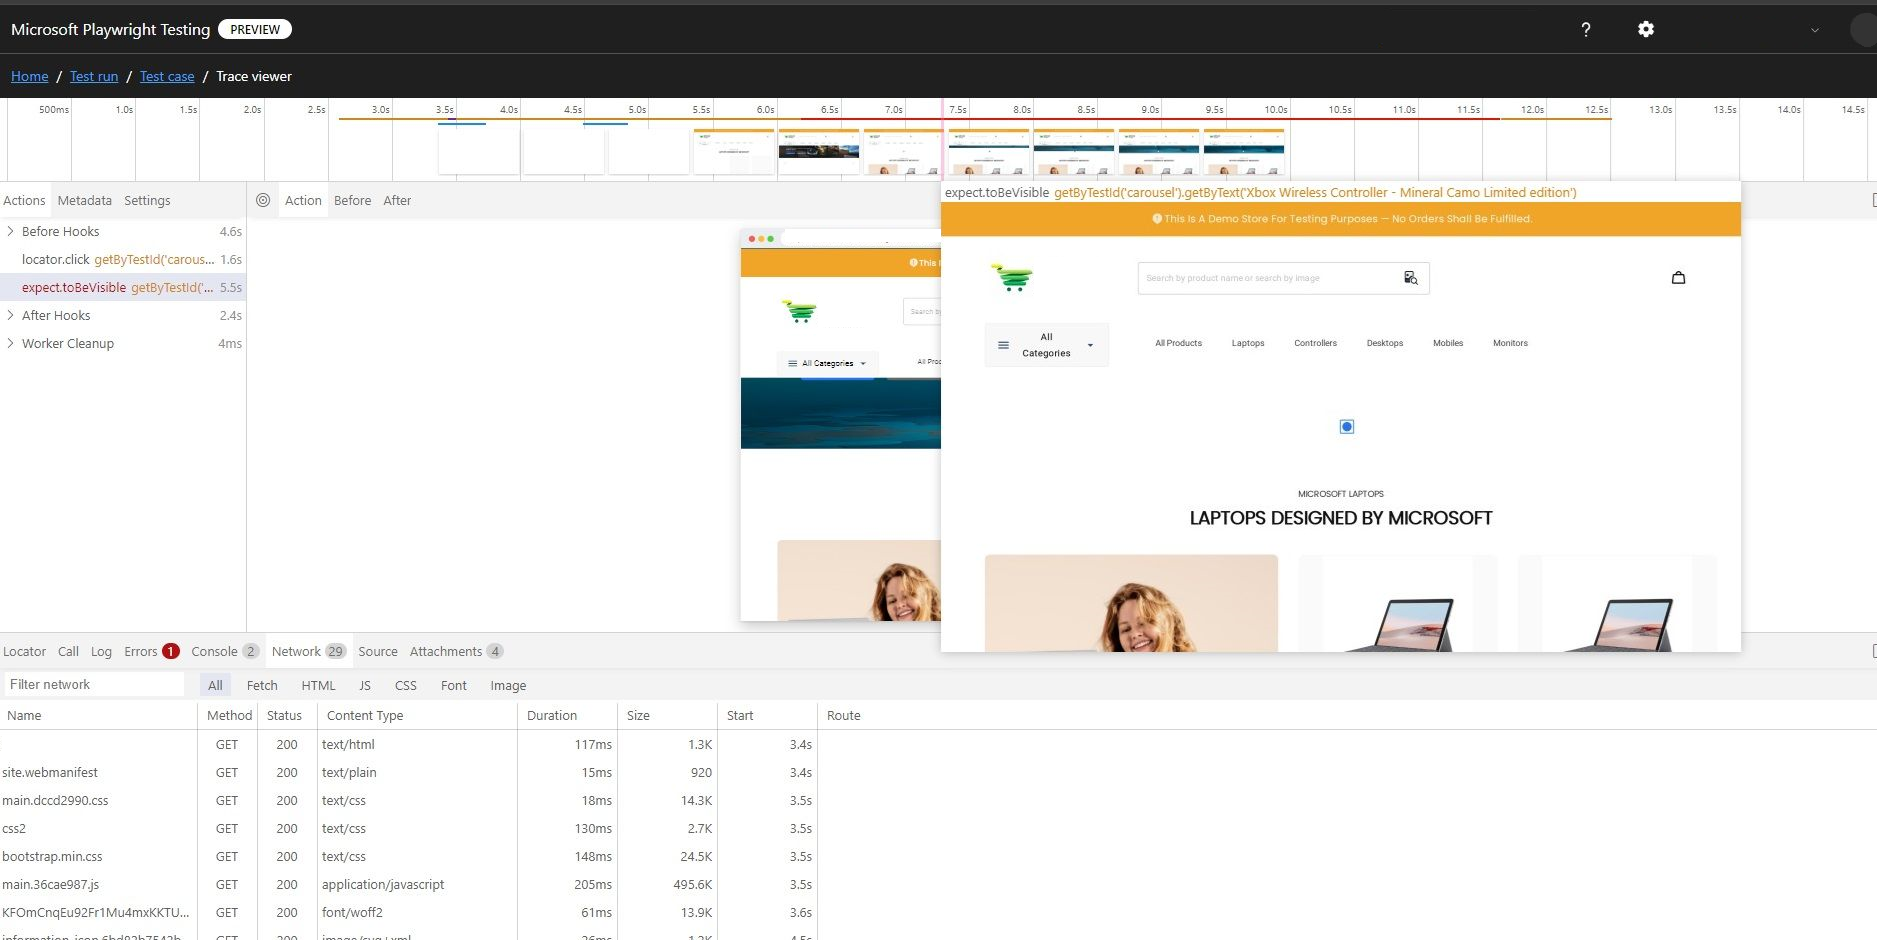
The Trace Viewer allows you to step through your test execution visually. You can:
- Use the timeline to hover over individual steps, revealing the page state before and after each action.
- Inspect detailed logs, DOM snapshots, network activity, errors, and console output for each step.


After your test run completes, you get a link to the Playwright portal in your terminal. Open this link to view detailed test results and associated artifacts. The portal displays essential information, including:
- CI build details
- Overall test run status
- The commit ID linked to the test run

The Playwright portal provides all the necessary information for troubleshooting. You can:
- View detailed error logs, and attached artifacts such as screenshots or videos.
- Navigate directly to the Trace Viewer for deeper analysis.

Note
Some metadata, such as the owner, description, and category, is currently not displayed on the service dashboard. If there’s additional information you’d like to see included, please submit a GitHub issue in our repository.
The Trace Viewer allows you to step through your test execution visually. You can:
- Use the timeline to hover over individual steps, revealing the page state before and after each action.
- Inspect detailed logs, DOM snapshots, network activity, errors, and console output for each step.

Tip
You can use Microsoft Playwright Testing service features independently. You can publish test results to the portal without using the cloud-hosted browsers feature and you can also use only cloud-hosted browsers to expedite your test suite without publishing test results. For details, see How to use service features.
Note
The test results and artifacts that you publish are retained on the service for 90 days. After that, they are automatically deleted.
Related content
You've successfully set up a continuous end-to-end testing workflow to run your Playwright tests at scale on cloud-hosted browsers.