Quickstart: Create an Azure Database for PostgreSQL - Single Server using PowerShell
APPLIES TO:  Azure Database for PostgreSQL - Single Server
Important
Azure Database for PostgreSQL - Single Server is on the retirement path. We strongly recommend that you upgrade to Azure Database for PostgreSQL - Flexible Server. For more information about migrating to Azure Database for PostgreSQL - Flexible Server, see What's happening to Azure Database for PostgreSQL Single Server?.
This quickstart describes how to use PowerShell to create an Azure Database for PostgreSQL server in an Azure resource group. You can use PowerShell to create and manage Azure resources interactively or in scripts.
Prerequisites
If you don't have an Azure subscription, create a free account before you begin.
If you choose to use PowerShell locally, this article requires that you install the Az PowerShell module and connect to your Azure account using the Connect-AzAccount cmdlet. For more information about installing the Az PowerShell module, see Install Azure PowerShell.
Important
While the Az.PostgreSql PowerShell module is in preview, you must install it separately from the Az
PowerShell module using the following command: Install-Module -Name Az.PostgreSql -AllowPrerelease.
Once the Az.PostgreSql PowerShell module is generally available, it becomes part of future Az
PowerShell module releases and available natively from within Azure Cloud Shell.
If this is your first time using the Azure Database for PostgreSQL service, you must register the Microsoft.DBforPostgreSQL resource provider.
Register-AzResourceProvider -ProviderNamespace Microsoft.DBforPostgreSQL
Azure Cloud Shell
Azure hosts Azure Cloud Shell, an interactive shell environment that you can use through your browser. You can use either Bash or PowerShell with Cloud Shell to work with Azure services. You can use the Cloud Shell preinstalled commands to run the code in this article, without having to install anything on your local environment.
To start Azure Cloud Shell:
| Option | Example/Link |
|---|---|
| Select Try It in the upper-right corner of a code or command block. Selecting Try It doesn't automatically copy the code or command to Cloud Shell. |  |
| Go to https://shell.azure.com, or select the Launch Cloud Shell button to open Cloud Shell in your browser. |  |
| Select the Cloud Shell button on the menu bar at the upper right in the Azure portal. |  |
To use Azure Cloud Shell:
Start Cloud Shell.
Select the Copy button on a code block (or command block) to copy the code or command.
Paste the code or command into the Cloud Shell session by selecting Ctrl+Shift+V on Windows and Linux, or by selecting Cmd+Shift+V on macOS.
Select Enter to run the code or command.
If you have multiple Azure subscriptions, choose the appropriate subscription in which the resources should be billed. Select a specific subscription ID using the Set-AzContext cmdlet.
Set-AzContext -SubscriptionId 00000000-0000-0000-0000-000000000000
Create a resource group
Create an Azure resource group using the New-AzResourceGroup cmdlet. A resource group is a logical container in which Azure resources are deployed and managed as a group.
The following example creates a resource group named myresourcegroup in the West US region.
New-AzResourceGroup -Name myresourcegroup -Location westus
Create an Azure Database for PostgreSQL server
Create an Azure Database for PostgreSQL server with the New-AzPostgreSqlServer cmdlet. A server can manage multiple databases. Typically, a separate database is used for each project or for each user.
The following table contains a list of commonly used parameters and sample values for the
New-AzPostgreSqlServer cmdlet.
| Setting | Sample value | Description |
|---|---|---|
| Name | mydemoserver | Choose a globally unique name in Azure that identifies your Azure Database for PostgreSQL server. The server name can only contain letters, numbers, and the hyphen (-) character. Any uppercase characters that are specified are automatically converted to lowercase during the creation process. It must contain from 3 to 63 characters. |
| ResourceGroupName | myresourcegroup | Provide the name of the Azure resource group. |
| Sku | GP_Gen5_2 | The name of the SKU. Follows the convention pricing-tier_compute-generation_vCores in shorthand. For more information about the Sku parameter, see the information following this table. |
| BackupRetentionDay | 7 | How long a backup should be retained. Unit is days. Range is 7-35. |
| GeoRedundantBackup | Enabled | Whether geo-redundant backups should be enabled for this server or not. This value cannot be enabled for servers in the basic pricing tier and it cannot be changed after the server is created. Allowed values: Enabled, Disabled. |
| Location | westus | The Azure region for the server. |
| SslEnforcement | Enabled | Whether SSL should be enabled or not for this server. Allowed values: Enabled, Disabled. |
| StorageInMb | 51200 | The storage capacity of the server (unit is megabytes). Valid StorageInMb is a minimum of 5120 MB and increases in 1024 MB increments. For more information about storage size limits, see Azure Database for PostgreSQL pricing tiers. |
| Version | 9.6 | The PostgreSQL major version. |
| AdministratorUserName | myadmin | The username for the administrator login. It cannot be azure_superuser, admin, administrator, root, guest, or public. |
| AdministratorLoginPassword | <securestring> |
The password of the administrator user in the form of a secure string. It must contain between 8 and 128 characters. Your password must contain characters from three of the following categories: English uppercase letters, English lowercase letters, numbers, and non-alphanumeric characters. |
The Sku parameter value follows the convention pricing-tier_compute-generation_vCores as shown in the following examples.
-Sku B_Gen5_1maps to Basic, Gen 5, and 1 vCore. This option is the smallest SKU available.-Sku GP_Gen5_32maps to General Purpose, Gen 5, and 32 vCores.-Sku MO_Gen5_2maps to Memory Optimized, Gen 5, and 2 vCores.
For information about valid Sku values by region and for tiers, see Azure Database for PostgreSQL pricing tiers.
The following example creates a PostgreSQL server in the West US region named mydemoserver in the myresourcegroup resource group with a server admin login of myadmin. It is a Gen 5 server in the general-purpose pricing tier with 2 vCores and geo-redundant backups enabled. Document the password used in the first line of the example as this is the password for the PostgreSQL server admin account.
Tip
A server name maps to a DNS name and must be globally unique in Azure.
$Password = Read-Host -Prompt 'Please enter your password' -AsSecureString
New-AzPostgreSqlServer -Name mydemoserver -ResourceGroupName myresourcegroup -Sku GP_Gen5_2 -GeoRedundantBackup Enabled -Location westus -AdministratorUsername myadmin -AdministratorLoginPassword $Password
Consider using the basic pricing tier if light compute and I/O are adequate for your workload.
Important
Servers created in the basic pricing tier cannot be later scaled to general-purpose or memory- optimized and cannot be geo-replicated.
Configure a firewall rule
Create an Azure Database for PostgreSQL server-level firewall rule using the
New-AzPostgreSqlFirewallRule cmdlet. A server-level firewall rule allows an external application, such as the psql command-line tool or PostgreSQL Workbench to connect to your server through the Azure Database for PostgreSQL service firewall.
The following example creates a firewall rule named AllowMyIP that allows connections from a specific IP address, 192.168.0.1. Substitute an IP address or range of IP addresses that correspond to the location that you are connecting from.
New-AzPostgreSqlFirewallRule -Name AllowMyIP -ResourceGroupName myresourcegroup -ServerName mydemoserver -StartIPAddress 192.168.0.1 -EndIPAddress 192.168.0.1
Note
Connections to Azure Database for PostgreSQL communicate over port 5432. If you try to connect from within a corporate network, outbound traffic over port 5432 might not be allowed. In this scenario, you can only connect to the server if your IT department opens port 5432.
Get the connection information
To connect to your server, you need to provide host information and access credentials. Use the following example to determine the connection information. Make a note of the values for FullyQualifiedDomainName and AdministratorLogin.
Get-AzPostgreSqlServer -Name mydemoserver -ResourceGroupName myresourcegroup |
  Select-Object -Property FullyQualifiedDomainName, AdministratorLogin
FullyQualifiedDomainName                    AdministratorLogin
------------------------                    ------------------
mydemoserver.postgres.database.azure.com       myadmin
Connect to PostgreSQL database using psql
If your client computer has PostgreSQL installed, you can use a local instance of
psql to connect to an Azure PostgreSQL server. You can also access a pre-installed version of the psql command-line tool in Azure Cloud Shell by selecting the Try It button on a code sample in this article. Other ways to access Azure Cloud Shell are to select the >_ button on the upper-right toolbar in the Azure portal or by visiting shell.azure.com.
Connect to your Azure PostgreSQL server using the
psqlcommand-line utility.psql --host=<servername> --port=<port> --username=<user@servername> --dbname=<dbname>For example, the following command connects to the default database called postgres on your PostgreSQL server
mydemoserver.postgres.database.azure.comusing access credentials. Enter the<server_admin_password>you chose when prompted for password.psql --host=mydemoserver.postgres.database.azure.com --port=5432 --username=myadmin@mydemoserver --dbname=postgresTip
If you prefer to use a URL path to connect to Postgres, URL encode the @ sign in the username with
%40. For example the connection string for psql would be,psql postgresql://myadmin%40mydemoserver@mydemoserver.postgres.database.azure.com:5432/postgresOnce you are connected to the server, create a blank database at the prompt.
CREATE DATABASE mypgsqldb;At the prompt, execute the following command to switch connection to the newly created database mypgsqldb:
\c mypgsqldb
Connect to the PostgreSQL Server using pgAdmin
pgAdmin is an open-source tool used with PostgreSQL. You can install pgAdmin from the pgAdmin website. The pgAdmin version you're using may be different from what is used in this Quickstart. Read the pgAdmin documentation if you need additional guidance.
Open the pgAdmin application on your client computer.
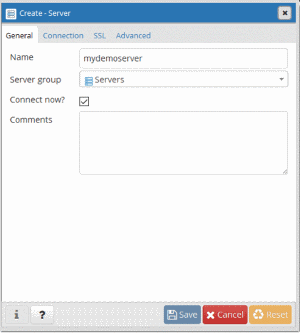
From the toolbar go to Object, hover over Create, and select Server.
In the Create - Server dialog box, on the General tab, enter a unique friendly name for the server, such as mydemoserver.
In the Create - Server dialog box, on the Connection tab, fill in the settings table.
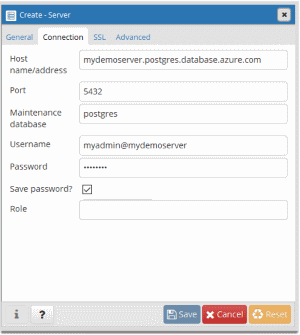
pgAdmin parameter Value Description Host name/address Server name The server name value that you used when you created the Azure Database for PostgreSQL server earlier. Our example server is mydemoserver.postgres.database.azure.com. Use the fully qualified domain name (*.postgres.database.azure.com) as shown in the example. If you don't remember your server name, follow the steps in the previous section to get the connection information. Port 5432 The port to use when you connect to the Azure Database for PostgreSQL server. Maintenance database postgres The default system-generated database name. Username Server admin login name The server admin login username that you supplied when you created the Azure Database for PostgreSQL server earlier. If you don't remember the username, follow the steps in the previous section to get the connection information. The format is username@servername. Password Your admin password The password you chose when you created the server earlier in this Quickstart. Role Leave blank There's no need to provide a role name at this point. Leave the field blank. SSL mode Require You can set the TLS/SSL mode in pgAdmin's SSL tab. By default, all Azure Database for PostgreSQL servers are created with TLS enforcing turned on. To turn off TLS enforcing, see Configure Enforcement of TLS. Select Save.
In the Browser pane on the left, expand the Servers node. Select your server, for example, mydemoserver. Select to connect to it.
Expand the server node, and then expand Databases under it. The list should include your existing postgres database and any other databases you've created. You can create multiple databases per server with Azure Database for PostgreSQL.
Right-click Databases, choose the Create menu, and then select Database.
Type a database name of your choice in the Database field, such as mypgsqldb2.
Select the Owner for the database from the list box. Choose your server admin login name, such as the example, my admin.
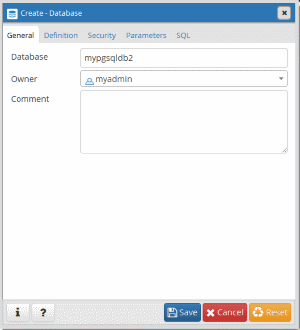
Select Save to create a new blank database.
In the Browser pane, you can see the database that you created in the list of databases under your server name.
Clean up resources
If the resources created in this quickstart aren't needed for another quickstart or tutorial, you can delete them by running the following example.
Caution
The following example deletes the specified resource group and all resources contained within it. If resources outside the scope of this quickstart exist in the specified resource group, they will also be deleted.
Remove-AzResourceGroup -Name myresourcegroup
To delete only the server created in this quickstart without deleting the resource group, use the
Remove-AzPostgreSqlServer cmdlet.
Remove-AzPostgreSqlServer -Name mydemoserver -ResourceGroupName myresourcegroup
Next steps
Feedback
Coming soon: Throughout 2024 we will be phasing out GitHub Issues as the feedback mechanism for content and replacing it with a new feedback system. For more information see: https://aka.ms/ContentUserFeedback.
Submit and view feedback for