Use Azure Firewall to inspect traffic destined to a private endpoint
Note
If you want to secure traffic to private endpoints in Azure Virtual WAN using secured virtual hub, see Secure traffic destined to private endpoints in Azure Virtual WAN.
Azure Private Endpoint is the fundamental building block for Azure Private Link. Private endpoints enable Azure resources deployed in a virtual network to communicate privately with private link resources.
Private endpoints allow resources access to the private link service deployed in a virtual network. Access to the private endpoint through virtual network peering and on-premises network connections extend the connectivity.
You may need to inspect or block traffic from clients to the services exposed via private endpoints. Complete this inspection by using Azure Firewall or a third-party network virtual appliance.
The following limitations apply:
- Network security groups (NSG) are bypassed by traffic coming from private endpoints
- User-defined routes (UDR) are bypassed by traffic coming from private endpoints. User-defined routes can be used to override traffic destined for the private endpoint.
- A single route table can be attached to a subnet
- A route table supports up to 400 routes
Azure Firewall filters traffic using either:
- FQDN in network rules for TCP and UDP protocols
- FQDN in application rules for HTTP, HTTPS, and MSSQL.
Important
The use of application rules over network rules is recommended when inspecting traffic destined to private endpoints in order to maintain flow symmetry. If network rules are used, or an NVA is used instead of Azure Firewall, SNAT must be configured for traffic destined to private endpoints in order to maintain flow symmetry.
Note
SQL FQDN filtering is supported in proxy-mode only (port 1433). Proxy mode can result in more latency compared to redirect. If you want to continue using redirect mode, which is the default for clients connecting within Azure, you can filter access using FQDN in firewall network rules.
Scenario 1: Hub and spoke architecture - Dedicated virtual network for private endpoints
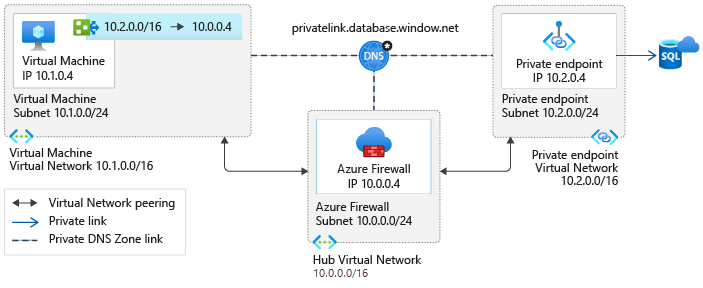
This scenario is the most expandable architecture to connect privately to multiple Azure services using private endpoints. A route pointing to the network address space where the private endpoints are deployed is created. This configuration reduces administrative overhead and prevents running into the limit of 400 routes.
Connections from a client virtual network to the Azure Firewall in a hub virtual network will incur charges if the virtual networks are peered. Connections from Azure Firewall in a hub virtual network to private endpoints in a peered virtual network are not charged.
For more information on charges related to connections with peered virtual networks, see the FAQ section of the pricing page.
Scenario 2: Hub and spoke architecture - Shared virtual network for private endpoints and virtual machines
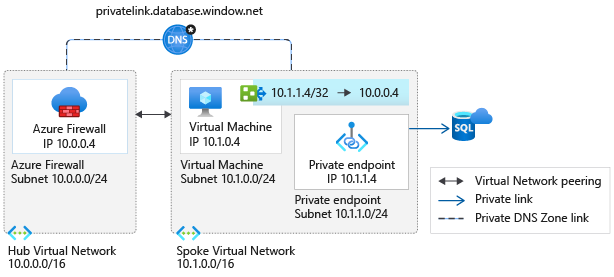
This scenario is implemented when:
It's not possible to have a dedicated virtual network for the private endpoints
When only a few services are exposed in the virtual network using private endpoints
The virtual machines will have /32 system routes pointing to each private endpoint. One route per private endpoint is configured to route traffic through Azure Firewall.
The administrative overhead of maintaining the route table increases as services are exposed in the virtual network. The possibility of hitting the route limit also increases.
Depending on your overall architecture, it's possible to run into the 400 routes limit. It's recommended to use scenario 1 whenever possible.
Connections from a client virtual network to the Azure Firewall in a hub virtual network will incur charges if the virtual networks are peered. Connections from Azure Firewall in a hub virtual network to private endpoints in a peered virtual network are not charged.
For more information on charges related to connections with peered virtual networks, see the FAQ section of the pricing page.
Scenario 3: Single virtual network
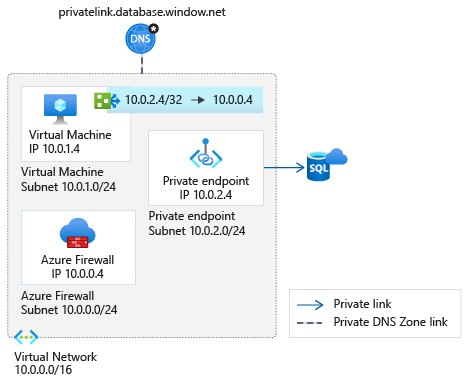
Use this pattern when a migration to a hub and spoke architecture isn't possible. The same considerations as in scenario 2 apply. In this scenario, virtual network peering charges don't apply.
Scenario 4: On-premises traffic to private endpoints
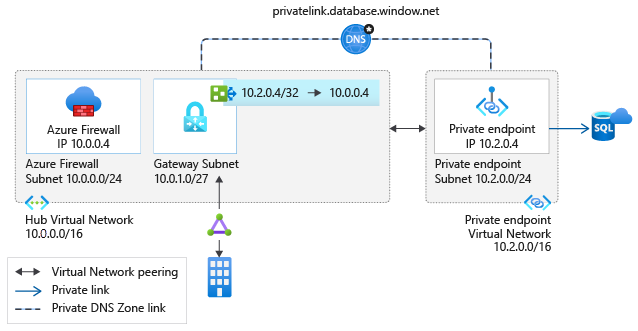
This architecture can be implemented if you have configured connectivity with your on-premises network using either:
If your security requirements require client traffic to services exposed via private endpoints to be routed through a security appliance, deploy this scenario.
The same considerations as in scenario 2 above apply. In this scenario, there aren't virtual network peering charges. For more information about how to configure your DNS servers to allow on-premises workloads to access private endpoints, see On-Premises workloads using a DNS forwarder.
Prerequisites
- An Azure subscription.
- A Log Analytics workspace.
See, Create a Log Analytics workspace in the Azure portal to create a workspace if you don't have one in your subscription.
Sign in to Azure
Sign in to the Azure portal at https://portal.azure.com.
Create a VM
In this section, you'll create a virtual network and subnet to host the VM used to access your private link resource. An Azure SQL database is used as the example service.
Virtual networks and parameters
Create three virtual networks and their corresponding subnets to:
- Contain the Azure Firewall used to restrict communication between the VM and the private endpoint.
- Host the VM that is used to access your private link resource.
- Host the private endpoint.
Replace the following parameters in the steps with the information below:
Azure Firewall network
Parameter | Value |
---|---|
<resource-group-name> | myResourceGroup |
<virtual-network-name> | myAzFwVNet |
<region-name> | South Central US |
<IPv4-address-space> | 10.0.0.0/16 |
<subnet-name> | AzureFirewallSubnet |
<subnet-address-range> | 10.0.0.0/24 |
Virtual machine network
Parameter | Value |
---|---|
<resource-group-name> | myResourceGroup |
<virtual-network-name> | myVMVNet |
<region-name> | South Central US |
<IPv4-address-space> | 10.1.0.0/16 |
<subnet-name> | VMSubnet |
<subnet-address-range> | 10.1.0.0/24 |
Private endpoint network
Parameter | Value |
---|---|
<resource-group-name> | myResourceGroup |
<virtual-network-name> | myPEVNet |
<region-name> | South Central US |
<IPv4-address-space> | 10.2.0.0/16 |
<subnet-name> | PrivateEndpointSubnet |
<subnet-address-range> | 10.2.0.0/24 |
Create the virtual network and subnet
In this section, you'll create a virtual network and subnet.
On the upper-left side of the screen, select Create a resource > Networking > Virtual network or search for Virtual network in the search box.
In Create virtual network, enter or select this information in the Basics tab:
Setting Value Project Details Subscription Select your Azure subscription Resource Group Select Create new, enter <resource-group-name>, then select OK, or select an existing <resource-group-name> based on parameters. Instance details Name Enter <virtual-network-name> Region Select <region-name> Select the IP Addresses tab or select the Next: IP Addresses button at the bottom of the page.
In the IP Addresses tab, enter this information:
Setting Value IPv4 address space Enter <IPv4-address-space> Under Subnet name, select the word default.
In Edit subnet, enter this information:
Setting Value Subnet name Enter <subnet-name> Subnet address range Enter <subnet-address-range> Select Save.
Select the Review + create tab or select the Review + create button.
Select Create.
- Repeat steps 1 to 9 to create the virtual networks for hosting the virtual machine and private endpoint resources.
Create virtual machine
On the upper-left side of the screen in the Azure portal, select Create a resource > Compute > Virtual machine.
In Create a virtual machine - Basics, enter or select this information:
Setting Value Project details Subscription Select your subscription. Resource group Select myResourceGroup. You created this resource group in the previous section. Instance details Virtual machine name Enter myVM. Region Select (US) South Central US. Availability options Leave the default No infrastructure redundancy required. Image Select Ubuntu Server 18.04 LTS - Gen1. Size Select Standard_B2s. Administrator account Authentication type Select Password. Username Enter a username of your choosing. Password Enter a password of your choosing. The password must be at least 12 characters long and meet the defined complexity requirements. Confirm Password Reenter password. Inbound port rules Public inbound ports Select None. Select Next: Disks.
In Create a virtual machine - Disks, leave the defaults and select Next: Networking.
In Create a virtual machine - Networking, select this information:
Setting Value Virtual network Select myVMVNet. Subnet Select VMSubnet (10.1.0.0/24). Public IP Leave the default (new) myVm-ip. Public inbound ports Select Allow selected ports. Select inbound ports Select SSH. Select Review + create. You're taken to the Review + create page where Azure validates your configuration.
When you see the Validation passed message, select Create.
Note
Azure provides a default outbound access IP for VMs that either aren't assigned a public IP address or are in the back-end pool of an internal basic Azure load balancer. The default outbound access IP mechanism provides an outbound IP address that isn't configurable.
The default outbound access IP is disabled when a public IP address is assigned to the VM, the VM is placed in the back-end pool of a standard load balancer, with or without outbound rules, or if an Azure Virtual Network NAT gateway resource is assigned to the subnet of the VM.
VMs that are created by virtual machine scale sets in flexible orchestration mode don't have default outbound access.
For more information about outbound connections in Azure, see Default outbound access in Azure and Use source network address translation (SNAT) for outbound connections.
Deploy the Firewall
On the Azure portal menu or from the Home page, select Create a resource.
Type firewall in the search box and press Enter.
Select Firewall and then select Create.
On the Create a Firewall page, use the following table to configure the firewall:
Setting Value Project details Subscription Select your subscription. Resource group Select myResourceGroup. Instance details Name Enter myAzureFirewall. Region Select South Central US. Availability zone Leave the default None. Choose a virtual network Select Use Existing. Virtual network Select myAzFwVNet. Public IP address Select Add new and in Name enter myFirewall-ip. Forced tunneling Leave the default Disabled. Select Review + create. You're taken to the Review + create page where Azure validates your configuration.
When you see the Validation passed message, select Create.
Enable firewall logs
In this section, you enable the logs on the firewall.
In the Azure portal, select All resources in the left-hand menu.
Select the firewall myAzureFirewall in the list of resources.
Under Monitoring in the firewall settings, select Diagnostic settings
Select + Add diagnostic setting in the Diagnostic settings.
In Diagnostics setting, enter or select this information:
Setting Value Diagnostic setting name Enter myDiagSetting. Category details log Select AzureFirewallApplicationRule and AzureFirewallNetworkRule. Destination details Select Send to Log Analytics. Subscription Select your subscription. Log Analytics workspace Select your Log Analytics workspace. Select Save.
Create Azure SQL database
In this section, you create a private SQL Database.
On the upper-left side of the screen in the Azure portal, select Create a resource > Databases > SQL Database.
In Create SQL Database - Basics, enter or select this information:
Setting Value Project details Subscription Select your subscription. Resource group Select myResourceGroup. You created this resource group in the previous section. Database details Database name Enter mydatabase. Server Select Create new and enter the information below. Server name Enter mydbserver. If this name is taken, enter a unique name. Server admin login Enter a name of your choosing. Password Enter a password of your choosing. Confirm Password Reenter password Location Select (US) South Central US. Want to use SQL elastic pool Leave the default No. Compute + storage Leave the default General Purpose Gen5, 2 vCores, 32 GB Storage. Select Review + create. You're taken to the Review + create page where Azure validates your configuration.
When you see the Validation passed message, select Create.
Create private endpoint
In this section, you create a private endpoint for the Azure SQL database in the previous section.
In the Azure portal, select All resources in the left-hand menu.
Select the Azure SQL server mydbserver in the list of services. If you used a different server name, choose that name.
In the server settings, select Private endpoint connections under Security.
Select + Private endpoint.
In Create a private endpoint, enter or select this information in the Basics tab:
Setting Value Project details Subscription Select your subscription. Resource group Select myResourceGroup. Instance details Name Enter SQLPrivateEndpoint. Region Select (US) South Central US. Select the Resource tab or select Next: Resource at the bottom of the page.
In the Resource tab, enter or select this information:
Setting Value Connection method Select Connect to an Azure resource in my directory. Subscription Select your subscription. Resource type Select Microsoft.Sql/servers. Resource Select mydbserver or the name of the server you created in the previous step. Target sub-resource Select sqlServer. Select the Configuration tab or select Next: Configuration at the bottom of the page.
In the Configuration tab, enter or select this information:
Setting Value Networking Virtual network Select myPEVnet. Subnet Select PrivateEndpointSubnet. Private DNS integration Integrate with private DNS zone Select Yes. Subscription Select your subscription. Private DNS zones Leave the default privatelink.database.windows.net. Select the Review + create tab or select Review + create at the bottom of the page.
Select Create.
After the endpoint is created, select Firewalls and virtual networks under Security.
In Firewalls and virtual networks, select Yes next to Allow Azure services and resources to access this server.
Select Save.
Connect the virtual networks using virtual network peering
In this section, we'll connect virtual networks myVMVNet and myPEVNet to myAzFwVNet using peering. There won't be direct connectivity between myVMVNet and myPEVNet.
In the portal's search bar, enter myAzFwVNet.
Select Peerings under Settings menu and select + Add.
In Add Peering enter or select the following information:
Setting Value Name of the peering from myAzFwVNet to remote virtual network Enter myAzFwVNet-to-myVMVNet. Peer details Virtual network deployment model Leave the default Resource Manager. I know my resource ID Leave unchecked. Subscription Select your subscription. Virtual network Select myVMVNet. Name of the peering from remote virtual network to myAzFwVNet Enter myVMVNet-to-myAzFwVNet. Configuration Configure virtual network access settings Allow virtual network access from myAzFwVNet to remote virtual network Leave the default Enabled. Allow virtual network access from remote virtual network to myAzFwVNet Leave the default Enabled. Configure forwarded traffic settings Allow forwarded traffic from remote virtual network to myAzFwVNet Select Enabled. Allow forwarded traffic from myAzFwVNet to remote virtual network Select Enabled. Configure gateway transit settings Allow gateway transit Leave unchecked Select OK.
Select + Add.
In Add Peering enter or select the following information:
Setting Value Name of the peering from myAzFwVNet to remote virtual network Enter myAzFwVNet-to-myPEVNet. Peer details Virtual network deployment model Leave the default Resource Manager. I know my resource ID Leave unchecked. Subscription Select your subscription. Virtual network Select myPEVNet. Name of the peering from remote virtual network to myAzFwVNet Enter myPEVNet-to-myAzFwVNet. Configuration Configure virtual network access settings Allow virtual network access from myAzFwVNet to remote virtual network Leave the default Enabled. Allow virtual network access from remote virtual network to myAzFwVNet Leave the default Enabled. Configure forwarded traffic settings Allow forwarded traffic from remote virtual network to myAzFwVNet Select Enabled. Allow forwarded traffic from myAzFwVNet to remote virtual network Select Enabled. Configure gateway transit settings Allow gateway transit Leave unchecked Select OK.
Link the virtual networks to the private DNS zone
In this section, we'll link virtual networks myVMVNet and myAzFwVNet to the privatelink.database.windows.net private DNS zone. This zone was created when we created the private endpoint.
The link is required for the VM and firewall to resolve the FQDN of database to its private endpoint address. Virtual network myPEVNet was automatically linked when the private endpoint was created.
Note
If you don't link the VM and firewall virtual networks to the private DNS zone, both the VM and firewall will still be able to resolve the SQL Server FQDN. They will resolve to its public IP address.
In the portal's search bar, enter privatelink.database.
Select privatelink.database.windows.net in the search results.
Select Virtual network links under Settings.
Select + Add
In Add virtual network link enter or select the following information:
Setting Value Link name Enter Link-to-myVMVNet. Virtual network details I know the resource ID of virtual network Leave unchecked. Subscription Select your subscription. Virtual network Select myVMVNet. CONFIGURATION Enable auto registration Leave unchecked. Select OK.
Configure an application rule with SQL FQDN in Azure Firewall
In this section, configure an application rule to allow communication between myVM and the private endpoint for SQL Server mydbserver.database.windows.net.
This rule allows communication through the firewall that we created in the previous steps.
In the portal's search bar, enter myAzureFirewall.
Select myAzureFirewall in the search results.
Select Rules under Settings in the myAzureFirewall overview.
Select the Application rule collection tab.
Select + Add application rule collection.
In Add application rule collection enter or select the following information:
Setting Value Name Enter SQLPrivateEndpoint. Priority Enter 100. Action Enter Allow. Rules FQDN tags Name Leave blank. Source type Leave the default IP address. Source Leave blank. FQDN tags Leave the default 0 selected. Target FQDNs Name Enter SQLPrivateEndpoint. Source type Leave the default IP address. Source Enter 10.1.0.0/16. Protocol: Port Enter mssql:1433. Target FQDNs Enter mydbserver.database.windows.net. Select Add.
Route traffic between the virtual machine and private endpoint through Azure Firewall
We didn't create a virtual network peering directly between virtual networks myVMVNet and myPEVNet. The virtual machine myVM doesn't have a route to the private endpoint we created.
In this section, we'll create a route table with a custom route.
The route sends traffic from the myVM subnet to the address space of virtual network myPEVNet, through the Azure Firewall.
On the Azure portal menu or from the Home page, select Create a resource.
Type route table in the search box and press Enter.
Select Route table and then select Create.
On the Create Route table page, use the following table to configure the route table:
Setting Value Project details Subscription Select your subscription. Resource group Select myResourceGroup. Instance details Region Select South Central US. Name Enter VMsubnet-to-AzureFirewall. Propagate gateway routes Select No. Select Review + create. You're taken to the Review + create page where Azure validates your configuration.
When you see the Validation passed message, select Create.
Once the deployment completes select Go to resource.
Select Routes under Settings.
Select + Add.
On the Add route page, enter, or select this information:
Setting Value Route name Enter myVMsubnet-to-privateendpoint. Address prefix Enter 10.2.0.0/16. Next hop type Select Virtual appliance. Next hop address Enter 10.0.0.4. Select OK.
Select Subnets under Settings.
Select + Associate.
On the Associate subnet page, enter or select this information:
Setting Value Virtual network Select myVMVNet. Subnet Select VMSubnet. Select OK.
Connect to the virtual machine from your client computer
Connect to the VM myVm from the internet as follows:
In the portal's search bar, enter myVm-ip.
Select myVM-ip in the search results.
Copy or write down the value under IP address.
If you're using Windows 10, run the following command using PowerShell. For other Windows client versions, use an SSH client like Putty:
Replace username with the admin username you entered during VM creation.
Replace IPaddress with the IP address from the previous step.
ssh username@IPaddress
- Enter the password you defined when creating myVm
Access SQL Server privately from the virtual machine
In this section, you'll connect privately to the SQL Database using the private endpoint.
Enter
nslookup mydbserver.database.windows.net
You'll receive a message similar to below:
Server: 127.0.0.53 Address: 127.0.0.53#53 Non-authoritative answer: mydbserver.database.windows.net canonical name = mydbserver.privatelink.database.windows.net. Name: mydbserver.privatelink.database.windows.net Address: 10.2.0.4
Install SQL Server command-line tools.
Run the following command to connect to the SQL Server. Use the server admin and password you defined when you created the SQL Server in the previous steps.
Replace <ServerAdmin> with the admin username you entered during the SQL server creation.
Replace <YourPassword> with the admin password you entered during SQL server creation.
sqlcmd -S mydbserver.database.windows.net -U '<ServerAdmin>' -P '<YourPassword>'
A SQL command prompt will be displayed on successful login. Enter exit to exit the sqlcmd tool.
Close the connection to myVM by entering exit.
Validate the traffic in Azure Firewall logs
In the Azure portal, select All Resources and select your Log Analytics workspace.
Select Logs under General in the Log Analytics workspace page.
Select the blue Get Started button.
In the Example queries window, select Firewalls under All Queries.
Select the Run button under Application rule log data.
In the log query output, verify mydbserver.database.windows.net is listed under FQDN and SQLPrivateEndpoint is listed under RuleCollection.
Clean up resources
When you're done using the resources, delete the resource group and all of the resources it contains:
Enter myResourceGroup in the Search box at the top of the portal and select myResourceGroup from the search results.
Select Delete resource group.
Enter myResourceGroup for TYPE THE RESOURCE GROUP NAME and select Delete.
Next steps
In this article, you explored different scenarios that you can use to restrict traffic between a virtual machine and a private endpoint using Azure Firewall.
You connected to the VM and securely communicated to the database through Azure Firewall using private link.
To learn more about private endpoint, see What is Azure Private Endpoint?.
Feedback
Submit and view feedback for