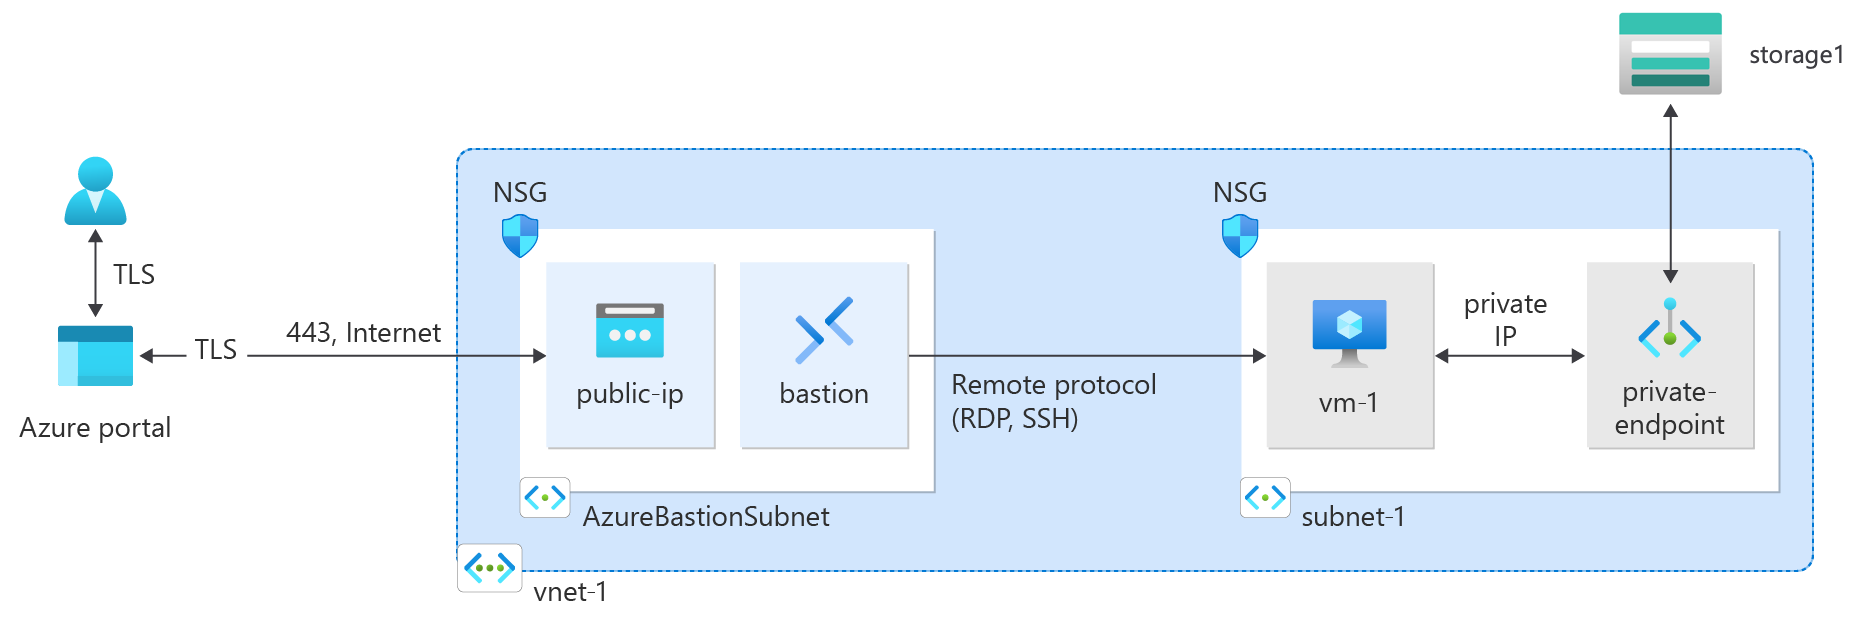
Tutorial: Connect to a storage account using an Azure Private Endpoint
Azure Private endpoint is the fundamental building block for Private Link in Azure. It enables Azure resources, like virtual machines (VMs), to privately and securely communicate with Private Link resources such as Azure Storage.
In this tutorial, you learn how to:
- Create a virtual network and bastion host.
- Create a storage account and disable public access.
- Create a private endpoint for the storage account.
- Create a virtual machine.
- Test connectivity to the storage account private endpoint.
Prerequisites
- An Azure subscription. If you don't have an Azure subscription, create a free account before you begin.
Sign in to Azure
Sign in to the Azure portal.
Create a virtual network and an Azure Bastion host
The following procedure creates a virtual network with a resource subnet, an Azure Bastion subnet, and a Bastion host:
In the portal, search for and select Virtual networks.
On the Virtual networks page, select + Create.
On the Basics tab of Create virtual network, enter or select the following information:
Setting Value Project details Subscription Select your subscription. Resource group Select Create new. Enter test-rg for the name. Select OK. Instance details Name Enter vnet-1. Region Select East US 2. 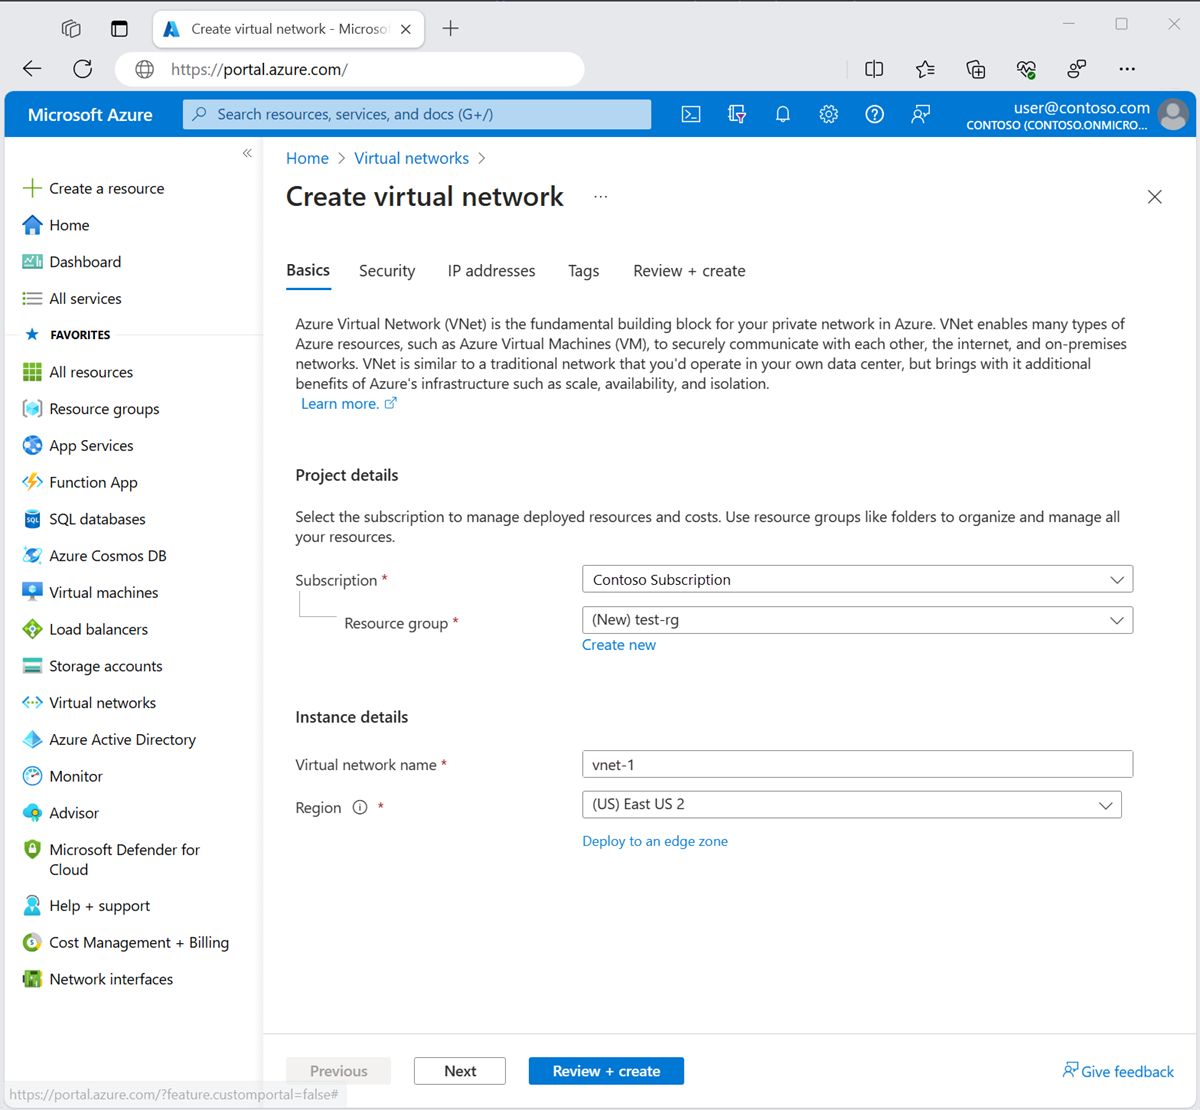
Select Next to proceed to the Security tab.
In the Azure Bastion section, select Enable Bastion.
Bastion uses your browser to connect to VMs in your virtual network over Secure Shell (SSH) or Remote Desktop Protocol (RDP) by using their private IP addresses. The VMs don't need public IP addresses, client software, or special configuration. For more information, see What is Azure Bastion?.
In Azure Bastion, enter or select the following information:
Setting Value Azure Bastion host name Enter bastion. Azure Bastion public IP address Select Create a public IP address. Enter public-ip-bastion in Name. Select OK. 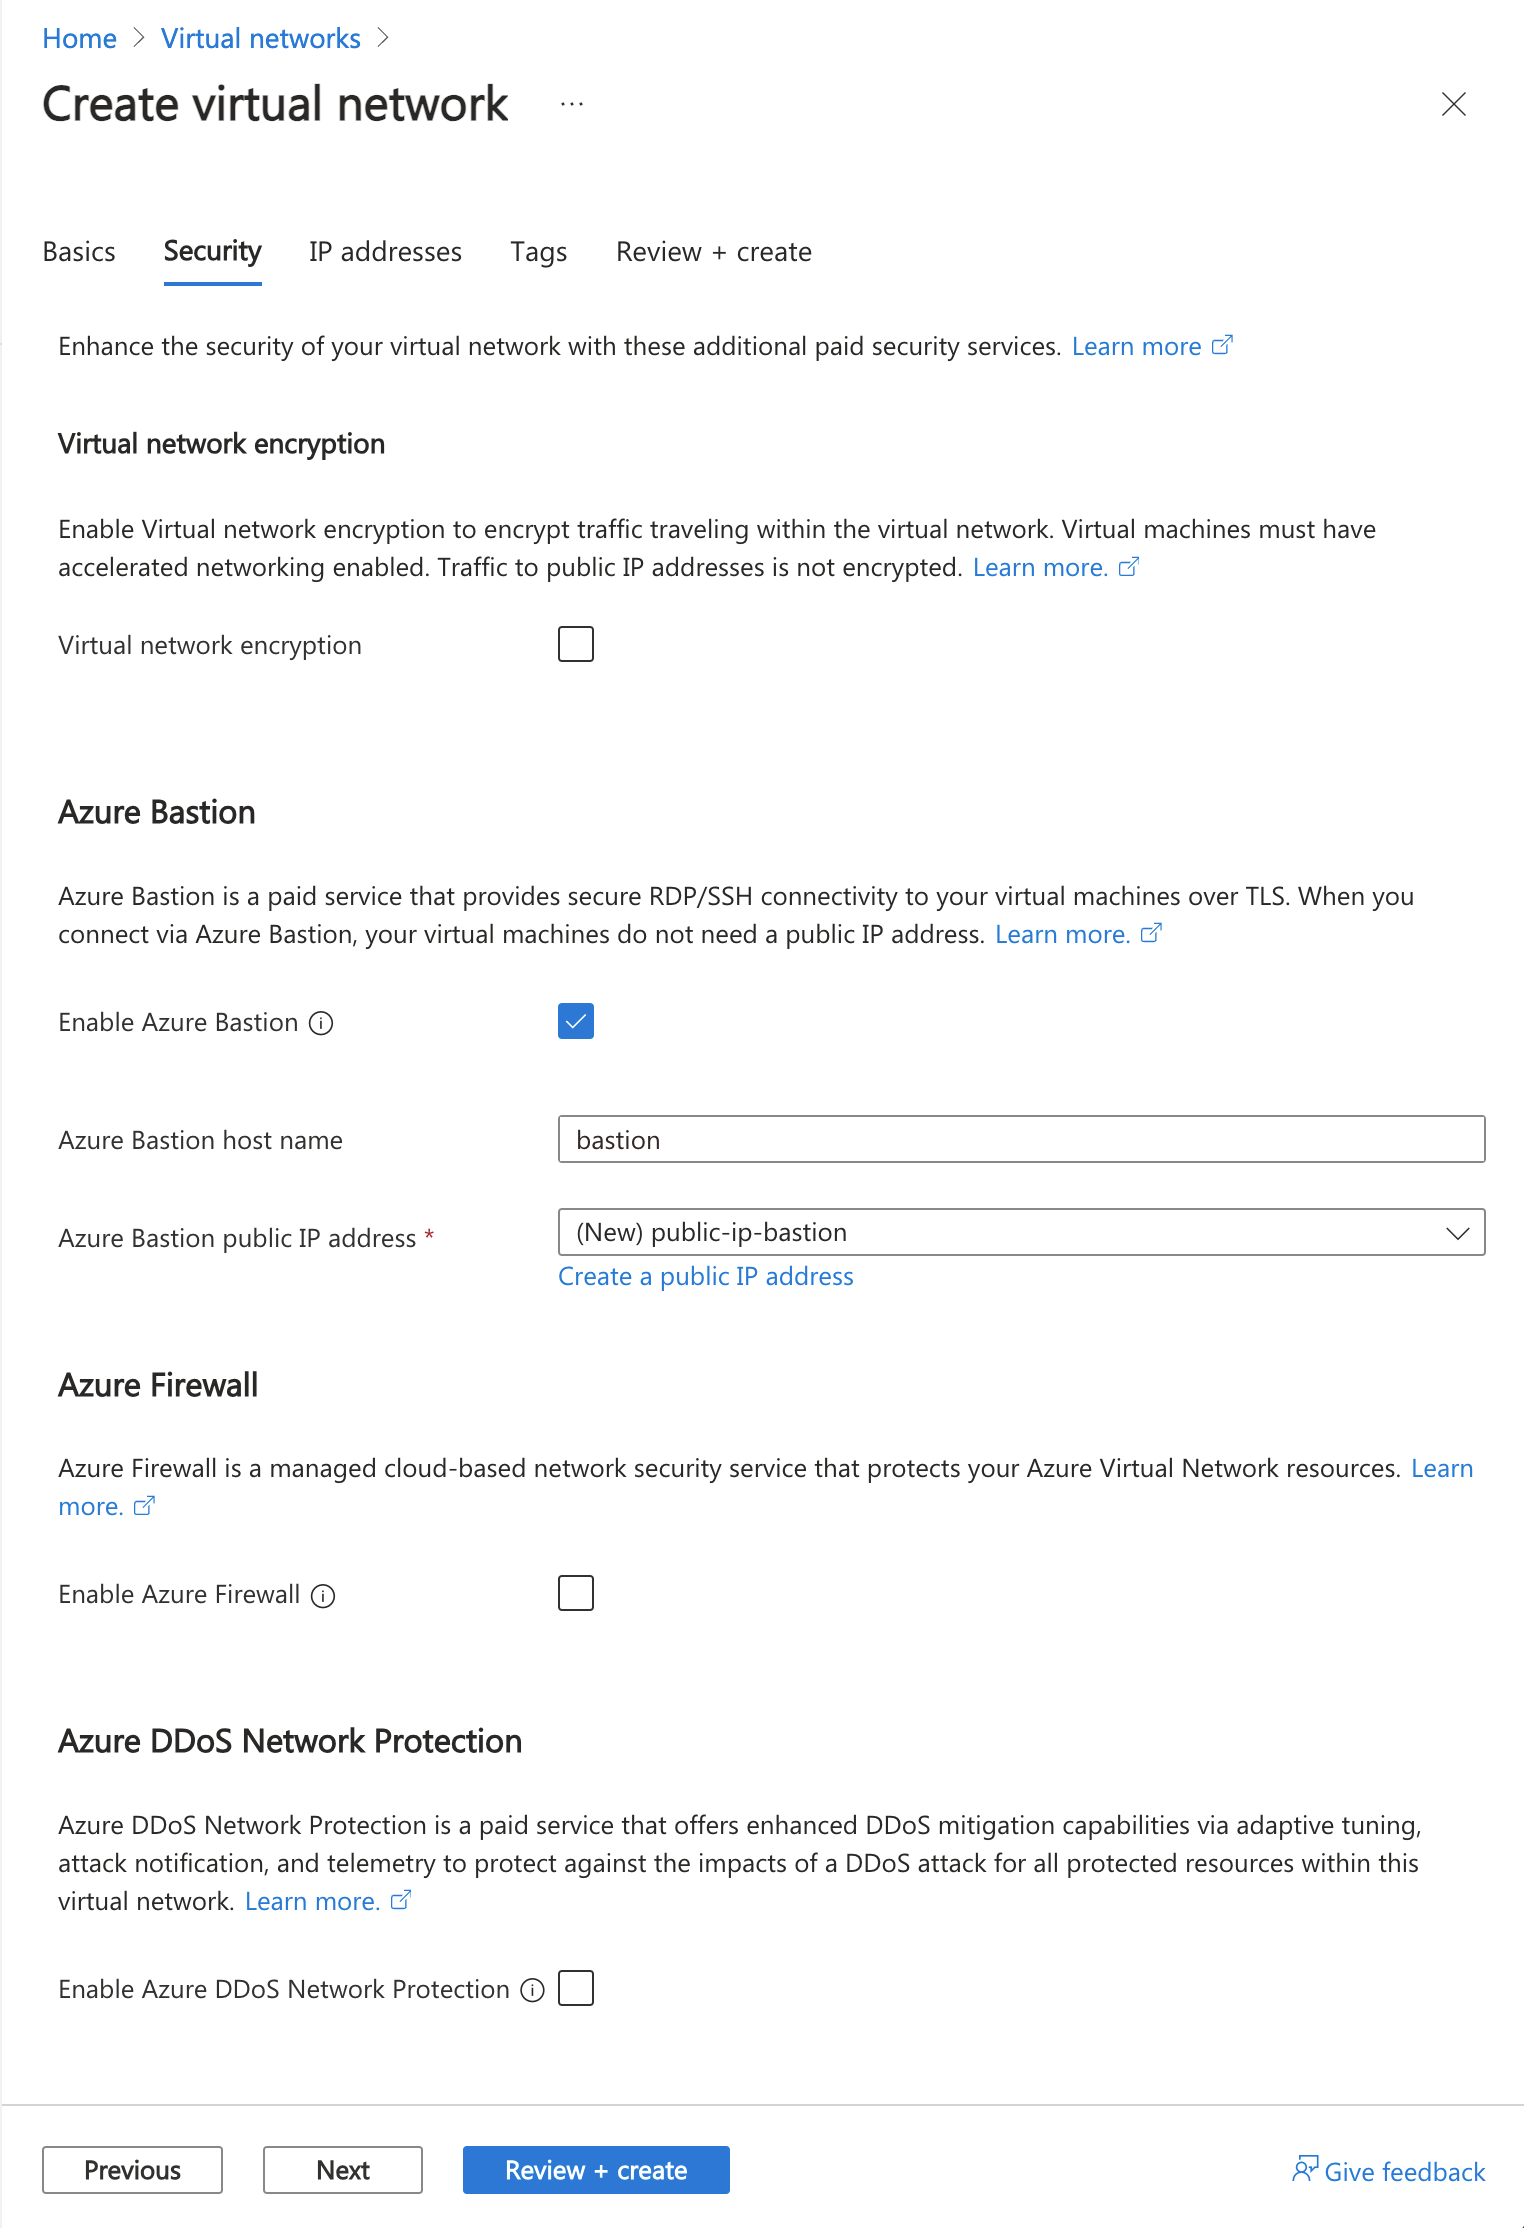
Select Next to proceed to the IP Addresses tab.
In the address space box in Subnets, select the default subnet.
In Edit subnet, enter or select the following information:
Setting Value Subnet details Subnet template Leave the default of Default. Name Enter subnet-1. Starting address Leave the default of 10.0.0.0. Subnet size Leave the default of /24 (256 addresses). 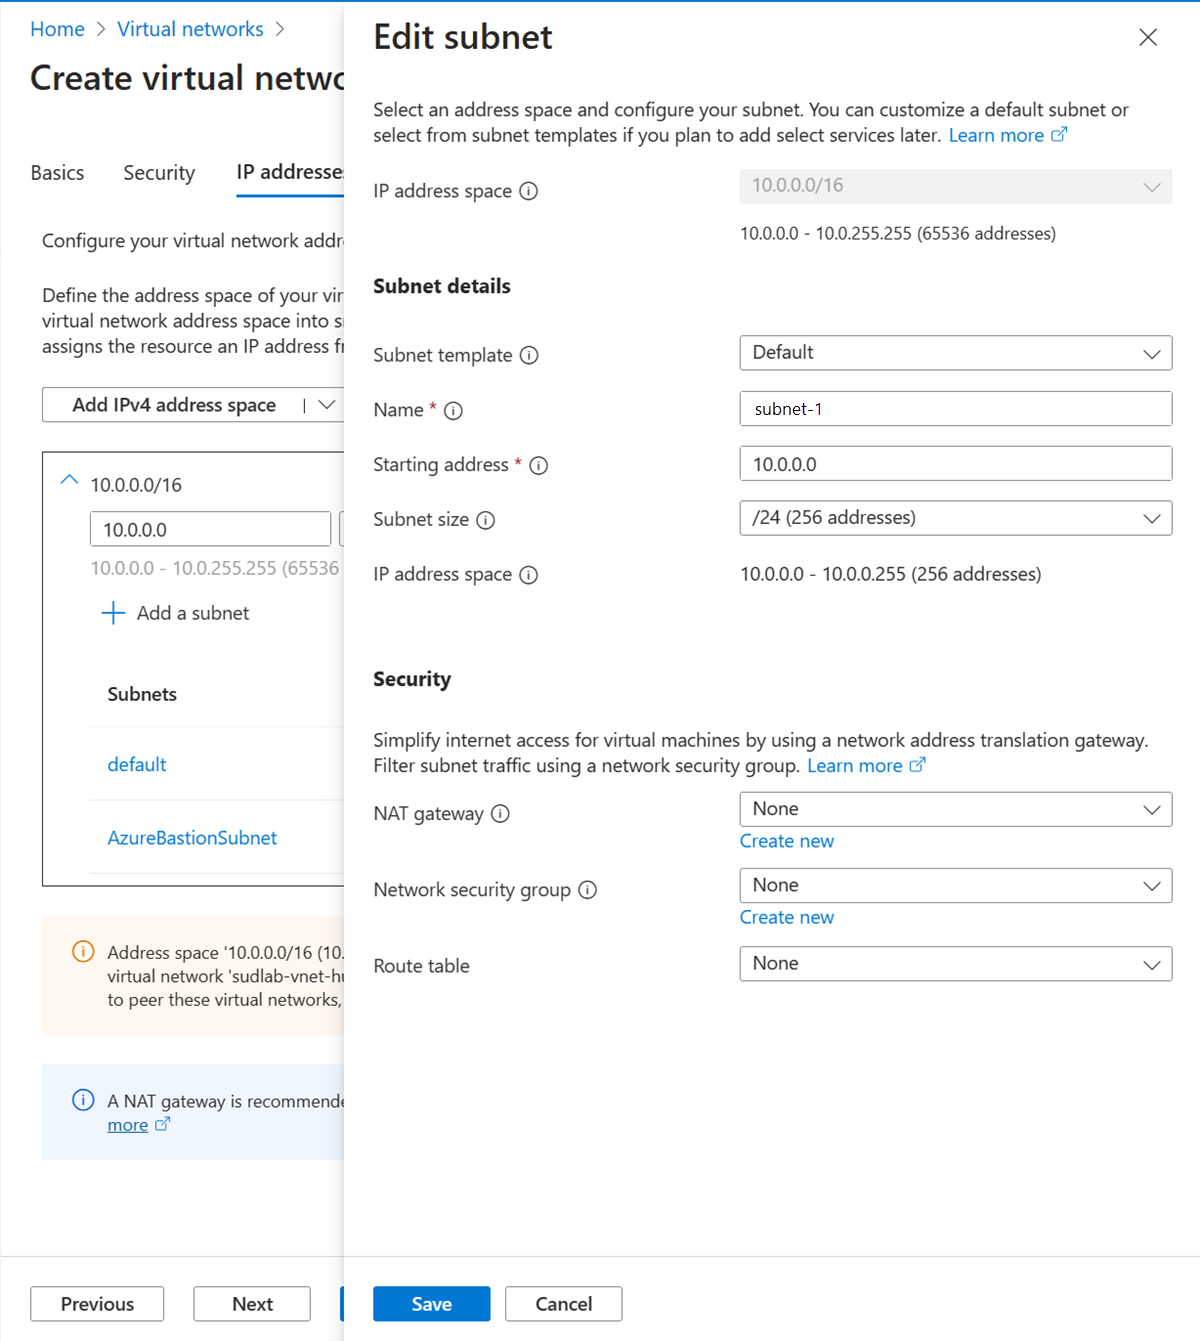
Select Save.
Select Review + create at the bottom of the window. When validation passes, select Create.
Create a storage account
Create an Azure Storage account for the steps in this article. If you already have a storage account, you can use it instead.
In the search box at the top of the portal, enter Storage account. Select Storage accounts in the search results.
Select + Create.
On the Basics tab of Create a storage account, enter or select the following information:
Setting Value Project Details Subscription Select your Azure subscription. Resource Group Select test-rg. Instance details Storage account name Enter storage1. If the name is unavailable, enter a unique name. Location Select (US) East US 2. Performance Leave the default Standard. Redundancy Select Locally-redundant storage (LRS). Select Review.
Select Create.
Disable public access to storage account
Before you create the private endpoint, it's recommended to disable public access to the storage account. Use the following steps to disable public access to the storage account.
In the search box at the top of the portal, enter Storage account. Select Storage accounts in the search results.
Select storage1 or the name of your existing storage account.
In Security + networking, select Networking.
In the Firewalls and virtual networks tab in Public network access, select Disabled.
Select Save.
Create private endpoint
In the search box at the top of the portal, enter Private endpoint. Select Private endpoints.
Select + Create in Private endpoints.
In the Basics tab of Create a private endpoint, enter or select the following information.
Setting Value Project details Subscription Select your subscription. Resource group Select test-rg Instance details Name Enter private-endpoint. Network Interface Name Leave the default of private-endpoint-nic. Region Select East US 2. Select Next: Resource.
In the Resource pane, enter or select the following information.
Setting Value Connection method Leave the default of Connect to an Azure resource in my directory. Subscription Select your subscription. Resource type Select Microsoft.Storage/storageAccounts. Resource Select storage-1 or your storage account. Target subresource Select blob. Select Next: Virtual Network.
In Virtual Network, enter or select the following information.
Setting Value Networking Virtual network Select vnet-1 (test-rg). Subnet Select subnet-1. Network policy for private endpoints Select edit to apply Network policy for private endpoints. In Edit subnet network policy, select the checkbox next to Network security groups and Route Tables in the Network policies setting for all private endpoints in this subnet pull-down. Select Save. For more information, see Manage network policies for private endpoints Setting Value Private IP configuration Select Dynamically allocate IP address. 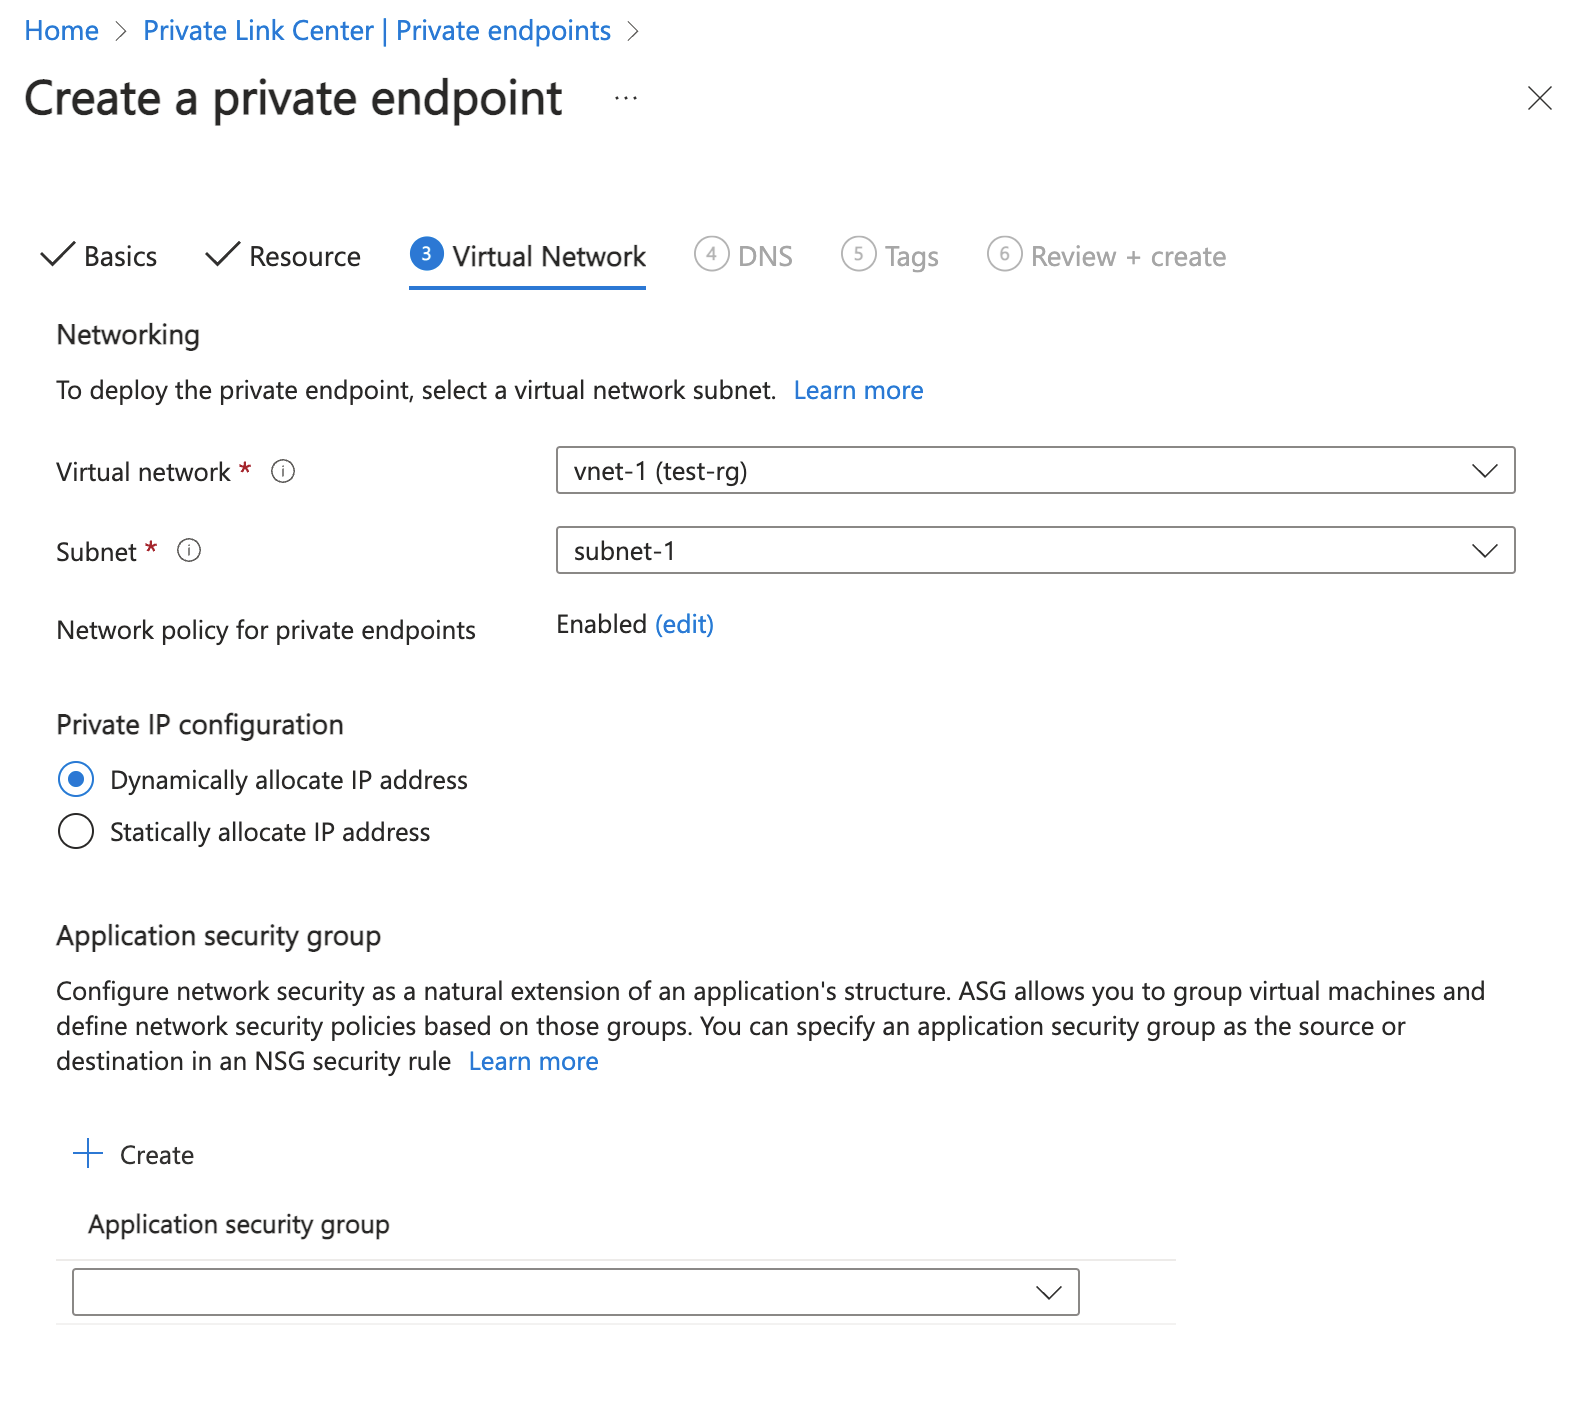
Select Next: DNS.
Leave the defaults in DNS. Select Next: Tags, then Next: Review + create.
Select Create.
Create test virtual machine
The following procedure creates a test virtual machine (VM) named vm-1 in the virtual network.
In the portal, search for and select Virtual machines.
In Virtual machines, select + Create, then Azure virtual machine.
On the Basics tab of Create a virtual machine, enter or select the following information:
Setting Value Project details Subscription Select your subscription. Resource group Select test-rg. Instance details Virtual machine name Enter vm-1. Region Select East US 2. Availability options Select No infrastructure redundancy required. Security type Leave the default of Standard. Image Select Windows Server 2022 Datacenter - x64 Gen2. VM architecture Leave the default of x64. Size Select a size. Administrator account Authentication type Select Password. Username Enter azureuser. Password Enter a password. Confirm password Reenter the password. Inbound port rules Public inbound ports Select None. Select the Networking tab at the top of the page.
Enter or select the following information in the Networking tab:
Setting Value Network interface Virtual network Select vnet-1. Subnet Select subnet-1 (10.0.0.0/24). Public IP Select None. NIC network security group Select Advanced. Configure network security group Select Create new. Enter nsg-1 for the name. Leave the rest at the defaults and select OK. Leave the rest of the settings at the defaults and select Review + create.
Review the settings and select Create.
Note
Virtual machines in a virtual network with a bastion host don't need public IP addresses. Bastion provides the public IP, and the VMs use private IPs to communicate within the network. You can remove the public IPs from any VMs in bastion hosted virtual networks. For more information, see Dissociate a public IP address from an Azure VM.
Note
Azure provides a default outbound access IP for VMs that either aren't assigned a public IP address or are in the backend pool of an internal basic Azure load balancer. The default outbound access IP mechanism provides an outbound IP address that isn't configurable.
The default outbound access IP is disabled when one of the following events happens:
- A public IP address is assigned to the VM.
- The VM is placed in the backend pool of a standard load balancer, with or without outbound rules.
- An Azure NAT Gateway resource is assigned to the subnet of the VM.
VMs that you create by using virtual machine scale sets in flexible orchestration mode don't have default outbound access.
For more information about outbound connections in Azure, see Default outbound access in Azure and Use Source Network Address Translation (SNAT) for outbound connections.
Storage access key
The storage access key is required for the later steps. Go to the storage account you created previously and copy the connection string with the access key for the storage account.
In the search box at the top of the portal, enter Storage account. Select Storage accounts in the search results.
Select the storage account you created in the previous steps or your existing storage account.
In the Security + networking section of the storage account, select Access keys.
Select Show, then select copy on the Connection string for key1.
Add a blob container
In the search box at the top of the portal, enter Storage account. Select Storage accounts in the search results.
Select the storage account you created in the previous steps.
In the Data storage section, select Containers.
Select + Container to create a new container.
Enter container in Name and select Private (no anonymous access) under Public access level.
Select Create.
Test connectivity to private endpoint
In this section, you use the virtual machine you created in the previous steps to connect to the storage account across the private endpoint using Microsoft Azure Storage Explorer.
In the search box at the top of the portal, enter Virtual machine. Select Virtual machines in the search results.
Select vm-1.
In Operations, select Bastion.
Enter the username and password that you entered during the virtual machine creation.
Select Connect.
Open Windows PowerShell on the server after you connect.
Enter
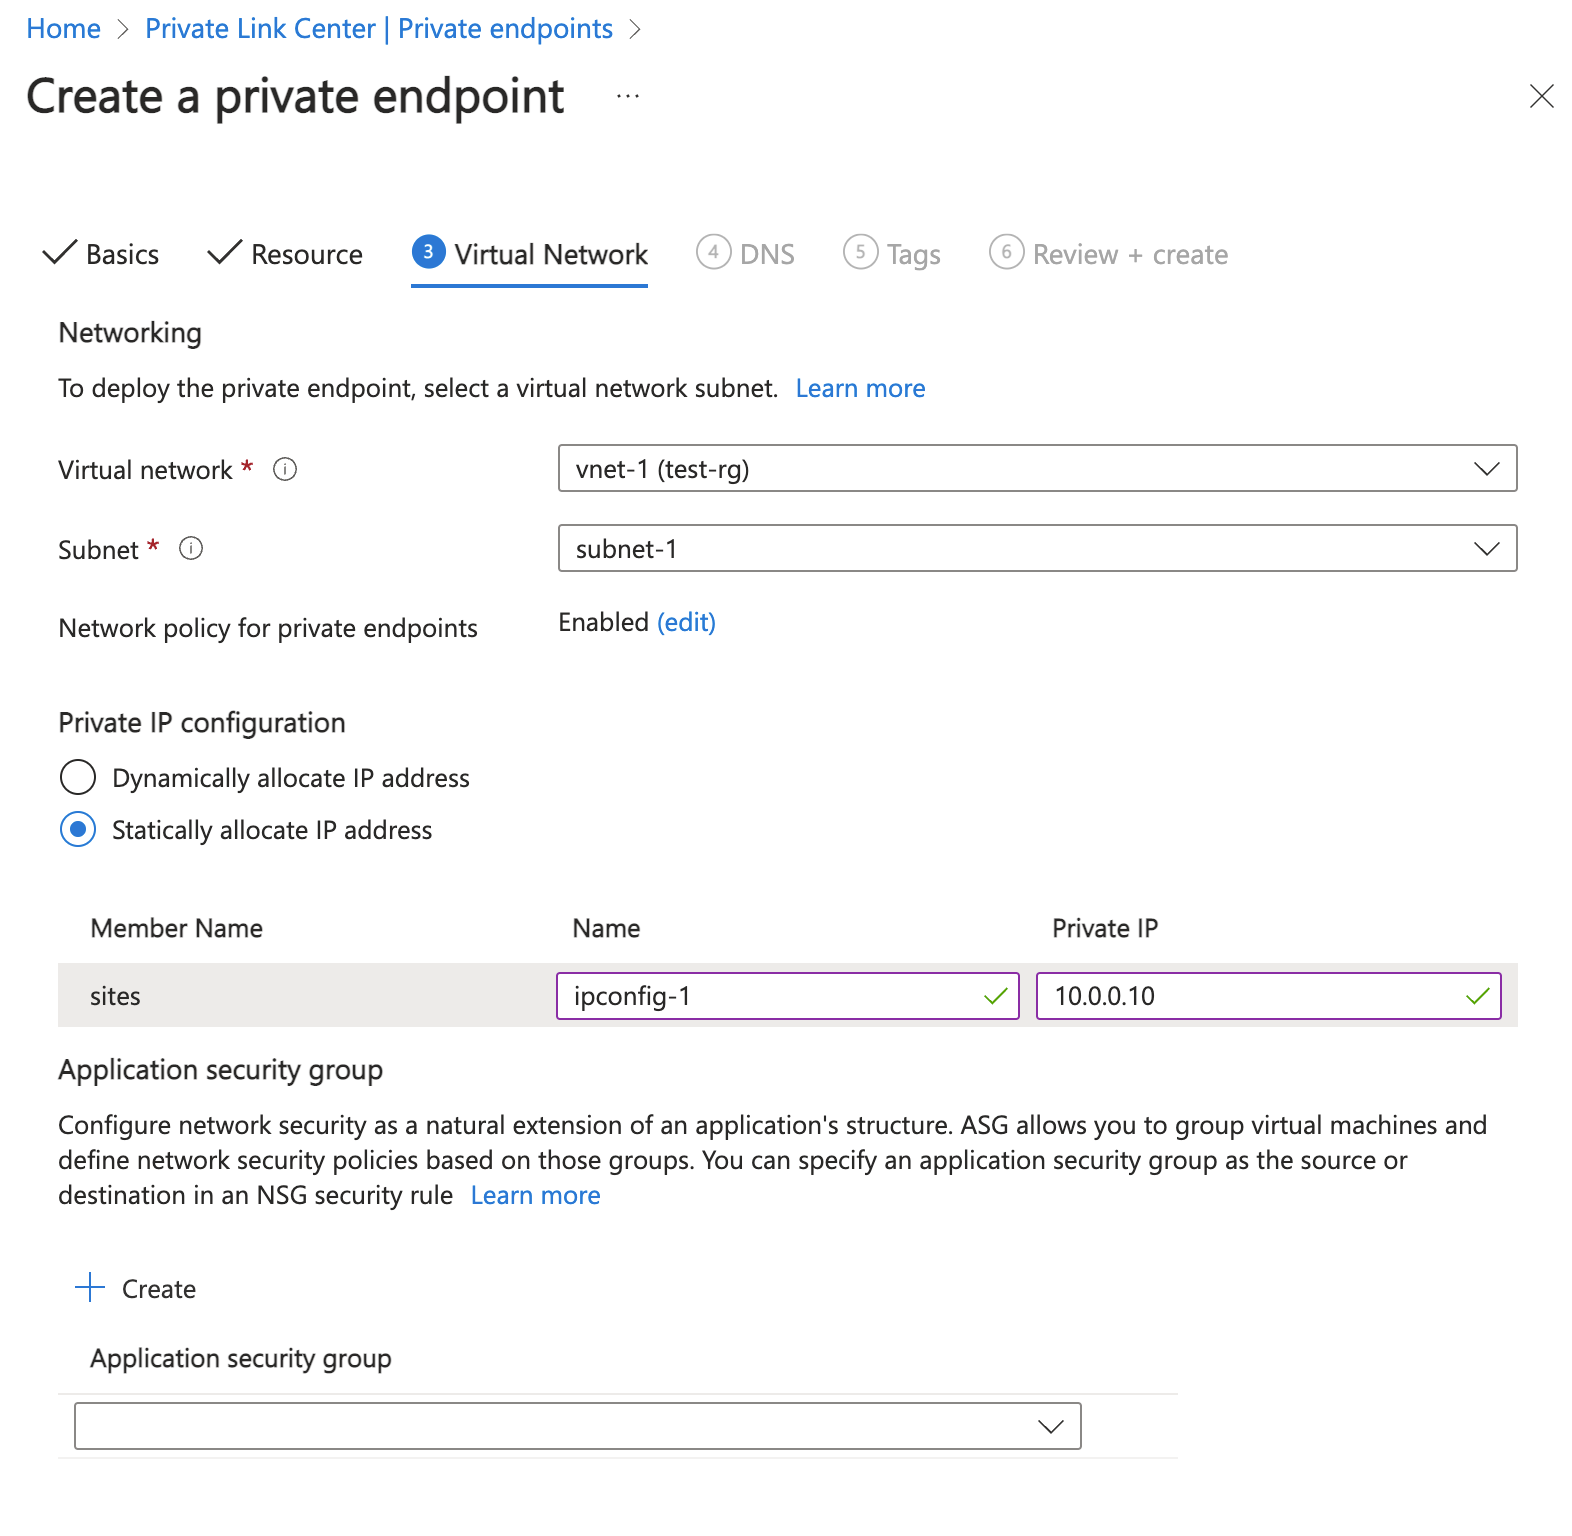
nslookup <storage-account-name>.blob.core.windows.net. Replace <storage-account-name> with the name of the storage account you created in the previous steps. The following example shows the output of the command.Server: UnKnown Address: 168.63.129.16 Non-authoritative answer: Name: storage1.privatelink.blob.core.windows.net Address: 10.0.0.10 Aliases: mystorageaccount.blob.core.windows.netA private IP address of 10.0.0.10 is returned for the storage account name. This address is in subnet-1 subnet of vnet-1 virtual network you created previously.
Install Microsoft Azure Storage Explorer on the virtual machine.
Select Finish after the Microsoft Azure Storage Explorer is installed. Leave the box checked to open the application.
Select the Power plug symbol to open the Select Resource dialog box in the left-hand toolbar.
In Select Resource , select Storage account or service to add a connection in Microsoft Azure Storage Explorer to your storage account that you created in the previous steps.
In the Select Connection Method screen, select Connection string, and then Next.
In the box under Connection String, paste the connection string from the storage account you copied in the previous steps. The storage account name automatically populates in the box under Display name.
Select Next.
Verify the settings are correct in Summary.
Select Connect
Select your storage account from the Storage Accounts in the explorer menu.
Expand the storage account and then Blob Containers.
The container you created previously is displayed.
Close the connection to vm-1.
Clean up resources
When you finish using the resources that you created, you can delete the resource group and all its resources:
In the Azure portal, search for and select Resource groups.
On the Resource groups page, select the test-rg resource group.
On the test-rg page, select Delete resource group.
Enter test-rg in Enter resource group name to confirm deletion, and then select Delete.
Next steps
In this tutorial, you learned how to create:
Virtual network and bastion host.
Virtual machine.
Storage account and a container.
Learn how to connect to an Azure Cosmos DB account via Azure Private Endpoint:
Feedback
Coming soon: Throughout 2024 we will be phasing out GitHub Issues as the feedback mechanism for content and replacing it with a new feedback system. For more information see: https://aka.ms/ContentUserFeedback.
Submit and view feedback for