Note
Access to this page requires authorization. You can try signing in or changing directories.
Access to this page requires authorization. You can try changing directories.
Data classification in the Microsoft Purview Data Map is a way of categorizing data assets by assigning unique logical labels or classes to the data assets. Classification is based on the business context of the data. For example, you might classify assets by Passport Number, Driver's License Number, Credit Card Number, SWIFT Code, Person’s Name, and so on. Learn more about data classification in Data Map.
This article describes best practices to adopt when you're classifying data assets, so that your scans will be more effective and you have the most complete information possible about your entire data estate.
Scan rule set
By using a scan rule set, you can configure the relevant classifications that should be applied to the particular scan for the data source. Select the relevant system classifications, or select custom classifications if you've created one for the data you're scanning.
For example, in the following image, only the specific selected system and custom classifications will be applied for the data source you're scanning (for example, financial data).

Annotation management
While you're deciding on which classifications to apply, we recommend that you:
Go to Data Map > Annotation management > Classifications pane.
Review the available system classifications to be applied on the data assets you're scanning. The formal names of system classifications have a MICROSOFT prefix.

Create a custom classification, if necessary. Select the Custom tab, and then select + New. Learn how to create a custom classification.
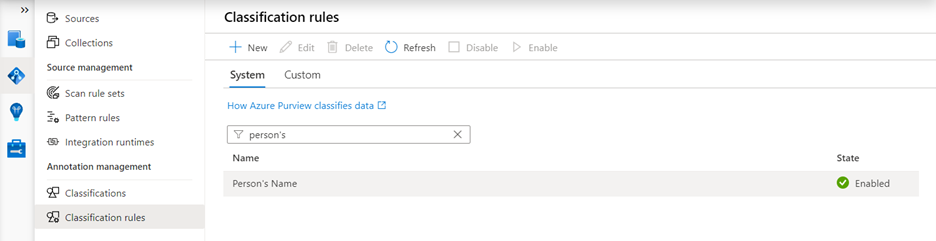
Create the classification rule for the custom classification that you created in the preceding step. Go to Data Map > Annotation management > Classification rules. Here, you can create the classification rule for the custom classification name that you created in the preceding step.


Custom classifications
Create custom classifications only if the available system classifications don't meet your needs.
For the name of the custom classification, it's a good practice to use a namespace convention (for example, <company name>.<business unit>.<custom classification name>).
As an example, for the custom EMPLOYEE_ID classification for fictitious company Contoso, the name of your custom classification would be CONTOSO.HR.EMPLOYEE_ID, and the friendly name is stored in the system as HR.EMPLOYEE ID.

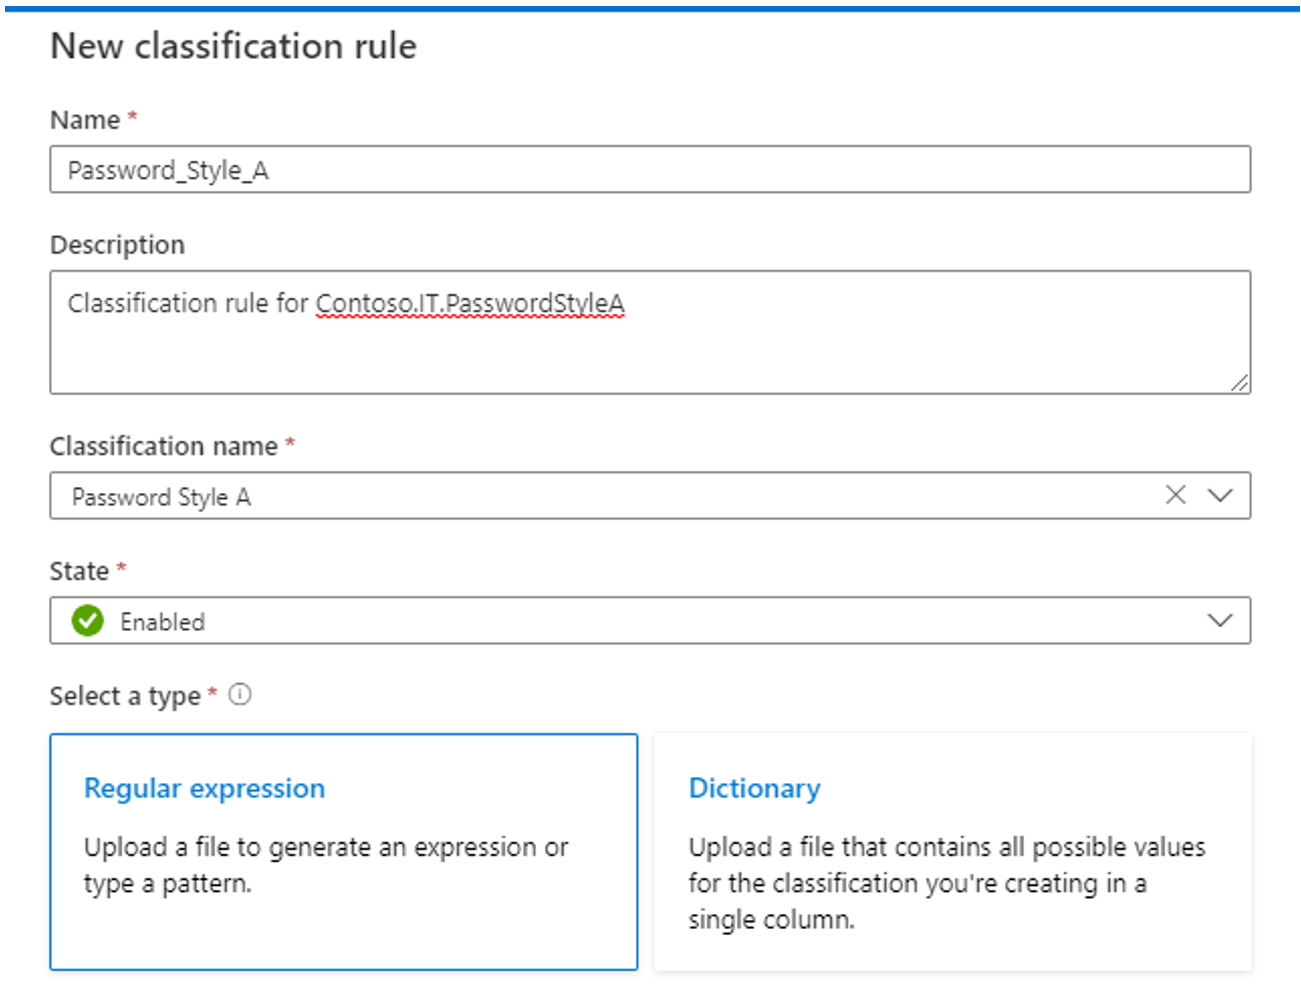
When you create and configure the classification rules for a custom classification, do the following:
Select the appropriate classification name for which the classification rule is to be created.
The Microsoft Purview Data Map supports the following two methods for creating custom classification rules:
Use the Regular expression (regex) method if you can consistently express the data element by using a regular expression pattern or you can generate the pattern by using a data file. Ensure that the sample data reflects the population.
Use the Dictionary method only if the list of values in the dictionary file represents all possible values of data to be classified and is expected to conform to a given set of data (considering future values as well).
Using the Regular expression method:
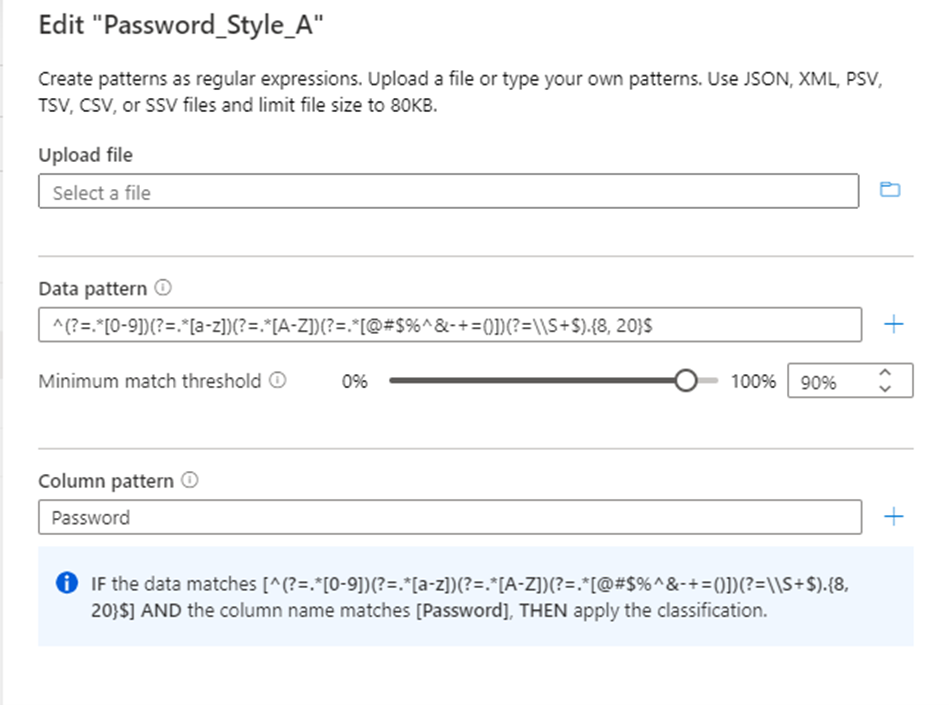
Configure the regex pattern for the data to be classified. Ensure that the regex pattern is generic enough to cater to the data being classified.
Microsoft Purview also provides a feature to generate a suggested regex pattern. After you upload a sample data file, select one of the suggested patterns, and then select Add to patterns to use the suggested data and column patterns. You can modify the suggested patterns, or you can type your own patterns without having to upload a file.
You can also configure the column name pattern, for the column to be classified to minimize false positives.
Configure the Minimum match threshold parameter that's acceptable for your data that matches the data pattern to apply the classification. The threshold values can be from 1% through 100%. We suggest a value of at least 60% as the threshold to avoid false positives. However, you could configure as necessary for your specific classification scenarios. For example, your threshold might be as low as 1% if you want to detect and apply a classification for any value in the data if it matches the pattern.
The option to set a minimum match rule is automatically disabled if more than one data pattern is added to the classification rule.
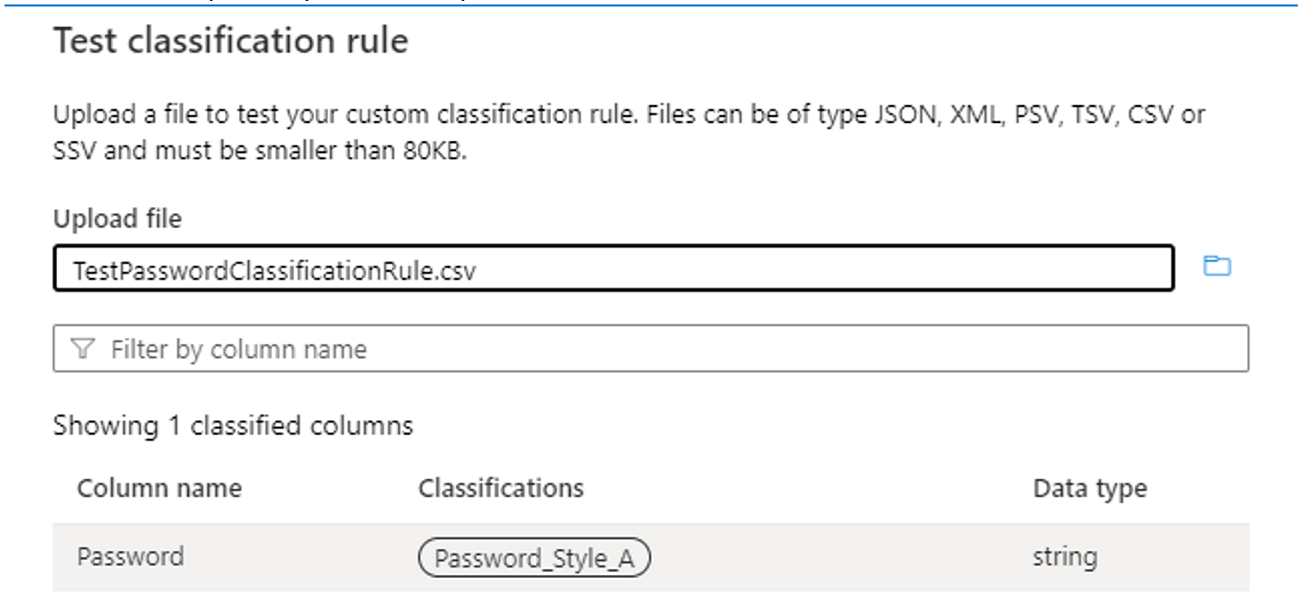
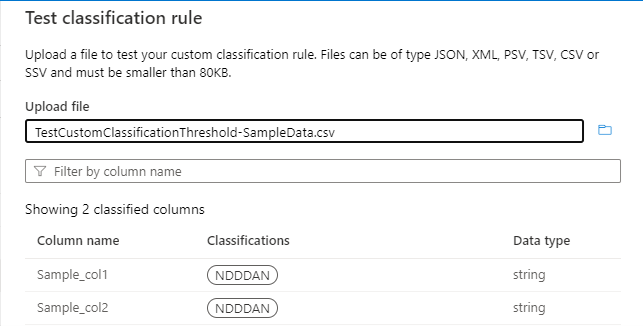
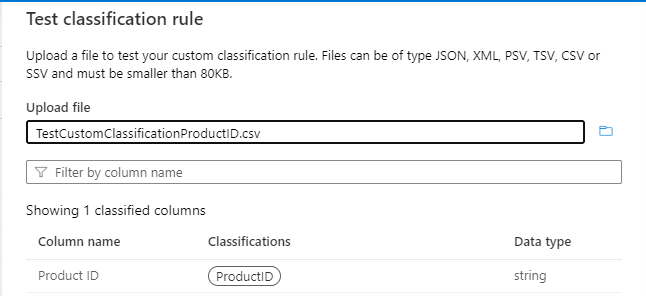
Use the Test classification rule and test with sample data to verify that the classification rule is working as expected. Ensure that in the sample data (for example, in a .csv file) at least three columns are present, including the column on which the classification is to be applied. If the test is successful, you should see the classification label on the column, as shown in the following image:
Using the Dictionary method:
You can use the Dictionary method to fit enumeration data or if the dictionary list of possible values is available.
This method supports .csv and .tsv files, with a file size limit of 30 megabytes (MB).


Custom classification archetypes
How the "threshold" parameter works in the regular expression
Consider the sample source data in the following image. There are five columns, and the custom classification rule should be applied to columns Sample_col1, Sample_col2, and Sample_col3 for the data pattern N{Digit}{Digit}{Digit}AN.
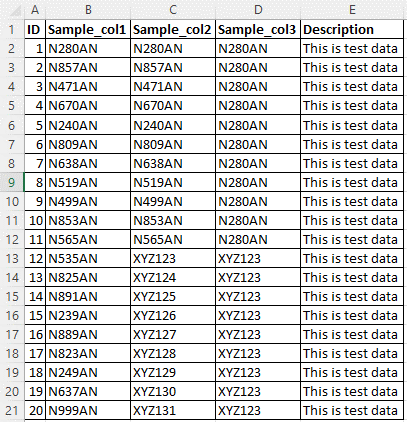
The custom classification is named NDDDAN.
The classification rule (regex for the data pattern) is ^N[0-9]{3}AN$.
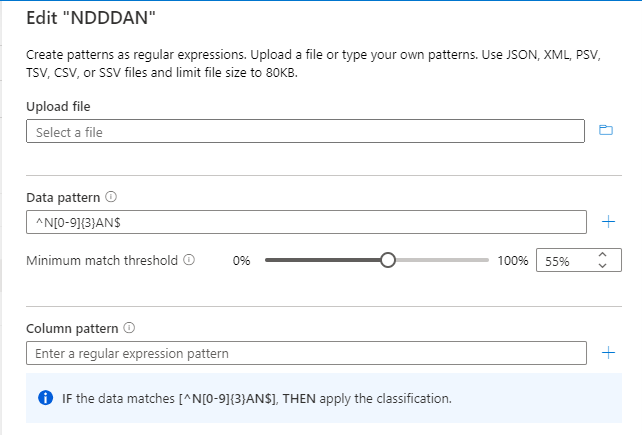
The threshold would be computed for the "^N[0-9]{3}AN$" pattern, as shown in the following image:

If you have a threshold of 55%, only columns Sample_col1 and Sample_col2 will be classified. Sample_col3 won't be classified, because it doesn't meet the 55% threshold criterion.


How to use both data and column patterns
For the given sample data, where both column B and column C have similar data patterns, you can classify on column B based on the data pattern "^P[0-9]{3}[A-Z]{2}$".
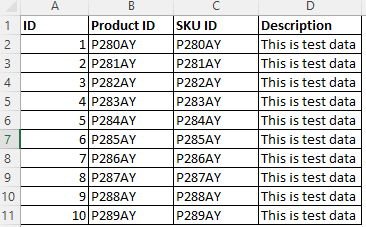
Use the column pattern along with the data pattern to ensure that only Product ID column is classified.
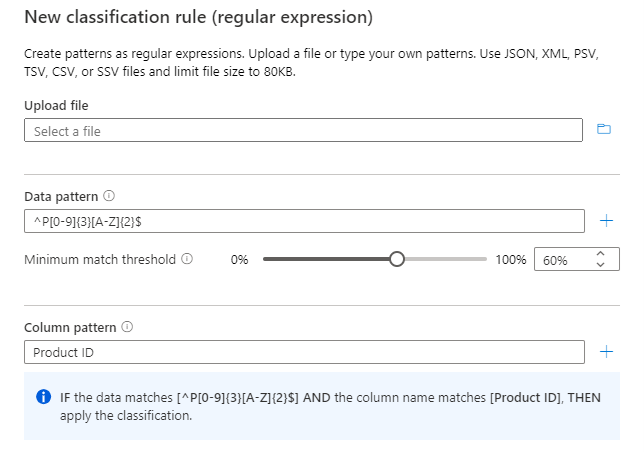
Note
The column pattern is verified as an AND condition with the data pattern.
Use the Test classification rule and test with sample data to verify that the classification rule is working as expected.


How to use multiple column patterns
If there are multiple column patterns to be classified for the same classification rule, use pipe (|) character-separated column names. For example, for columns Product ID, Product_ID, ProductID, and so on, write the column pattern as shown in the following image:

For more information, see regex alternation construct.
Classification considerations
Here are some considerations to bear in mind as you're defining classifications:
To decide what classifications are required to be applied to the assets prior to scanning, consider how your classifications are to be used. Unnecessary classification labels might look noisy and even misleading for data consumers. You can use classifications to:
- Describe the nature of the data that exists in the data asset or schema that's being scanned. In other words, classifications should enable customers to identify the content of data asset or schema from the classification labels as they search the catalog.
- Set priorities and develop a plan to achieve the security and compliance needs of an organization.
- Describe the phases in the data preparation processes (raw zone, landing zone, and so on) and assign the classifications to specific assets to mark the phase in the process.
You can assign classifications at the asset or column level automatically by including relevant classifications in the scan rule, or you can assign them manually after you ingest the metadata into the Microsoft Purview Data Map.
For automatic assignment, see supported data stores for the Microsoft Purview Data Map.
Before you scan your data sources in the Microsoft Purview Data Map, it's important to understand your data and configure the appropriate scan rule set for it (for example, by selecting relevant system classification, custom classifications, or a combination of both), because it could affect your scan performance. For more information, see supported classifications in Microsoft Purview Data Map.
The Microsoft Purview scanner applies data sampling rules for deep scans (subject to classification) for both system and custom classifications. The sampling rule is based on the type of data sources. For more information, see the "Sampling within a file" section in Supported data sources and file types in Microsoft Purview.
Note
Distinct data threshold: This is the total number of distinct data values that need to be found in a column before the scanner runs the data pattern on it. Distinct data threshold has nothing to do with pattern matching but it is a pre-requisite for pattern matching. System classification rules require there to be at least 8 distinct values in each column to subject them to classification. The system requires this value to make sure that the column contains enough data for the scanner to accurately classify it. For example, a column that contains multiple rows that all contain the value 1 won't be classified. Columns that contain one row with a value and the rest of the rows have null values also won't get classified. If you specify multiple patterns, this value applies to each of them.
The sampling rules apply to resource sets as well. For more information, see the "Resource set file sampling" section in supported data sources and file types in the Microsoft Purview Data Map.
Custom classifications can't be applied on document type assets using custom classification rules. Classifications for such types can be applied manually only.
Custom classifications aren't included in any default scan rules. Therefore, if automatic assignment of custom classifications is expected, you must deploy and use a custom scan rule that includes the custom classification to run the scan.
If you apply classifications manually from the Microsoft Purview governance portal, such classifications are retained in subsequent scans.
Subsequent scans won't remove any classifications from assets, if they were detected previously, even if the classification rules are inapplicable.
For encrypted source data assets, Microsoft Purview picks only file names, fully qualified names, schema details for structured file types, and database tables. For classification to work, decrypt the encrypted data before you run scans.