Quickstart: Create a Microsoft Purview (formerly Azure Purview) account using an ARM template
Important
You can only create one Microsoft Purview account per tenant. If your organization already has a Microsoft Purview account, you will not be able to create a new Microsoft Purview account unless your organization already had multiple accounts and is still under the the pre-existing quota. For more information, see the FAQ.
This quickstart describes the steps to deploy a Microsoft Purview (formerly Azure Purview) account using an Azure Resource Manager (ARM) template.
After you've created the account, you can begin registering your data sources and using the Microsoft Purview governance portal to understand and govern your data landscape. By connecting to data across your on-premises, multi-cloud, and software-as-a-service (SaaS) sources, the Microsoft Purview Data Map creates an up-to-date map of your information. It identifies and classifies sensitive data, and provides end-to-end data linage. Data consumers are able to discover data across your organization and data administrators are able to audit, secure, and ensure right use of your data.
For more information about the governance capabilities of Microsoft Purview, see our governance solutions overview page. For more information about deploying Microsoft Purview across your organization, see our deployment best practices
To deploy a Microsoft Purview account to your subscription using an ARM template, follow the guide below.
Prerequisites
If you don't have an Azure subscription, create a free subscription before you begin.
An Microsoft Entra tenant associated with your subscription.
The user account that you use to sign in to Azure must be a member of the contributor or owner role, or an administrator of the Azure subscription. To view the permissions that you have in the subscription, follow these steps:
- Go to the Azure portal
- Select your username in the upper-right corner.
- Select the ellipsis button ("...") for more options.
- Then select My permissions.
- If you have access to multiple subscriptions, select the appropriate subscription.
Sign in to Azure
Sign in to the Azure portal with your Azure account.
Deploy a custom template
If your environment meets the prerequisites and you're familiar with using ARM templates, select the Deploy to Azure button. The template will open in the Azure portal where you can customize values and deploy. The template will deploy a Microsoft Purview account into a new or existing resource group in your subscription.

Review the template
The template used in this quickstart is from Azure Quickstart Templates.
{
  "$schema": "https://schema.management.azure.com/schemas/2019-04-01/deploymentTemplate.json#",
  "contentVersion": "1.0.0.0",
  "metadata": {
    "_generator": {
      "name": "bicep",
      "version": "0.11.1.770",
      "templateHash": "10388724958841997784"
    }
  },
  "parameters": {
    "purviewName": {
      "type": "string",
      "defaultValue": "[format('azurePurview{0}', uniqueString(resourceGroup().id))]",
      "metadata": {
        "description": "Specify a name for the Azure Purview account."
      }
    },
    "location": {
      "type": "string",
      "defaultValue": "[resourceGroup().location]",
      "metadata": {
        "description": "Specify a region for resource deployment."
      }
    }
  },
  "resources": [
    {
      "type": "Microsoft.Purview/accounts",
      "apiVersion": "2021-12-01",
      "name": "[parameters('purviewName')]",
      "location": "[parameters('location')]",
      "sku": {
        "name": "Standard",
        "capacity": 1
      },
      "identity": {
        "type": "SystemAssigned"
      },
      "properties": {
        "publicNetworkAccess": "Enabled",
        "managedResourceGroupName": "[format('managed-rg-{0}', parameters('purviewName'))]"
      }
    }
  ]
}
The following resources are defined in the template:
The template performs the following tasks:
- Creates a Microsoft Purview account in a specified resource group.
Customize network settings for your account
When you're deploying your ARM template, you can also use the following settings in the template to manage your public network access settings:
- Enabled for all networks
"publicNetworkAccess": "Enabled", "managedResourcesPublicNetworkAccess": "Enabled" - Disabled for ingestion only (Preview)
"publicNetworkAccess": "Enabled", "managedResourcesPublicNetworkAccess": "Disabled" - Disabled from all networks
"publicNetworkAccess": "Disables", "managedResourcesPublicNetworkAccess": "Disabled"
For example:
"resources": [ { "type": "Microsoft.Purview/accounts", "apiVersion": "2021-12-01", "name": "[parameters('purviewName')]", "location": "[parameters('location')]", "sku": { "name": "Standard", "capacity": 1 }, "identity": { "type": "SystemAssigned" }, "properties": { "publicNetworkAccess": "Enabled", "managedResourcesPublicNetworkAccess": "Enabled" "managedResourceGroupName": "[format('managed-rg-{0}', parameters('purviewName'))]" } } ]
Open Microsoft Purview governance portal
After your Microsoft Purview account is created, you'll use the Microsoft Purview governance portal to access and manage it. There are two ways to open Microsoft Purview governance portal:
Open your Microsoft Purview account in the Azure portal. Select the "Open Microsoft Purview governance portal" tile on the overview page.
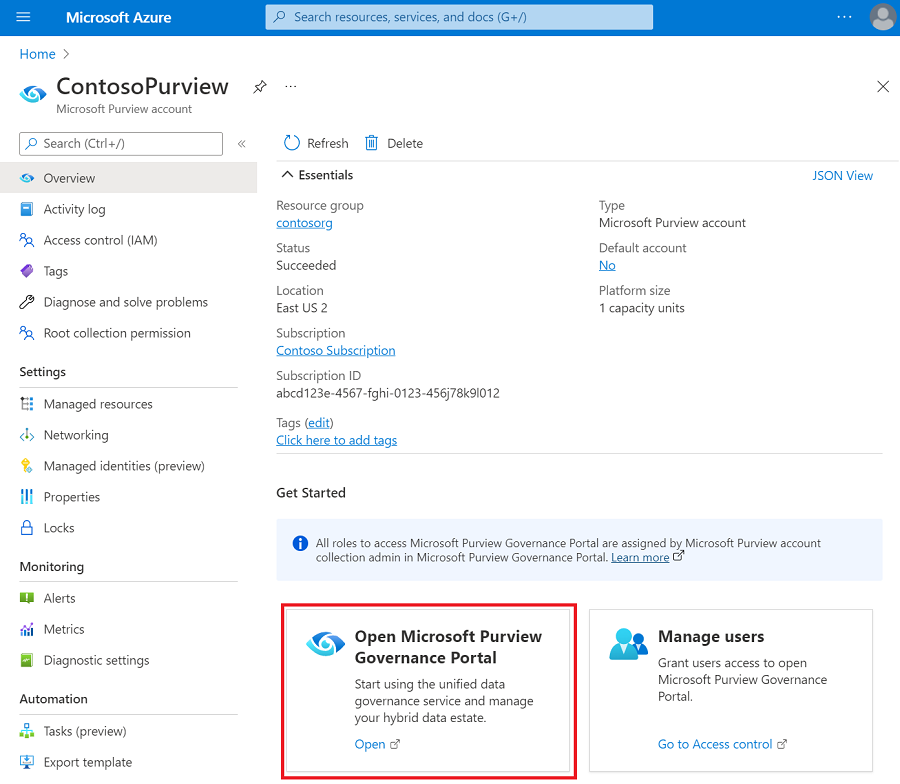
Alternatively, you can browse to https://web.purview.azure.com, select your Microsoft Purview account, and sign in to your workspace.
Get started with your Purview resource
After deployment, the first activities are usually:
At this time, these actions aren't able to be taken through an Azure Resource Manager template. Follow the guides above to get started!
Clean up resources
To clean up the resources deployed in this quickstart, delete the resource group, which deletes all resources in the group. You can delete the resources either through the Azure portal, or using the PowerShell script below.
$resourceGroupName = Read-Host -Prompt "Enter the resource group name"
Remove-AzResourceGroup -Name $resourceGroupName
Write-Host "Press [ENTER] to continue..."
Next steps
In this quickstart, you learned how to create a Microsoft Purview (formerly Azure Purview) account and how to access the Microsoft Purview governance portal.
Next, you can create a user-assigned managed identity (UAMI) that will enable your new Microsoft Purview account to authenticate directly with resources using Microsoft Entra authentication.
To create a UAMI, follow our guide to create a user-assigned managed identity.
Follow these next articles to learn how to navigate the Microsoft Purview governance portal, create a collection, and grant access to Microsoft Purview:
Feedback
Coming soon: Throughout 2024 we will be phasing out GitHub Issues as the feedback mechanism for content and replacing it with a new feedback system. For more information see: https://aka.ms/ContentUserFeedback.
Submit and view feedback for