Note
Access to this page requires authorization. You can try signing in or changing directories.
Access to this page requires authorization. You can try changing directories.
This article outlines how to register Snowflake, and how to authenticate and interact with Snowflake in Microsoft Purview. For more information about Microsoft Purview, read the introductory article.
Supported capabilities
Scanning capabilities
| Metadata Extraction | Full Scan | Incremental Scan | Scoped Scan |
|---|---|---|---|
| Yes | Yes | No | Yes |
When scanning Snowflake source, Microsoft Purview supports:
Extracting technical metadata including:
- Server
- Databases
- Schemas
- Tables including the columns, foreign keys, and unique constraints
- Views including the columns
- Stored procedures including the parameter dataset and result set
- Functions including the parameter dataset
- Pipes
- Stages
- Streams including the columns
- Tasks
- Sequences
Fetching static lineage on assets relationships among tables, views, streams, and stored procedures.
For stored procedures, you can choose the level of details to extract on scan settings. Stored procedure lineage is supported for Snowflake Scripting (SQL) and JavaScript languages, and generated based on the procedure definition.
When setting up scan, you can choose to scan one or more Snowflake databases entirely based on the given names or name patterns, or further scope the scan to a subset of schemas matching the given names or name patterns.
Other capabilities
For classifications, sensitivity labels, policies, data lineage, and live view, see the list of supported capabilities.
Known limitations
- When object is deleted from the data source, currently the subsequent scan won't automatically remove the corresponding asset in Microsoft Purview.
- Stored procedure lineage isn't supported for the following patterns:
- Stored procedure defined in Java, Python, and Scala languages.
- Stored procedure using SQL EXECUTE IMMEDIATE with static SQL query as variable.
Prerequisites
An Azure account with an active subscription. Create an account for free.
An active Microsoft Purview account.
You need Data Source Administrator and Data Reader permissions to register a source and manage it in the Microsoft Purview governance portal. For more information about permissions, see Access control in Microsoft Purview.
Choose the right integration runtime configuration for your scenario.
- To use Managed Virtual Network Integration Runtime to connect to Snowflake via private link, follow the steps in Connect to Snowflake via Managed Private Endpoint to set up the private endpoint.
- To use Self-hosted Integration Runtime for scan, set up the latest self-hosted integration runtime. For more information, see the create and configure a self-hosted integration runtime guide.
- Ensure JDK 11 is installed on the machine where the self-hosted integration runtime is installed. Restart the machine after you newly install the JDK for it to take effect.
- Ensure Visual C++ Redistributable (version Visual Studio 2012 Update 4 or newer) is installed on the self-hosted integration runtime machine. If you don't have this update installed, you can download it here.
Required permissions for scan
Microsoft Purview supports basic authentication (username and password) for scanning Snowflake. The default role of the given user will be used to perform the scan. The Snowflake user must have usage rights on a warehouse and the databases to be scanned, and read access to system tables in order to access advanced metadata.
Here's a sample walkthrough to create a user specifically for Microsoft Purview scan and set up the permissions. If you choose to use an existing user, make sure it has adequate rights to the warehouse and database objects.
Set up a
purview_readerrole. You need ACCOUNTADMIN rights to do this.USE ROLE ACCOUNTADMIN; --create role to allow read only access - this will later be assigned to the Microsoft Purview user CREATE OR REPLACE ROLE purview_reader; --make sysadmin the parent role GRANT ROLE purview_reader TO ROLE sysadmin;Create a warehouse for Microsoft Purview to use and grant rights.
--create warehouse - account admin required
CREATE OR REPLACE WAREHOUSE purview_wh WITH
    WAREHOUSE_SIZE = 'XSMALL'
    WAREHOUSE_TYPE = 'STANDARD'
    AUTO_SUSPEND = 300
    AUTO_RESUME = TRUE
    MIN_CLUSTER_COUNT = 1
    MAX_CLUSTER_COUNT = 2
    SCALING_POLICY = 'STANDARD';

--grant rights to the warehouse
GRANT USAGE ON WAREHOUSE purview_wh TO ROLE purview_reader;
Create a user
purviewfor Microsoft Purview scan.CREATE OR REPLACE USER purview PASSWORD = '<password>'; --note the default role will be used during scan ALTER USER purview SET DEFAULT_ROLE = purview_reader; --add user to purview_reader role GRANT ROLE purview_reader TO USER purview;Grant reader rights to the database objects.
GRANT USAGE ON DATABASE <your_database_name> TO purview_reader;

--grant reader access to all the database structures that purview can currently scan
GRANT USAGE ON ALL SCHEMAS IN DATABASE <your_database_name> TO role purview_reader;
GRANT USAGE ON ALL FUNCTIONS IN DATABASE <your_database_name> TO role purview_reader;
GRANT USAGE ON ALL PROCEDURES IN DATABASE <your_database_name> TO role purview_reader;
GRANT SELECT ON ALL TABLES IN DATABASE <your_database_name> TO role purview_reader;
GRANT SELECT ON ALL VIEWS IN DATABASE <your_database_name> TO role purview_reader;
GRANT USAGE, READ on ALL STAGES IN DATABASE <your_database_name> TO role purview_reader;

--grant reader access to any future objects that could be created
GRANT USAGE ON FUTURE SCHEMAS IN DATABASE <your_database_name> TO role purview_reader;
GRANT USAGE ON FUTURE FUNCTIONS IN DATABASE <your_database_name> TO role purview_reader;
GRANT USAGE ON FUTURE PROCEDURES IN DATABASE <your_database_name> TO role purview_reader;
GRANT SELECT ON FUTURE TABLES IN DATABASE <your_database_name> TO role purview_reader;
GRANT SELECT ON FUTURE VIEWS IN DATABASE <your_database_name> TO role purview_reader;
GRANT USAGE, READ ON FUTURE STAGES IN DATABASE <your_database_name> TO role purview_reader;
Register
This section describes how to register Snowflake in Microsoft Purview using the Microsoft Purview governance portal.
Steps to register
To register a new Snowflake source in Microsoft Purview Unified Catalog, follow these steps:
- Navigate to your Microsoft Purview account in the Microsoft Purview governance portal.
- Select Data Map on the left navigation.
- Select Register
- On Register sources, select Snowflake. Select Continue.
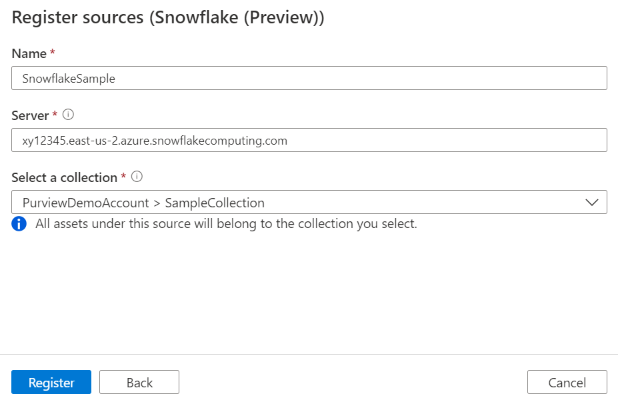
On the Register sources (Snowflake) screen, follow these steps:
Enter a Name that the data source will be listed within the Catalog.
Enter the server URL in the form of
<account_identifier>.snowflakecomputing.com, for example,orgname-accountname.snowflakecomputing.com. Learn more about Snowflake account identifier. Note this URL is used as part of the Snowflake assets' fully qualified name, and is the default endpoint for Microsoft Purview to connect to Snowflake during scan.Add additional hosts if applicable. Specify it when you want the scan operations to connect to a Snowflake endpoint other than the server URL. You can choose the host for connection during scan setup.
Tip
If you already scanned Snowflake but want to switch to use another endpoint, for example, from public endpoint to private endpoint, you can add another host in data source and choose that host for connection in scan to ensure Microsoft Purview generate the assets with the same fully qualified name as previous.
When registering a data source, Microsoft Purview performs uniqueness check that the server URL and other hosts doesn't overlap with any existing sources.
Select a collection from the list.
Finish to register the data source.
Scan
Follow the steps below to scan Snowflake to automatically identify assets. For more information about scanning in general, see our introduction to scans and ingestion.
Authentication for a scan
The supported authentication type for a Snowflake source is Basic authentication.
Create and run scan
To create and run a new scan, follow these steps:
In the Microsoft Purview governance portal, navigate to Sources.
Select the registered Snowflake source.
Select + New scan.
Provide the below details:
Name: The name of the scan
Connect via integration runtime: Select the Azure autoresolved integration runtime, Managed Virtual Network IR or SHIR according to your scenario. Learn more from Choose the right integration runtime configuration for your scenario. To use Managed Virtual Network IR to connect to Snowflake via private link, follow the steps in Connect to Snowflake via Managed Private Endpoint to set up the private endpoint first.
Host for connection: Choose the endpoint used to establish connection to Snowflake during scan. You can choose from the server URL or the other hosts that you configured in data source.
Credential: Select the credential to connect to your data source. Make sure to:
- Select Basic Authentication while creating a credential.
- Provide the user name used to connect to Snowflake in the User name input field.
- Store the user password used to connect to Snowflake in the secret key.
Warehouse: Specify the name of the warehouse instance used to empower scan in capital case. The default role assigned to the user specified in the credential must have USAGE rights on this warehouse.
Databases: Specify one or more database instance names to import in capital case. Separate the names in the list with a semi-colon (;). For example,
DB1;DB2. The default role assigned to the user specified in the credential must have adequate rights on the database objects.Note
Classification is not applied to tables when more than one database instance names are specified.
Acceptable database name patterns can be static names or contain wildcard %. For example:
A%;%B;%C%;D:- Start with A or
- End with B or
- Contain C or
- Equal D
Schema: List subset of schemas to import expressed as a semicolon separated list. For example,
schema1;schema2. All user schemas are imported if that list is empty. All system schemas and objects are ignored by default.Acceptable schema name patterns using can be static names or contain wildcard %. For example:
A%;%B;%C%;D:- Start with A or
- End with B or
- Contain C or
- Equal D
Usage of NOT and special characters aren't acceptable.
Stored procedure details: Controls the number of details imported from stored procedures:
- Signature (default): The name and parameters of stored procedures.
- Code, signature: The name, parameters, and code of stored procedures.
- Lineage, code, signature: The name, parameters and code of stored procedures, and the data lineage derived from the code.
- None: Stored procedure details aren't included.
Note
If you use Self-hosted Integration Runtime for scan, customized setting other than the default Signature is supported since version 5.30.8541.1. The earlier versions always extract the name and parameters of stored procedures.
Maximum memory available (applicable when using self-hosted integration runtime): Maximum memory (in GB) available on customer's VM to be used by scanning processes. It's dependent on the size of Snowflake source to be scanned.
Note
As a rule of thumb, please provide 1GB memory for every 1000 tables.
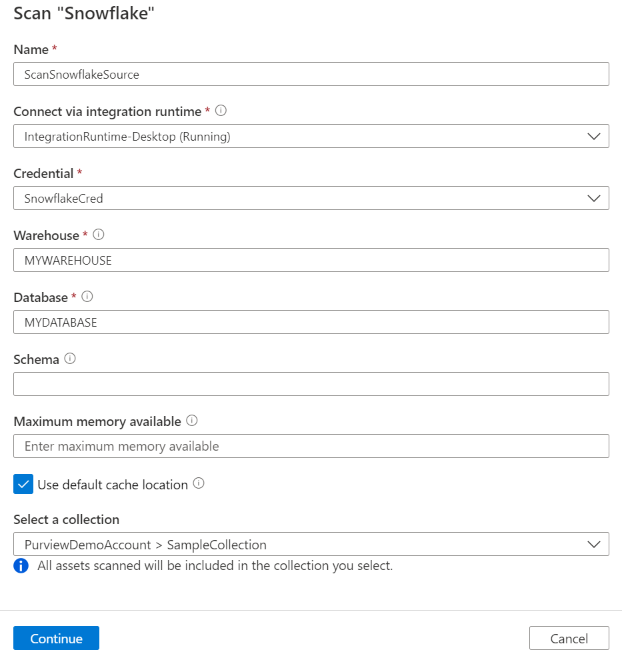
Select Test connection to validate the settings (available when using Azure Integration Runtime).
Select Continue.
Select a scan rule set for classification. You can choose between the system default, existing custom rule sets, or create a new rule set inline. Check the Classification article to learn more.
Note
Classification won't be applied to tables or views when the table name, view name, schema name, or database name contain special characters.
Note
If you are using self-hosted runtime, you'll need to upgrade to version 5.26.404.1 or higher to use Snowflake classification. You can find the latest version of Microsoft Integration runtime here.
Choose your scan trigger. You can set up a schedule or ran the scan once.
Review your scan and select Save and Run.
View your scans and scan runs
To view existing scans:
- Go to the Microsoft Purview portal. On the left pane, select Data map.
- Select the data source. You can view a list of existing scans on that data source under Recent scans, or you can view all scans on the Scans tab.
- Select the scan that has results you want to view. The pane shows you all the previous scan runs, along with the status and metrics for each scan run.
- Select the run ID to check the scan run details.
Manage your scans
To edit, cancel, or delete a scan:
Go to the Microsoft Purview portal. On the left pane, select Data Map.
Select the data source. You can view a list of existing scans on that data source under Recent scans, or you can view all scans on the Scans tab.
Select the scan that you want to manage. You can then:
- Edit the scan by selecting Edit scan.
- Cancel an in-progress scan by selecting Cancel scan run.
- Delete your scan by selecting Delete scan.
Note
- Deleting your scan does not delete catalog assets created from previous scans.
Lineage
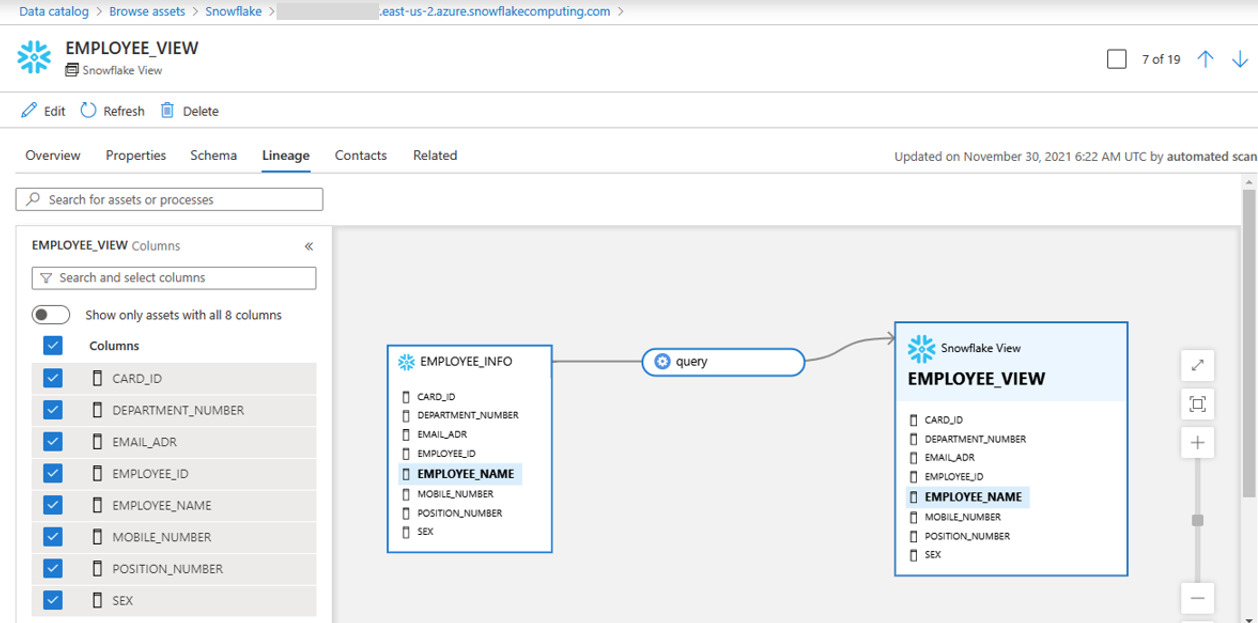
After scanning your Snowflake source, you can browse Unified Catalog or search Unified Catalog to view the asset details.
Go to the asset -> lineage tab, you can see the asset relationship when applicable. Refer to the supported capabilities section on the supported Snowflake lineage scenarios. For more information about lineage in general, see data lineage and lineage user guide.
Note
If a view was created by tables from different databases or different schemas, scan all databases and schemas simultaneously using the names in the semicolon (;) list.
Connect to Snowflake via Managed Private Endpoint
This section describes the required steps to set up a Managed Private Endpoint (PE) from Microsoft Purview to Snowflake on Azure. Learn more about Azure Private Link and Snowflake.
In your Snowflake account, retrieve the target endpoints and resource ID. Run the system function SYSTEM$GET_PRIVATELINK_CONFIG() with Account Admin role, and note down the values of the following properties:
- privatelink-pls-id
- privatelink-account-url
- regionless-privatelink-account-url
- privatelink_ocsp-url
use role accountadmin;
select key, value::varchar from table(flatten(input=>parse_json(SYSTEM$GET_PRIVATELINK_CONFIG())));
In Microsoft Purview, create a managed private endpoint to Snowflake.
- Follow the steps to Create a Managed Virtual Network Integration Runtime. If you already have one, make sure it's in version 2 which supports Snowflake PE.
- Create a managed private endpoint for Snowflake. Navigate to Managed private endpoint -> + New -> Snowflake, and fill in the following information.
- Resource ID or alias: Fill in the value of privatelink-pls-id you retrieved.
- Fully qualified domain names: Add the privatelink_ocsp-url, regionless-privatelink-account-url and privatelink-account-url.

After creating the PE, you can see its provisioning state as Succeeded and approval state as Pending. Open the PE and find the Managed private endpoint resource ID in details page.
Contact Snowflake Technical Support and provide the resource ID to let Snowflake approve this PE.
Once Snowflake Support confirms the PE is approved, you should see your managed private endpoint approval state as Approved in Microsoft Purview.
Register the data source and set up a scan. When setting up scan, choose the Managed Virtual Network IR associated with the Snowflake PE.
Troubleshooting tips
- Check your account identifier in the source registration step. Don't include
https://part at the front. - Make sure the warehouse name and database name are in capital case on the scan setup page.
- Check your key vault. Make sure there are no typos in the password.
- Check the credential you set up in Microsoft Purview. The user you specify must have a default role with the necessary access rights to both the warehouse and the database you're trying to scan. See Required permissions for scan. USE
DESCRIBE USER;to verify the default role of the user you've specified for Microsoft Purview. - Use Query History in Snowflake to see if any activity is coming across.
- If there's a problem with the account identifer or password, you won't see any activity.
- If there's a problem with the default role, you should at least see a
USE WAREHOUSE . . .statement. - You can use the QUERY_HISTORY_BY_USER table function to identify what role is being used by the connection. Setting up a dedicated Microsoft Purview user makes troubleshooting easier.
Next steps
Now that you've registered your source, follow the below guides to learn more about Microsoft Purview and your data.