Tutorial: Access provisioning by data owner to Azure Storage datasets (preview)
Important
This feature is currently in preview. The Supplemental Terms of Use for Microsoft Azure Previews include additional legal terms that apply to Azure features that are in beta, in preview, or otherwise not yet released into general availability.
Policies in Microsoft Purview allow you to enable access to data sources that have been registered to a collection. This tutorial describes how a data owner can use Microsoft Purview to enable access to datasets in Azure Storage through Microsoft Purview.
In this tutorial, you learn how to:
- Prepare your Azure environment
- Configure permissions to allow Microsoft Purview to connect to your resources
- Register your Azure Storage resource for Data Policy Enforcement
- Create and publish a policy for your resource group or subscription
Prerequisites
An Azure account with an active subscription. Create an account for free.
A new or existing Microsoft Purview account. Follow this quickstart guide to create one.
Region support
- All Microsoft Purview regions are supported.
- Storage accounts in the following regions are supported without the need for additional configuration. However, zone-redundant storage (ZRS) accounts are not supported.
- Australia Central
- Australia East
- Australia Southeast
- Brazil South
- Canada Central
- Canada East
- Central India
- Central US
- East Asia
- East US 2
- East US
- France Central
- Germany West Central
- Japan East
- Japan West
- Korea Central
- North Central US
- North Europe
- Norway East
- Poland Central
- Qatar Central
- South Central US
- South Africa North
- Southeast Asia
- South India
- Sweden Central
- Switzerland North
- West Central US
- West Europe
- West US
- West US 2
- West US 3
- UAE North
- UK South
- UK West
- Storage accounts in other regions in Public Cloud are supported after setting feature flag AllowPurviewPolicyEnforcement, as outlined in the next section. Newly created ZRS Storage accounts are supported, if created after setting the feature flag AllowPurviewPolicyEnforcement.
If needed, you can create a new Storage account by following this guide.
Configure the subscription where the Azure Storage account resides for policies from Microsoft Purview
This step is only necessary in certain regions (see prior section). To enable Microsoft Purview to manage policies for one or more Azure Storage accounts, execute the following PowerShell commands in the subscription where you'll deploy your Azure Storage account. These PowerShell commands will enable Microsoft Purview to manage policies on all Azure Storage accounts in that subscription.
If you’re executing these commands locally, be sure to run PowerShell as an administrator. Alternatively, you can use the Azure Cloud Shell in the Azure portal: https://shell.azure.com.
# Install the Az module
Install-Module -Name Az -Scope CurrentUser -Repository PSGallery -Force
# Login into the subscription
Connect-AzAccount -Subscription <SubscriptionID>
# Register the feature
Register-AzProviderFeature -FeatureName AllowPurviewPolicyEnforcement -ProviderNamespace Microsoft.Storage
If the output of the last command shows RegistrationState as Registered, then your subscription is enabled for access policies. If the output is Registering, wait at least 10 minutes, and then retry the command. Do not continue unless the RegistrationState shows as Registered.
Configuration
Register the data source in Microsoft Purview
Before a policy can be created in Microsoft Purview for a data resource, you must register that data resource in Microsoft Purview Studio. You will find the instructions related to registering the data resource later in this guide.
Note
Microsoft Purview policies rely on the data resource ARM path. If a data resource is moved to a new resource group or subscription it will need to be de-registered and then registered again in Microsoft Purview.
Configure permissions to enable Data policy enforcement on the data source
Once a resource is registered, but before a policy can be created in Microsoft Purview for that resource, you must configure permissions. A set of permissions are needed to enable the Data policy enforcement. This applies to data sources, resource groups, or subscriptions. To enable Data policy enforcement, you must have both specific Identity and Access Management (IAM) privileges on the resource as well as specific Microsoft Purview privileges:
You must have either one of the following IAM role combinations on the resource's Azure Resource Manager path or any parent of it (that is, using IAM permission inheritance):
- IAM Owner
- Both IAM Contributor and IAM User Access Administrator
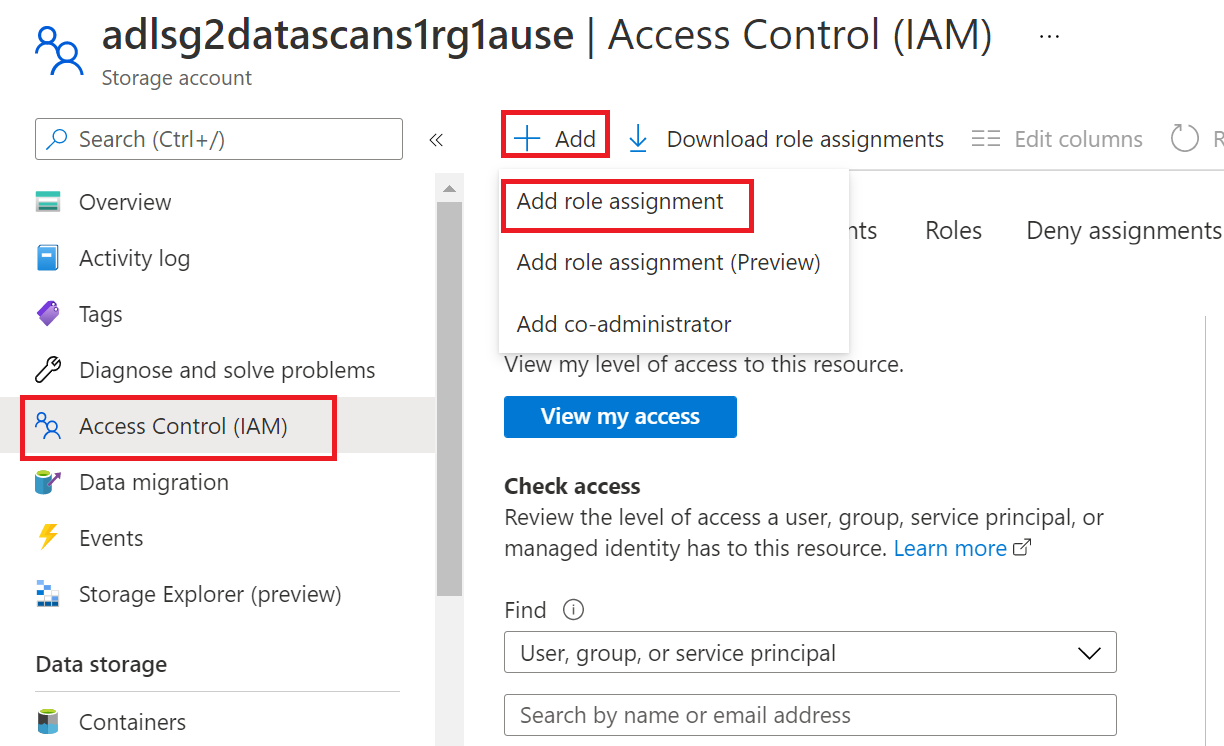
To configure Azure role-based access control (RBAC) permissions, follow this guide. The following screenshot shows how to access the Access Control section in the Azure portal for the data resource to add a role assignment.
Note
The IAM Owner role for a data resource can be inherited from a parent resource group, a subscription, or a subscription management group. Check which Microsoft Entra users, groups, and service principals hold or are inheriting the IAM Owner role for the resource.
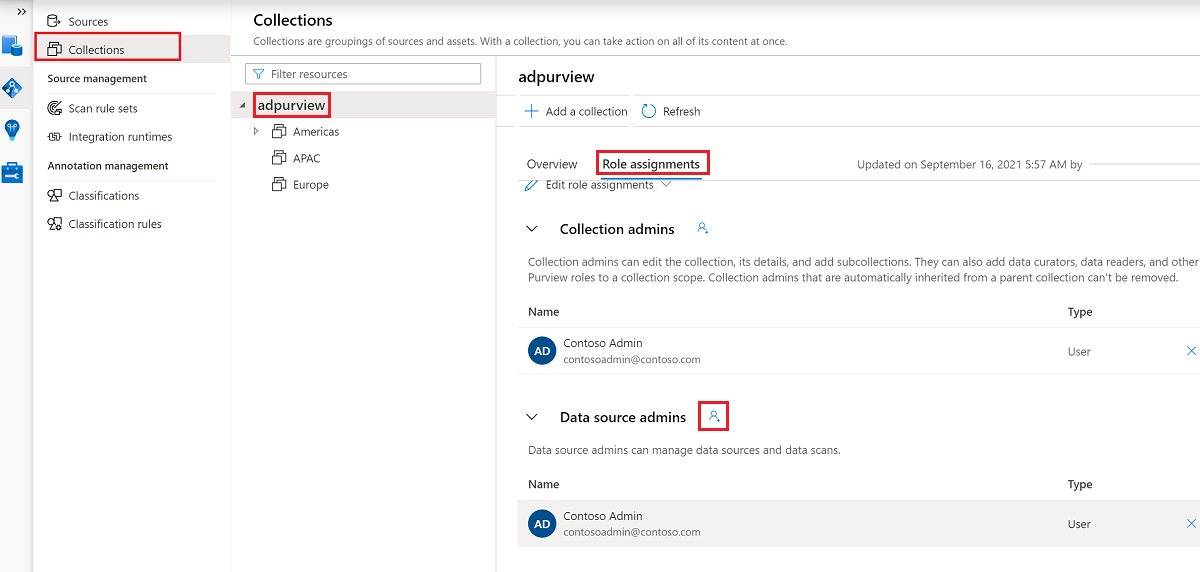
You also need to have the Microsoft Purview Data source admin role for the collection or a parent collection (if inheritance is enabled). For more information, see the guide on managing Microsoft Purview role assignments.
The following screenshot shows how to assign the Data source admin role at the root collection level.


Configure Microsoft Purview permissions to create, update, or delete access policies
To create, update or delete policies, you need to get the Policy author role in Microsoft Purview at root collection level:
- The Policy author role can create, update, and delete DevOps and Data Owner policies.
- The Policy author role can delete self-service access policies.
For more information about managing Microsoft Purview role assignments, see Create and manage collections in the Microsoft Purview Data Map.
Note
Policy author role must be configured at the root collection level.
In addition, to easily search Microsoft Entra users or groups when creating or updating the subject of a policy, you can greatly benefit from getting the Directory Readers permission in Microsoft Entra ID. This is a common permission for users in an Azure tenant. Without the Directory Reader permission, the Policy Author will have to type the complete username or email for all the principals included in the subject of a data policy.
Configure Microsoft Purview permissions for publishing Data Owner policies
Data Owner policies allow for checks and balances if you assign the Microsoft Purview Policy author and Data source admin roles to different people in the organization. Before a Data owner policy takes effect, a second person (Data source admin) must review it and explicitly approve it by publishing it. This does not apply to DevOps or Self-service access policies as publishing is automatic for them when those policies are created or updated.
To publish a Data owner policy you need to get the Data source admin role in Microsoft Purview at root collection level.
For more information about managing Microsoft Purview role assignments, see Create and manage collections in the Microsoft Purview Data Map.
Note
To publish Data owner policies, the Data source admin role must be configured at the root collection level.
Delegate access provisioning responsibility to roles in Microsoft Purview
After a resource has been enabled for Data policy enforcement, any Microsoft Purview user with the Policy author role at the root collection level can provision access to that data source from Microsoft Purview.
Note
Any Microsoft Purview root Collection admin can assign new users to root Policy author roles. Any Collection admin can assign new users to a Data source admin role under the collection. Minimize and carefully vet the users who hold Microsoft Purview Collection admin, Data source admin, or Policy author roles.
If a Microsoft Purview account with published policies is deleted, such policies will stop being enforced within an amount of time that depends on the specific data source. This change can have implications on both security and data access availability. The Contributor and Owner roles in IAM can delete Microsoft Purview accounts. You can check these permissions by going to the Access control (IAM) section for your Microsoft Purview account and selecting Role Assignments. You can also use a lock to prevent the Microsoft Purview account from being deleted through Resource Manager locks.
Register the data sources in Microsoft Purview for Data Policy Enforcement
Your Azure Storage account needs to be registered in Microsoft Purview to later define access policies, and during registration we'll enable Data Policy Enforcement. Data Policy Enforcement is an available feature in Microsoft Purview that allows users to manage access to a resource from within Microsoft Purview. This allows you to centralize data discovery and access management, however it's a feature that directly impacts your data security.
Warning
Before enabling Data Policy Enforcement for any of your resources, read through our Data Policy Enforcement article.
This article includes Data Policy Enforcement best practices to help you ensure that your information is secure.
To register your resource and enable Data Policy Enforcement, follow these steps:
Note
You need to be an owner of the subscription or resource group to be able to add a managed identity on an Azure resource.
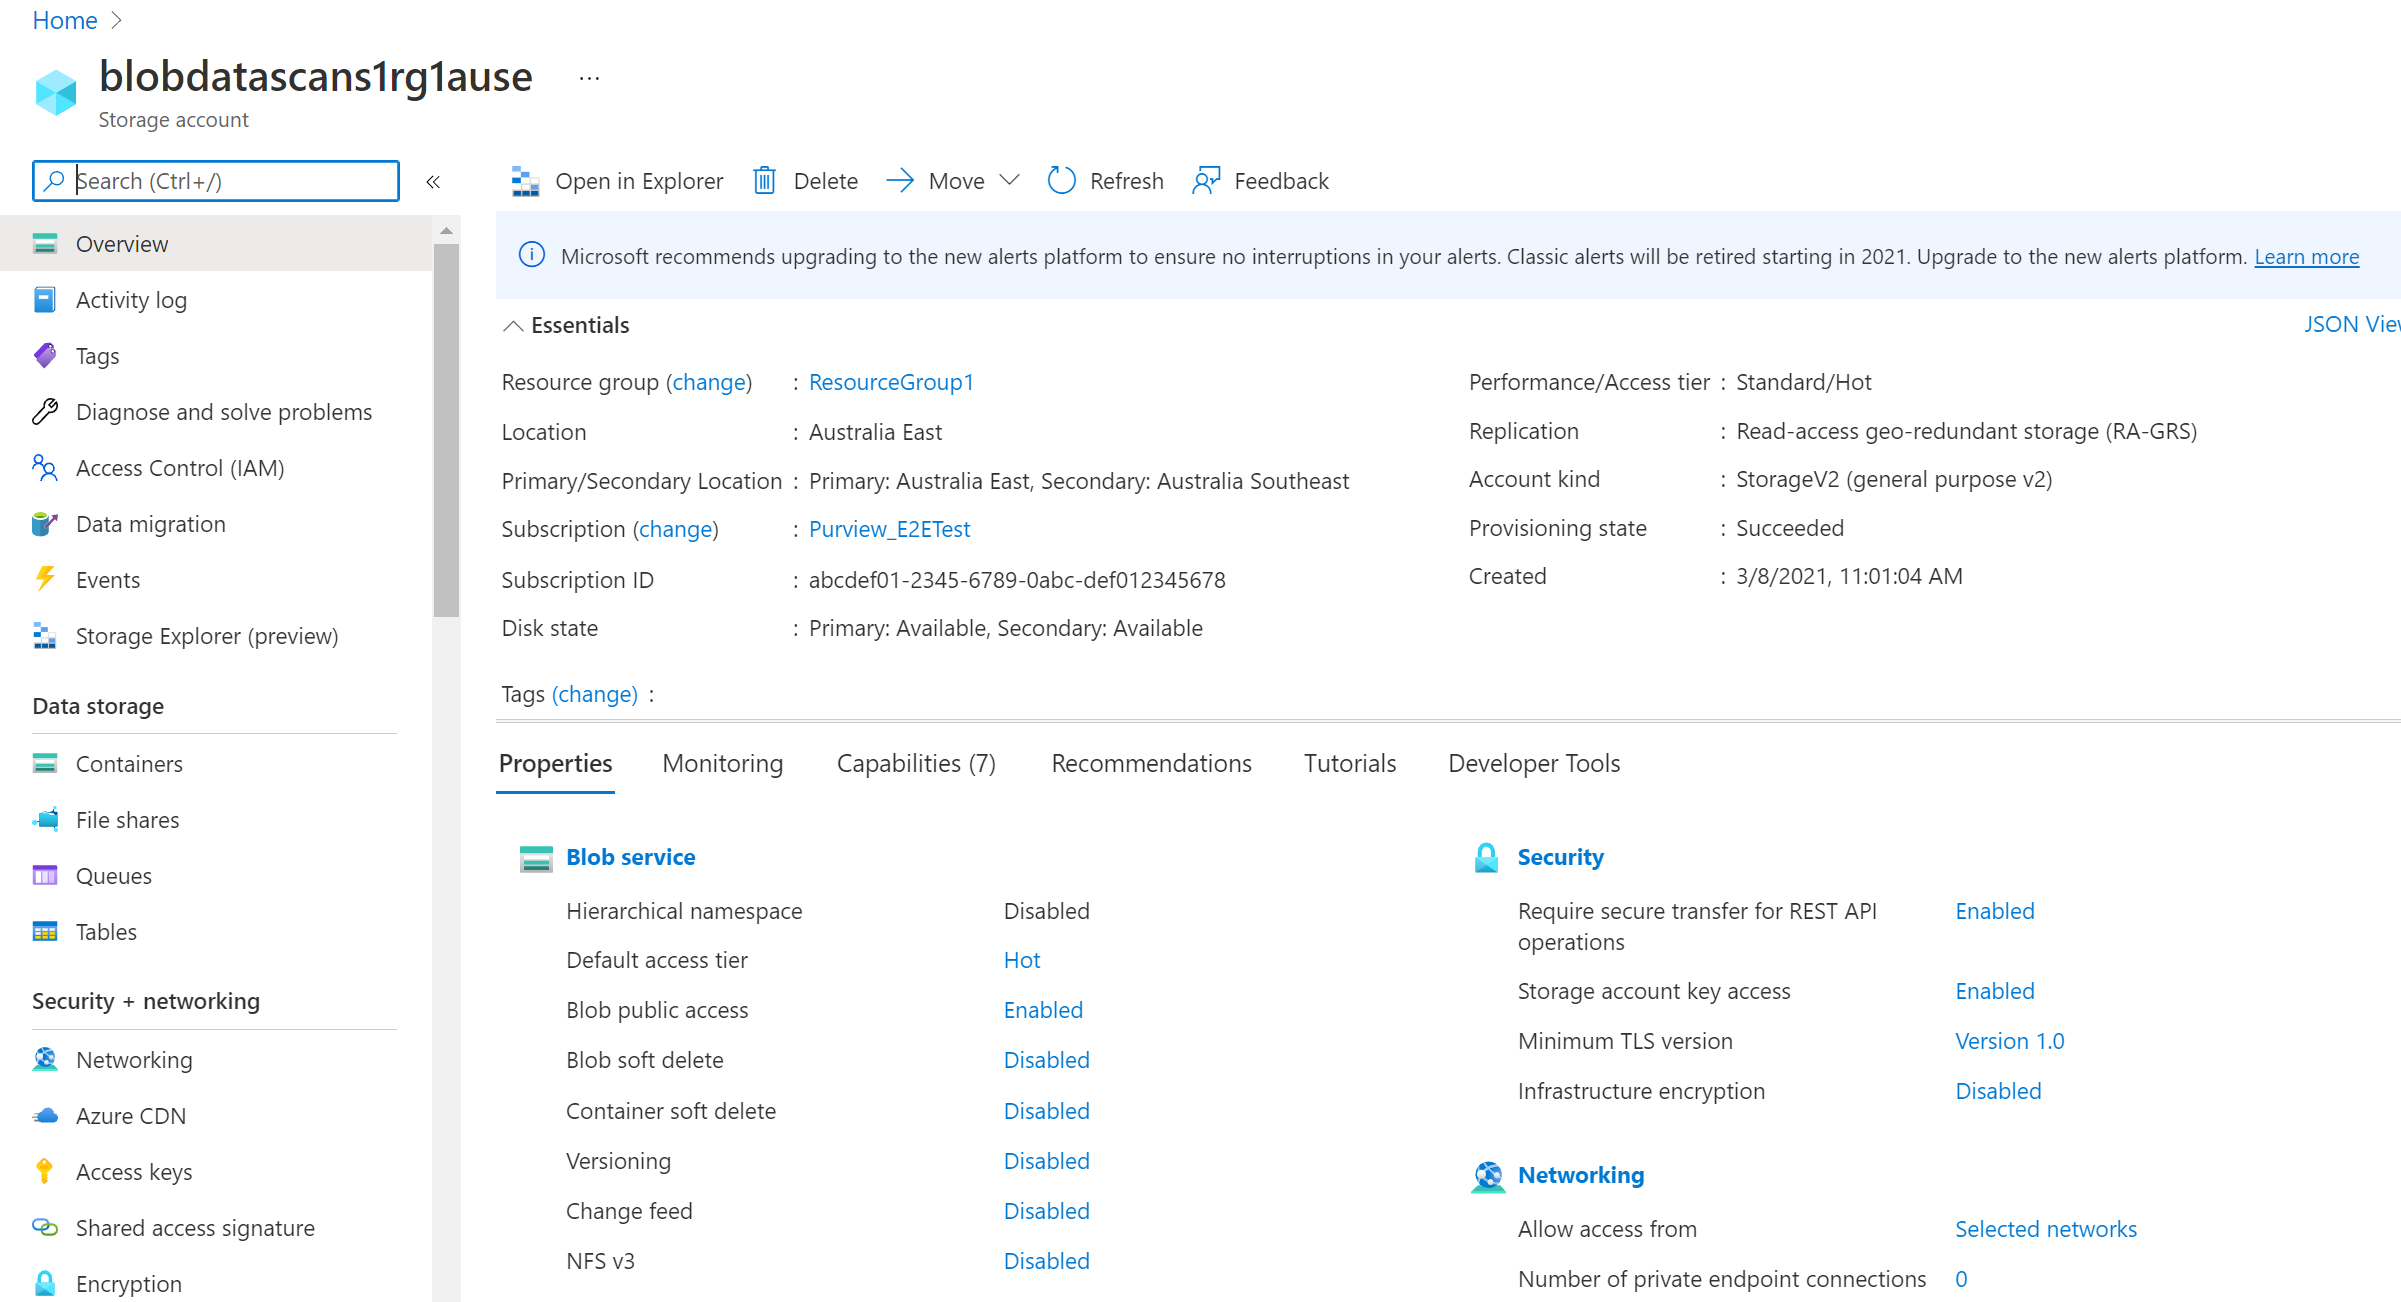
From the Azure portal, find the Azure Blob storage account that you would like to register.
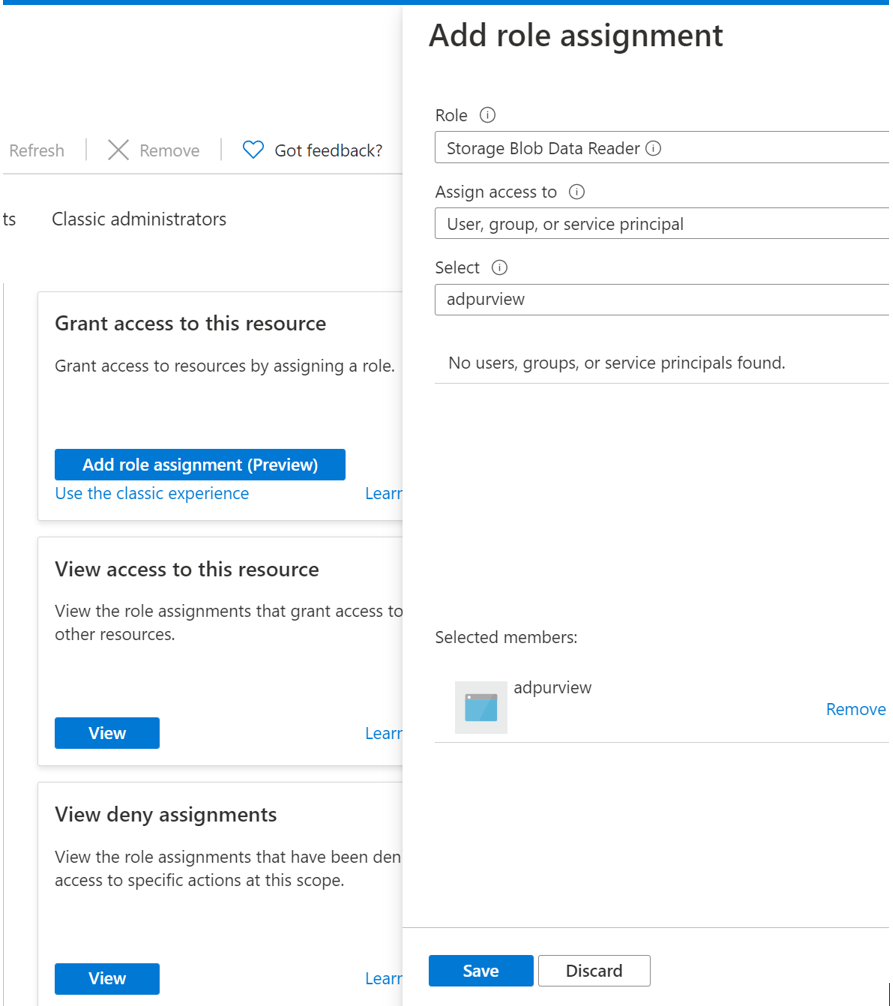
Select Access Control (IAM) in the left navigation and then select + Add --> Add role assignment.
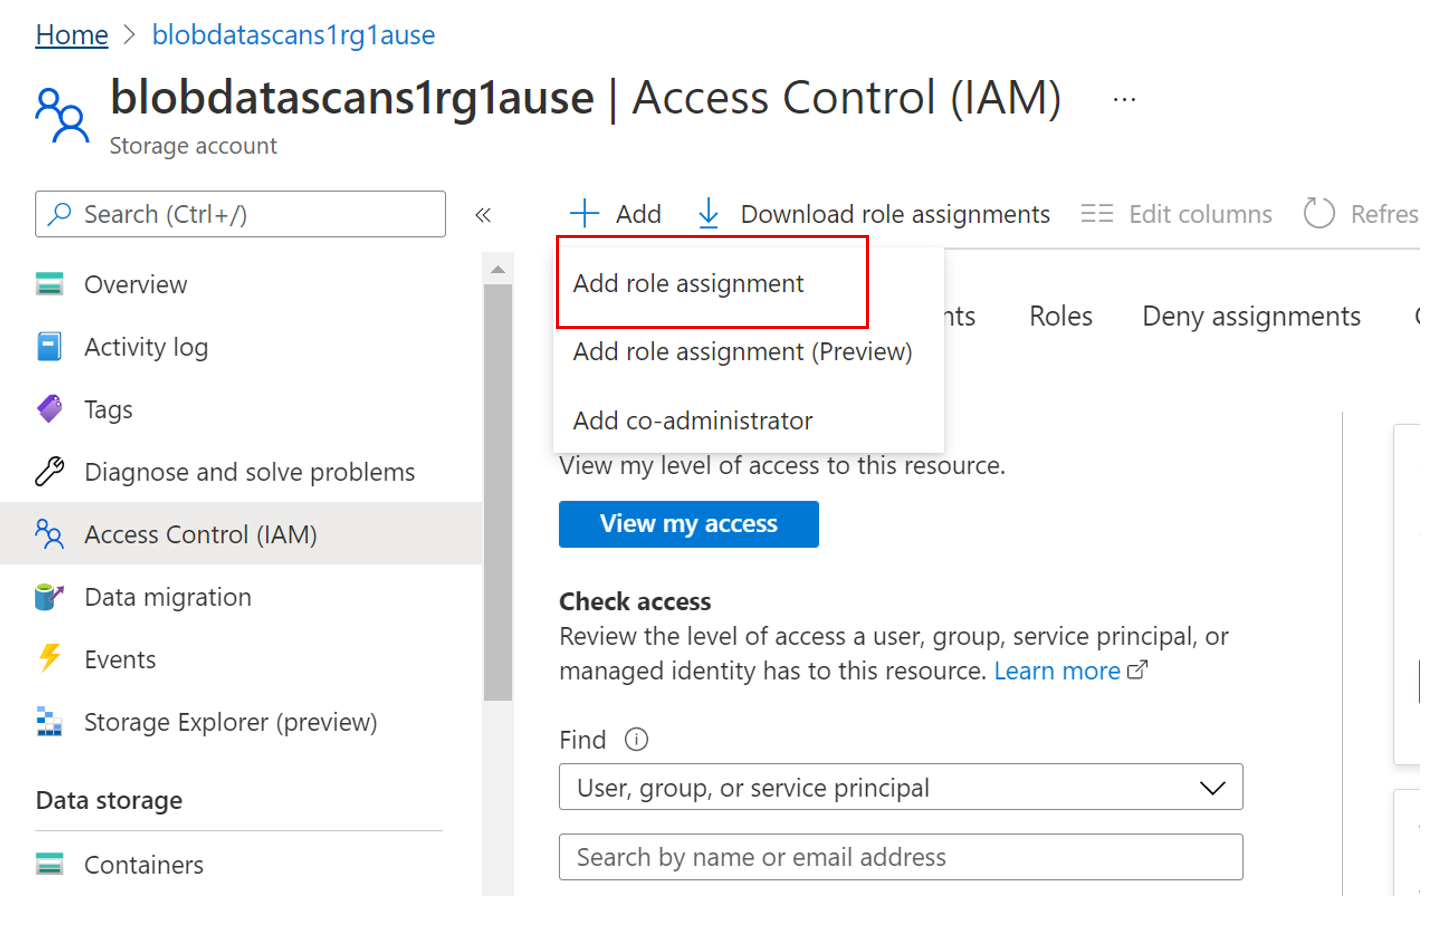
Set the Role to Storage Blob Data Reader and enter your Microsoft Purview account name under the Select input box. Then, select Save to give this role assignment to your Microsoft Purview account.
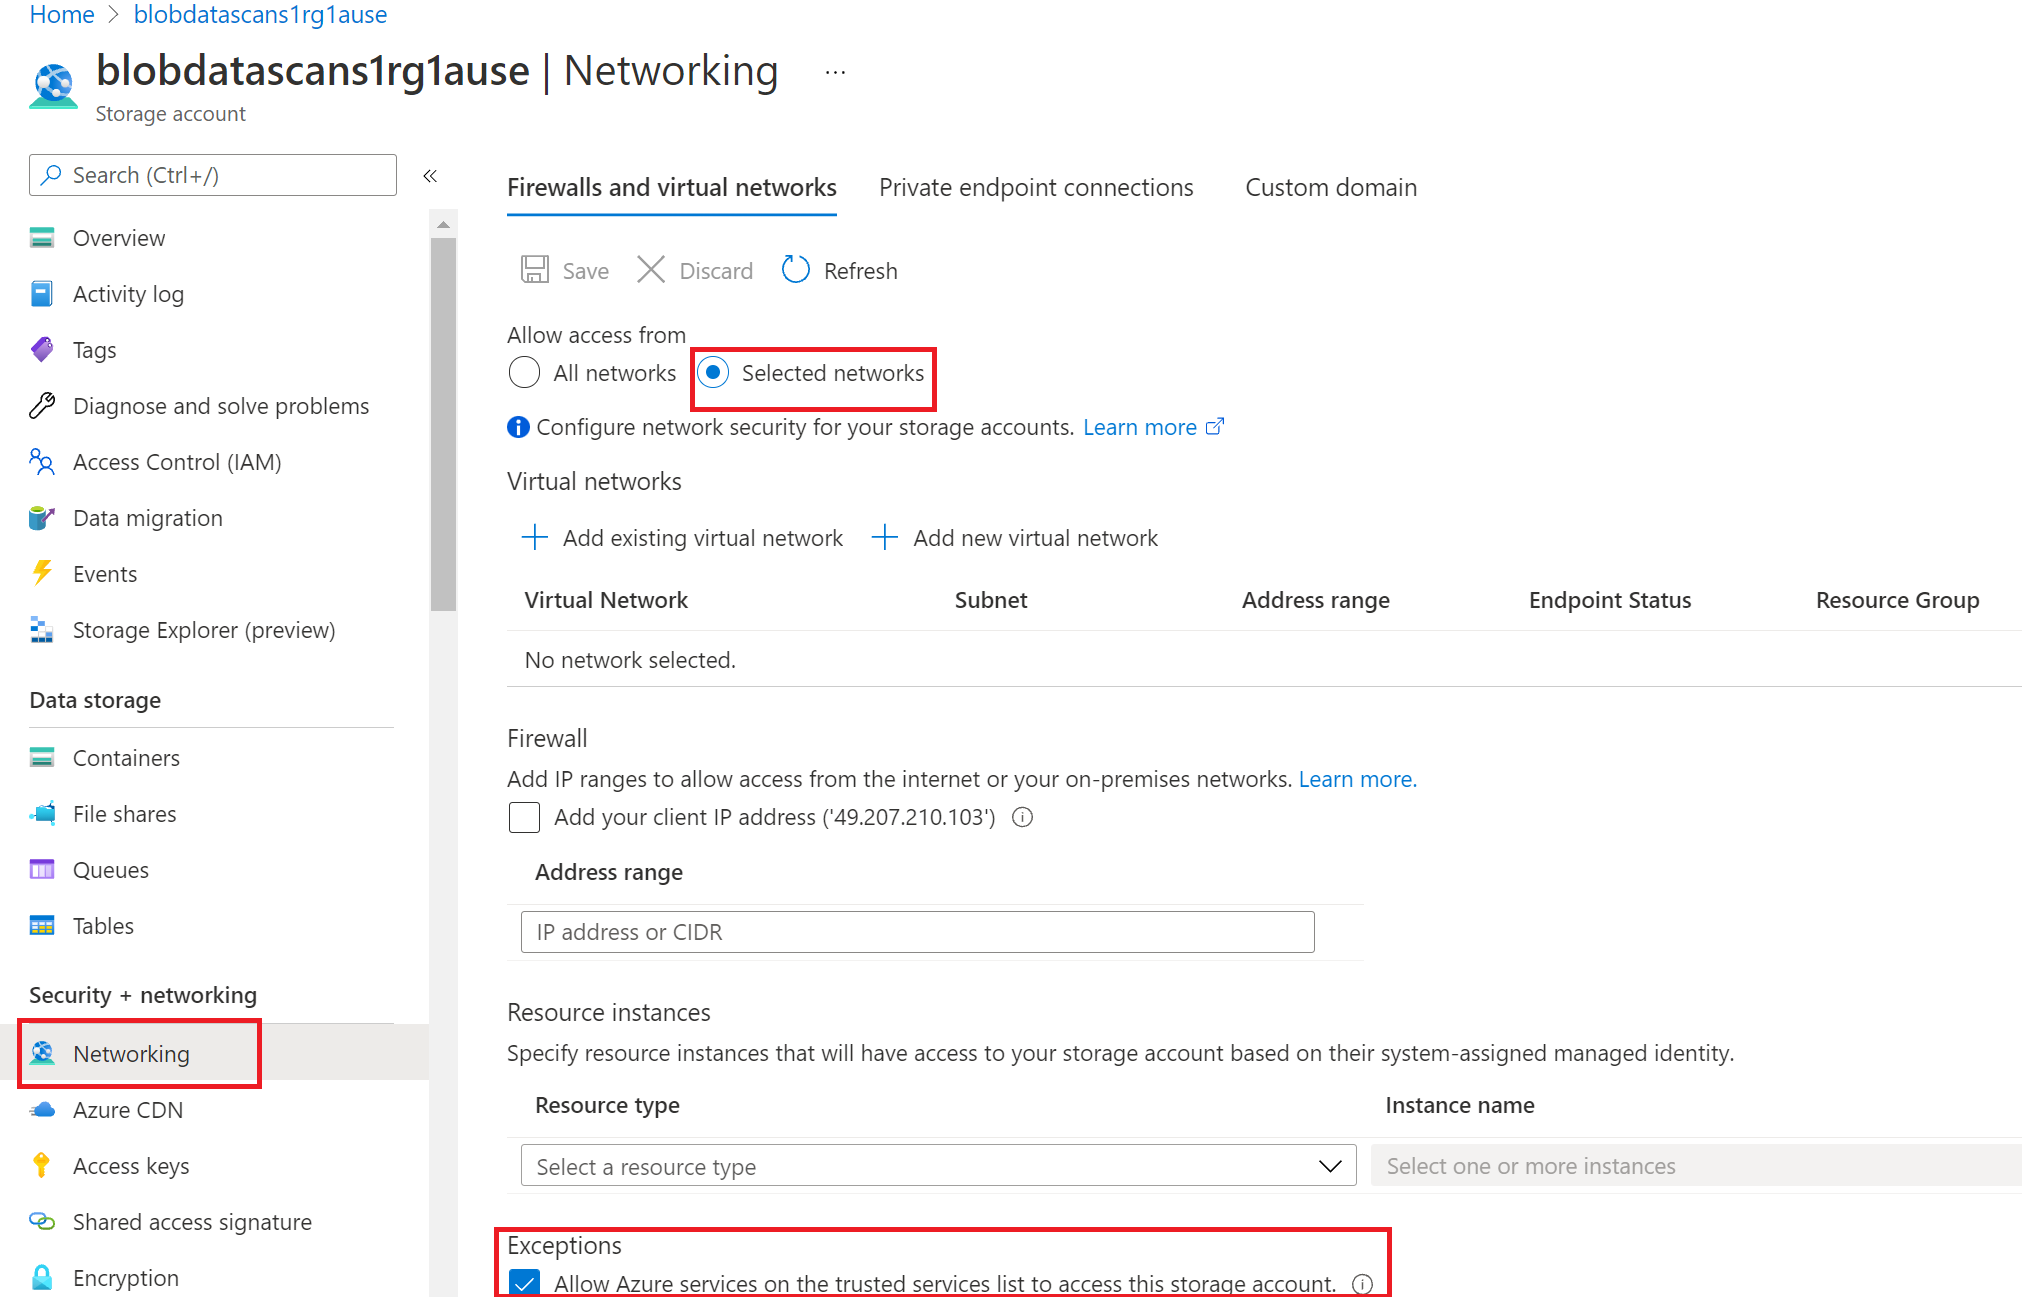
If you have a firewall enabled on your Storage account, follow these steps as well:
Go into your Azure Storage account in Azure portal.
Navigate to Security + networking > Networking.
Choose Selected Networks under Allow access from.
In the Exceptions section, select Allow trusted Microsoft services to access this storage account and select Save.
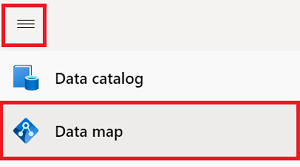
Once you have set up authentication for your storage account, go to the Microsoft Purview governance portal.
Select Data Map on the left menu.
Select Register.
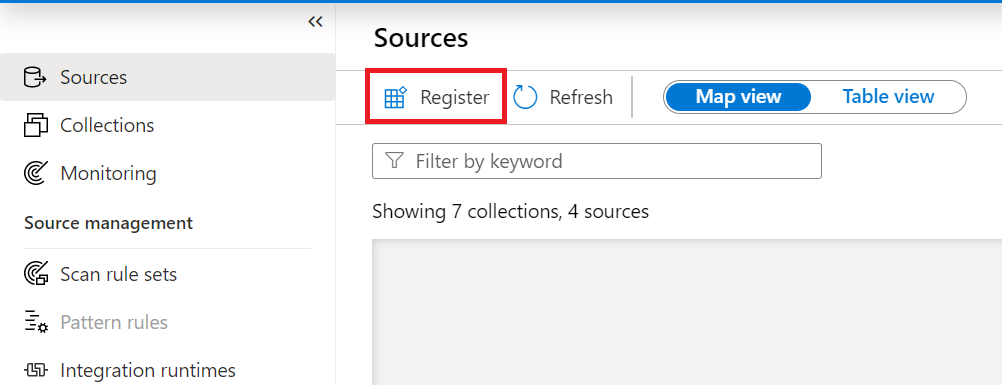
On Register sources, select Azure Blob Storage.
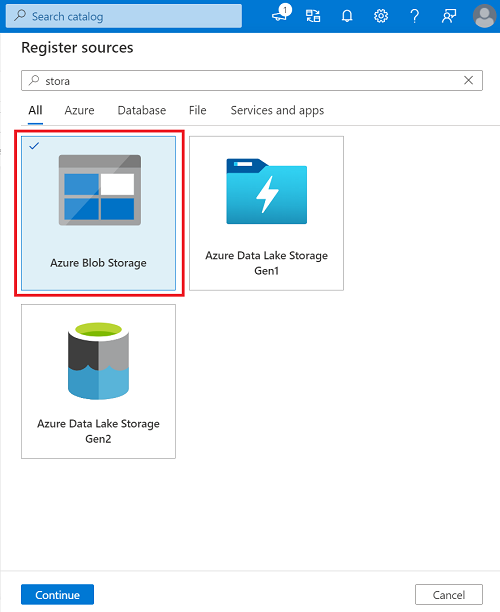
Select Continue.
On the Register sources (Azure) screen, do the following:
In the Name box, enter a friendly name that the data source will be listed with in the catalog.
In the Subscription dropdown list boxes, select the subscription where your storage account is housed. Then select your storage account under Storage account name. In Select a collection select the collection where you'd like to register your Azure Storage account.

In the Select a collection box, select a collection or create a new one (optional).
Set the Data Policy Enforcement toggle to Enabled, as shown in the image below.
Tip
If the Data Policy Enforcement toggle is greyed out and unable to be selected:
- Confirm you have followed all prerequisites to enable Data Policy Enforcement across your resources.
- Confirm that you have selected a storage account to be registered.
- It may be that this resource is already registered in another Microsoft Purview account. Hover over it to know the name of the Microsoft Purview account that has registered the data resource.first. Only one Microsoft Purview account can register a resource for Data Policy Enforcement at at time.
Select Register to register the resource group or subscription with Microsoft Purview with Data Policy Enforcement enabled.


Tip
For more information about Data Policy Enforcement, including best practices or known issues, see our Data Policy Enforcement article.
Create a data owner policy
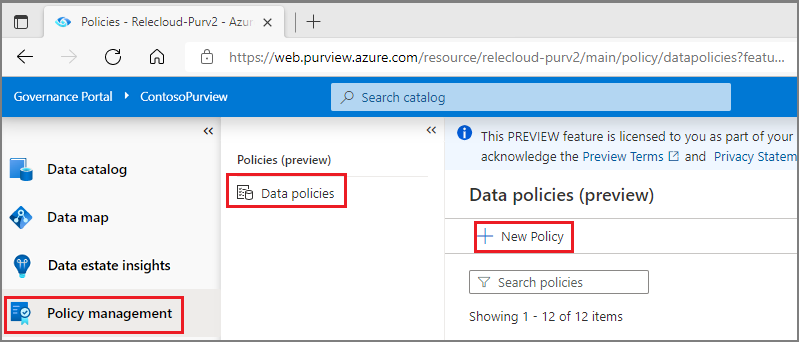
Sign in to the Microsoft Purview governance portal.
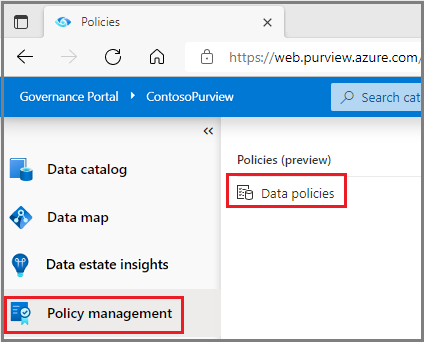
Navigate to the Data policy feature using the left side panel. Then select Data policies.
Select the New Policy button in the policy page.
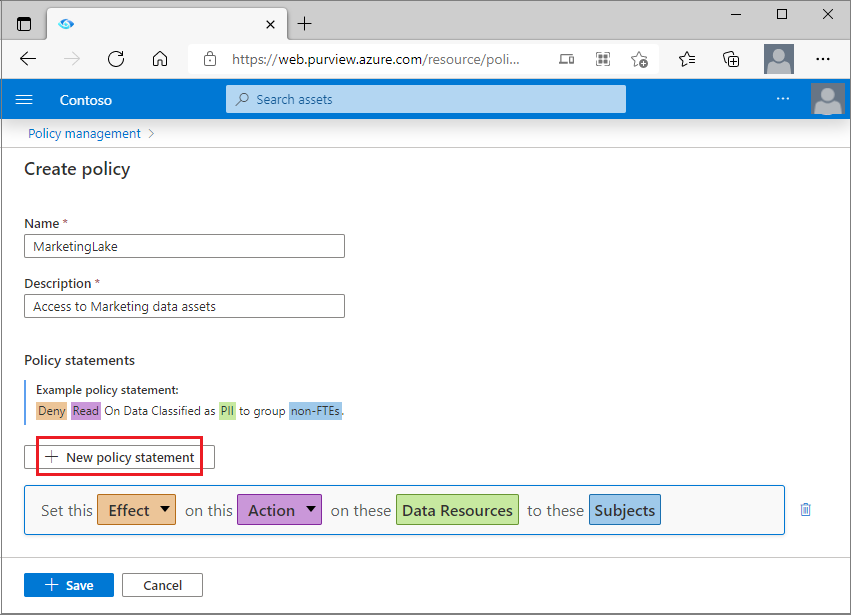
The new policy page will appear. Enter the policy Name and Description.
To add a policy statement to the new policy, select the New policy statement button. This will bring up the policy statement builder.
Select the Effect button and choose Allow from the drop-down list.
Select the Action button and choose Read or Modify from the drop-down list.
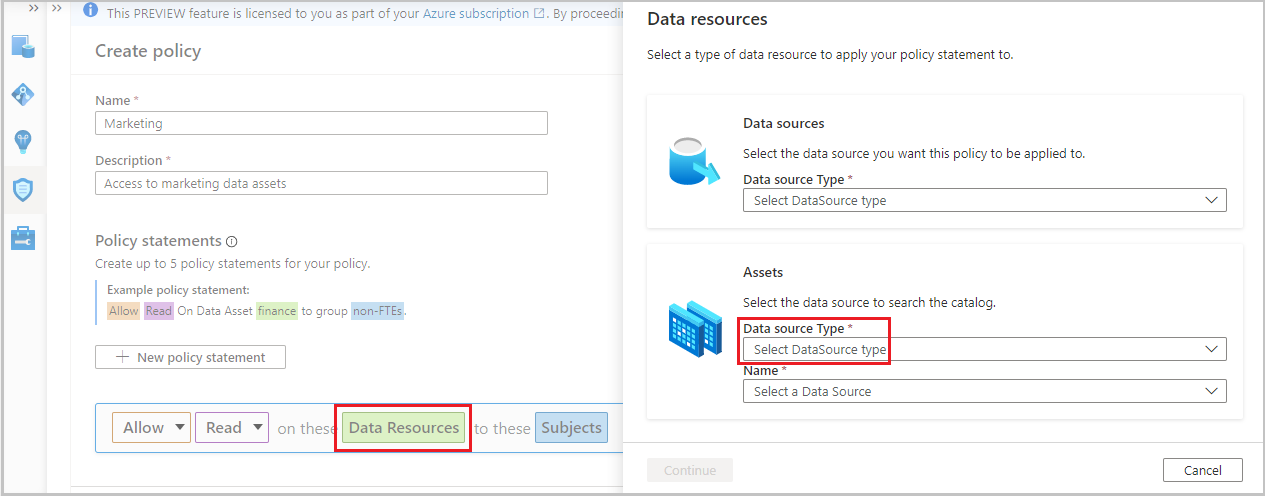
Select the Data Resources button to bring up the window to enter Data resource information, which will open to the right.
Under the Data Resources Panel do one of two things depending on the granularity of the policy:
- To create a broad policy statement that covers an entire data source, resource group, or subscription that was previously registered, use the Data sources box and select its Type.
- To create a fine-grained policy, use the Assets box instead. Enter the Data Source Type and the Name of a previously registered and scanned data source. See example in the image.
Select the Continue button and traverse the hierarchy to select and underlying data-object (for example: folder, file, etc.). Select Recursive to apply the policy from that point in the hierarchy down to any child data-objects. Then select the Add button. This will take you back to the policy editor.

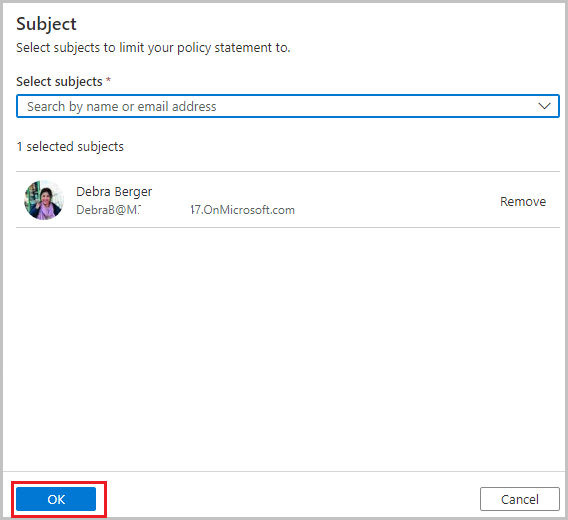
Select the Subjects button and enter the subject identity as a principal, group, or MSI. Then select the OK button. This will take you back to the policy editor
Select the Save button to save the policy.


Publish a data owner policy
Sign in to the Microsoft Purview governance portal.
Navigate to the Data policy feature using the left side panel. Then select Data policies.
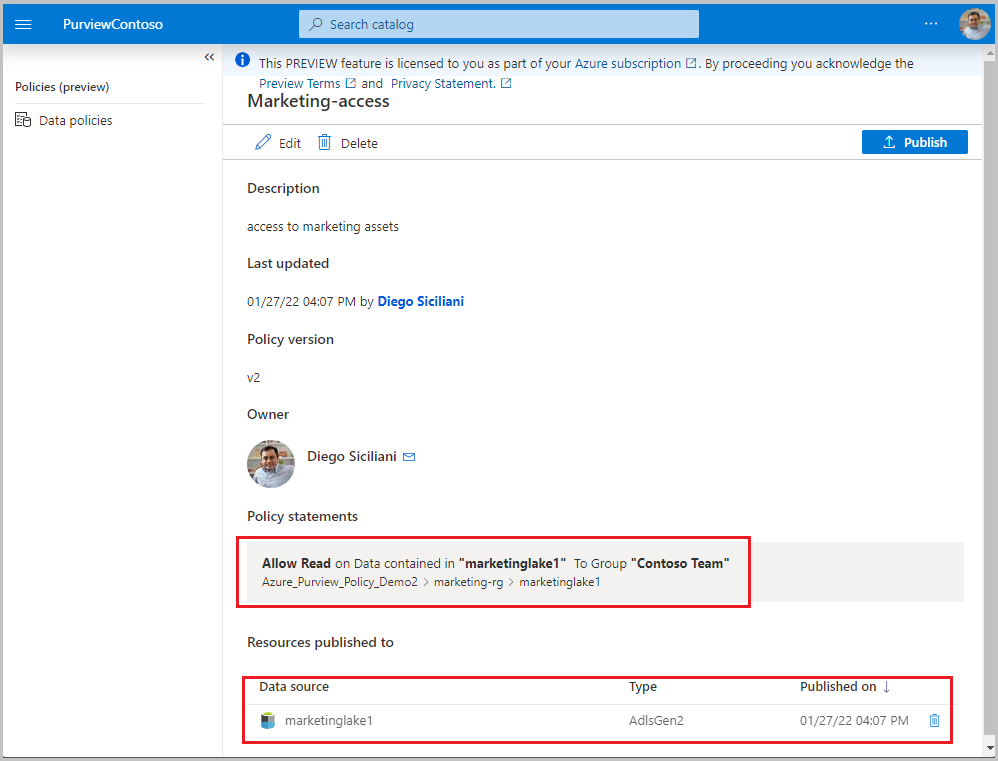
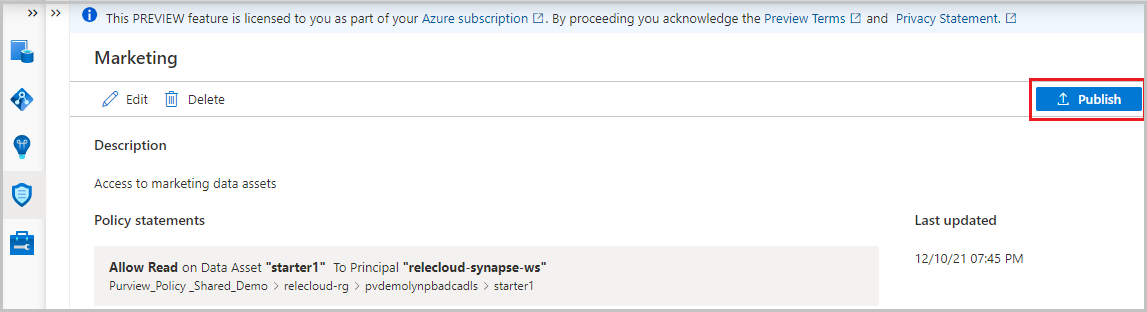
The Policy portal will present the list of existing policies in Microsoft Purview. Locate the policy that needs to be published. Select the Publish button on the right top corner of the page.
A list of data sources is displayed. You can enter a name to filter the list. Then, select each data source where this policy is to be published and then select the Publish button.
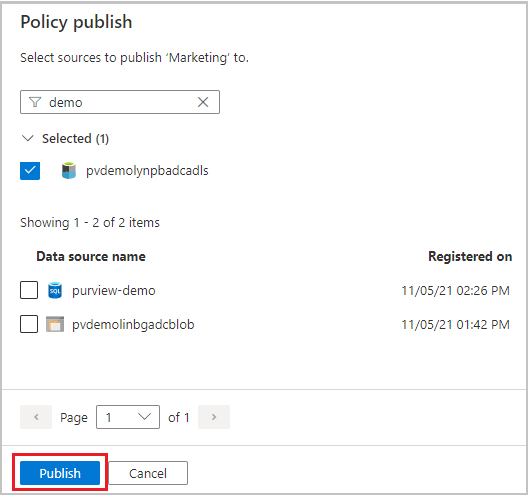

Important
- Publish is a background operation. It can take up to 2 hours for the changes to be reflected in Storage account(s).
Clean up resources
To delete a policy in Microsoft Purview, follow these steps:
Sign in to the Microsoft Purview governance portal.
Navigate to the Data policy feature using the left side panel. Then select Data policies.
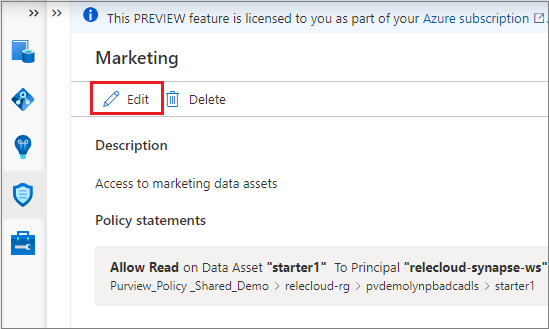
The Policy portal will present the list of existing policies in Microsoft Purview. Select the policy that needs to be updated.
The policy details page will appear, including Edit and Delete options. Select the Edit button, which brings up the policy statement builder. Now, any parts of the statements in this policy can be updated. To delete the policy, use the Delete button.
Next steps
Check our demo and related tutorials:
Feedback
Coming soon: Throughout 2024 we will be phasing out GitHub Issues as the feedback mechanism for content and replacing it with a new feedback system. For more information see: https://aka.ms/ContentUserFeedback.
Submit and view feedback for