Note
Access to this page requires authorization. You can try signing in or changing directories.
Access to this page requires authorization. You can try changing directories.
The following example gives a first glimpse at how a Q# program is implemented:
/// # Sample
/// Bell States
///
/// # Description
/// Bell states or EPR pairs are specific quantum states of two qubits
/// that represent the simplest (and maximal) examples of quantum entanglement.
///
/// This Q# program implements the four different Bell states.

import Std.Diagnostics.*;
import Std.Measurement.*;

operation Main() : (Result, Result)[] {
    // Allocate the two qubits that will be used to create a Bell state.
    use register = Qubit[2];

    // This array contains a label and a preparation operation for each one
    // of the four Bell states.
    let bellStateTuples = [
        ("|Φ+〉", PreparePhiPlus),
        ("|Φ-〉", PreparePhiMinus),
        ("|Ψ+〉", PreparePsiPlus),
        ("|Ψ-〉", PreparePsiMinus)
    ];

    // Prepare all Bell states, show them using the `DumpMachine` operation
    // and measure the Bell state qubits.
    mutable measurements = [];
    for (label, prepare) in bellStateTuples {
        prepare(register);
        Message($"Bell state {label}:");
        DumpMachine();
        measurements += [(MResetZ(register[0]), MResetZ(register[1]))];
    }
    return measurements;
}

operation PreparePhiPlus(register : Qubit[]) : Unit {
    ResetAll(register);             // |00〉
    H(register[0]);                 // |+0〉
    CNOT(register[0], register[1]); // 1/sqrt(2)(|00〉 + |11〉)
}

operation PreparePhiMinus(register : Qubit[]) : Unit {
    ResetAll(register);             // |00〉
    H(register[0]);                 // |+0〉
    Z(register[0]);                 // |-0〉
    CNOT(register[0], register[1]); // 1/sqrt(2)(|00〉 - |11〉)
}

operation PreparePsiPlus(register : Qubit[]) : Unit {
    ResetAll(register);             // |00〉
    H(register[0]);                 // |+0〉
    X(register[1]);                 // |+1〉
    CNOT(register[0], register[1]); // 1/sqrt(2)(|01〉 + |10〉)
}

operation PreparePsiMinus(register : Qubit[]) : Unit {
    ResetAll(register);             // |00〉
    H(register[0]);                 // |+0〉
    Z(register[0]);                 // |-0〉
    X(register[1]);                 // |-1〉
    CNOT(register[0], register[1]); // 1/sqrt(2)(|01〉 - |10〉)
}
This program implements the four basic Bell states of quantum entanglement, and is one of the sample programs included the Azure Quantum Visual Code extension.
You can run the program from the built-in simulator in the VS Code QDK extension and get standard output
Message: Bell state |Φ+〉:

DumpMachine:

 Basis | Amplitude      | Probability | Phase
 -----------------------------------------------
  |00⟩ |  0.7071+0.0000𝑖 |    50.0000% |   0.0000
  |11⟩ |  0.7071+0.0000𝑖 |    50.0000% |   0.0000

Message: Bell state |Φ-〉:

DumpMachine:

 Basis | Amplitude      | Probability | Phase
 -----------------------------------------------
  |00⟩ |  0.7071+0.0000𝑖 |    50.0000% |   0.0000
  |11⟩ | −0.7071+0.0000𝑖 |    50.0000% |  -3.1416

Message: Bell state |Ψ+〉:

DumpMachine:

 Basis | Amplitude      | Probability | Phase
 -----------------------------------------------
  |01⟩ |  0.7071+0.0000𝑖 |    50.0000% |   0.0000
  |10⟩ |  0.7071+0.0000𝑖 |    50.0000% |   0.0000

Message: Bell state |Ψ-〉:

DumpMachine:

 Basis | Amplitude      | Probability | Phase
 -----------------------------------------------
  |01⟩ |  0.7071+0.0000𝑖 |    50.0000% |   0.0000
  |10⟩ | −0.7071+0.0000𝑖 |    50.0000% |  -3.1416

Result: "[(One, One), (Zero, Zero), (One, Zero), (Zero, One)]"
Finished shot 1 of 1

Q# simulation completed.
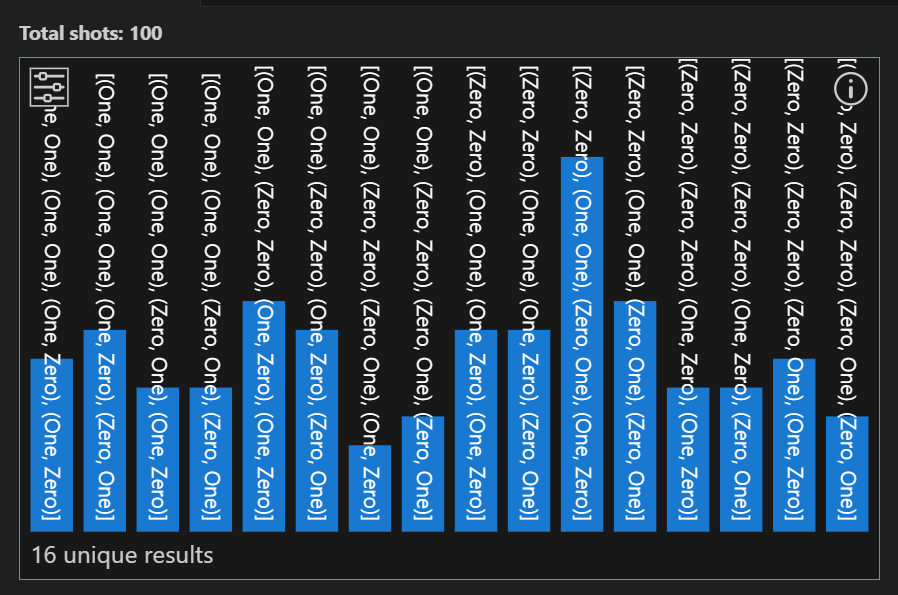
or run the simulator with a histogram output
To run the program on quantum hardware, the program first needs to be compiled and submitted to Azure Quantum, all of which can be done from inside VS Code. For the full end-to-end process, see Get started with Q# programs and Visual Studio Code.