Note
Access to this page requires authorization. You can try signing in or changing directories.
Access to this page requires authorization. You can try changing directories.
Important
As of August 31, 2024, Azure classic administrator roles (along with Azure classic resources and Azure Service Manager) are retired and no longer supported. If you still have active Co-Administrator or Service Administrator role assignments, convert these role assignments to Azure RBAC immediately. Starting in December 2025, Azure will begin to automatically assign the Owner role at subscription scope to users in the public cloud who are still assigned the Co-Administrator or Service Administrator role.
Microsoft recommends that you manage access to Azure resources using Azure role-based access control (Azure RBAC). If you're still using the classic deployment model, you'll need to migrate your resources from classic deployment to Resource Manager deployment. For more information, see Azure Resource Manager vs. classic deployment.
This article describes the retirement of the Co-Administrator and Service Administrator roles and how to convert these role assignments.
Frequently asked questions
What happens to classic administrator role assignments after August 31, 2024?
- Co-Administrator and Service Administrator roles are retired and no longer supported. You should convert these role assignments to Azure RBAC immediately.
What happens to classic administrator role assignments after December 2025?
- Azure will begin to automatically assign the Owner role at subscription scope to users in the public cloud who are still assigned the Co-Administrator or Service Administrator role. For more information, see Automatic assignment to Owner role.
How do I know what subscriptions have classic administrators?
- You can use the Azure portal to list subscriptions with Service Administrator or Co-Administrator role assignments. For steps see List classic administrators.
What is the equivalent Azure role I should assign for Co-Administrators?
- Owner role at subscription scope has the equivalent access. However, Owner is a privileged administrator role and grants full access to manage Azure resources. You should consider a job function role with fewer permissions, reduce the scope, or add a condition.
What is the equivalent Azure role I should assign for Service Administrator?
- Owner role at subscription scope has the equivalent access.
Why do I need to migrate to Azure RBAC?
- Azure RBAC offers fine grained access control, compatibility with Microsoft Entra Privileged Identity Management (PIM), and full audit logs support. All future investments will be in Azure RBAC.
What about the Account Administrator role?
- The Account Administrator is the primary user for your billing account. Account Administrator isn't being deprecated and you don't need to convert this role assignment. Account Administrator and Service Administrator might be the same user. However, you only need to convert the Service Administrator role assignment.
What should I do if I lose access to a subscription?
If you remove your classic administrators without having at least one Owner role assignment for a subscription, you will lose access to the subscription and the subscription will be orphaned. To regain access to a subscription, you can do the following:
- Follow steps to elevate access to manage all subscriptions in a tenant.
- Assign the Owner role at subscription scope for a user.
- Remove elevated access.
Automatic assignment to Owner role
Starting in December 2025, if you don't take any action and you still have classic administrators in the public cloud, Azure will begin to automatically assign the classic administrators the Owner role at subscription scope. These role assignments will have the following properties:
- description:
The Classic Admin role was converted to an Azure Owner role on behalf of the user due to Classic Admin retirement - createdBy:
0469d4cd-df37-4d93-8a61-f8c75b809164

If Azure automatically assigns the Owner role, it doesn't automatically remove the classic administrator role assignment. You should remove this classic administrator role assignment. For steps on how to remove this role assignment, see remove Co-Administrator. If you don't want the Owner role assignment, you must remove both the Owner and Co-Administrator role assignments to remove access for the user.
List classic administrators
Follow these steps to list the Service Administrator and Co-Administrators for a subscription using the Azure portal.
Sign in to the Azure portal as an Owner of a subscription.
Open Subscriptions and select a subscription.
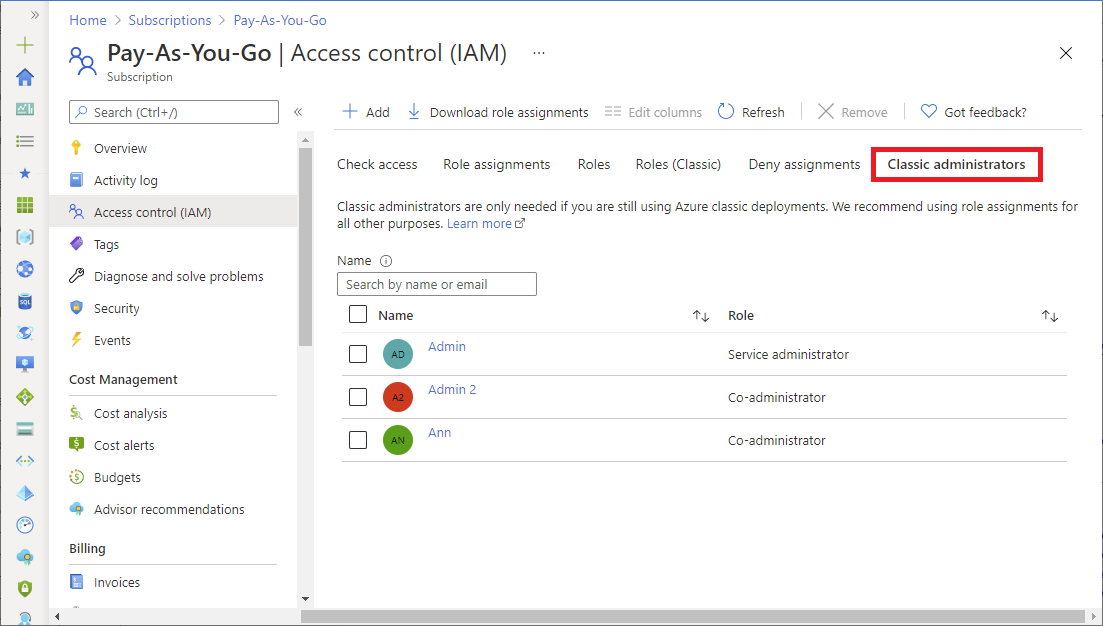
Select Access control (IAM).
Select the Classic administrators tab to view a list of the Co-Administrators.

Co-Administrators retirement
If you still have classic administrators, use the following steps to help you convert Co-Administrator role assignments.
Step 1: Review your current Co-Administrators
Sign in to the Azure portal as an Owner of a subscription.
Use the Azure portal to list your Co-Administrators.
Review the sign-in logs for your Co-Administrators to assess whether they're active users.
Step 2: Remove Co-Administrators that no longer need access
If user is no longer in your enterprise, remove Co-Administrator.
If user was deleted, but their Co-Administrator assignment wasn't removed, remove Co-Administrator.
Users that have been deleted typically include the text (User was not found in this directory).

After reviewing activity of user, if user is no longer active, remove Co-Administrator.
If user already has the Owner role assignment, remove Co-Administrator.

Step 3: Convert Co-Administrators to job function roles
Most users don't need the same permissions as a Co-Administrator. Consider a job function role instead.
If a user still needs some access, determine the appropriate job function role they need.
Determine the scope user needs.
Follow steps to assign a job function role to user.
Step 4: Convert Co-Administrators to Owner role with conditions
Some users might need more access than what a job function role can provide. If you must assign the Owner role, consider adding a condition or using Microsoft Entra Privileged Identity Management (PIM) to constrain the role assignment.
Assign the Owner role with conditions.
For example, assign the Owner role at subscription scope with conditions. If you have PIM, make the user eligible for Owner role assignment.
Step 5: Convert Co-Administrators to Owner role
If a user must be an administrator for a subscription, assign the Owner role at subscription scope.
- Follow the steps in How to convert a Co-Administrator with Owner role.
How to convert a Co-Administrator to Owner role
The easiest way to covert a Co-Administrator role assignment to the Owner role at subscription scope is to use the Remediate steps.
Sign in to the Azure portal as an Owner of a subscription.
Open Subscriptions and select a subscription.
Select Access control (IAM).
Select the Classic administrators tab to view a list of the Co-Administrators.
For the Co-Administrator you want to convert to the Owner role, under the Remediate column, select the Assign RBAC role link.
In the Add role assignment pane, review the role assignment.

Select Review + assign to assign the Owner role and remove the Co-Administrator role assignment.

How to remove a Co-Administrator
Follow these steps to remove a Co-Administrator.
Sign in to the Azure portal as an Owner of a subscription.
Open Subscriptions and select a subscription.
Select Access control (IAM).
Select the Classic administrators tab to view a list of the Co-Administrators.
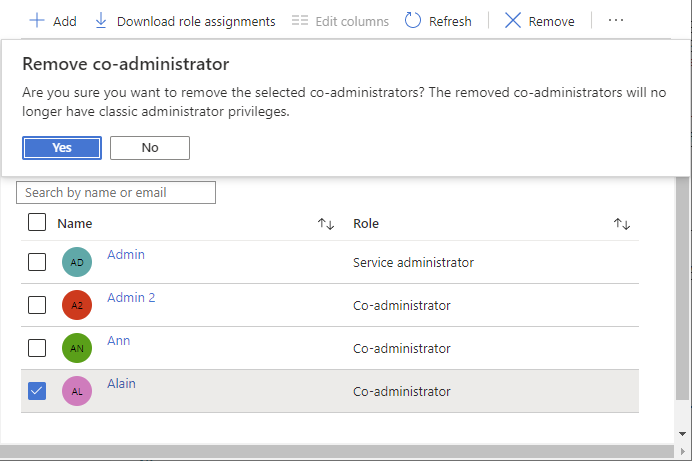
Add a check mark next to the Co-Administrator you want to remove.
Select Delete.
In the message box that appears, select Yes.

Service Administrator retirement
If you still have classic administrators, use the following steps to help you convert the Service Administrator role assignment. Before you remove the Service Administrator, you must have at least one user who is assigned the Owner role at subscription scope without conditions to avoid orphaning the subscription. A subscription Owner has the same access as the Service Administrator.
Step 1: Review your current Service Administrator
Sign in to the Azure portal as an Owner of a subscription.
Use the Azure portal to list your Service Administrator.
Review the sign-in logs for your Service Administrator to assess whether they're an active user.
Step 2: Review your current Billing account owners
The user that is assigned the Service Administrator role might also be the same user that is the administrator for your billing account. You should review your current Billing account owners to ensure they are still accurate.
Use the Azure portal to get your Billing account owners.
Review your list of Billing account owners. If necessary, update or add another Billing account owner.
Step 3: Convert Service Administrator to Owner role
Your Service Administrator might be a Microsoft account or a Microsoft Entra account. A Microsoft account is a personal account such as Outlook, OneDrive, Xbox LIVE, or Microsoft 365. A Microsoft Entra account is an identity created through Microsoft Entra ID.
If Service Administrator user is a Microsoft account and you want this user to keep the same permissions, convert the Service Administrator to Owner role.
If Service Administrator user is a Microsoft Entra account and you want this user to keep the same permissions, convert the Service Administrator to Owner role.
If you want to change the Service Administrator user to a different user, assign the Owner role to this new user at subscription scope without conditions. Then, remove the Service Administrator.
How to convert the Service Administrator to Owner role
The easiest way to convert the Service Administrator role assignment to the Owner role at subscription scope is to use the Remediate steps.
Sign in to the Azure portal as an Owner of a subscription.
Open Subscriptions and select a subscription.
Select Access control (IAM).
Select the Classic administrators tab to view the Service Administrator.
For the Service Administrator, under the Remediate column, select the Assign RBAC role link.
In the Add role assignment pane, review the role assignment.
Select Review + assign to assign the Owner role and remove the Service Administrator role assignment.
How to remove the Service Administrator
Important
To remove the Service Administrator, you must have a user who is assigned the Owner role at subscription scope without conditions to avoid orphaning the subscription. A subscription Owner has the same access as the Service Administrator.
Sign in to the Azure portal as an Owner of a subscription.
Open Subscriptions and select a subscription.
Select Access control (IAM).
Select the Classic administrators tab.
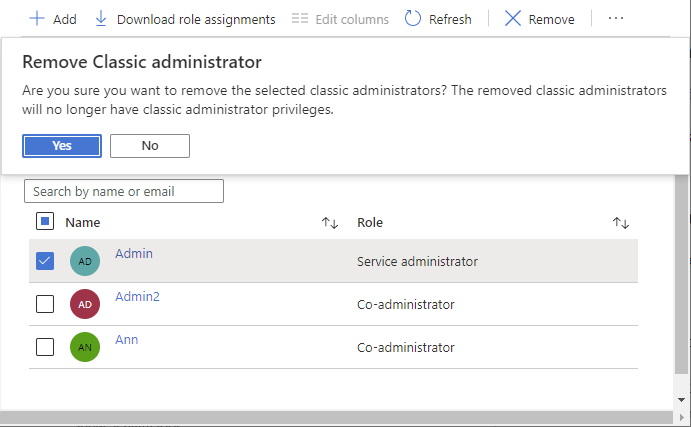
Add a check mark next to the Service Administrator.
Select Delete.
In the message box that appears, select Yes.