Note
Access to this page requires authorization. You can try signing in or changing directories.
Access to this page requires authorization. You can try changing directories.
In this article, you learn how to allow read access to blobs based on blob index tags and custom security attributes by using attribute-based access control (ABAC) conditions. This can make it easier to manage access to blobs.
Prerequisites
To assign custom security attributes and add role assignments conditions in your Microsoft Entra tenant, you need:
- Attribute Definition Administrator and Attribute Assignment Administrator
- Role Based Access Control Administrator
Important
By default, Global Administrator and other administrator roles do not have permissions to read, define, or assign custom security attributes. If you do not meet these prerequisites, you won't see the principal/user attributes in the condition editor.
Condition
In this article, you allow read access to blobs if the user has a custom security attribute that matches the blob index tag. This is accomplished by adding a condition to the role assignment.
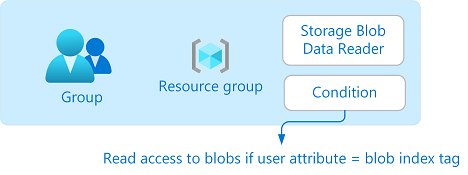
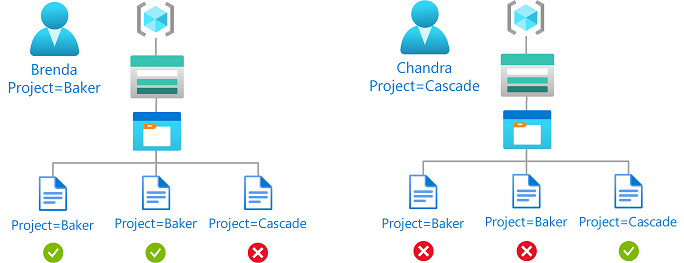
For example, if Brenda has the attribute Project=Baker, she can only read blobs with the Project=Baker blob index tag. Similarly, Chandra can only read blobs with Project=Cascade.
Here is what the condition looks like in code:
(
 (
  !(ActionMatches{'Microsoft.Storage/storageAccounts/blobServices/containers/blobs/read'} AND NOT SubOperationMatches{'Blob.List'})
 )
 OR
 (
  @Principal[Microsoft.Directory/CustomSecurityAttributes/Id:Engineering_Project] StringEquals @Resource[Microsoft.Storage/storageAccounts/blobServices/containers/blobs/tags:Project<$key_case_sensitive$>]
 )
)
For more information about conditions, see What is Azure attribute-based access control (Azure ABAC)?.
Step 1: Add a new custom security attribute
Sign in to the Azure portal.
Click Microsoft Entra ID > Custom security attributes.
Add an attribute named
Projectwith values ofBakerandCascade. Or use an existing attribute. For more information, see Add or deactivate custom security attributes in Microsoft Entra ID.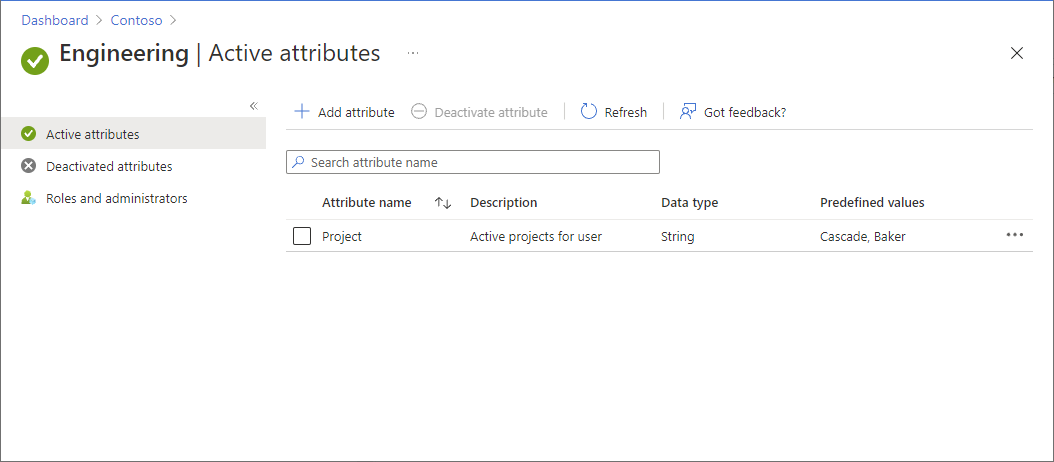
Step 2: Assign the custom security attribute to a user
In Microsoft Entra ID, create a security group.
Add a user as a member of the group.
Assign the
Projectattribute with a value ofCascadeto the user. For more information, see Assign, update, list, or remove custom security attributes for a user.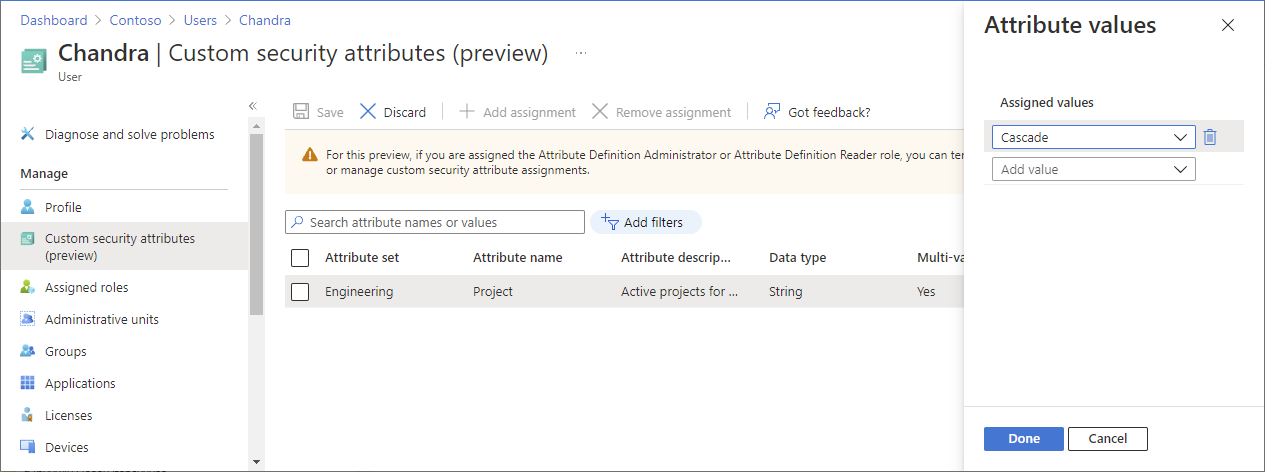
Be sure to click Save to save your assignment.
Step 3: Set up storage and blob index tags
Create a storage account that is compatible with the blob index tags feature. For more information, see Manage and find Azure Blob data with blob index tags.
Create a new container within the storage account and set the Public access level to Private (no anonymous access).
Set the authentication type to Azure AD User Account.
Upload text files to the container and set the following blob index tags.
File Key Value Baker text file Project Baker Cascade text file Project Cascade Tip
For information about the characters that are allowed for blob index tags, see Setting blob index tags.
Step 4: Assign Storage Blob Data Reader role with a condition
Open a new tab and sign in to the Azure portal.
Open the resource group that has the storage account.
Click Access control (IAM).
Click the Role assignments tab to view the role assignments at this scope.
Click Add > Add role assignment.
On the Role tab, select the Storage Blob Data Reader role.
On the Members tab, select the security group you created earlier.
(Optional) In the Description box, enter Read access to blobs if the user has a custom security attribute that matches the blob index tag.
On the Conditions (optional) tab, click Add condition.
The Add role assignment condition page appears.
In the Add action section, click Add action.
The Select an action pane appears. This pane is a filtered list of data actions based on the role assignment that will be the target of your condition.
Click Read a blob and then click Select.
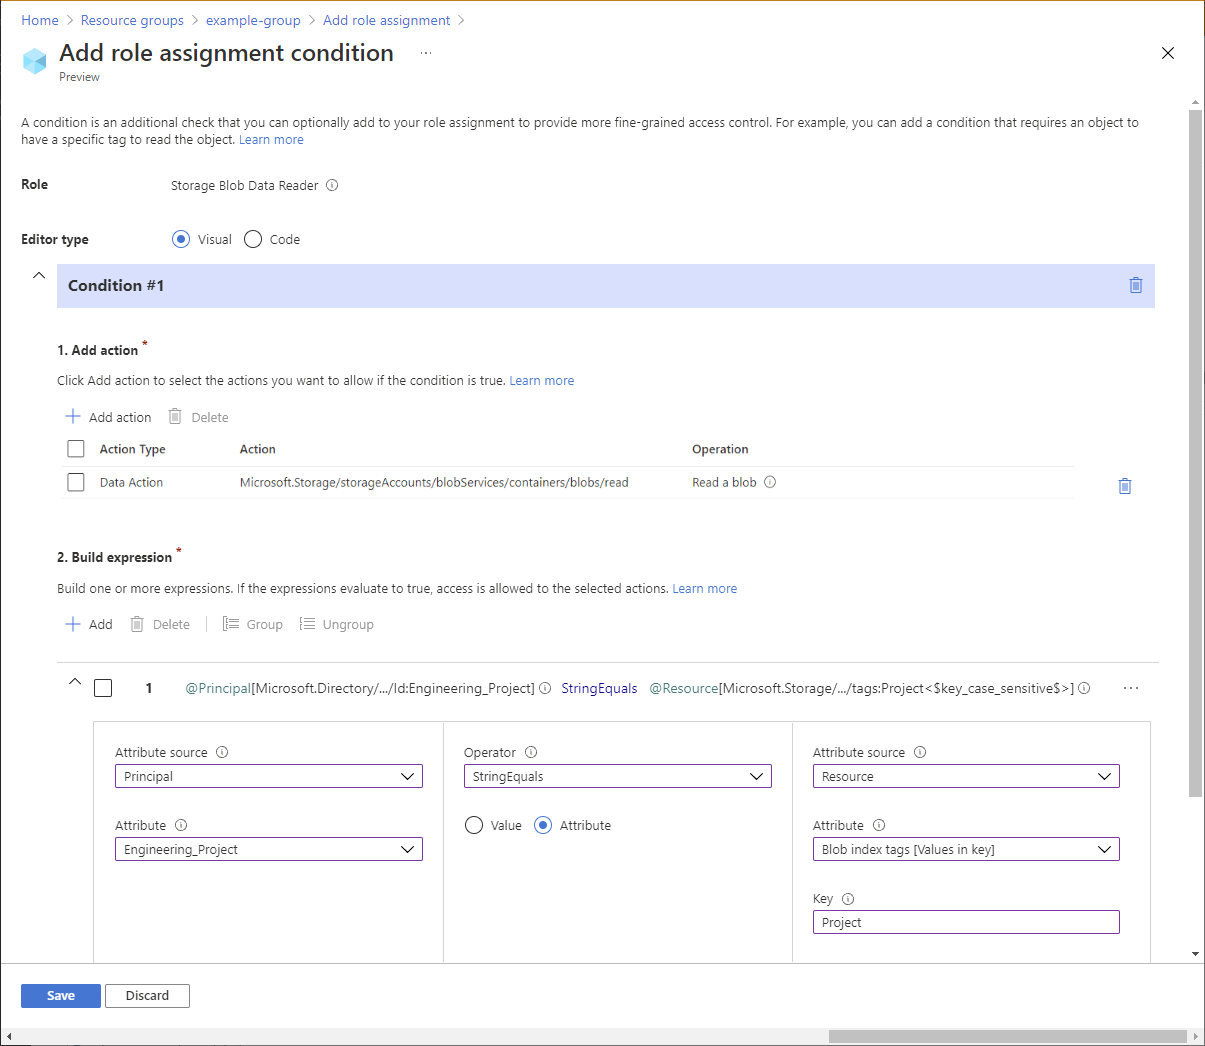
In the Build expression section, click Add.
Enter the following settings:
Setting Value Attribute source Principal Attribute <attributeset>_Project Operator StringEquals Option Attribute Attribute source Resource Attribute Blob index tags [Values in key] Key Project Note
If Principal is not listed as an option in Attribute source, make sure you have defined custom security attribute as described earlier in Step 1: Add a new custom security attribute.
Scroll up to Editor type and click Code.
Your condition should look similar to the following:
(
 (
  !(ActionMatches{'Microsoft.Storage/storageAccounts/blobServices/containers/blobs/read'} AND NOT SubOperationMatches{'Blob.List'})
 )
 OR
 (
  @Principal[Microsoft.Directory/CustomSecurityAttributes/Id:Engineering_Project] StringEquals @Resource[Microsoft.Storage/storageAccounts/blobServices/containers/blobs/tags:Project<$key_case_sensitive$>]
 )
)
Click Save to save the condition.
On the Review + assign tab, click Review + assign to assign the Storage Blob Data Reader role with a condition.
Step 5: Assign Reader role
Repeat the previous steps to assign the Reader role for the security group at resource group scope.
Note
You typically don't need to assign the Reader role. However, this is done so that you can test the condition using the Azure portal.
Step 6: Test the condition
In a new window, open the Azure portal.
Sign in as the user you created with the
Project=Cascadecustom security attribute.Open the storage account and container you created.
Ensure that the authentication method is set to Azure AD User Account and not Access key.
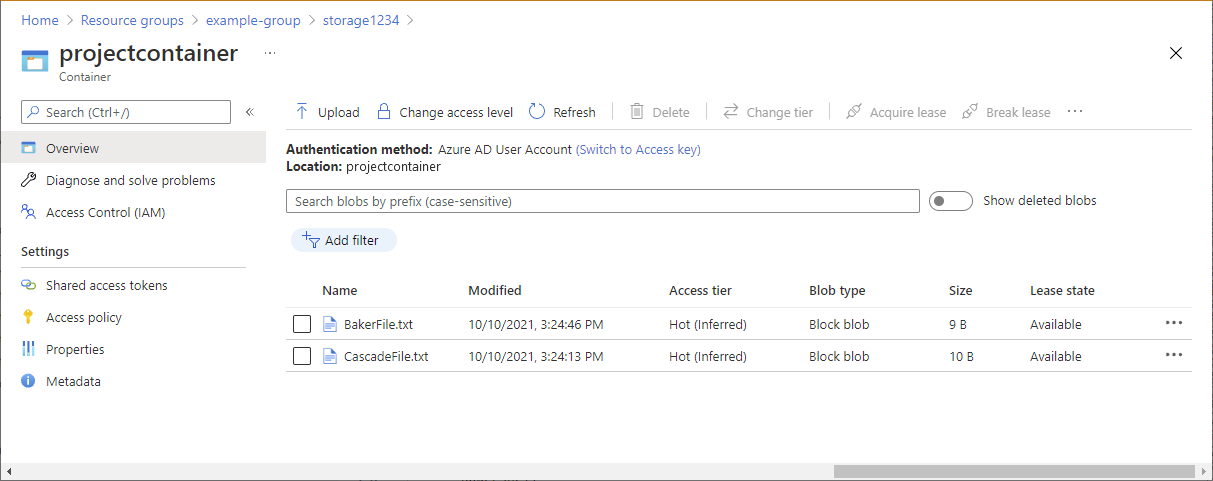
Click the Baker text file.
You should NOT be able to view or download the blob and an authorization failed message should be displayed.
Click Cascade text file.
You should be able to view and download the blob.
Azure PowerShell
You can also use Azure PowerShell to add role assignment conditions. The following commands show how to add conditions. For information, see Tutorial: Add a role assignment condition to restrict access to blobs using Azure PowerShell.
Add a condition
Use the Connect-AzAccount command and follow the instructions that appear to sign in to your directory as Role Based Access Control Administrator.
Connect-AzAccountUse Get-AzRoleAssignment to get the role assignment you assigned to the security group.
$groupRoleAssignment = Get-AzRoleAssignment -ObjectId <groupObjectId> -Scope <scope>Set the
Conditionproperty of the role assignment object. Be sure to use your attribute set name.$groupRoleAssignment.Condition="((!(ActionMatches{'Microsoft.Storage/storageAccounts/blobServices/containers/blobs/read'} AND NOT SubOperationMatches{'Blob.List'})) OR (@Principal[Microsoft.Directory/CustomSecurityAttributes/Id:Engineering_Project] StringEquals @Resource[Microsoft.Storage/storageAccounts/blobServices/containers/blobs/tags:Project<`$key_case_sensitive`$>]))"Set the
ConditionVersionproperty of the role assignment object.$groupRoleAssignment.ConditionVersion = "2.0"Use Set-AzRoleAssignment to update the role assignment.
Set-AzRoleAssignment -InputObject $groupRoleAssignment
Test the condition
In a new PowerShell window, use the Connect-AzAccount command to sign in as a member of the security group.
Connect-AzAccountUse New-AzStorageContext to set the context for the storage account.
$bearerCtx = New-AzStorageContext -StorageAccountName <accountName>Use Get-AzStorageBlob to try to read the Baker file.
Get-AzStorageBlob -Container <containerName> -Blob <blobNameBaker> -Context $bearerCtxYou should NOT be able to read the blob and an authorization failed message should be displayed.
Get-AzStorageBlob : This request is not authorized to perform this operation using this permission. HTTP Status Code:
403 - HTTP Error Message: This request is not authorized to perform this operation using this permission.
...
Use Get-AzStorageBlob to try to read the Cascade file.
Get-AzStorageBlob -Container <containerName> -Blob <blobNameCascade> -Context $bearerCtx
You should be able to read the blob.
AccountName: <storageAccountName>, ContainerName: <containerName>

Name                 BlobType  Length          ContentType                    LastModified         AccessTier SnapshotT
                                                                                                              ime
----                 --------  ------          -----------                    ------------         ---------- ---------
CascadeFile.txt      BlockBlob 7               text/plain                     2021-04-24 05:35:24Z Hot
Azure CLI
You can also use Azure CLI to add role assignments conditions. The following commands show how to add conditions. For information, see Tutorial: Add a role assignment condition to restrict access to blobs using Azure CLI.
Add a condition
Use the az login command and follow the instructions that appear to sign in to your directory as Role Based Access Control Administrator.
az loginUse az role assignment list to get the role assignment you assigned to the security group.
az role assignment list --assignee <groupObjectId> --scope <scope>Create a JSON file with the following format.
{
    "canDelegate": null,
    "condition": "",
    "conditionVersion": "",
    "description": "",
    "id": "/subscriptions/{subscriptionId}/resourceGroups/{resourceGroup}/providers/Microsoft.Authorization/roleAssignments/{roleAssignmentId}",
    "name": "{roleAssignmentId}",
    "principalId": "{groupObjectId}",
    "principalName": "{principalName}",
    "principalType": "Group",
    "resourceGroup": "{resourceGroup}",
    "roleDefinitionId": "/subscriptions/{subscriptionId}/providers/Microsoft.Authorization/roleDefinitions/2a2b9908-6ea1-4ae2-8e65-a410df84e7d1",
    "roleDefinitionName": "Storage Blob Data Reader",
    "scope": "/subscriptions/{subscriptionId}/resourceGroups/{resourceGroup}",
    "type": "Microsoft.Authorization/roleAssignments"
}
Update the
conditionproperty. Be sure to use your attribute set name."condition": "((!(ActionMatches{'Microsoft.Storage/storageAccounts/blobServices/containers/blobs/read'} AND NOT SubOperationMatches{'Blob.List'})) OR (@Principal[Microsoft.Directory/CustomSecurityAttributes/Id:Engineering_Project] StringEquals @Resource[Microsoft.Storage/storageAccounts/blobServices/containers/blobs/tags:Project<$key_case_sensitive$>]))",Update the
conditionVersionproperty."conditionVersion": "2.0",Use az role assignment update to add the condition to the role assignment.
az role assignment update --role-assignment "./path/roleassignment.json"
Test the condition
In a new command window, use the az login command to sign in as a member of the security group.
az loginUse az storage blob show to try to read the properties for the Baker file.
az storage blob show --account-name <storageAccountName> --container-name <containerName> --name <blobNameBaker> --auth-mode loginYou should NOT be able to read the blob and an authorization failed message should be displayed.
You do not have the required permissions needed to perform this operation.
...
Use az storage blob show to try to read the properties for the Cascade file.
az storage blob show --account-name <storageAccountName> --container-name <containerName> --name <blobNameCascade> --auth-mode login
You should be able to read the blob.
{
  "container": "<containerName>",
  "content": "",
  "deleted": false,
  "encryptedMetadata": null,
  "encryptionKeySha256": null,
  "encryptionScope": null,
...
}