Note
Access to this page requires authorization. You can try signing in or changing directories.
Access to this page requires authorization. You can try changing directories.
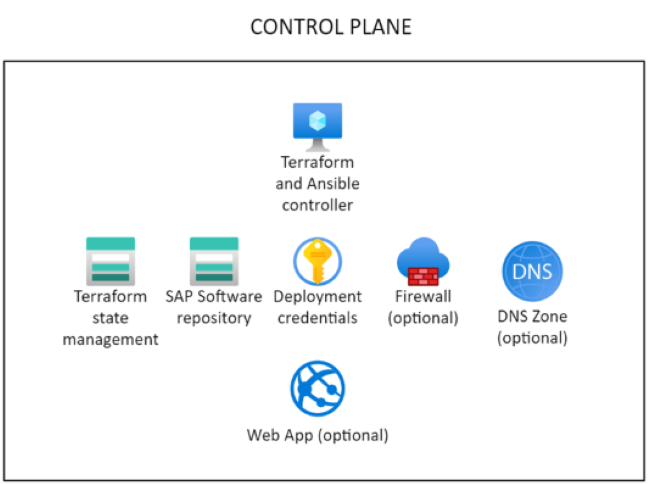
The control plane deployment for SAP Deployment Automation Framework consists of the:
- Deployer
- SAP library
Prepare the deployment credentials
SAP Deployment Automation Framework uses service principals for deployments. To create a service principal for the control plane deployment, use an account that has permissions to create service principals:
az ad sp create-for-rbac --role="Contributor" --scopes="/subscriptions/<subscriptionID>" --name="<environment>-Deployment-Account"
Important
The name of the service principal must be unique.
Record the output values from the command:
- appId
- password
- tenant
Optionally, assign the following permissions to the service principal:
az role assignment create --assignee <appId> --role "User Access Administrator" --scope /subscriptions/<subscriptionID>
If you want to provide the User Access Administrator role scoped to the resource group only, use the following command:
az role assignment create --assignee <appId> --role "User Access Administrator" --scope /subscriptions/<subscriptionID>/resourceGroups/<resourceGroupName>
Deploy the control plane
All the artifacts that are required to deploy the control plane are located in GitHub repositories.
Prepare for the control plane deployment by cloning the repositories using the following commands:
mkdir -p ~/Azure_SAP_Automated_Deployment; cd $_

git clone https://github.com/Azure/sap-automation.git sap-automation

git clone https://github.com/Azure/sap-automation-samples.git samples
The sample deployer configuration file MGMT-WEEU-DEP00-INFRASTRUCTURE.tfvars is located in the ~/Azure_SAP_Automated_Deployment/samples/Terraform/WORKSPACES/DEPLOYER/MGMT-WEEU-DEP00-INFRASTRUCTURE folder.
The sample SAP library configuration file MGMT-WEEU-SAP_LIBRARY.tfvars is located in the ~/Azure_SAP_Automated_Deployment/samples/Terraform/WORKSPACES/LIBRARY/MGMT-WEEU-SAP_LIBRARY folder.
You can copy the sample configuration files to start testing the deployment automation framework.
A minimal Terraform file for the DEPLOYER might look like this example:
# The environment value is a mandatory field, it is used for partitioning the environments.
environment = "MGMT"
# The location/region value is a mandatory field, it is used to control where the resources are deployed
location = "westeurope"

# management_network_address_space is the address space for management virtual network
management_network_address_space = "10.10.20.0/25"
# management_subnet_address_prefix is the address prefix for the management subnet
management_subnet_address_prefix = "10.10.20.64/28"

# management_firewall_subnet_address_prefix is the address prefix for the firewall subnet
management_firewall_subnet_address_prefix = "10.10.20.0/26"
firewall_deployment = false

# management_bastion_subnet_address_prefix is the address prefix for the bastion subnet
management_bastion_subnet_address_prefix = "10.10.20.128/26"
bastion_deployment = true

# deployer_enable_public_ip controls if the deployer Virtual machines will have Public IPs
deployer_enable_public_ip = false

# deployer_count defines how many deployer VMs will be deployed
deployer_count = 1

# use_service_endpoint defines that the management subnets have service endpoints enabled
use_service_endpoint = true

# use_private_endpoint defines that the storage accounts and key vaults have private endpoints enabled
use_private_endpoint = false

# enable_firewall_for_keyvaults_and_storage defines that the storage accounts and key vaults have firewall enabled
enable_firewall_for_keyvaults_and_storage = false

# public_network_access_enabled controls if storage account and key vaults have public network access enabled
public_network_access_enabled = true
Note the Terraform variable file locations for future edits during deployment.
A minimal Terraform file for the LIBRARY might look like this example:
# The environment value is a mandatory field, it is used for partitioning the environments, for example, PROD and NP.
environment = "MGMT"
# The location/region value is a mandatory field, it is used to control where the resources are deployed
location = "westeurope"

#Defines the DNS suffix for the resources
dns_label = "azure.contoso.net"

# use_private_endpoint defines that the storage accounts and key vaults have private endpoints enabled
use_private_endpoint = false
Note the Terraform variable file locations for future edits during deployment.
Run the following command to create the deployer and the SAP library. The command adds the service principal details to the deployment key vault.
Set the environment variables for the service principal:
export ARM_SUBSCRIPTION_ID="<subscriptionId>"
export       ARM_CLIENT_ID="<appId>"
export   ARM_CLIENT_SECRET="<password>"
export       ARM_TENANT_ID="<tenantId>"
Run the following command to deploy the control plane:
export            env_code="MGMT"
export         region_code="WEEU"
export           vnet_code="DEP00"

export DEPLOYMENT_REPO_PATH="${HOME}/Azure_SAP_Automated_Deployment/sap-automation"
export CONFIG_REPO_PATH="${HOME}/Azure_SAP_Automated_Deployment/WORKSPACES"
export SAP_AUTOMATION_REPO_PATH="${HOME}/Azure_SAP_Automated_Deployment/sap-automation"

az logout
az login --service-principal -u "${ARM_CLIENT_ID}" -p="${ARM_CLIENT_SECRET}" --tenant "${ARM_TENANT_ID}"

cd ~/Azure_SAP_Automated_Deployment/WORKSPACES


deployer_parameter_file="${CONFIG_REPO_PATH}/DEPLOYER/${env_code}-${region_code}-${vnet_code}-INFRASTRUCTURE/${env_code}-${region_code}-${vnet_code}-INFRASTRUCTURE.tfvars"
library_parameter_file="${CONFIG_REPO_PATH}/LIBRARY/${env_code}-${region_code}-SAP_LIBRARY/${env_code}-${region_code}-SAP_LIBRARY.tfvars"

${SAP_AUTOMATION_REPO_PATH}/deploy/scripts/deploy_controlplane.sh  \
    --deployer_parameter_file "${deployer_parameter_file}"         \
    --library_parameter_file "${library_parameter_file}"            \
    --subscription "${ARM_SUBSCRIPTION_ID}"                        \
    --spn_id "${ARM_CLIENT_ID}"                                    \
    --spn_secret "${ARM_CLIENT_SECRET}"                            \
    --tenant_id "${ARM_TENANT_ID}"
Manually configure a virtual machine as a SDAF deployer using Azure Bastion
To connect to the deployer:
Sign in to the Azure portal.
Go to the resource group that contains the deployer virtual machine (VM).
Connect to the VM by using Azure Bastion.
The default username is azureadm.
Select SSH Private Key from Azure Key Vault.
Select the subscription that contains the control plane.
Select the deployer key vault.
From the list of secrets, choose the secret that ends with -sshkey.
Connect to the VM.
Run the following script to configure the deployer:
mkdir -p ~/Azure_SAP_Automated_Deployment; cd $_

wget https://raw.githubusercontent.com/Azure/sap-automation/main/deploy/scripts/configure_deployer.sh -O configure_deployer.sh
chmod +x ./configure_deployer.sh
./configure_deployer.sh

# Source the new variables

. /etc/profile.d/deploy_server.sh
The script installs Terraform and Ansible and configures the deployer.
Manually configure a virtual machine as a SDAF deployer
Connect to the deployer VM from a computer that can reach the Azure virtual network.
To connect to the deployer:
Sign in to the Azure portal.
Select or search for Key vaults.
On the Key vault page, find the deployer key vault. The name starts with
MGMT[REGION]DEP00user. Filter by the Resource group or Location, if necessary.On the Settings section in the left pane, select Secrets.
Find and select the secret that contains sshkey. It might look like
MGMT-[REGION]-DEP00-sshkey.On the secret's page, select the current version. Then copy the Secret value.
Open a plain text editor. Copy the secret value.
Save the file where you keep SSH keys. An example is
C:\Users\<your-username>\.ssh.Save the file. If you're prompted to Save as type, select All files if SSH isn't an option. For example, use
deployer.ssh.Connect to the deployer VM through any SSH client, such as Visual Studio Code. Use the private IP address of the deployer and the SSH key you downloaded. For instructions on how to connect to the deployer by using Visual Studio Code, see Connect to the deployer by using Visual Studio Code. If you're using PuTTY, convert the SSH key file first by using PuTTYGen.
Note
The default username is azureadm.
Configure the deployer by using the following script:
mkdir -p ~/Azure_SAP_Automated_Deployment; cd $_

wget https://raw.githubusercontent.com/Azure/sap-automation/main/deploy/scripts/configure_deployer.sh -O configure_deployer.sh
chmod +x ./configure_deployer.sh
./configure_deployer.sh

# Source the new variables

. /etc/profile.d/deploy_server.sh
The script installs Terraform and Ansible and configures the deployer.
Securing the control plane
The control plane is the most critical part of the SAP automation framework. It's important to secure the control plane. The following steps help you secure the control plane. If you have created your control plane using an external virtual machine or by using the cloud shell, you should secure the control plane by implementing private endpoints for the storage accounts and key vaults.
You can use the sync_deployer.sh script to copy the control plane configuration files to the deployer VM. Sign in to the deployer VM and run the following commands:
cd ~/Azure_SAP_Automated_Deployment/WORKSPACES

../sap-automation/deploy/scripts/sync_deployer.sh --storageaccountname mgtneweeutfstate### --state_subscription xxxxxxxx-xxxx-xxxx-xxxx-xxxxxxxxxxxx
Ensure that the use_private_endpoint variable is set to true in the DEPLOYER and LIBRARY configuration files. Also ensure that public_network_access_enabled is set to false in the DEPLOYER configuration files.
# use_private_endpoint defines that the storage accounts and key vaults have private endpoints enabled
use_private_endpoint = true

# public_network_access_enabled controls if storage account and key vaults have public network access enabled
public_network_access_enabled = false
Rerun the control plane deployment to enable private endpoints for the storage accounts and key vaults.
export            env_code="MGMT"
export         region_code="WEEU"
export           vnet_code="DEP00"
export  storageaccountname=<storageaccountname>

export DEPLOYMENT_REPO_PATH="${HOME}/Azure_SAP_Automated_Deployment/sap-automation"
export CONFIG_REPO_PATH="${HOME}/Azure_SAP_Automated_Deployment/WORKSPACES"
export SAP_AUTOMATION_REPO_PATH="${HOME}/Azure_SAP_Automated_Deployment/sap-automation"

az logout
az login --service-principal -u "${ARM_CLIENT_ID}" -p="${ARM_CLIENT_SECRET}" --tenant "${ARM_TENANT_ID}"

cd ~/Azure_SAP_Automated_Deployment/WORKSPACES

deployer_parameter_file="${CONFIG_REPO_PATH}/DEPLOYER/${env_code}-${region_code}-${vnet_code}-INFRASTRUCTURE/${env_code}-${region_code}-${vnet_code}-INFRASTRUCTURE.tfvars"
library_parameter_file="${CONFIG_REPO_PATH}/LIBRARY/${env_code}-${region_code}-SAP_LIBRARY/${env_code}-${region_code}-SAP_LIBRARY.tfvars"

${SAP_AUTOMATION_REPO_PATH}/deploy/scripts/deploy_controlplane.sh  \
    --deployer_parameter_file "${deployer_parameter_file}"         \
    --library_parameter_file "${library_parameter_file}"            \
    --subscription "${ARM_SUBSCRIPTION_ID}"                        \
    --spn_id "${ARM_CLIENT_ID}"                                    \
    --spn_secret "${ARM_CLIENT_SECRET}"                            \
    --tenant_id "${ARM_TENANT_ID}"                                 \
    --storageaccountname "${storageaccountname}"                   \
    --recover
Prepare the web app
This step is optional. If you want a browser-based UX to help the configuration of SAP workload zones and systems, run the following commands before you deploy the control plane.
echo '[{"resourceAppId":"00000003-0000-0000-c000-000000000000","resourceAccess":[{"id":"e1fe6dd8-ba31-4d61-89e7-88639da4683d","type":"Scope"}]}]' >> manifest.json

region_code=WEEU

export TF_VAR_app_registration_app_id=$(az ad app create \
    --display-name ${region_code}-webapp-registration \
    --enable-id-token-issuance true \
    --sign-in-audience AzureADMyOrg \
    --required-resource-access @manifest.json \
    --query "appId" | tr -d '"')

export TF_VAR_webapp_client_secret=$(az ad app credential reset \
    --id $TF_VAR_app_registration_app_id --append               \
    --query "password" | tr -d '"')

export TF_VAR_use_webapp=true
rm manifest.json