Tutorial: Debug a skillset using Debug Sessions
A skillset coordinates the actions of skills that analyze, transform, or create searchable content. Frequently, the output of one skill becomes the input of another. When inputs depend on outputs, mistakes in skillset definitions and field associations can result in missed operations and data.
Debug sessions is an Azure portal tool that provides a holistic visualization of a skillset. Using this tool, you can drill down to specific steps to easily see where an action might be falling down.
In this article, use Debug sessions to find and fix missing inputs and outputs. The tutorial is all-inclusive. It provides sample data, a REST file that creates objects, and instructions for debugging problems in the skillset.
If you don't have an Azure subscription, create a free account before you begin.
Prerequisites
Azure AI Search. Create a service or find an existing service under your current subscription. You can use a free service for this tutorial.
Azure Storage account with Blob storage, used for hosting sample data, and for persisting cached data created during a debug session.
Visual Studio Code with a REST client.
Sample debug-sessions.rest file used to create the enrichment pipeline.
Note
This tutorial also uses Azure AI services for language detection, entity recognition, and key phrase extraction. Because the workload is so small, Azure AI services is tapped behind the scenes for free processing for up to 20 transactions. This means that you can complete this exercise without having to create a billable Azure AI services resource.
Set up the sample data
This section creates the sample data set in Azure Blob Storage so that the indexer and skillset have content to work with.
Download sample data (clinical-trials-pdf-19), consisting of 19 files.
Create an Azure storage account or find an existing account.
Choose the same region as Azure AI Search to avoid bandwidth charges.
Choose the StorageV2 (general purpose V2) account type.
Navigate to the Azure Storage services pages in the portal and create a Blob container. Best practice is to specify the access level "private". Name your container
clinicaltrialdataset.In container, select Upload to upload the sample files you downloaded and unzipped in the first step.
While in the portal, copy the connection string for Azure Storage. You can get the connection string from Settings > Access Keys in the portal.
Copy a key and URL
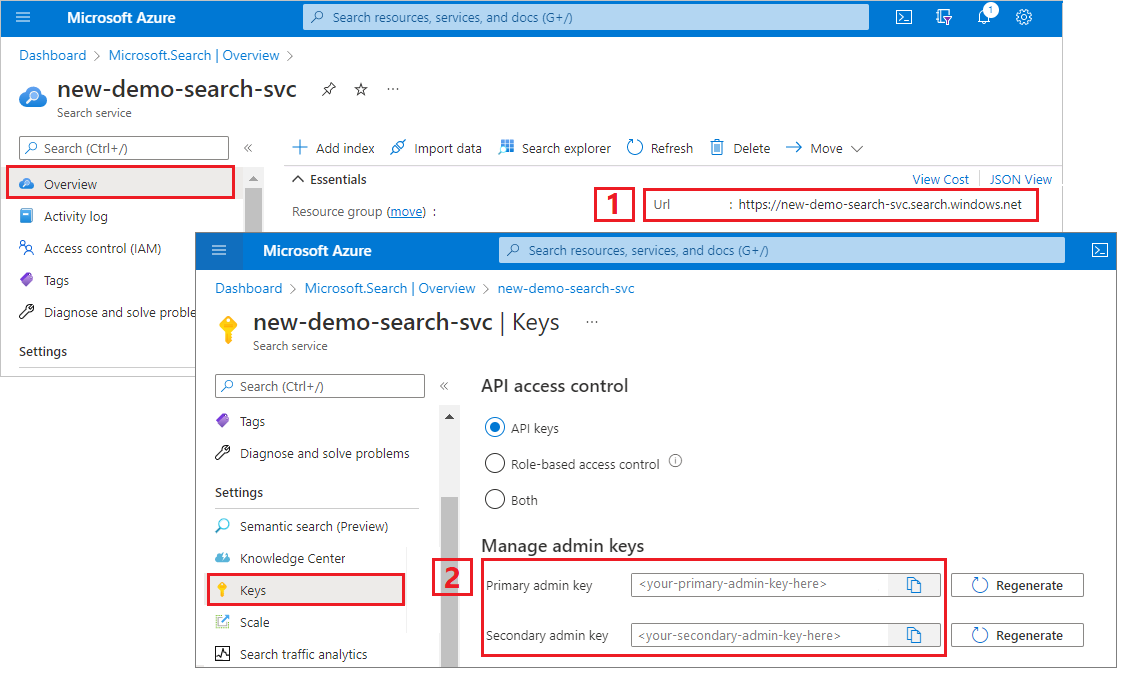
REST calls require the search service endpoint and an API key on every request. You can get these values from the Azure portal.
Sign in to the Azure portal, navigate to the Overview page, and copy the URL. An example endpoint might look like
https://mydemo.search.windows.net.Under Settings > Keys, copy an admin key. Admin keys are used to add, modify, and delete objects. There are two interchangeable admin keys. Copy either one.
A valid API key establishes trust, on a per request basis, between the application sending the request and the search service handling it.
Create data source, skillset, index, and indexer
In this section, create a "buggy" workflow that you can fix in this tutorial.
Start Visual Studio Code and open the
debug-sessions.restfile.Provide the following variables: search service URL, search services admin API key, storage connection string, and the name of the blob container storing the PDFs.
Send each request in turn. Creating the indexer takes several minutes to complete.
Close the file.
Check results in the portal
The sample code intentionally creates a buggy index as a consequence of problems that occurred during skillset execution. The problem is that the index is missing data.
In Azure portal, on the search service Overview page, select the Indexes tab.
Select clinical-trials.
Enter this JSON query string in Search explorer's JSON view. It returns fields for specific documents (identified by the unique
metadata_storage_pathfield)."select": "metadata_storage_path, organizations, locations", "count"=true`Run the query. You should see empty values for
organizationsandlocations.These fields should have been populated through the skillset's Entity Recognition skill, used to detect organizations and locations anywhere within the blob's content. In the next exercise, you'll debug the skillset to determine what went wrong.
Another way to investigate errors and warnings is through the Azure portal.
Open the Indexers tab and select clinical-trials-idxr.
Notice that while the indexer job succeeded overall, there were warnings.
Select Success to view the warnings (if there were mostly errors, the detail link would be Failed). You'll see a long list of every warning emitted by the indexer.

Start your debug session
From the search service left-navigation pane, under Search management, select Debug sessions.
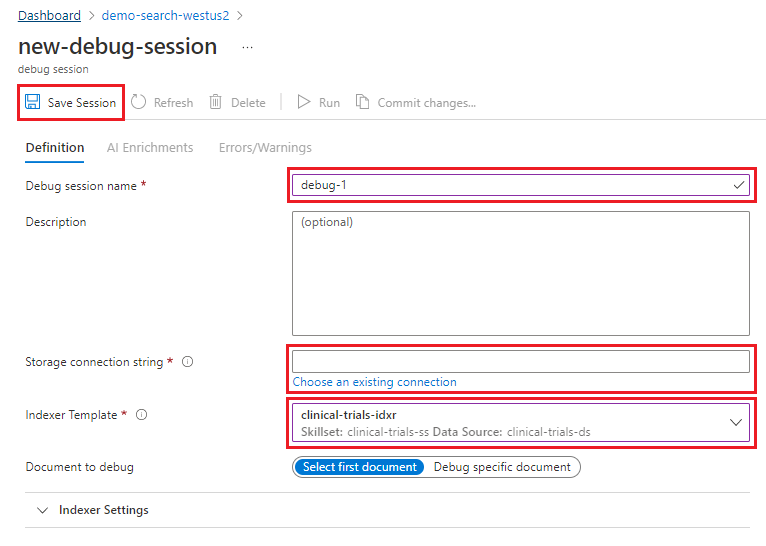
Select + Add Debug Session.
Give the session a name.
Connect the session to your storage account. Create a container named "debug sessions". You can use this container repeatedly to store all of your debug session data.
If you configured a trusted connection between search and storage, select the user-managed identity or system identity for the connection. Otherwise, use the default (None).
In Indexer template, provide the indexer name. The indexer has references to the data source, the skillset, and index.
Accept the default document choice for the first document in the collection. A debug session only works with a single document. You can choose which document to debug, or just use the first one.
Save the session. Saving the session will kick off the enrichment pipeline as defined by the skillset for the selected document.
When the debug session has finished initializing, the session defaults to the AI Enrichments tab, highlighting the Skill Graph. The Skill Graph provides a visual hierarchy of the skillset and its order of execution sequentially and in parallel.

Find issues with the skillset
Any issues reported by the indexer can be found in the adjacent Errors/Warnings tab.
Notice that the Errors/Warnings tab will provide a much smaller list than the one displayed earlier because this list is only detailing the errors for a single document. Like the list displayed by the indexer, you can select on a warning message and see the details of this warning.
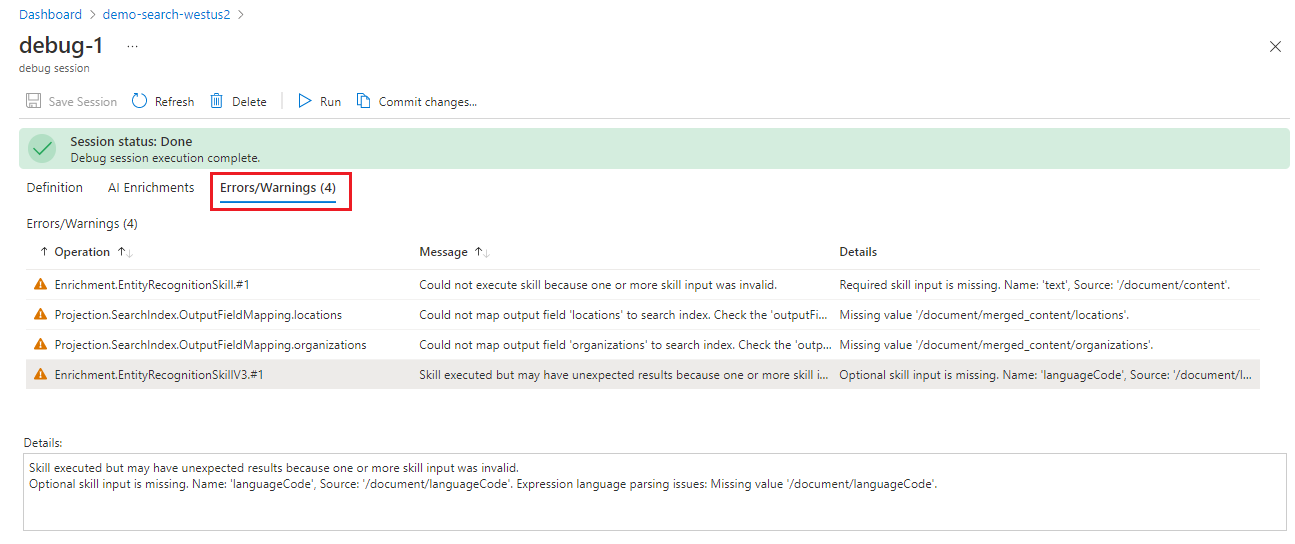
Select Errors/Warnings to review the notifications. You should see four:
"Could not execute skill because one or more skill inputs were invalid. Required skill input is missing. Name: 'text', Source: '/document/content'."
"Could not map output field 'locations' to search index. Check the 'outputFieldMappings' property of your indexer. Missing value '/document/merged_content/locations'."
"Could not map output field 'organizations' to search index. Check the 'outputFieldMappings' property of your indexer. Missing value '/document/merged_content/organizations'."
"Skill executed but may have unexpected results because one or more skill inputs were invalid. Optional skill input is missing. Name: 'languageCode', Source: '/document/languageCode'. Expression language parsing issues: Missing value '/document/languageCode'."
Many skills have a "languageCode" parameter. By inspecting the operation, you can see that this language code input is missing from the EntityRecognitionSkill.#1, which is the same Entity Recognition skill that is having trouble with 'locations' and 'organizations' output.
Because all four notifications are about this skill, your next step is to debug this skill. If possible, start by solving input issues first before moving on to output issues.
Fix missing skill input values
In the Errors/Warnings tab, there are two missing inputs for an operation labeled EntityRecognitionSkill.#1. The detail of the first error explains that a required input for 'text' is missing. The second indicates a problem with an input value "/document/languageCode".
In AI Enrichments > Skill Graph, select the skill labeled #1 to display its details in the right pane.
Select the Executions tab and locate the input for "text".
Select the </> symbol to pop open the Expression Evaluator. The displayed result for this input doesn’t look like a text input. It looks like a series of new line characters
\n \n\n\n\ninstead of text. The lack of text means that no entities can be identified, so either this document fails to meet the prerequisites of the skill, or there's another input that should be used instead.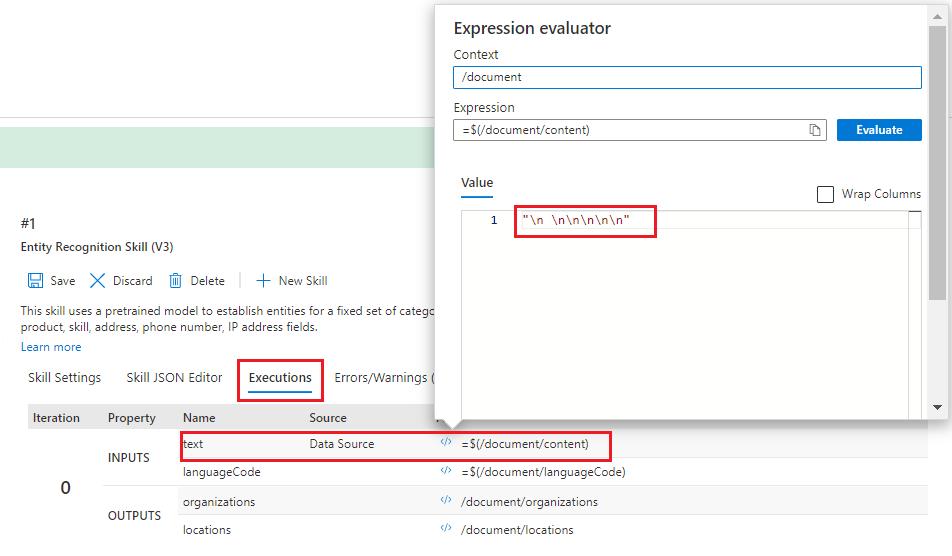
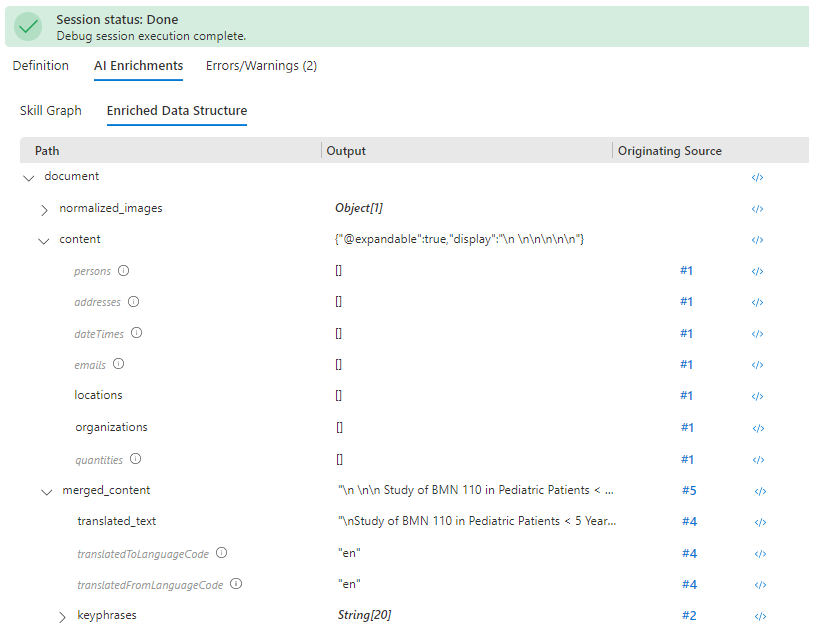
Switch the left pane to Enriched Data Structure and scroll down the list of enrichment nodes for this document. Notice the
\n \n\n\n\nfor "content" has no originating source, but another value for "merged_content" has OCR output. Although there's no indication, the content of this PDF appears to be a JPEG file, as evidenced by the extracted and processed text in "merged_content".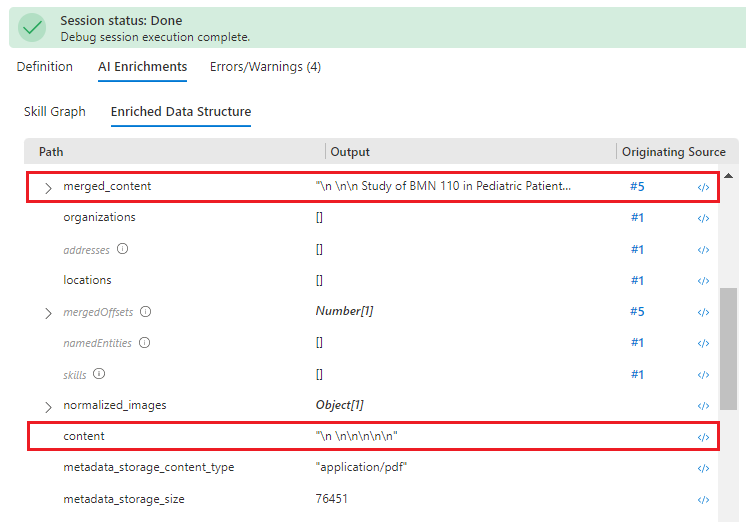
In the right pane, select Executions for the #1 skill and open the Expression Evaluator </> for the input "text".
Change the expression from
/document/contentto/document/merged_content, and then select Evaluate. Notice that the content is now a chunk of text, and thus actionable for entity recognition.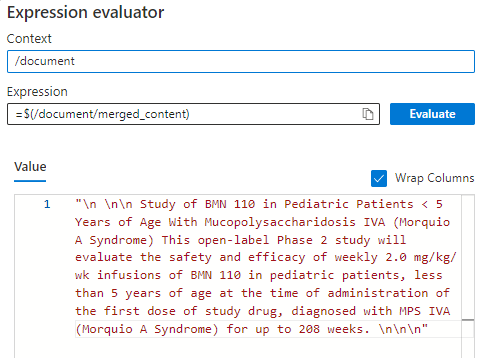
Switch to Skill JSON Editor.
At line 16, under "inputs", change
/document/contentto/document/merged_content.{ "name": "text", "source": "/document/merged_content" },Select Save in the Skill Details pane.

Select Run in the session's window menu. This will kick off another execution of the skillset using the document.
Once the debug session execution completes, check the Errors/Warnings tab and it will show that the error for text input is gone, but the other warnings remain. The next step is to address the warning about "languageCode".

Select the Executions tab and locate the input for "languageCode".
Select the </> symbol to pop open the Expression Evaluator. Notice the confirmation that the "languageCode" property isn't a valid input.
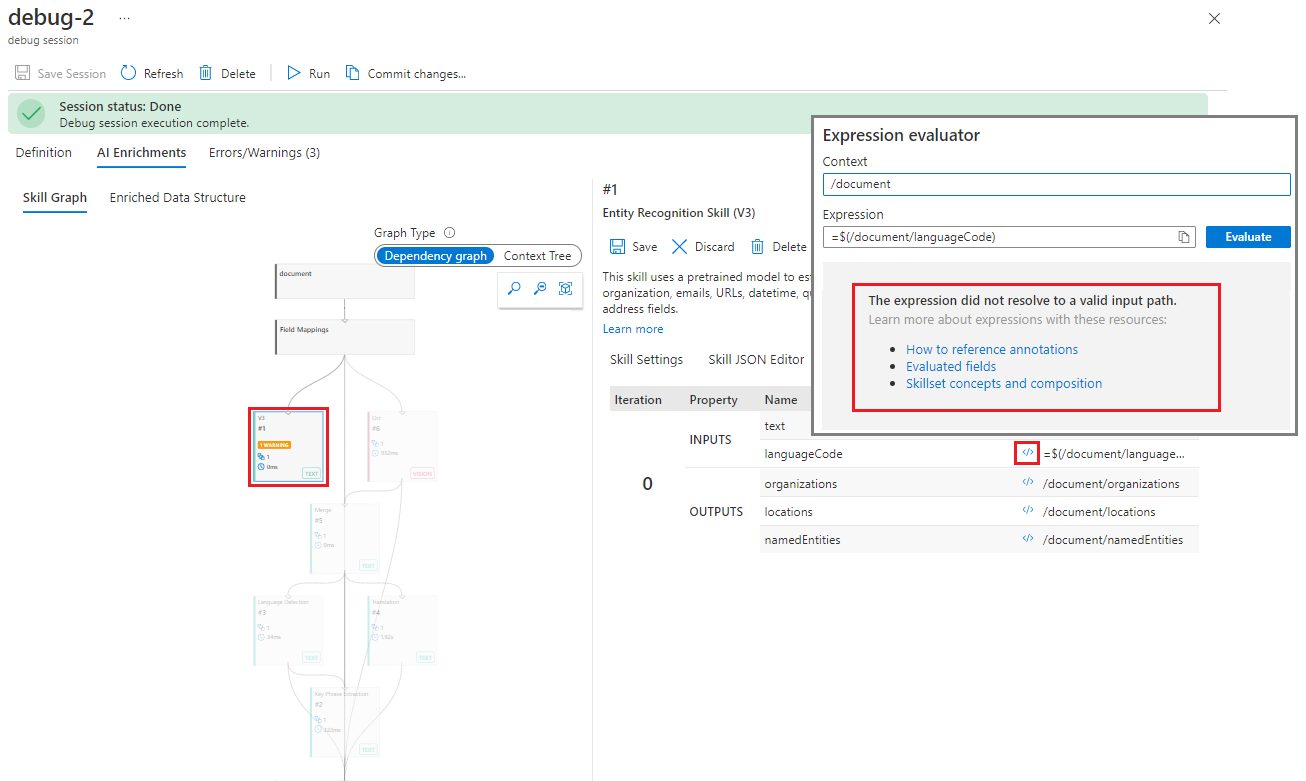
There are two ways to research this error. The first is to look at where the input is coming from - what skill in the hierarchy is supposed to produce this result? The Executions tab in the skill details pane should display the source of the input. If there's no source, this indicates a field mapping error.
In the Executions tab, check the INPUTS and find "languageCode". There's no source for this input listed.
Switch the left pane to Enriched Data Structure. Scroll down the list of enrichment nodes for this document. Notice that there's no "languageCode" node, but there's one for "language". So, there's a typo in the skill settings.
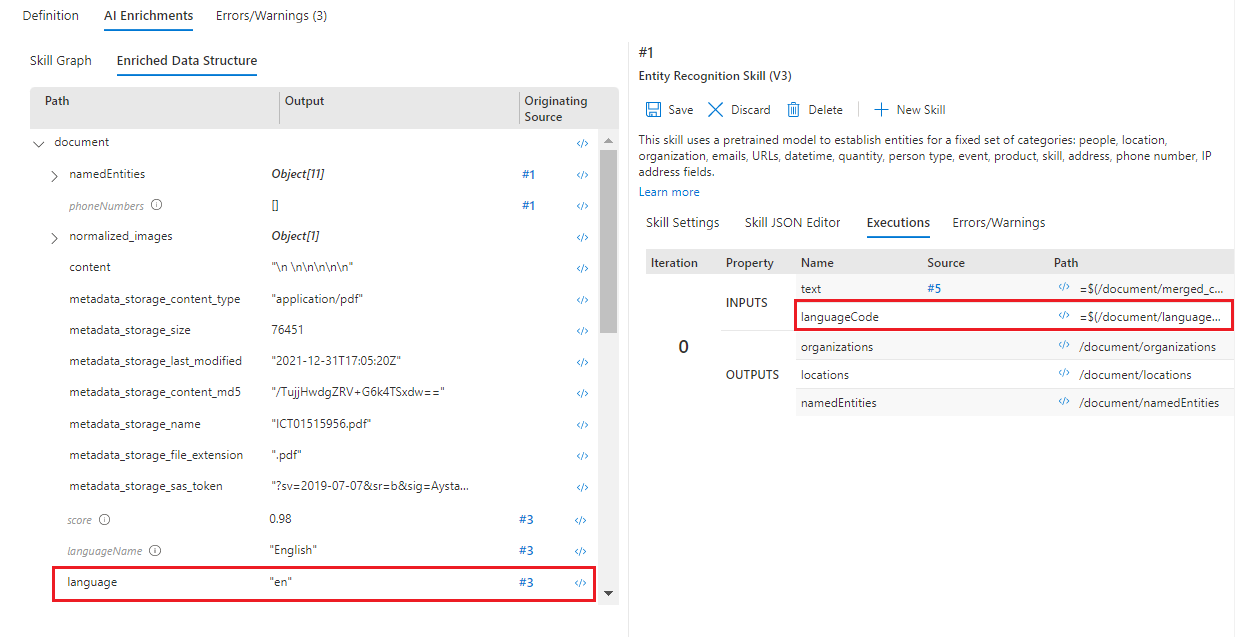
Still in the Enriched Data Structure, open the Expression Evaluator </> for the "language" node and copy the expression
/document/language.In the right pane, select Skill Settings for the #1 skill and open the Expression Evaluator </> for the input "languageCode".
Paste the new value,
/document/languageinto the Expression box and select Evaluate. It should display the correct input "en".Select Save.
Select Run.
After the debug session execution completes, check the Errors/Warnings tab and it will show that all of the input warnings are gone. There now remain just the two warnings about output fields for organizations and locations.
Fix missing skill output values
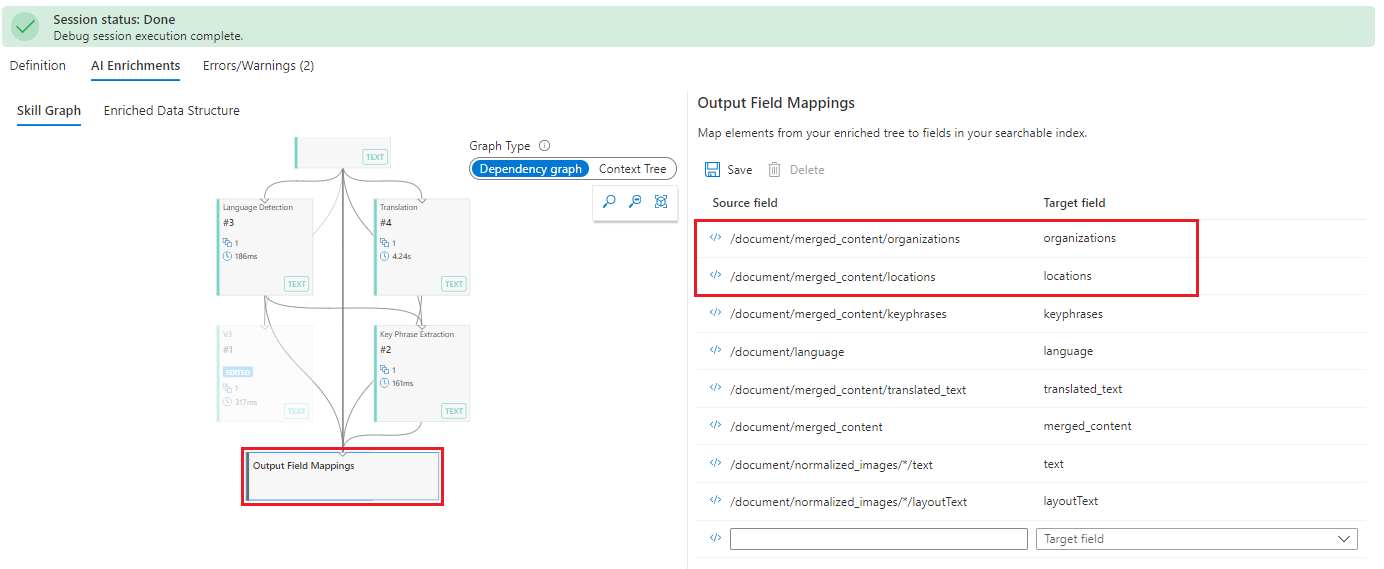
The messages say to check the 'outputFieldMappings' property of your indexer, so lets start there.
Go to Skill Graph and select Output Field Mappings. The mappings are actually correct, but normally you would check the index definition to ensure that fields exist for "locations" and "organizations".
If there's no problem with the index, the next step is to check skill outputs. As before, select the Enriched Data Structure, and scroll the nodes to find "locations" and "organizations". Notice that the parent is "content" instead of "merged_content". The context is wrong.
Switch back to Skill Graph and select the entity recognition skill.
Navigate the Skill Settings to find "context."
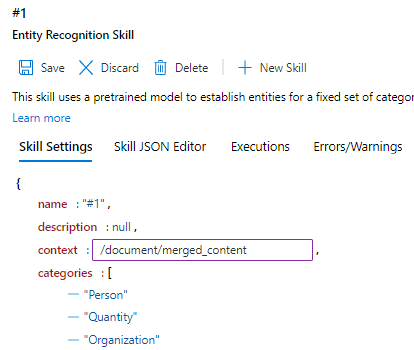
Double-click the setting for "context" and edit it to read '/document/merged_content'.
Select Save.
Select Run.
All of the errors have been resolved.
Commit changes to the skillset
When the debug session was initiated, the search service created a copy of the skillset. This was done to protect the original skillset on your search service. Now that you have finished debugging your skillset, the fixes can be committed (overwrite the original skillset).
Alternatively, if you aren't ready to commit changes, you can save the debug session and reopen it later.
Select Commit changes in the main Debug sessions menu.
Select OK to confirm that you wish to update your skillset.
Close Debug session and open Indexers from the left navigation pane.
Select 'clinical-trials-idxr'.
Select Reset.
Select Run.
Select Refresh to show the status of the reset and run commands.
When the indexer has finished running, there should be a green checkmark and the word Success next to the time stamp for the latest run in the Execution history tab. To ensure that the changes have been applied:
In the left navigation pane, open Indexes.
Select 'clinical-trials' index and in the Search explorer tab, enter this query string:
$select=metadata_storage_path, organizations, locations&$count=trueto return fields for specific documents (identified by the uniquemetadata_storage_pathfield).Select Search.
The results should show that organizations and locations are now populated with the expected values.
Clean up resources
When you're working in your own subscription, it's a good idea at the end of a project to identify whether you still need the resources you created. Resources left running can cost you money. You can delete resources individually or delete the resource group to delete the entire set of resources.
You can find and manage resources in the portal, using the All resources or Resource groups link in the left-navigation pane.
The free service is limited to three indexes, indexers, and data sources. You can delete individual items in the portal to stay under the limit.
Next steps
This tutorial touched on various aspects of skillset definition and processing. To learn more about concepts and workflows, refer to the following articles:
Feedback
Coming soon: Throughout 2024 we will be phasing out GitHub Issues as the feedback mechanism for content and replacing it with a new feedback system. For more information see: https://aka.ms/ContentUserFeedback.
Submit and view feedback for