Note
Access to this page requires authorization. You can try signing in or changing directories.
Access to this page requires authorization. You can try changing directories.
Note
Knowledge stores are secondary storage that exists in Azure Storage and contain the outputs of Azure AI Search skillsets. They're separate from knowledge sources and knowledge bases, which are used in agentic retrieval workflows.
In Azure AI Search, a knowledge store is a repository of skill-generated content that's used for non-search scenarios. You create the knowledge store using an indexer and skillset, and specify Azure Storage to store the output. After the knowledge store is populated, use tools like Storage Explorer or Power BI to explore the content.
In this article, you use the REST API to ingest, enrich, and explore a set of customer reviews of hotel stays in a knowledge store. The knowledge store contains original text content pulled from the source, plus AI-generated content that includes a sentiment score, key phrase extraction, language detection, and text translation of non-English customer comments.
To make the initial data set available, the hotel reviews are first imported into Azure Blob Storage. Post-processing, the results are saved as a knowledge store in Azure Table Storage.
Tip
This article uses REST for detailed explanations of each step. Download the REST file if you want to just run the commands.
Prerequisites
Visual Studio Code with a REST client. If you need help with getting started, see Quickstart: Full-text search using REST.
Azure AI Search. Create a service or find an existing one. You can use the free service for this exercise.
Azure Storage. Create an account or find an existing one. The account type must be StorageV2 (general purpose V2).
The skillset in this example uses Foundry Tools for enrichments. Because the workload is so small, Foundry Tools is tapped behind the scenes to provide free processing for up to 20 transactions daily. A small workload means that you can skip creating or attaching a Microsoft Foundry resource.
Upload data to Azure Storage and get a connection string
Download HotelReviews_data.csv. This CSV contains 19 pieces of customer feedback about a single hotel (originates from Kaggle.com).
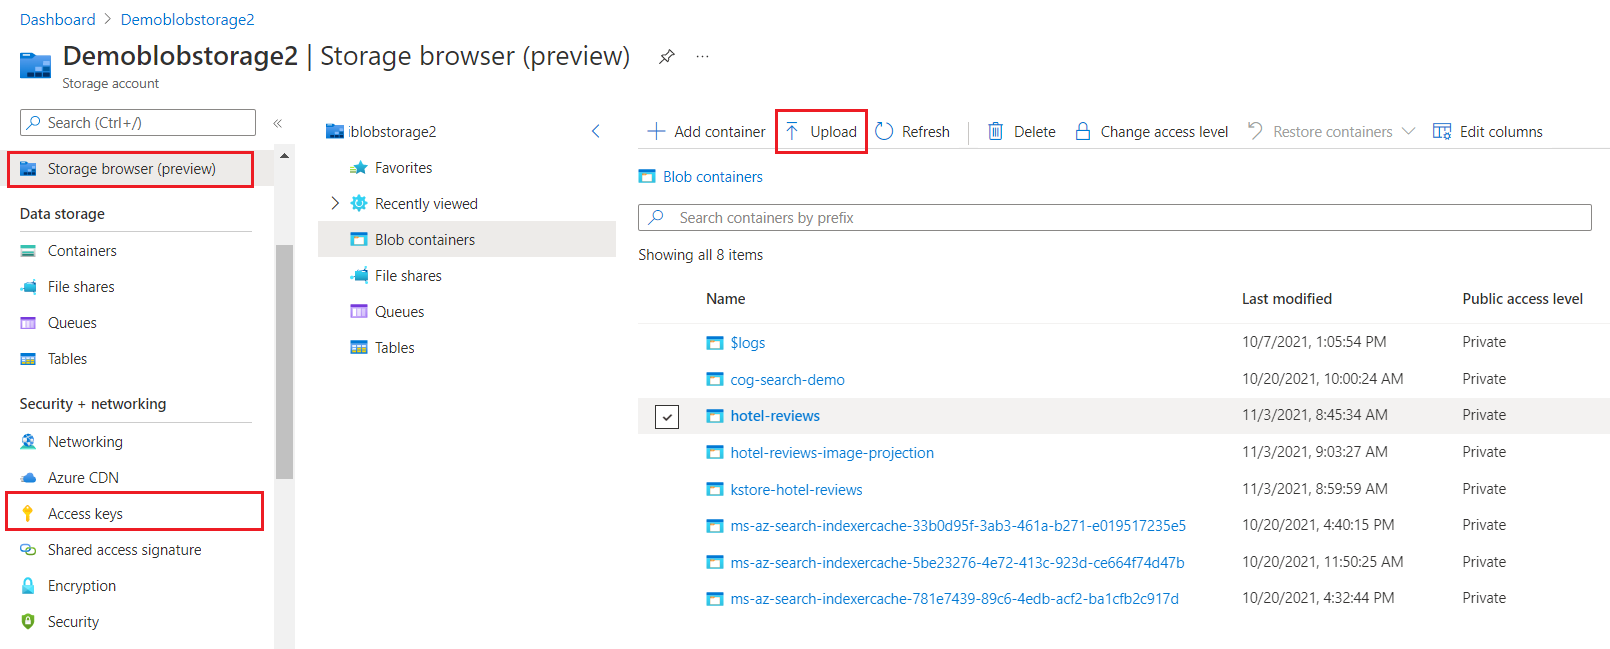
In Azure portal, find your storage account and use Storage Browser to create a blob container named hotel-reviews.
Select Upload at the top of the page to load the HotelReviews_data.csv file you downloaded from the previous step.
On the left, select Access Keys, select Show Keys, and then copy the connection string for either key1 or key2. A full access connection string has the following format:
"knowledgeStore": {
    "storageConnectionString": "DefaultEndpointsProtocol=https;AccountName=<YOUR-ACCOUNT-NAME>;AccountKey=<YOUR-ACCOUNT-KEY>;EndpointSuffix=core.windows.net;"
}
Note
See Connect using a managed identity if you don't want to provide sensitive data in the connection string.
Copy a key and URL
In this example, REST calls require the search service endpoint and use an API key on every request. You can get these values from the Azure portal.
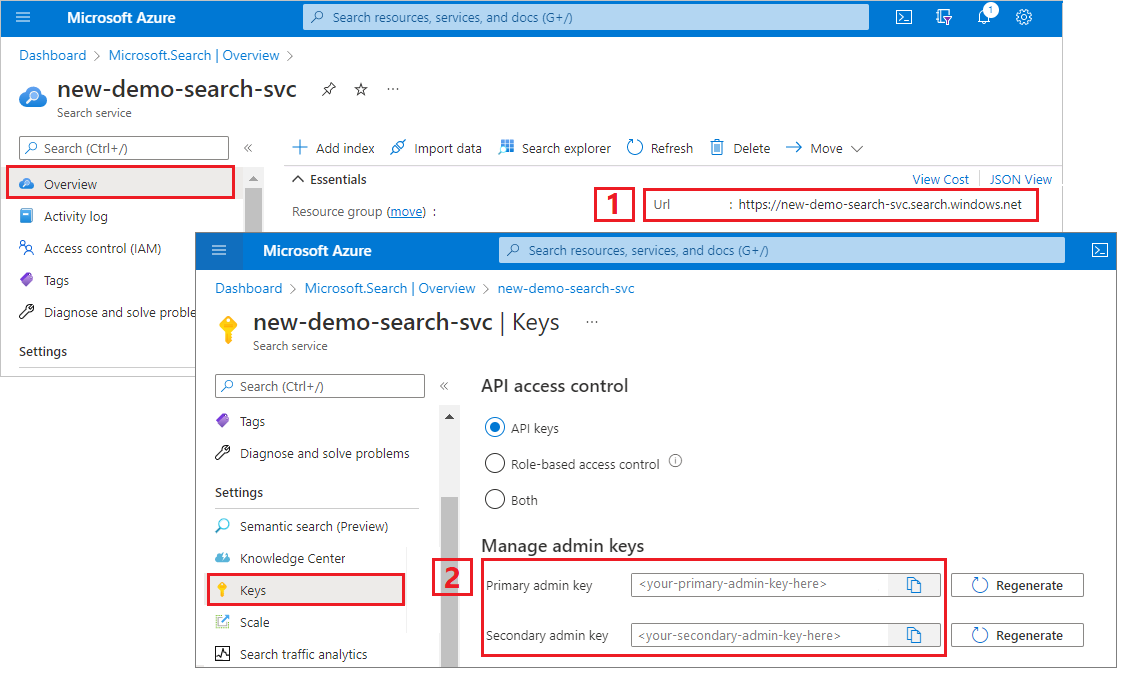
Go to your search service in the Azure portal.
On the Overview page, copy the endpoint URL. An example endpoint might look like
https://mydemo.search.windows.net.On Settings > Keys, copy an admin key. Admin keys are used to add, modify, and delete objects. There are two interchangeable admin keys. Copy either one.
A valid API key establishes trust, on a per request basis, between the application sending the request and the search service handling it.
Create an index
Create Index (REST) creates a search index on the search service. A search index is unrelated to a knowledge store, but the indexer requires one. The search index contains the same content as the knowledge store, which you can explore by sending query requests.
Open a new text file in Visual Studio Code.
Set variables to the search endpoint and the API key you collected earlier.
@baseUrl = PUT-YOUR-SEARCH-SERVICE-URL-HERE
@apiKey = PUT-YOUR-ADMIN-API-KEY-HERE
 @storageConnectionString = PUT-YOUR-STORAGE-CONNECTION-STRING-HERE
@blobContainer = PUT-YOUR-CONTAINER-NAME-HERE (hotel-reviews)
Save the file with a
.restfile extension.Paste in the following example to create the index request.
### Create a new index
POST {{baseUrl}}/indexes?api-version=2025-09-01  HTTP/1.1
    Content-Type: application/json
    api-key: {{apiKey}}

    {
        "name": "hotel-reviews-kstore-idx",
        "fields": [
            { "name": "name", "type": "Edm.String", "filterable": false, "sortable": false, "facetable": false },
            { "name": "reviews_date", "type": "Edm.DateTimeOffset", "searchable": false, "filterable": false, "sortable": false, "facetable": false },
            { "name": "reviews_rating", "type": "Edm.String", "searchable": false, "filterable": false, "sortable": false, "facetable": false },
            { "name": "reviews_text", "type": "Edm.String", "filterable": false,  "sortable": false, "facetable": false },
            { "name": "reviews_title", "type": "Edm.String", "searchable": false, "filterable": false, "sortable": false, "facetable": false },
            { "name": "reviews_username", "type": "Edm.String", "searchable": false, "filterable": false, "sortable": false, "facetable": false },
            { "name": "AzureSearch_DocumentKey", "type": "Edm.String", "searchable": false, "filterable": false, "sortable": false, "facetable": false, "key": true },
            { "name": "language", "type": "Edm.String", "filterable": true, "sortable": false, "facetable": true },
            { "name": "translated_text", "type": "Edm.String", "filterable": false, "sortable": false, "facetable": false },
            { "name": "sentiment", "type": "Collection(Edm.String)", "searchable": false, "filterable": true, "retrievable": true, "sortable": false, "facetable": true },
            { "name": "keyphrases", "type": "Collection(Edm.String)", "filterable": true, "sortable": false, "facetable": true }
        ]
    }
Select Send request. You should have an
HTTP/1.1 201 Createdresponse and the response body should include the JSON representation of the index schema.
Create a data source
Create Data Source creates a data source connection on Azure AI Search.
Paste in the following example to create the data source.
### Create a data source
POST {{baseUrl}}/datasources?api-version=2025-09-01  HTTP/1.1
  Content-Type: application/json
  api-key: {{apiKey}}

    {
        "name": "hotel-reviews-kstore-ds",
        "description": null,
        "type": "azureblob",
        "subtype": null,
        "credentials": {
            "connectionString": "{{storageConnectionString}}"
        },
        "container": {
            "name": "{{blobContainer}}",
            "query": null
        },
        "dataChangeDetectionPolicy": null,
        "dataDeletionDetectionPolicy": null
    }
Select Send request.
Create a skillset
A skillset defines enrichments (skills) and your knowledge store. Create Skillset creates the object on your search service.
Paste in the following example to create the skillset.
### Create a skillset
POST {{baseUrl}}/skillsets?api-version=2025-09-01  HTTP/1.1
    Content-Type: application/json
    api-key: {{apiKey}}

    {
        "name": "hotel-reviews-kstore-ss",
        "description": "Skillset to detect language, translate text, extract key phrases, and score sentiment",
        "skills": [
            {
                "@odata.type": "#Microsoft.Skills.Text.SplitSkill",
                "context": "/document/reviews_text", "textSplitMode": "pages", "maximumPageLength": 5000,
                "inputs": [
                    { "name": "text", "source": "/document/reviews_text" }
                ],
                "outputs": [
                    { "name": "textItems", "targetName": "pages" }
                ]
            },
            {
                "@odata.type": "#Microsoft.Skills.Text.V3.SentimentSkill",
                "context": "/document/reviews_text/pages/*",
                "inputs": [
                    { "name": "text", "source": "/document/reviews_text/pages/*" },
                    { "name": "languageCode", "source": "/document/language" }
                ],
                "outputs": [
                    { "name": "sentiment", "targetName": "sentiment" }
                ]
            },
            {
                "@odata.type": "#Microsoft.Skills.Text.LanguageDetectionSkill",
                "context": "/document",
                "inputs": [
                    { "name": "text", "source": "/document/reviews_text" }
                ],
                "outputs": [
                    { "name": "languageCode", "targetName": "language" }
                ]
            },
            {
                "@odata.type": "#Microsoft.Skills.Text.TranslationSkill",
                "context": "/document/reviews_text/pages/*",
                "defaultFromLanguageCode": null,
                "defaultToLanguageCode": "en",
                "inputs": [
                    { "name": "text", "source": "/document/reviews_text/pages/*" }
                ],
                "outputs": [
                    { "name": "translatedText", "targetName": "translated_text" }
                ]
            },
            {
                "@odata.type": "#Microsoft.Skills.Text.KeyPhraseExtractionSkill",
                "context": "/document/reviews_text/pages/*",
                "inputs": [
                    { "name": "text",  "source": "/document/reviews_text/pages/*" },
                    { "name": "languageCode",  "source": "/document/language" }
                ],
                "outputs": [
                    { "name": "keyPhrases" , "targetName": "keyphrases" }
                ]
            },
            {
                "@odata.type": "#Microsoft.Skills.Util.ShaperSkill",
                "context": "/document",
                "inputs": [
                    { "name": "name",  "source": "/document/name" },
                    { "name": "reviews_date",  "source": "/document/reviews_date" },
                    { "name": "reviews_rating",  "source": "/document/reviews_rating" },
                    { "name": "reviews_text",  "source": "/document/reviews_text" },
                    { "name": "reviews_title",  "source": "/document/reviews_title" },
                    { "name": "reviews_username",  "source": "/document/reviews_username" },
                    { "name": "AzureSearch_DocumentKey",  "source": "/document/AzureSearch_DocumentKey" },
                    {
                    "name": "pages",
                    "sourceContext": "/document/reviews_text/pages/*",
                    "inputs": [
                        {
                        "name": "languageCode",
                        "source": "/document/language"
                        },
                        {
                        "name": "translatedText",
                        "source": "/document/reviews_text/pages/*/translated_text"
                        },
                        {
                        "name": "sentiment",
                        "source": "/document/reviews_text/pages/*/sentiment"
                        },
                        {
                        "name": "keyPhrases",
                        "source": "/document/reviews_text/pages/*/keyphrases/*"
                        },
                        {
                        "name": "Page",
                        "source": "/document/reviews_text/pages/*"
                        }
                    ]
                    }
                ],
                "outputs": [
                    { "name": "output" , "targetName": "tableprojection" }
                ]
            }
        ],
        "knowledgeStore": {
            "storageConnectionString": "{{storageConnectionString}}",
            "projections": [
                {
                    "tables": [
                        { "tableName": "hotelReviews1Document", "generatedKeyName": "Documentid", "source": "/document/tableprojection" },
                        { "tableName": "hotelReviews2Pages", "generatedKeyName": "Pagesid", "source": "/document/tableprojection/pages/*" },
                        { "tableName": "hotelReviews3KeyPhrases", "generatedKeyName": "KeyPhrasesid", "source": "/document/tableprojection/pages/*/keyPhrases/*" }
                    ],
                    "objects": []
                },
                {
                    "tables": [
                        {
                            "tableName": "hotelReviews4InlineProjectionDocument", "generatedKeyName": "Documentid", "sourceContext": "/document",
                            "inputs": [
                                { "name": "name", "source": "/document/name"},
                                { "name": "reviews_date", "source": "/document/reviews_date"},
                                { "name": "reviews_rating", "source": "/document/reviews_rating"},
                                { "name": "reviews_username", "source": "/document/reviews_username"},
                                { "name": "reviews_title", "source": "/document/reviews_title"},
                                { "name": "reviews_text", "source": "/document/reviews_text"},
                                { "name": "AzureSearch_DocumentKey", "source": "/document/AzureSearch_DocumentKey" }
                            ]
                        },
                        {
                            "tableName": "hotelReviews5InlineProjectionPages", "generatedKeyName": "Pagesid", "sourceContext": "/document/reviews_text/pages/*",
                            "inputs": [
                                { "name": "Sentiment", "source": "/document/reviews_text/pages/*/sentiment"},
                                { "name": "LanguageCode", "source": "/document/language"},
                                { "name": "Keyphrases", "source": "/document/reviews_text/pages/*/keyphrases"},
                                { "name": "TranslatedText", "source": "/document/reviews_text/pages/*/translated_text"},
                                { "name": "Page", "source": "/document/reviews_text/pages/*" }
                            ]
                        },
                        {
                            "tableName": "hotelReviews6InlineProjectionKeyPhrases", "generatedKeyName": "kpidv2", "sourceContext": "/document/reviews_text/pages/*/keyphrases/*",
                            "inputs": [
                                { "name": "Keyphrases", "source": "/document/reviews_text/pages/*/keyphrases/*" }
                            ]
                        }
                    ],
                    "objects": []
                }
            ]
        }
    }
Key points:
The Shaper skill is important to knowledge store definition. It specifies how the data flows into the tables of the knowledge store. The inputs are the parts of the enriched document that you want to store. The output is a consolidation of the nodes into a single structure.
Projections specify the tables, objects, and blobs of your knowledge store. Each projection item specifies the
"name"of column or field to create in Azure Storage. The"source"specifies which part of the shaper output is assigned to that field or column.
Create an indexer
Create Indexer creates and runs the indexer. Indexer execution starts by cracking the documents, extracting text and images, and initializing the skillset. The indexer checks for the other objects that you created: the data source, the index, and the skillset.
Paste in the following example to create the indexer.
### Create indexer
POST {{baseUrl}}/indexers?api-version=2025-09-01  HTTP/1.1
    Content-Type: application/json
    api-key: {{apiKey}}

    {
        "name": "hotel-reviews-kstore-idxr",
        "dataSourceName": "hotel-reviews-kstore-ds",
        "skillsetName": "hotel-reviews-kstore-ss",
        "targetIndexName": "hotel-reviews-kstore-idx",
        "parameters": {
            "configuration": {
                "dataToExtract": "contentAndMetadata",
                "parsingMode": "delimitedText",
                "firstLineContainsHeaders": true,
                "delimitedTextDelimiter": ","
    }
},
"fieldMappings": [
    {
        "sourceFieldName": "AzureSearch_DocumentKey",
        "targetFieldName": "AzureSearch_DocumentKey",
        "mappingFunction": { "name": "base64Encode" }
    }
],
"outputFieldMappings": [
    { "sourceFieldName": "/document/reviews_text/pages/*/keyphrases/*", "targetFieldName": "keyphrases" },
    { "sourceFieldName": "/document/language", "targetFieldName": "language" },
    { "sourceFieldName": "/document/reviews_text/pages/*/sentiment", "targetFieldName": "sentiment" }
    ]
}
Select Send request to create and run the indexer. This step takes several minutes to complete.
Key points:
The
parameters/configurationobject controls how the indexer ingests the data. In this case, the input data is in a single CSV file that has a header line and comma-separated values.The field mapping for
AzureSearch_DocumentKeycreates a unique identifier for each document generated by the blob indexer (based on the metadata storage path).Output field mappings specify how enriched fields are mapped to fields in a search index. Output field mappings aren't used in knowledge stores (knowledge stores use shapes and projections to express the physical data structures).
Check status
After you send each request, the search service should respond with a 201 success message.
### Get Indexer Status (wait several minutes for the indexer to complete)
GET {{baseUrl}}/indexers/hotel-reviews-kstore-idxr/status?api-version=2025-09-01  HTTP/1.1
  Content-Type: application/json
  api-key: {{apiKey}}
After several minutes, you can query the index to inspect the content. Even if you're not using the index, this step is a convenient way to confirm that the skillset produced the expected output.
### Query the index (indexer status must be "success" before querying the index)
POST {{baseUrl}}/indexes/hotel-reviews-kstore-idx/docs/search?api-version=2025-09-01  HTTP/1.1
  Content-Type: application/json
  api-key: {{apiKey}}

  {
    "search": "*",
    "select": "reviews_title, reviews_username, language, translated_text, sentiment",
    "count": true
  }
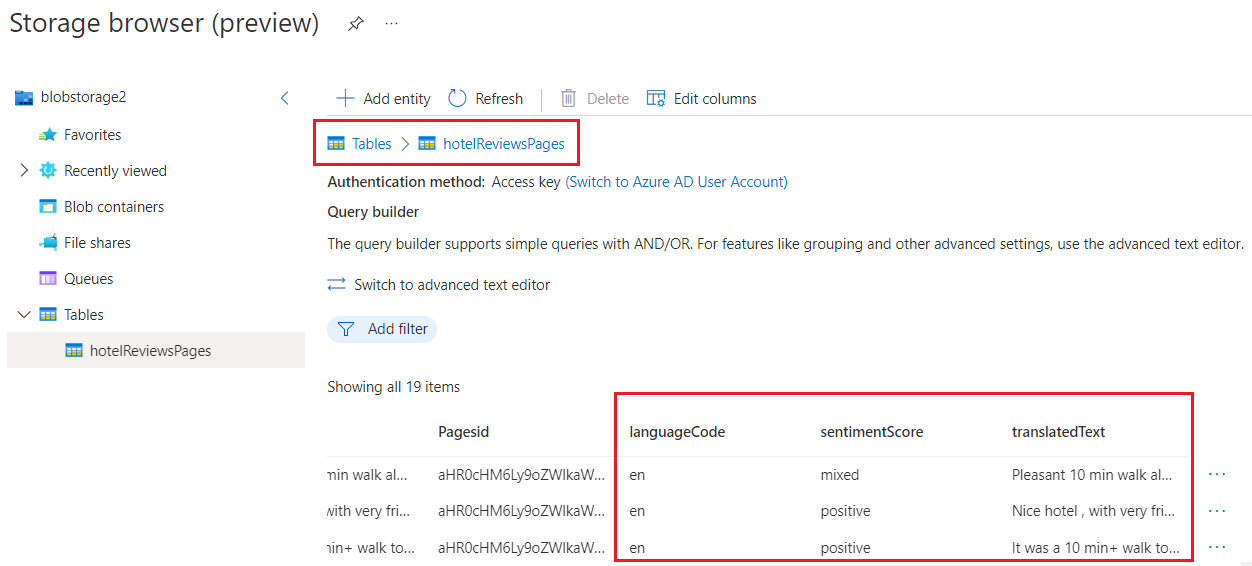
Check tables in Azure portal
In the Azure portal, switch to your Azure Storage account and use Storage Browser to view the new tables. You should see six tables, one for each projection defined in the skillset.
Each table is generated with the IDs necessary for cross-linking the tables in queries. When you open a table, scroll past these fields to view the content fields added by the pipeline.
In this walkthrough, the knowledge store is composed of various tables that show different ways of shaping and structuring data. Tables one through three use output from a Shaper skill to determine columns and rows. Tables four through six are created from inline shaping instructions embedded within the projection itself. You can use either approach to achieve the same outcome.
| Table | Description |
|---|---|
hotelReviews1Document |
Contains fields carried forward from the CSV, such as reviews_date and reviews_text. |
hotelReviews2Pages |
Contains enriched fields created by the skillset, such as sentiment score and translated text. |
hotelReviews3KeyPhrases |
Contains a long list of just the key phrases. |
hotelReviews4InlineProjectionDocument |
Alternative to the first table, using inline shaping instead of the Shaper skill to shape data for the projection. |
hotelReviews5InlineProjectionPages |
Alternative to the second table, using inline shaping. |
hotelReviews6InlineProjectionKeyPhrases |
Alternative to the third table, using inline shaping. |
Clean up
When you're working in your own subscription, it's a good idea at the end of a project to identify whether you still need the resources you created. Resources left running can cost you money. You can delete resources individually or delete the resource group to delete the entire set of resources.
You can find and manage resources in the Azure portal, using the All resources or Resource groups link in the left-navigation pane.
Next steps
Now that you've enriched your data by using Foundry Tools and projected the results to a knowledge store, you can use Storage Explorer or other apps to explore your enriched data set.