Note
Access to this page requires authorization. You can try signing in or changing directories.
Access to this page requires authorization. You can try changing directories.
In this quickstart, you use the Azure AI Search client library for .NET to add semantic ranking to an existing search index and query the index.
Semantic ranking is query-side functionality that uses machine reading comprehension to rescore search results, promoting the most semantically relevant matches to the top of the list. You can add a semantic configuration to an existing index with no rebuild requirement. Semantic ranking is most effective for informational or descriptive text.
Tip
Want to get started right away? Download the source code on GitHub.
Prerequisites
An Azure account with an active subscription. Create an account for free.
An index with descriptive text fields attributed as
searchableandretrievable. This quickstart assumes the hotels-sample index..NET 9 or later.
Git to clone the sample repository.
The Azure CLI for keyless authentication with Microsoft Entra ID.
Configure access
Before you begin, make sure you have permissions to access content and operations in Azure AI Search. This quickstart uses Microsoft Entra ID for authentication and role-based access for authorization. You must be an Owner or User Access Administrator to assign roles. If roles aren't feasible, use key-based authentication instead.
To configure the recommended role-based access:
Enable role-based access for your search service.
Assign the following roles to your user account.
Search Service Contributor
Search Index Data Reader
Note
Unlike other quickstarts that create and load an index, this quickstart assumes an existing index that already contains data, so you don't need the Search Index Data Contributor role.
Get endpoint
Each Azure AI Search service has an endpoint, which is a unique URL that identifies and provides network access to the service. In a later section, you specify this endpoint to connect to your search service programmatically.
To get the endpoint:
Go to your search service in the Azure portal.
From the left pane, select Overview.
Make a note of the endpoint, which should look like
https://my-service.search.windows.net.
Start with an index
This quickstart modifies an existing index to include a semantic configuration. We recommend the hotels-sample index, which you can create in minutes using an Azure portal wizard.
To use a different index, replace the index name, field names in the semantic configuration, and field names in query select statements throughout the sample code. Your index should contain descriptive text fields that are attributed as searchable and retrievable.
To review and query the hotels-sample index before semantic ranking:
Go to your search service in the Azure portal.
From the left pane, select Search management > Indexes.
Select hotels-sample.
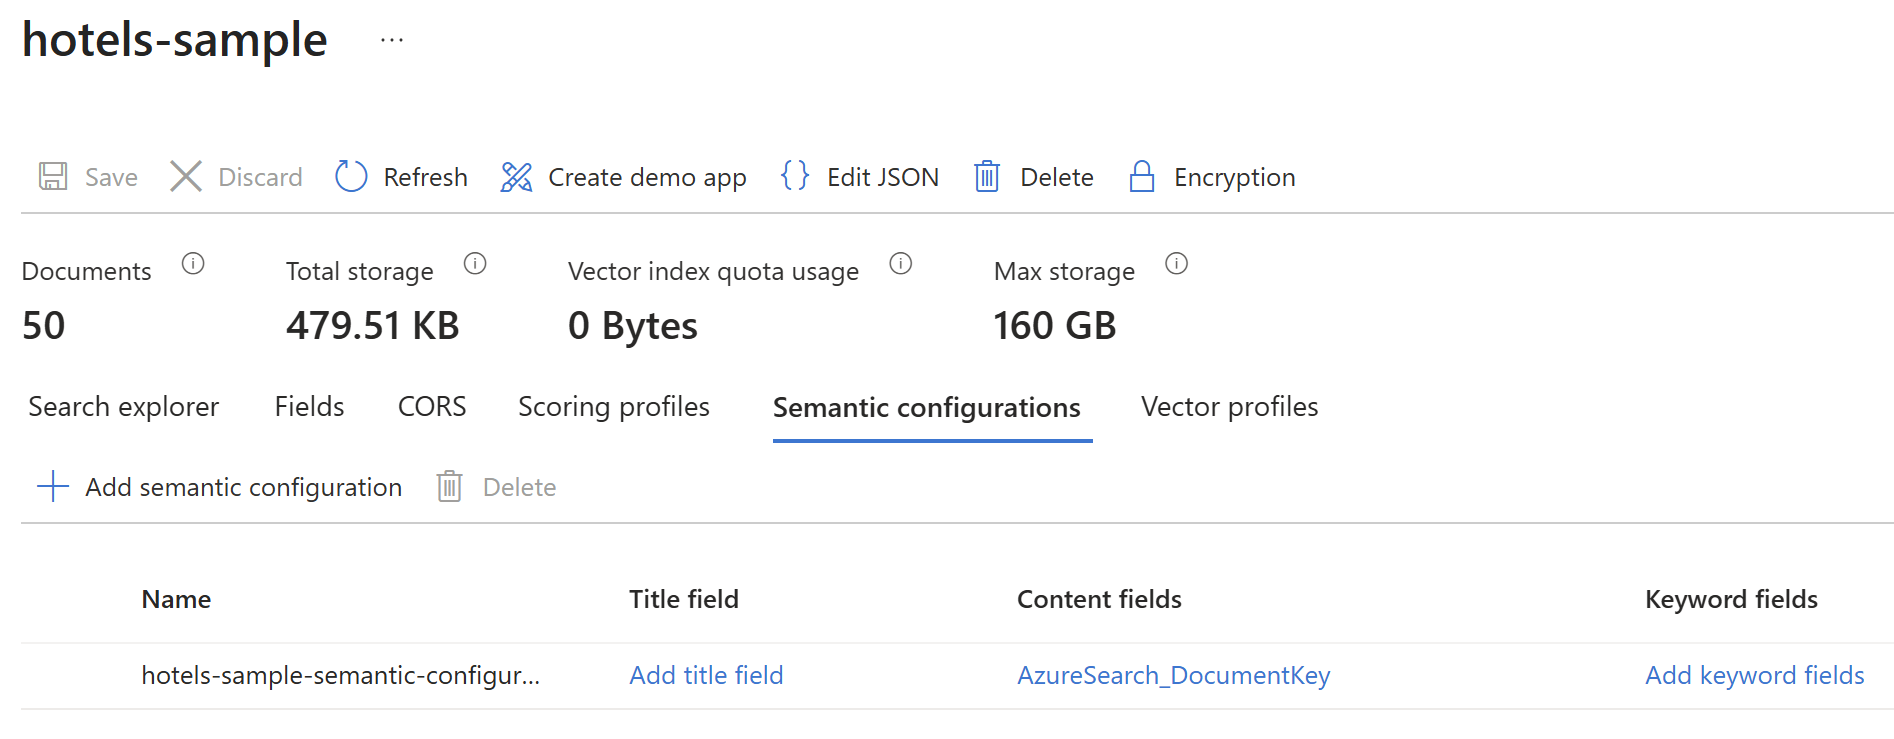
Select Semantic configurations to view any existing configurations. If you enabled semantic ranking during the wizard creation flow, there should be a default configuration.
Select Search explorer, and then select View > JSON view.
Paste the following JSON into the query editor.
{
  "search": "walking distance to live music",
  "select": "HotelId, HotelName, Description",
  "count": true
}
Select Search to run the query.
The response should be similar to the following example. This is a full-text query ranked by BM25, so results match on individual query terms and linguistic variants rather than the overall meaning of the query. For example,
walkingmatcheswalk, andliveandmusicmatch independently rather than as a phrase."@odata.count": 30, "value": [ { "@search.score": 5.004435, "HotelId": "2", "HotelName": "Old Century Hotel", "Description": "The hotel is situated in a nineteenth century plaza, which has been expanded and renovated to the highest architectural standards to create a modern, functional and first-class hotel in which art and unique historical elements coexist with the most modern comforts. The hotel also regularly hosts events like wine tastings, beer dinners, and live music." }, { "@search.score": 4.555706, "HotelId": "24", "HotelName": "Uptown Chic Hotel", "Description": "Chic hotel near the city. High-rise hotel in downtown, within walking distance to theaters, art galleries, restaurants and shops. Visit Seattle Art Museum by day, and then head over to Benaroya Hall to catch the evening's concert performance." }, { "@search.score": 3.5625167, "HotelId": "4", "HotelName": "Sublime Palace Hotel", "Description": "Sublime Cliff Hotel is located in the heart of the historic center of Sublime in an extremely vibrant and lively area within short walking distance to the sites and landmarks of the city and is surrounded by the extraordinary beauty of churches, buildings, shops and monuments. Sublime Cliff is part of a lovingly restored 19th century resort, updated for every modern convenience." }, ... // Trimmed for brevity ]Tip
This query shows how the response looks before semantic ranking is applied. After you configure a semantic configuration, add
"queryType": "semantic"and"semanticConfiguration": "semantic-config"to see how the same query is ranked differently by semantic ranking.

Set up the environment
Use Git to clone the sample repository.
git clone https://github.com/Azure-Samples/azure-search-dotnet-samplesNavigate to the quickstart folder.
cd azure-search-dotnet-samples/quickstart-semantic-rankingIn
BuildIndex/Program.cs, replace the placeholder value forendpointwith the URL you obtained in Get endpoint.Repeat the previous step for
QueryIndex/Program.cs.For keyless authentication with Microsoft Entra ID, sign in to your Azure account. If you have multiple subscriptions, select the one that contains your Azure AI Search service.
az login
Run the code
Run the first project to update the index with a semantic configuration.
dotnet run --project BuildIndexRun the second project to query the index. Press Enter between queries to see the progression from simple query to semantic query with captions and answers.
dotnet run --project QueryIndex
Output
The first project updates the hotels-sample index with a semantic configuration. The output includes confirmation of the semantic configuration.
Here's a list of all indexes on the search service. You should see hotels-sample:
hotels-sample

Added new semantic configuration 'semantic-config' to the index definition.
Index updated successfully.
Here is the revised index definition:
{
  "Name": "hotels-sample",
  ... // Trimmed for brevity
  "SemanticSearch": {
    "DefaultConfigurationName": "semantic-config",
    "Configurations": [
      {
        "Name": "hotels-sample-semantic-configuration",
        ... // Trimmed for brevity
      },
      {
        "Name": "semantic-config",
        "PrioritizedFields": {
          "TitleField": {
            "FieldName": "HotelName"
          },
          "ContentFields": [
            {
              "FieldName": "Description"
            }
          ],
          "KeywordsFields": [
            {
              "FieldName": "Tags"
            }
          ]
        },
        "RankingOrder": {}
      }
    ]
  }
}
The second project runs four queries. The output includes the search results with relevance scores, captions, and answers.
Query 1: Simple query using the search string 'walking distance to live music'.
HotelId: 2
HotelName: Old Century Hotel
Description: The hotel is situated in a nineteenth century plaza, which has been expanded and renovated to the highest architectural standards to create a modern, functional and first-class hotel in which art and unique historical elements coexist with the most modern comforts. The hotel also regularly hosts events like wine tastings, beer dinners, and live music.
@search.score: 5.004435
----------------------------------------
HotelId: 24
HotelName: Uptown Chic Hotel
Description: Chic hotel near the city. High-rise hotel in downtown, within walking distance to theaters, art galleries, restaurants and shops. Visit Seattle Art Museum by day, and then head over to Benaroya Hall to catch the evening's concert performance.
@search.score: 4.555706
----------------------------------------
... // Trimmed for brevity
Press Enter to continue to the next query...


Query 2: Semantic query (no captions, no answers) for 'walking distance to live music'.
HotelId: 24
HotelName: Uptown Chic Hotel
Description: Chic hotel near the city. High-rise hotel in downtown, within walking distance to theaters, art galleries, restaurants and shops. Visit Seattle Art Museum by day, and then head over to Benaroya Hall to catch the evening's concert performance.
@search.score: 4.555706
@search.rerankerScore: 2.613231658935547
----------------------------------------
HotelId: 2
HotelName: Old Century Hotel
Description: The hotel is situated in a nineteenth century plaza, which has been expanded and renovated to the highest architectural standards to create a modern, functional and first-class hotel in which art and unique historical elements coexist with the most modern comforts. The hotel also regularly hosts events like wine tastings, beer dinners, and live music.
@search.score: 5.004435
@search.rerankerScore: 2.271434783935547
----------------------------------------
... // Trimmed for brevity
Press Enter to continue to the next query...


Query 3: Semantic query with captions.
Caption: Chic hotel near the city. High-rise hotel in downtown, within walking distance to<em> theaters, </em>art galleries, restaurants and shops. Visit<em> Seattle Art Museum </em>by day, and then head over to<em> Benaroya Hall </em>to catch the evening's concert performance.
HotelId: 24
HotelName: Uptown Chic Hotel
Description: Chic hotel near the city. High-rise hotel in downtown, within walking distance to theaters, art galleries, restaurants and shops. Visit Seattle Art Museum by day, and then head over to Benaroya Hall to catch the evening's concert performance.
@search.score: 4.555706
@search.rerankerScore: 2.613231658935547
----------------------------------------
... // Trimmed for brevity
Press Enter to continue to the next query...


Query 4: Semantic query with a verbatim answer from the Description field for 'what's a good hotel for people who like to read'.
Extractive Answers:
  Nature is Home on the beach. Explore the shore by day, and then come home to our shared living space to relax around a stone fireplace, sip something warm, and explore the<em> library </em>by night. Save up to 30 percent. Valid Now through the end of the year. Restrictions and blackouts may apply.
----------------------------------------
... // Trimmed for brevity
Understand the code
Note
The code snippets in this section might have been modified for readability. For a complete working example, see the source code.
Now that you've run the code, let's break down the key steps:
Configuration and authentication
Both projects share the same configuration pattern. The Program.cs files define the search endpoint and use DefaultAzureCredential for keyless authentication.
var endpoint = new Uri("PUT-YOUR-SEARCH-SERVICE-ENDPOINT-HERE");
var credential = new DefaultAzureCredential();
var indexClient = new SearchIndexClient(endpoint, credential);
Key takeaways:
DefaultAzureCredentialprovides keyless authentication using Microsoft Entra ID. It chains multiple credential types, including the Azure CLI credential fromaz login.SearchIndexClientmanages index-level operations, such as updating the index schema.SearchClienthandles document-level operations, such as querying the index.
Update the index with a semantic configuration
The following code in BuildIndex/Program.cs adds a semantic configuration to the existing index. This operation doesn't delete any search documents, and your index remains operational after the configuration is added.
static void AddSemanticConfiguration(
    SearchIndex index,
    string semanticConfigName)
{
    if (index.SemanticSearch == null)
    {
        index.SemanticSearch = new SemanticSearch();
    }
    var configs = index.SemanticSearch.Configurations;
    if (!configs.Any(c => c.Name == semanticConfigName))
    {
        var prioritizedFields =
            new SemanticPrioritizedFields
        {
            TitleField = new SemanticField("HotelName"),
            ContentFields =
            {
                new SemanticField("Description")
            },
            KeywordsFields =
            {
                new SemanticField("Tags")
            }
        };

        configs.Add(
            new SemanticConfiguration(
                semanticConfigName,
                prioritizedFields
            )
        );
    }
    index.SemanticSearch.DefaultConfigurationName =
        semanticConfigName;
}
Key takeaways:
- A semantic configuration specifies the fields used for semantic ranking.
- Semantic configurations can be added to existing indexes without rebuilding.
TitleFieldsets the field that represents the document title.ContentFieldssets the fields containing the main content.KeywordsFieldssets the fields containing keywords or tags.
Query the index
The QueryIndex project runs four queries in sequence, progressing from a simple keyword search to semantic ranking with captions and answers.
Simple query
The first query is a simple keyword search that doesn't use semantic ranking. This query serves as a baseline for comparing results with and without semantic reranking.
await RunQuery(client, searchText, new SearchOptions
{
    Size = 5,
    QueryType = SearchQueryType.Simple,
    IncludeTotalCount = true,
    Select = { "HotelId", "HotelName", "Description" }
});
Key takeaways:
SearchQueryType.Simpleuses the default BM25 ranking algorithm.- Results are ranked by keyword relevance (
@search.score) only.
Semantic query (no captions, no answers)
The next query adds semantic ranking with no captions or answers. The following code shows the minimum requirement for invoking semantic ranking.
var semanticOptions = new SearchOptions
{
    Size = 5,
    QueryType = SearchQueryType.Semantic,
    SemanticSearch = new SemanticSearchOptions
    {
        SemanticConfigurationName = "semantic-config"
    },
    IncludeTotalCount = true,
    Select =
    {
        "HotelId", "HotelName", "Description"
    }
};
await RunQuery(client, searchText, semanticOptions);
Key takeaways:
SearchQueryType.Semanticenables semantic ranking on the query.SemanticConfigurationNamespecifies which semantic configuration to use.@search.rerankerScoreindicates semantic relevance (higher is better).- The initial results from the term query are rescored using semantic ranking models. For this dataset and query, the effects of semantic ranking are more pronounced in the lower-ranked results.
Semantic query with captions
The following code adds captions to extract the most relevant passages from each result, with hit highlighting applied to the important terms and phrases.
var captionsOptions = new SearchOptions
{
    Size = 5,
    QueryType = SearchQueryType.Semantic,
    SemanticSearch = new SemanticSearchOptions
    {
        SemanticConfigurationName = "semantic-config",
        QueryCaption =
            new QueryCaption(QueryCaptionType.Extractive)
        {
            HighlightEnabled = true
        }
    },
    IncludeTotalCount = true,
    Select =
    {
        "HotelId", "HotelName", "Description"
    }
};
captionsOptions.HighlightFields.Add("Description");
await RunQuery(
    client, searchText, captionsOptions, showCaptions: true
);
Key takeaways:
QueryCaptionenables extractive captions from the content fields.- Captions surface the most relevant passages and add
<em>tags around important terms.
Semantic query with answers
The final query adds semantic answers. This query uses a different search string (searchText2) because semantic answers work best when the query is phrased as a question. The answer is a verbatim passage extracted from your index, not a composed response from a chat completion model.
The query and the indexed content must be closely aligned for an answer to be returned. If no candidate meets the confidence threshold, the response doesn't include an answer. This example uses a question that's known to produce a result so that you can see the syntax. If answers aren't useful for your scenario, omit QueryAnswer from your code. For composed answers, consider a RAG pattern or agentic retrieval.
var answersOptions = new SearchOptions
{
    Size = 5,
    QueryType = SearchQueryType.Semantic,
    SemanticSearch = new SemanticSearchOptions
    {
        SemanticConfigurationName = "semantic-config",
        QueryAnswer =
            new QueryAnswer(QueryAnswerType.Extractive)
    },
    IncludeTotalCount = true,
    Select =
    {
        "HotelId", "HotelName", "Description"
    }
};
await RunQuery(
    client, searchText2, answersOptions, showAnswers: true
);
Key takeaways:
QueryAnswerenables extractive answers for question-like queries.- Answers are verbatim content extracted from your index, not generated text.
In this quickstart, you use the Azure AI Search client library for Java to add semantic ranking to an existing search index and query the index.
Semantic ranking is query-side functionality that uses machine reading comprehension to rescore search results, promoting the most semantically relevant matches to the top of the list. You can add a semantic configuration to an existing index with no rebuild requirement. Semantic ranking is most effective for informational or descriptive text.
Tip
Want to get started right away? Download the source code on GitHub.
Prerequisites
An Azure account with an active subscription. Create an account for free.
An index with descriptive text fields attributed as
searchableandretrievable. This quickstart assumes the hotels-sample index.Java 21 (LTS) and Maven.
Git to clone the sample repository.
The Azure CLI for keyless authentication with Microsoft Entra ID.
Configure access
Before you begin, make sure you have permissions to access content and operations in Azure AI Search. This quickstart uses Microsoft Entra ID for authentication and role-based access for authorization. You must be an Owner or User Access Administrator to assign roles. If roles aren't feasible, use key-based authentication instead.
To configure the recommended role-based access:
Enable role-based access for your search service.
Assign the following roles to your user account.
Search Service Contributor
Search Index Data Reader
Note
Unlike other quickstarts that create and load an index, this quickstart assumes an existing index that already contains data, so you don't need the Search Index Data Contributor role.
Get endpoint
Each Azure AI Search service has an endpoint, which is a unique URL that identifies and provides network access to the service. In a later section, you specify this endpoint to connect to your search service programmatically.
To get the endpoint:
Go to your search service in the Azure portal.
From the left pane, select Overview.
Make a note of the endpoint, which should look like
https://my-service.search.windows.net.
Start with an index
This quickstart modifies an existing index to include a semantic configuration. We recommend the hotels-sample index, which you can create in minutes using an Azure portal wizard.
To use a different index, replace the index name, field names in the semantic configuration, and field names in query select statements throughout the sample code. Your index should contain descriptive text fields that are attributed as searchable and retrievable.
To review and query the hotels-sample index before semantic ranking:
Go to your search service in the Azure portal.
From the left pane, select Search management > Indexes.
Select hotels-sample.
Select Semantic configurations to view any existing configurations. If you enabled semantic ranking during the wizard creation flow, there should be a default configuration.
Select Search explorer, and then select View > JSON view.
Paste the following JSON into the query editor.
{
  "search": "walking distance to live music",
  "select": "HotelId, HotelName, Description",
  "count": true
}
Select Search to run the query.
The response should be similar to the following example. This is a full-text query ranked by BM25, so results match on individual query terms and linguistic variants rather than the overall meaning of the query. For example,
walkingmatcheswalk, andliveandmusicmatch independently rather than as a phrase."@odata.count": 30, "value": [ { "@search.score": 5.004435, "HotelId": "2", "HotelName": "Old Century Hotel", "Description": "The hotel is situated in a nineteenth century plaza, which has been expanded and renovated to the highest architectural standards to create a modern, functional and first-class hotel in which art and unique historical elements coexist with the most modern comforts. The hotel also regularly hosts events like wine tastings, beer dinners, and live music." }, { "@search.score": 4.555706, "HotelId": "24", "HotelName": "Uptown Chic Hotel", "Description": "Chic hotel near the city. High-rise hotel in downtown, within walking distance to theaters, art galleries, restaurants and shops. Visit Seattle Art Museum by day, and then head over to Benaroya Hall to catch the evening's concert performance." }, { "@search.score": 3.5625167, "HotelId": "4", "HotelName": "Sublime Palace Hotel", "Description": "Sublime Cliff Hotel is located in the heart of the historic center of Sublime in an extremely vibrant and lively area within short walking distance to the sites and landmarks of the city and is surrounded by the extraordinary beauty of churches, buildings, shops and monuments. Sublime Cliff is part of a lovingly restored 19th century resort, updated for every modern convenience." }, ... // Trimmed for brevity ]Tip
This query shows how the response looks before semantic ranking is applied. After you configure a semantic configuration, add
"queryType": "semantic"and"semanticConfiguration": "semantic-config"to see how the same query is ranked differently by semantic ranking.
Set up the environment
Use Git to clone the sample repository.
git clone https://github.com/Azure-Samples/azure-search-java-samplesNavigate to the quickstart folder.
cd azure-search-java-samples/quickstart-semantic-rankingIn
src/main/resources/application.properties, replace the placeholder value forazure.search.endpointwith the URL you obtained in Get endpoint.Compile the project to resolve dependencies, including azure-search-documents.
mvn compileWhen the build completes, verify that no errors appear in the output.
For keyless authentication with Microsoft Entra ID, sign in to your Azure account. If you have multiple subscriptions, select the one that contains your Azure AI Search service.
az login
Run the code
Get the existing index settings.
mvn compile exec:java "-Dexec.mainClass=com.azure.search.quickstart.GetIndexSettings"Update the index with a semantic configuration.
mvn compile exec:java "-Dexec.mainClass=com.azure.search.quickstart.UpdateIndexSettings"Run a semantic query.
mvn compile exec:java "-Dexec.mainClass=com.azure.search.quickstart.SemanticQuery"Run a semantic query with captions.
mvn compile exec:java "-Dexec.mainClass=com.azure.search.quickstart.SemanticQueryWithCaptions"Run a semantic query with answers.
mvn compile exec:java "-Dexec.mainClass=com.azure.search.quickstart.SemanticAnswer"
Output
The output of GetIndexSettings.java is the name of the index, its fields, and its semantic configurations. Before you add a new configuration, the index has only the default one.
Index name: hotels-sample
Number of fields: 23
Field: HotelId, Type: Edm.String, Searchable: true
Field: HotelName, Type: Edm.String, Searchable: true
Field: Description, Type: Edm.String, Searchable: true
// Trimmed for brevity
Semantic search configurations: 1
Configuration name: hotels-sample-semantic-configuration
The output of UpdateIndexSettings.java lists all semantic configurations on the index, including the one the code added, followed by a success message.
// Trimmed for brevity
Configuration name: semantic-config
Title field: HotelName
Keywords fields: Tags
Content fields: Description
----------------------------------------
Semantic configuration updated successfully.
The output of SemanticQuery.java returns all matching documents ordered by the semantic ranking re-ranker score.
Search result #1:
  Re-ranker Score: 2.61
  HotelId: 24
  HotelName: Uptown Chic Hotel
  Description: Chic hotel near the city. High-rise hotel in downtown, within walking distance to theaters, art galleries, restaurants and shops. Visit Seattle Art Museum by day, and then head over to Benaroya Hall to catch the evening's concert performance.

Search result #2:
  Re-ranker Score: 2.27
  HotelId: 2
  HotelName: Old Century Hotel
  Description: The hotel is situated in a nineteenth century plaza, which has been expanded and renovated to the highest architectural standards to create a modern, functional and first-class hotel in which art and unique historical elements coexist with the most modern comforts. The hotel also regularly hosts events like wine tastings, beer dinners, and live music.

Search result #3:
  Re-ranker Score: 1.99
  HotelId: 4
  HotelName: Sublime Palace Hotel
  Description: Sublime Cliff Hotel is located in the heart of the historic center of Sublime in an extremely vibrant and lively area within short walking distance to the sites and landmarks of the city and is surrounded by the extraordinary beauty of churches, buildings, shops and monuments. Sublime Cliff is part of a lovingly restored 19th century resort, updated for every modern convenience.
// Trimmed for brevity
The output of SemanticQueryWithCaptions.java adds a caption element with hit highlighting alongside search fields. Captions are the most relevant passages in a result. If your index includes larger text, captions help extract the most interesting sentences.
Search result #1:
  Re-ranker Score: 2.61
  HotelName: Uptown Chic Hotel
  Description: Chic hotel near the city. High-rise hotel in downtown, within walking distance to theaters, art galleries, restaurants and shops. Visit Seattle Art Museum by day, and then head over to Benaroya Hall to catch the evening's concert performance.

  Caption with highlights: Chic hotel near the city. High-rise hotel in downtown, within walking distance to<em> theaters, </em>art galleries, restaurants and shops. Visit<em> Seattle Art Museum </em>by day, and then head over to<em> Benaroya Hall </em>to catch the evening's concert performance.
------------------------------------------------------------
Search result #2:
  Re-ranker Score: 2.27
  HotelName: Old Century Hotel
  Description: The hotel is situated in a nineteenth century plaza, which has been expanded and renovated to the highest architectural standards to create a modern, functional and first-class hotel in which art and unique historical elements coexist with the most modern comforts. The hotel also regularly hosts events like wine tastings, beer dinners, and live music.

  Caption text: The hotel is situated in a nineteenth century plaza, which has been expanded and renovated to the highest architectural standards to create a modern, functional and first-class hotel in which art and unique historical elements coexist with the most modern comforts. The hotel also regularly hosts events like wine tastings, beer dinners, and live.
------------------------------------------------------------
// Trimmed for brevity
The output of SemanticAnswer.java includes a semantic answer pulled from one of the results that best matches the question, followed by search results with captions.
Semantic answer result #1:
Semantic Answer: Nature is Home on the beach. Explore the shore by day, and then come home to our shared living space to relax around a stone fireplace, sip something warm, and explore the<em> library </em>by night. Save up to 30 percent. Valid Now through the end of the year. Restrictions and blackouts may apply.
Semantic Answer Score: 0.98

Search Results:

Search result #1:
Re-ranker Score: 2.12
Hotel: Stay-Kay City Hotel
Description: This classic hotel is fully-refurbished and ideally located on the main commercial artery of the city in the heart of New York. A few minutes away is Times Square and the historic centre of the city, as well as other places of interest that make New York one of America's most attractive and cosmopolitan cities.
Caption: This classic hotel is<em> fully-refurbished </em>and ideally located on the main commercial artery of the city in the heart of New York. A few minutes away is Times Square and the historic centre of the city, as well as other places of interest that make New York one of America's most attractive and cosmopolitan cities.

Search result #2:
Re-ranker Score: 2.07
Hotel: Double Sanctuary Resort
Description: 5 star Luxury Hotel - Biggest Rooms in the city. #1 Hotel in the area listed by Traveler magazine. Free WiFi, Flexible check in/out, Fitness Center & espresso in room.
Caption: <em>5 star Luxury Hotel </em>-<em> Biggest </em>Rooms in the city. #1 Hotel in the area listed by Traveler magazine. Free WiFi, Flexible check in/out, Fitness Center & espresso in room.
// Trimmed for brevity
Understand the code
Note
The code snippets in this section might have been modified for readability. For a complete working example, see the source code.
Now that you've run the code, let's break down the key steps:
Configuration and authentication
The SearchConfig.java class loads properties from application.properties and creates a DefaultAzureCredential for keyless authentication.
import com.azure.identity.DefaultAzureCredential;
import com.azure.identity.DefaultAzureCredentialBuilder;

import java.io.IOException;
import java.io.InputStream;
import java.util.Properties;

public class SearchConfig {
    private static final Properties properties =
        new Properties();

    static {
        try (InputStream input = SearchConfig.class
            .getClassLoader()
            .getResourceAsStream(
                "application.properties")) {
            properties.load(input);
        } catch (IOException e) {
            throw new RuntimeException(
                "Failed to load application.properties",
                e);
        }
    }

    public static final String SEARCH_ENDPOINT =
        properties.getProperty(
            "azure.search.endpoint");
    public static final String INDEX_NAME =
        properties.getProperty(
            "azure.search.index.name");
    public static final String SEMANTIC_CONFIG_NAME =
        properties.getProperty(
            "semantic.configuration.name");

    public static final DefaultAzureCredential
        CREDENTIAL = new DefaultAzureCredentialBuilder()
            .build();
}
Key takeaways:
DefaultAzureCredentialprovides keyless authentication using Microsoft Entra ID. It chains multiple credential types, including the Azure CLI credential fromaz login.- Properties are loaded from the
application.propertiesfile in the classpath. - Static fields (
SEARCH_ENDPOINT,INDEX_NAME,SEMANTIC_CONFIG_NAME,CREDENTIAL) are shared across all classes in the project.
Update the index with a semantic configuration
The UpdateIndexSettings.java class adds a semantic configuration to the existing hotels-sample index. This operation doesn't delete any search documents, and your index remains operational after the configuration is added.
import com.azure.search.documents.indexes
    .SearchIndexClientBuilder;
import com.azure.search.documents.indexes.models
    .SearchIndex;
import com.azure.search.documents.indexes.models
    .SemanticConfiguration;
import com.azure.search.documents.indexes.models
    .SemanticField;
import com.azure.search.documents.indexes.models
    .SemanticPrioritizedFields;
import com.azure.search.documents.indexes.models
    .SemanticSearch;

import java.util.ArrayList;
import java.util.List;

var indexClient = new SearchIndexClientBuilder()
    .endpoint(SearchConfig.SEARCH_ENDPOINT)
    .credential(SearchConfig.CREDENTIAL)
    .buildClient();

SearchIndex existingIndex =
    indexClient.getIndex(SearchConfig.INDEX_NAME);

var prioritizedFields =
    new SemanticPrioritizedFields()
        .setTitleField(
            new SemanticField("HotelName"))
        .setKeywordsFields(
            List.of(new SemanticField("Tags")))
        .setContentFields(
            List.of(
                new SemanticField("Description")));

var newSemanticConfiguration =
    new SemanticConfiguration(
        SearchConfig.SEMANTIC_CONFIG_NAME,
        prioritizedFields);

SemanticSearch semanticSearch =
    existingIndex.getSemanticSearch();
if (semanticSearch == null) {
    semanticSearch = new SemanticSearch();
    existingIndex.setSemanticSearch(semanticSearch);
}

List<SemanticConfiguration> configurations =
    semanticSearch.getConfigurations();
if (configurations == null) {
    configurations = new ArrayList<>();
    semanticSearch.setConfigurations(configurations);
}

configurations.add(newSemanticConfiguration);

indexClient.createOrUpdateIndex(existingIndex);
Key takeaways:
SemanticPrioritizedFieldsdefines which fields the semantic ranker evaluates.setTitleFieldsets the document title,setContentFieldssets the main content, andsetKeywordsFieldssets the keyword or tag fields.SemanticConfigurationpairs a name with the prioritized fields, identifying which semantic configuration to use at query time.createOrUpdateIndexpushes the updated schema to the search service without rebuilding the index or deleting documents.
Query the index
The following three classes query the index in sequence, progressing from a basic semantic search to semantic ranking with captions and answers.
Semantic query (no captions, no answers)
The first query adds semantic ranking with no captions or answers. The SemanticQuery.java class shows the minimum requirement for invoking semantic ranking.
import com.azure.search.documents
    .SearchClientBuilder;
import com.azure.search.documents.SearchDocument;
import com.azure.search.documents.models.QueryType;
import com.azure.search.documents.models.SearchOptions;
import com.azure.search.documents.models.SearchResult;
import com.azure.search.documents.models
    .SemanticSearchOptions;
import com.azure.search.documents.util
    .SearchPagedIterable;

var searchClient = new SearchClientBuilder()
    .endpoint(SearchConfig.SEARCH_ENDPOINT)
    .indexName(SearchConfig.INDEX_NAME)
    .credential(SearchConfig.CREDENTIAL)
    .buildClient();

var searchOptions = new SearchOptions()
    .setQueryType(QueryType.SEMANTIC)
    .setSemanticSearchOptions(
        new SemanticSearchOptions()
            .setSemanticConfigurationName(
                SearchConfig.SEMANTIC_CONFIG_NAME))
    .setSelect("HotelId", "HotelName", "Description");

SearchPagedIterable results = searchClient.search(
    "walking distance to live music",
    searchOptions, null);

for (SearchResult result : results) {
    var document = result.getDocument(
        SearchDocument.class);
    double rerankerScore = result
        .getSemanticSearch().getRerankerScore();

    System.out.printf("Re-ranker Score: %.2f%n",
        rerankerScore);
    System.out.printf("HotelName: %s%n",
        document.get("HotelName"));
    System.out.printf("Description: %s%n%n",
        document.get("Description"));
}
Key takeaways:
QueryType.SEMANTICenables semantic ranking on the query.setSemanticConfigurationNamespecifies which semantic configuration to use.SearchPagedIterableprovides an iterable over the reranked results. EachSearchResultcontains agetSemanticSearch()accessor for the reranker score.
Semantic query with captions
The SemanticQueryWithCaptions.java class adds captions to extract the most relevant passages from each result, with hit highlighting applied to the important terms and phrases.
import com.azure.search.documents.models
    .QueryCaption;
import com.azure.search.documents.models
    .QueryCaptionResult;
import com.azure.search.documents.models
    .QueryCaptionType;

var searchOptions = new SearchOptions()
    .setQueryType(QueryType.SEMANTIC)
    .setSemanticSearchOptions(
        new SemanticSearchOptions()
            .setSemanticConfigurationName(
                SearchConfig.SEMANTIC_CONFIG_NAME)
            .setQueryCaption(
                new QueryCaption(
                    QueryCaptionType.EXTRACTIVE)
                    .setHighlightEnabled(true)))
    .setSelect(
        "HotelId", "HotelName", "Description");

SearchPagedIterable results = searchClient.search(
    "walking distance to live music",
    searchOptions, null);

for (SearchResult result : results) {
    List<QueryCaptionResult> captions =
        result.getSemanticSearch()
            .getQueryCaptions();
    if (captions != null && !captions.isEmpty()) {
        QueryCaptionResult caption = captions.get(0);
        if (caption.getHighlights() != null) {
            System.out.printf(
                "Caption: %s%n",
                caption.getHighlights());
        }
    }
}
Key takeaways:
QueryCaption(QueryCaptionType.EXTRACTIVE)enables extractive captions from the content fields.setHighlightEnabled(true)adds<em>tags around important terms in captions.- Each
SearchResultprovidesgetQueryCaptions()on the semantic search accessor.
Semantic query with answers
The SemanticAnswer.java class adds semantic answers. This class uses a question as the search text because semantic answers work best when the query is phrased as a question. The answer is a verbatim passage extracted from your index, not a composed response from a chat completion model.
The query and the indexed content must be closely aligned for an answer to be returned. If no candidate meets the confidence threshold, the response doesn't include an answer. This example uses a question that's known to produce a result so that you can see the syntax. If answers aren't useful for your scenario, omit setQueryAnswer from your code. For composed answers, consider a RAG pattern or agentic retrieval.
import com.azure.search.documents.models
    .QueryAnswer;
import com.azure.search.documents.models
    .QueryAnswerResult;
import com.azure.search.documents.models
    .QueryAnswerType;

var searchOptions = new SearchOptions()
    .setQueryType(QueryType.SEMANTIC)
    .setSemanticSearchOptions(
        new SemanticSearchOptions()
            .setSemanticConfigurationName(
                SearchConfig.SEMANTIC_CONFIG_NAME)
            .setQueryCaption(
                new QueryCaption(
                    QueryCaptionType.EXTRACTIVE))
            .setQueryAnswer(
                new QueryAnswer(
                    QueryAnswerType.EXTRACTIVE)))
    .setSelect(
        "HotelName", "Description", "Category");

SearchPagedIterable results = searchClient.search(
    "What's a good hotel for people who like to read",
    searchOptions, null);

List<QueryAnswerResult> semanticAnswers =
    results.getSemanticResults().getQueryAnswers();

for (QueryAnswerResult answer :
    semanticAnswers != null ? semanticAnswers
        : List.<QueryAnswerResult>of()) {
    if (answer.getHighlights() != null) {
        System.out.printf(
            "Semantic Answer: %s%n",
            answer.getHighlights());
    } else {
        System.out.printf(
            "Semantic Answer: %s%n",
            answer.getText());
    }
    System.out.printf(
        "Semantic Answer Score: %.2f%n",
        answer.getScore());
}
Key takeaways:
QueryAnswer(QueryAnswerType.EXTRACTIVE)enables extractive answers for question-like queries.- Answers are verbatim content extracted from your index, not generated text.
results.getSemanticResults().getQueryAnswers()retrieves the answer objects separately from the search results.
In this quickstart, you use the Azure AI Search client library for JavaScript to add semantic ranking to an existing search index and query the index.
Semantic ranking is query-side functionality that uses machine reading comprehension to rescore search results, promoting the most semantically relevant matches to the top of the list. You can add a semantic configuration to an existing index with no rebuild requirement. Semantic ranking is most effective for informational or descriptive text.
Tip
Want to get started right away? Download the source code on GitHub.
Prerequisites
An Azure account with an active subscription. Create an account for free.
An index with descriptive text fields attributed as
searchableandretrievable. This quickstart assumes the hotels-sample index.Node.js 20 LTS or later.
Git to clone the sample repository.
The Azure CLI for keyless authentication with Microsoft Entra ID.
Configure access
Before you begin, make sure you have permissions to access content and operations in Azure AI Search. This quickstart uses Microsoft Entra ID for authentication and role-based access for authorization. You must be an Owner or User Access Administrator to assign roles. If roles aren't feasible, use key-based authentication instead.
To configure the recommended role-based access:
Enable role-based access for your search service.
Assign the following roles to your user account.
Search Service Contributor
Search Index Data Reader
Note
Unlike other quickstarts that create and load an index, this quickstart assumes an existing index that already contains data, so you don't need the Search Index Data Contributor role.
Get endpoint
Each Azure AI Search service has an endpoint, which is a unique URL that identifies and provides network access to the service. In a later section, you specify this endpoint to connect to your search service programmatically.
To get the endpoint:
Go to your search service in the Azure portal.
From the left pane, select Overview.
Make a note of the endpoint, which should look like
https://my-service.search.windows.net.
Start with an index
This quickstart modifies an existing index to include a semantic configuration. We recommend the hotels-sample index, which you can create in minutes using an Azure portal wizard.
To use a different index, replace the index name, field names in the semantic configuration, and field names in query select statements throughout the sample code. Your index should contain descriptive text fields that are attributed as searchable and retrievable.
To review and query the hotels-sample index before semantic ranking:
Go to your search service in the Azure portal.
From the left pane, select Search management > Indexes.
Select hotels-sample.
Select Semantic configurations to view any existing configurations. If you enabled semantic ranking during the wizard creation flow, there should be a default configuration.
Select Search explorer, and then select View > JSON view.
Paste the following JSON into the query editor.
{
  "search": "walking distance to live music",
  "select": "HotelId, HotelName, Description",
  "count": true
}
Select Search to run the query.
The response should be similar to the following example. This is a full-text query ranked by BM25, so results match on individual query terms and linguistic variants rather than the overall meaning of the query. For example,
walkingmatcheswalk, andliveandmusicmatch independently rather than as a phrase."@odata.count": 30, "value": [ { "@search.score": 5.004435, "HotelId": "2", "HotelName": "Old Century Hotel", "Description": "The hotel is situated in a nineteenth century plaza, which has been expanded and renovated to the highest architectural standards to create a modern, functional and first-class hotel in which art and unique historical elements coexist with the most modern comforts. The hotel also regularly hosts events like wine tastings, beer dinners, and live music." }, { "@search.score": 4.555706, "HotelId": "24", "HotelName": "Uptown Chic Hotel", "Description": "Chic hotel near the city. High-rise hotel in downtown, within walking distance to theaters, art galleries, restaurants and shops. Visit Seattle Art Museum by day, and then head over to Benaroya Hall to catch the evening's concert performance." }, { "@search.score": 3.5625167, "HotelId": "4", "HotelName": "Sublime Palace Hotel", "Description": "Sublime Cliff Hotel is located in the heart of the historic center of Sublime in an extremely vibrant and lively area within short walking distance to the sites and landmarks of the city and is surrounded by the extraordinary beauty of churches, buildings, shops and monuments. Sublime Cliff is part of a lovingly restored 19th century resort, updated for every modern convenience." }, ... // Trimmed for brevity ]Tip
This query shows how the response looks before semantic ranking is applied. After you configure a semantic configuration, add
"queryType": "semantic"and"semanticConfiguration": "semantic-config"to see how the same query is ranked differently by semantic ranking.
Set up the environment
Use Git to clone the sample repository.
git clone https://github.com/Azure-Samples/azure-search-javascript-samplesNavigate to the quickstart folder.
cd azure-search-javascript-samples/quickstart-semantic-ranking-jsIn
sample.env, replace the placeholder value forAZURE_SEARCH_ENDPOINTwith the URL you obtained in Get endpoint.Rename
sample.envto.env.mv sample.env .envInstall the dependencies.
npm installWhen the installation completes, you should see a
node_modulesfolder in the project directory.For keyless authentication with Microsoft Entra ID, sign in to your Azure account. If you have multiple subscriptions, select the one that contains your Azure AI Search service.
az login
Run the code
Get the existing index settings.
node -r dotenv/config src/getIndexSettings.jsUpdate the index with a semantic configuration.
node -r dotenv/config src/updateIndexSettings.jsRun a semantic query.
node -r dotenv/config src/semanticQuery.jsRun a semantic query with captions.
node -r dotenv/config src/semanticQueryReturnCaptions.jsRun a semantic query with answers.
node -r dotenv/config src/semanticAnswer.js
Output
The getIndexSettings.js script returns the name of the index, its fields, and any existing semantic configurations.
Getting semantic ranking index settings...
Index name: hotels-sample
Number of fields: 23
Field: HotelId, Type: Edm.String, Searchable: true
Field: HotelName, Type: Edm.String, Searchable: true
Field: Description, Type: Edm.String, Searchable: true
Field: Description_fr, Type: Edm.String, Searchable: true
Field: Category, Type: Edm.String, Searchable: true
Field: Tags, Type: Collection(Edm.String), Searchable: true
// Trimmed for brevity
Semantic ranking configurations: 1
Configuration name: hotels-sample-semantic-configuration
Title field: undefined
The updateIndexSettings.js script returns all semantic configurations on the index, including the one the code added, followed by a success message.
Semantic configurations:
----------------------------------------
Configuration name: hotels-sample-semantic-configuration
Title field: undefined
Keywords fields:
Content fields: AzureSearch_DocumentKey
----------------------------------------
Configuration name: semantic-config
Title field: HotelName
Keywords fields: Tags
Content fields: Description
----------------------------------------
Semantic configuration updated successfully.
The semanticQuery.js script returns all matching documents ordered by the semantic ranking re-ranker score.
Search result #1:
  Re-ranker Score: 2.613231658935547
  HotelId: 24
  HotelName: Uptown Chic Hotel
  Description: Chic hotel near the city. High-rise hotel in downtown, within walking distance to theaters, art galleries, restaurants and shops. Visit Seattle Art Museum by day, and then head over to Benaroya Hall to catch the evening's concert performance.

Search result #2:
  Re-ranker Score: 2.271434783935547
  HotelId: 2
  HotelName: Old Century Hotel
  Description: The hotel is situated in a nineteenth century plaza, which has been expanded and renovated to the highest architectural standards to create a modern, functional and first-class hotel in which art and unique historical elements coexist with the most modern comforts. The hotel also regularly hosts events like wine tastings, beer dinners, and live music.

Search result #3:
  Re-ranker Score: 1.9861756563186646
  HotelId: 4
  HotelName: Sublime Palace Hotel
  Description: Sublime Cliff Hotel is located in the heart of the historic center of Sublime in an extremely vibrant and lively area within short walking distance to the sites and landmarks of the city and is surrounded by the extraordinary beauty of churches, buildings, shops and monuments. Sublime Cliff is part of a lovingly restored 19th century resort, updated for every modern convenience.
// Trimmed for brevity
The semanticQueryReturnCaptions.js script returns a caption element with hit highlighting alongside search fields. Captions are the most relevant passages in a result. If your index includes larger text, captions help extract the most interesting sentences.
Search result #1:
  Re-ranker Score: 2.613231658935547
  HotelName: Uptown Chic Hotel
  Description: Chic hotel near the city. High-rise hotel in downtown, within walking distance to theaters, art galleries, restaurants and shops. Visit Seattle Art Museum by day, and then head over to Benaroya Hall to catch the evening's concert performance.

  Caption with highlights: Chic hotel near the city. High-rise hotel in downtown, within walking distance to<em> theaters, </em>art galleries, restaurants and shops. Visit<em> Seattle Art Museum </em>by day, and then head over to<em> Benaroya Hall </em>to catch the evening's concert performance.
------------------------------------------------------------
Search result #2:
  Re-ranker Score: 2.271434783935547
  HotelName: Old Century Hotel
  Description: The hotel is situated in a nineteenth century plaza, which has been expanded and renovated to the highest architectural standards to create a modern, functional and first-class hotel in which art and unique historical elements coexist with the most modern comforts. The hotel also regularly hosts events like wine tastings, beer dinners, and live music.

  Caption text: The hotel is situated in a nineteenth century plaza, which has been expanded and renovated to the highest architectural standards to create a modern, functional and first-class hotel in which art and unique historical elements coexist with the most modern comforts. The hotel also regularly hosts events like wine tastings, beer dinners, and live.
------------------------------------------------------------
// Trimmed for brevity
The semanticAnswer.js script returns a semantic answer pulled from one of the results that best matches the question, followed by search results with captions.
Answers:

Semantic answer result #1:
Semantic Answer: Nature is Home on the beach. Explore the shore by day, and then come home to our shared living space to relax around a stone fireplace, sip something warm, and explore the<em> library </em>by night. Save up to 30 percent. Valid Now through the end of the year. Restrictions and blackouts may apply.
Semantic Answer Score: 0.9829999804496765

Search Results:

Search result #1:
2.124817371368408
Stay-Kay City Hotel
This classic hotel is fully-refurbished and ideally located on the main commercial artery of the city in the heart of New York. A few minutes away is Times Square and the historic centre of the city, as well as other places of interest that make New York one of America's most attractive and cosmopolitan cities.
Caption: This classic hotel is<em> fully-refurbished </em>and ideally located on the main commercial artery of the city in the heart of New York. A few minutes away is Times Square and the historic centre of the city, as well as other places of interest that make New York one of America's most attractive and cosmopolitan cities.
// Trimmed for brevity
Understand the code
Note
The code snippets in this section might have been modified for readability. For a complete working example, see the source code.
Now that you've run the code, let's break down the key steps:
Configuration and authentication
The config.js file loads environment variables and creates a DefaultAzureCredential for authentication.
import { DefaultAzureCredential }
    from "@azure/identity";

export const searchEndpoint =
    process.env.AZURE_SEARCH_ENDPOINT
    || "PUT-YOUR-SEARCH-SERVICE-ENDPOINT-HERE";
export const indexName =
    process.env.AZURE_SEARCH_INDEX_NAME
    || "hotels-sample";
export const semanticConfigurationName =
    process.env.SEMANTIC_CONFIGURATION_NAME
    || "semantic-config";

export const credential = new DefaultAzureCredential();
Key takeaways:
DefaultAzureCredentialprovides keyless authentication using Microsoft Entra ID. It chains multiple credential types, including the Azure CLI credential fromaz login.- Environment variables are loaded from the
.envfile usingdotenv.
Update the index with a semantic configuration
The updateIndexSettings.js file adds a semantic configuration to the existing hotels-sample index. This operation doesn't delete any search documents, and your index remains operational after the configuration is added.
import { SearchIndexClient }
    from "@azure/search-documents";
import {
    searchEndpoint, indexName,
    credential, semanticConfigurationName
} from "./config.js";

const indexClient = new SearchIndexClient(
    searchEndpoint, credential
);
const existingIndex =
    await indexClient.getIndex(indexName);

const fields = {
    titleField: { name: "HotelName" },
    keywordsFields: [{ name: "Tags" }],
    contentFields: [{ name: "Description" }]
};

const newSemanticConfiguration = {
    name: semanticConfigurationName,
    prioritizedFields: fields
};

if (existingIndex.semanticSearch
    && existingIndex.semanticSearch.configurations) {
    existingIndex.semanticSearch.configurations
        .push(newSemanticConfiguration);
} else {
    existingIndex.semanticSearch = {
        configurations: [newSemanticConfiguration]
    };
}

await indexClient.createOrUpdateIndex(existingIndex);
Key takeaways:
- A semantic configuration specifies the fields used for semantic ranking.
titleFielddefines the document title,contentFieldsdefines the main content, andkeywordsFieldsdefines the keyword or tag fields. - You create a configuration object and push it to the existing index's
semanticSearch.configurationsarray. createOrUpdateIndexpushes the updated schema to the search service without rebuilding the index or deleting documents.
Query the index
The query scripts run three queries in sequence, progressing from a basic semantic search to semantic ranking with captions and answers.
Semantic query (no captions, no answers)
The following code shows the minimum requirement for invoking semantic ranking.
import { SearchClient }
    from "@azure/search-documents";
import {
    credential, searchEndpoint,
    indexName, semanticConfigurationName
} from "./config.js";

const searchClient = new SearchClient(
    searchEndpoint, indexName, credential
);

const results = await searchClient.search(
    "walking distance to live music",
    {
        queryType: "semantic",
        semanticSearchOptions: {
            configurationName:
                semanticConfigurationName
        },
        select: [
            "HotelId", "HotelName", "Description"
        ]
    }
);
Key takeaways:
queryType: "semantic"enables semantic ranking on the query.semanticSearchOptions.configurationNamespecifies which semantic configuration to use.- The
rerankerScorein results indicates semantic relevance (higher is better).
Semantic query with captions
The following code adds captions to extract the most relevant passages from each result, with hit highlighting applied to the important terms and phrases.
const results = await searchClient.search(
    "walking distance to live music",
    {
        queryType: "semantic",
        semanticSearchOptions: {
            configurationName:
                semanticConfigurationName,
            captions: {
                captionType: "extractive",
                highlight: true
            }
        },
        select: [
            "HotelId", "HotelName", "Description"
        ]
    }
);

for await (const result of results.results) {
    const captions = result.captions;
    if (captions && captions.length > 0) {
        const caption = captions[0];
        if (caption.highlights) {
            console.log(
                `Caption: ${caption.highlights}`
            );
        }
    }
}
Key takeaways:
captions.captionType: "extractive"enables extractive captions from the content fields.- Captions surface the most relevant passages and add
<em>tags around important terms.
Semantic query with answers
The final query adds semantic answers. This query uses a question as the search text because semantic answers work best when the query is phrased as a question. The answer is a verbatim passage extracted from your index, not a composed response from a chat completion model.
The query and the indexed content must be closely aligned for an answer to be returned. If no candidate meets the confidence threshold, the response doesn't include an answer. This example uses a question that's known to produce a result so that you can see the syntax. If answers aren't useful for your scenario, omit answers from your code. For composed answers, consider a RAG pattern or agentic retrieval.
const results = await searchClient.search(
    "What's a good hotel for people who "
    + "like to read",
    {
        queryType: "semantic",
        semanticSearchOptions: {
            configurationName:
                semanticConfigurationName,
            captions: {
                captionType: "extractive"
            },
            answers: {
                answerType: "extractive"
            }
        },
        select: [
            "HotelName", "Description", "Category"
        ]
    }
);

const semanticAnswers = results.answers;
for (const answer of semanticAnswers || []) {
    if (answer.highlights) {
        console.log(
            `Semantic Answer: ${answer.highlights}`
        );
    } else {
        console.log(
            `Semantic Answer: ${answer.text}`
        );
    }
    console.log(
        `Semantic Answer Score: ${answer.score}`
    );
}
Key takeaways:
answers.answerType: "extractive"enables extractive answers for question-like queries.- Answers are verbatim content extracted from your index, not generated text.
results.answersretrieves the answer objects separately from the search results.
In this quickstart, you use the Azure AI Search client library for Python to add semantic ranking to an existing search index and query the index.
Semantic ranking is query-side functionality that uses machine reading comprehension to rescore search results, promoting the most semantically relevant matches to the top of the list. You can add a semantic configuration to an existing index with no rebuild requirement. Semantic ranking is most effective for informational or descriptive text.
Tip
Want to get started right away? Download the source code on GitHub.
Prerequisites
An Azure account with an active subscription. Create an account for free.
An index with descriptive text fields attributed as
searchableandretrievable. This quickstart assumes the hotels-sample index.Python 3.10 or later.
Visual Studio Code with the Python extension.
Git to clone the sample repository.
The Azure CLI for keyless authentication with Microsoft Entra ID.
Configure access
Before you begin, make sure you have permissions to access content and operations in Azure AI Search. This quickstart uses Microsoft Entra ID for authentication and role-based access for authorization. You must be an Owner or User Access Administrator to assign roles. If roles aren't feasible, use key-based authentication instead.
To configure the recommended role-based access:
Enable role-based access for your search service.
Assign the following roles to your user account.
Search Service Contributor
Search Index Data Reader
Note
Unlike other quickstarts that create and load an index, this quickstart assumes an existing index that already contains data, so you don't need the Search Index Data Contributor role.
Get endpoint
Each Azure AI Search service has an endpoint, which is a unique URL that identifies and provides network access to the service. In a later section, you specify this endpoint to connect to your search service programmatically.
To get the endpoint:
Go to your search service in the Azure portal.
From the left pane, select Overview.
Make a note of the endpoint, which should look like
https://my-service.search.windows.net.
Start with an index
This quickstart modifies an existing index to include a semantic configuration. We recommend the hotels-sample index, which you can create in minutes using an Azure portal wizard.
To use a different index, replace the index name, field names in the semantic configuration, and field names in query select statements throughout the sample code. Your index should contain descriptive text fields that are attributed as searchable and retrievable.
To review and query the hotels-sample index before semantic ranking:
Go to your search service in the Azure portal.
From the left pane, select Search management > Indexes.
Select hotels-sample.
Select Semantic configurations to view any existing configurations. If you enabled semantic ranking during the wizard creation flow, there should be a default configuration.
Select Search explorer, and then select View > JSON view.
Paste the following JSON into the query editor.
{
  "search": "walking distance to live music",
  "select": "HotelId, HotelName, Description",
  "count": true
}
Select Search to run the query.
The response should be similar to the following example. This is a full-text query ranked by BM25, so results match on individual query terms and linguistic variants rather than the overall meaning of the query. For example,
walkingmatcheswalk, andliveandmusicmatch independently rather than as a phrase."@odata.count": 30, "value": [ { "@search.score": 5.004435, "HotelId": "2", "HotelName": "Old Century Hotel", "Description": "The hotel is situated in a nineteenth century plaza, which has been expanded and renovated to the highest architectural standards to create a modern, functional and first-class hotel in which art and unique historical elements coexist with the most modern comforts. The hotel also regularly hosts events like wine tastings, beer dinners, and live music." }, { "@search.score": 4.555706, "HotelId": "24", "HotelName": "Uptown Chic Hotel", "Description": "Chic hotel near the city. High-rise hotel in downtown, within walking distance to theaters, art galleries, restaurants and shops. Visit Seattle Art Museum by day, and then head over to Benaroya Hall to catch the evening's concert performance." }, { "@search.score": 3.5625167, "HotelId": "4", "HotelName": "Sublime Palace Hotel", "Description": "Sublime Cliff Hotel is located in the heart of the historic center of Sublime in an extremely vibrant and lively area within short walking distance to the sites and landmarks of the city and is surrounded by the extraordinary beauty of churches, buildings, shops and monuments. Sublime Cliff is part of a lovingly restored 19th century resort, updated for every modern convenience." }, ... // Trimmed for brevity ]Tip
This query shows how the response looks before semantic ranking is applied. After you configure a semantic configuration, add
"queryType": "semantic"and"semanticConfiguration": "semantic-config"to see how the same query is ranked differently by semantic ranking.
Set up the environment
Use Git to clone the sample repository.
git clone https://github.com/Azure-Samples/azure-search-python-samplesNavigate to the quickstart folder and open it in Visual Studio Code.
cd azure-search-python-samples/Quickstart-Semantic-Ranking
code .
In
sample.env, replace the placeholder value forAZURE_SEARCH_ENDPOINTwith the URL you obtained in Get endpoint.Rename
sample.envto.env.mv sample.env .envOpen
semantic-ranking-quickstart.ipynb.Press Ctrl+Shift+P, select Notebook: Select Notebook Kernel, and follow the prompts to create a virtual environment. Select requirements.txt for the dependencies.
When complete, you should see a
.venvfolder in the project directory.For keyless authentication with Microsoft Entra ID, sign in to your Azure account. If you have multiple subscriptions, select the one that contains your Azure AI Search service.
az login
Run the code
Run the
Install packages and set variablescells to install the required packages and load environment variables.Run the remaining cells sequentially to add a semantic configuration and query the index.
Output
The output of the Get the index definition cell is the name of the index, its fields, and any existing semantic configurations.
Index name: hotels-sample
Number of fields: 23
Field: HotelId, Type: Edm.String, Searchable: True
Field: HotelName, Type: Edm.String, Searchable: True
Field: Description, Type: Edm.String, Searchable: True
Field: Description_fr, Type: Edm.String, Searchable: True
Field: Category, Type: Edm.String, Searchable: True
Field: Tags, Type: Collection(Edm.String), Searchable: True
// Trimmed for brevity
Semantic config: hotels-sample-semantic-configuration
Title field: HotelName
The output of the Add a semantic configuration to the index cell lists all semantic configurations on the index, including the one the code added, followed by a success message.
Semantic configurations:
----------------------------------------
  Configuration: hotels-sample-semantic-configuration
    Title field: HotelName
    Keywords fields: Category
    Content fields: Description

  Configuration: semantic-config
    Title field: HotelName
    Keywords fields: Tags
    Content fields: Description

✅ Semantic configuration successfully added!
The output of the Run a term query cell returns all matching documents ordered by BM25 score. This baseline query doesn't use semantic ranking.
5.360838
4
Sublime Palace Hotel
Description: Sublime Cliff Hotel is located in the heart of the
historic center of Sublime in an extremely vibrant and lively area
within short walking distance to the sites and landmarks of the city
and is surrounded by the extraordinary beauty of churches, buildings,
shops and monuments. Sublime Cliff is part of a lovingly restored
19th century resort, updated for every modern convenience.
4.691083
2
Old Century Hotel
Description: The hotel is situated in a nineteenth century plaza,
which has been expanded and renovated to the highest architectural
standards to create a modern, functional and first-class hotel in
which art and unique historical elements coexist with the most
modern comforts. The hotel also regularly hosts events like wine
tastings, beer dinners, and live music.
// Trimmed for brevity
The output of the Run a semantic query cell returns all matching documents ordered by the semantic re-ranker score.
2.613231658935547
24
Uptown Chic Hotel
Description: Chic hotel near the city. High-rise hotel in downtown,
within walking distance to theaters, art galleries, restaurants and
shops. Visit Seattle Art Museum by day, and then head over to
Benaroya Hall to catch the evening's concert performance.
2.271434783935547
2
Old Century Hotel
Description: The hotel is situated in a nineteenth century plaza,
which has been expanded and renovated to the highest architectural
standards to create a modern, functional and first-class hotel in
which art and unique historical elements coexist with the most
modern comforts. The hotel also regularly hosts events like wine
tastings, beer dinners, and live music.
// Trimmed for brevity
The output of the Return captions cell adds a caption element with hit highlighting alongside search fields. Captions are the most relevant passages in a result. If your index includes larger text, captions help extract the most interesting sentences.
2.613231658935547
24
Uptown Chic Hotel
Description: Chic hotel near the city. High-rise hotel in downtown,
within walking distance to theaters, art galleries, restaurants and
shops. Visit Seattle Art Museum by day, and then head over to
Benaroya Hall to catch the evening's concert performance.
Caption: Chic hotel near the city. High-rise hotel in downtown,
within walking distance to<em> theaters, </em>art galleries,
restaurants and shops. Visit<em> Seattle Art Museum </em>by day, and
then head over to<em> Benaroya Hall </em>to catch the evening's
concert performance.
// Trimmed for brevity
The output of the Return semantic answers cell includes a semantic answer pulled from one of the results that best matches the question, followed by search results with captions.
Semantic Answer: Nature is Home on the beach. Explore the shore by
day, and then come home to our shared living space to relax around a
stone fireplace, sip something warm, and explore the<em> library
</em>by night. Save up to 30 percent. Valid Now through the end of
the year. Restrictions and blackouts may apply.
Semantic Answer Score: 0.9829999804496765
Understand the code
Note
The code snippets in this section might have been modified for readability. For a complete working example, see the source code.
Now that you've run the code, let's break down the key steps:
Configuration and authentication
The Install packages and set variables cell loads environment variables and creates a DefaultAzureCredential for authentication.
from dotenv import load_dotenv
from azure.identity import DefaultAzureCredential
from azure.identity import get_bearer_token_provider
import os

load_dotenv(override=True)

search_endpoint = os.environ["AZURE_SEARCH_ENDPOINT"]
credential = DefaultAzureCredential()
index_name = os.getenv(
    "AZURE_SEARCH_INDEX", "hotels-sample"
)
Key takeaways:
DefaultAzureCredentialprovides keyless authentication using Microsoft Entra ID. It chains multiple credential types, including the Azure CLI credential fromaz login.- Environment variables are loaded from the
.envfile usingpython-dotenv.
Update the index with a semantic configuration
The Add a semantic configuration to the index cell adds a semantic configuration to the existing hotels-sample index. This operation doesn't delete any search documents, and your index remains operational after the configuration is added.
from azure.search.documents.indexes.models import (
    SemanticConfiguration,
    SemanticField,
    SemanticPrioritizedFields,
    SemanticSearch
)

new_semantic_config = SemanticConfiguration(
    name="semantic-config",
    prioritized_fields=SemanticPrioritizedFields(
        title_field=SemanticField(field_name="HotelName"),
        keywords_fields=[
            SemanticField(field_name="Tags")
        ],
        content_fields=[
            SemanticField(field_name="Description")
        ]
    )
)

if existing_index.semantic_search is None:
    existing_index.semantic_search = SemanticSearch(
        configurations=[new_semantic_config]
    )
else:
    existing_index.semantic_search.configurations.append(
        new_semantic_config
    )

result = index_client.create_or_update_index(existing_index)
Key takeaways:
- A semantic configuration specifies the fields used for semantic ranking.
title_fieldsets the document title,content_fieldssets the main content, andkeywords_fieldssets the keyword or tag fields. - You create the configuration with
SemanticConfigurationand its associatedSemanticPrioritizedFieldsmodel, and then append it to the existing index. create_or_update_indexpushes the updated schema to the search service without rebuilding the index or deleting documents.
Query the index
The query cells run four queries in sequence: a baseline keyword search followed by three semantic ranking variations with increasing functionality.
Term query (baseline)
The Run a term query cell runs a keyword search using BM25 scoring. This baseline query doesn't use semantic ranking and serves as a comparison point.
from azure.search.documents import SearchClient

search_client = SearchClient(
    endpoint=search_endpoint,
    index_name=index_name,
    credential=credential
)

results = search_client.search(
    query_type='simple',
    search_text="walking distance to live music",
    select='HotelId,HotelName,Description',
    include_total_count=True
)
Key takeaways:
query_type='simple'specifies a keyword search using BM25 scoring.- The
@search.scorein results indicates the BM25 relevance score.
Semantic query (no captions, no answers)
The Run a semantic query cell shows the minimum requirement for invoking semantic ranking.
from azure.search.documents import SearchClient

search_client = SearchClient(
    endpoint=search_endpoint,
    index_name=index_name,
    credential=credential
)

results = search_client.search(
    query_type='semantic',
    semantic_configuration_name='semantic-config',
    search_text="walking distance to live music",
    select='HotelId,HotelName,Description',
    query_caption='extractive'
)
Key takeaways:
query_type='semantic'enables semantic ranking on the query.semantic_configuration_namespecifies which semantic configuration to use.- The
@search.reranker_scorein results indicates semantic relevance (higher is better).
Semantic query with captions
The Return captions cell adds captions to extract the most relevant passages from each result, with hit highlighting applied to the important terms and phrases.
results = search_client.search(
    query_type='semantic',
    semantic_configuration_name='semantic-config',
    search_text="walking distance to live music",
    select='HotelName,HotelId,Description',
    query_caption='extractive'
)

for result in results:
    captions = result["@search.captions"]
    if captions:
        caption = captions[0]
        if caption.highlights:
            print(f"Caption: {caption.highlights}\n")
Key takeaways:
query_caption='extractive'enables extractive captions from the content fields.- Captions surface the most relevant passages and add
<em>tags around important terms.
Semantic query with answers
The Return semantic answers cell adds semantic answers. This query uses a question as the search text because semantic answers work best when the query is phrased as a question. The answer is a verbatim passage extracted from your index, not a composed response from a chat completion model.
The query and the indexed content must be closely aligned for an answer to be returned. If no candidate meets the confidence threshold, the response doesn't include an answer. This example uses a question that's known to produce a result so that you can see the syntax. If answers aren't useful for your scenario, omit query_answer from your code. For composed answers, consider a RAG pattern or agentic retrieval.
results = search_client.search(
    query_type='semantic',
    semantic_configuration_name='semantic-config',
    search_text="what's a good hotel for people who "
                "like to read",
    select='HotelName,Description,Category',
    query_caption='extractive',
    query_answer="extractive",
)

semantic_answers = results.get_answers()
for answer in semantic_answers:
    if answer.highlights:
        print(f"Semantic Answer: {answer.highlights}")
    else:
        print(f"Semantic Answer: {answer.text}")
    print(f"Semantic Answer Score: {answer.score}\n")
Key takeaways:
query_answer="extractive"enables extractive answers for question-like queries.- Answers are verbatim content extracted from your index, not generated text.
results.get_answers()retrieves the answer objects separately from the search results.
In this quickstart, you use the Azure AI Search client library for JavaScript (compatible with TypeScript) to add semantic ranking to an existing search index and query the index.
Semantic ranking is query-side functionality that uses machine reading comprehension to rescore search results, promoting the most semantically relevant matches to the top of the list. You can add a semantic configuration to an existing index with no rebuild requirement. Semantic ranking is most effective for informational or descriptive text.
Tip
Want to get started right away? Download the source code on GitHub.
Prerequisites
An Azure account with an active subscription. Create an account for free.
An index with descriptive text fields attributed as
searchableandretrievable. This quickstart assumes the hotels-sample index.Node.js 20 LTS or later to run the compiled code.
TypeScript to compile TypeScript to JavaScript.
Git to clone the sample repository.
The Azure CLI for keyless authentication with Microsoft Entra ID.
Configure access
Before you begin, make sure you have permissions to access content and operations in Azure AI Search. This quickstart uses Microsoft Entra ID for authentication and role-based access for authorization. You must be an Owner or User Access Administrator to assign roles. If roles aren't feasible, use key-based authentication instead.
To configure the recommended role-based access:
Enable role-based access for your search service.
Assign the following roles to your user account.
Search Service Contributor
Search Index Data Reader
Note
Unlike other quickstarts that create and load an index, this quickstart assumes an existing index that already contains data, so you don't need the Search Index Data Contributor role.
Get endpoint
Each Azure AI Search service has an endpoint, which is a unique URL that identifies and provides network access to the service. In a later section, you specify this endpoint to connect to your search service programmatically.
To get the endpoint:
Go to your search service in the Azure portal.
From the left pane, select Overview.
Make a note of the endpoint, which should look like
https://my-service.search.windows.net.
Start with an index
This quickstart modifies an existing index to include a semantic configuration. We recommend the hotels-sample index, which you can create in minutes using an Azure portal wizard.
To use a different index, replace the index name, field names in the semantic configuration, and field names in query select statements throughout the sample code. Your index should contain descriptive text fields that are attributed as searchable and retrievable.
To review and query the hotels-sample index before semantic ranking:
Go to your search service in the Azure portal.
From the left pane, select Search management > Indexes.
Select hotels-sample.
Select Semantic configurations to view any existing configurations. If you enabled semantic ranking during the wizard creation flow, there should be a default configuration.
Select Search explorer, and then select View > JSON view.
Paste the following JSON into the query editor.
{
  "search": "walking distance to live music",
  "select": "HotelId, HotelName, Description",
  "count": true
}
Select Search to run the query.
The response should be similar to the following example. This is a full-text query ranked by BM25, so results match on individual query terms and linguistic variants rather than the overall meaning of the query. For example,
walkingmatcheswalk, andliveandmusicmatch independently rather than as a phrase."@odata.count": 30, "value": [ { "@search.score": 5.004435, "HotelId": "2", "HotelName": "Old Century Hotel", "Description": "The hotel is situated in a nineteenth century plaza, which has been expanded and renovated to the highest architectural standards to create a modern, functional and first-class hotel in which art and unique historical elements coexist with the most modern comforts. The hotel also regularly hosts events like wine tastings, beer dinners, and live music." }, { "@search.score": 4.555706, "HotelId": "24", "HotelName": "Uptown Chic Hotel", "Description": "Chic hotel near the city. High-rise hotel in downtown, within walking distance to theaters, art galleries, restaurants and shops. Visit Seattle Art Museum by day, and then head over to Benaroya Hall to catch the evening's concert performance." }, { "@search.score": 3.5625167, "HotelId": "4", "HotelName": "Sublime Palace Hotel", "Description": "Sublime Cliff Hotel is located in the heart of the historic center of Sublime in an extremely vibrant and lively area within short walking distance to the sites and landmarks of the city and is surrounded by the extraordinary beauty of churches, buildings, shops and monuments. Sublime Cliff is part of a lovingly restored 19th century resort, updated for every modern convenience." }, ... // Trimmed for brevity ]Tip
This query shows how the response looks before semantic ranking is applied. After you configure a semantic configuration, add
"queryType": "semantic"and"semanticConfiguration": "semantic-config"to see how the same query is ranked differently by semantic ranking.
Set up the environment
Use Git to clone the sample repository.
git clone https://github.com/Azure-Samples/azure-search-javascript-samplesNavigate to the quickstart folder.
cd azure-search-javascript-samples/quickstart-semantic-ranking-tsIn
sample.env, replace the placeholder value forAZURE_SEARCH_ENDPOINTwith the URL you obtained in Get endpoint.Rename
sample.envto.env.mv sample.env .envInstall the dependencies.
npm installWhen the installation completes, you should see a
node_modulesfolder in the project directory.Compile the TypeScript files to JavaScript.
npm run buildFor keyless authentication with Microsoft Entra ID, sign in to your Azure account. If you have multiple subscriptions, select the one that contains your Azure AI Search service.
az login
Run the code
Get the existing index settings.
node -r dotenv/config dist/getIndexSettings.jsUpdate the index with a semantic configuration.
node -r dotenv/config dist/updateIndexSettings.jsRun a semantic query.
node -r dotenv/config dist/semanticQuery.jsRun a semantic query with captions.
node -r dotenv/config dist/semanticQueryReturnCaptions.jsRun a semantic query with answers.
node -r dotenv/config dist/semanticAnswer.jsNote
These commands run the compiled
.jsfiles from thedistfolder. TypeScript code must be transpiled to JavaScript before Node.js can execute it, which is why you previously rannpm run build.
Output
The getIndexSettings.js script returns the index name, field count, field details with type and searchable status, and any existing semantic configurations.
Index name: hotels-sample
Number of fields: 23
Field: HotelId, Type: Edm.String, Searchable: true
Field: HotelName, Type: Edm.String, Searchable: true
Field: Description, Type: Edm.String, Searchable: true
// Trimmed for brevity
Semantic ranking configurations: 1
Configuration name: hotels-sample-semantic-configuration
Title field: undefined
The updateIndexSettings.js script returns all semantic configurations, including the one you added.
Semantic configurations:
----------------------------------------
Configuration name: hotels-sample-semantic-configuration
Title field: undefined
Keywords fields:
Content fields: AzureSearch_DocumentKey
----------------------------------------
Configuration name: semantic-config
Title field: HotelName
Keywords fields: Tags
Content fields: Description
----------------------------------------
Semantic configuration updated successfully.
The semanticQuery.js script returns results ordered by the reranker score.
Search result #1:
  Re-ranker Score: 2.613231658935547
  HotelId: 24
  HotelName: Uptown Chic Hotel
  Description: Chic hotel near the city. High-rise hotel in downtown,
  within walking distance to theaters, art galleries, restaurants and
  shops. Visit Seattle Art Museum by day, and then head over to
  Benaroya Hall to catch the evening's concert performance.

Search result #2:
  Re-ranker Score: 2.271434783935547
  HotelId: 2
  HotelName: Old Century Hotel
  Description: The hotel is situated in a nineteenth century plaza...
  // Trimmed for brevity
The semanticQueryReturnCaptions.js script returns extractive captions with hit highlighting. Captions are the most relevant passages in a result.
Search result #1:
  Re-ranker Score: 2.613231658935547
  HotelName: Uptown Chic Hotel
  Description: Chic hotel near the city. High-rise hotel in downtown,
  within walking distance to theaters, art galleries, restaurants and
  shops. Visit Seattle Art Museum by day, and then head over to
  Benaroya Hall to catch the evening's concert performance.

  Caption with highlights: Chic hotel near the city. High-rise hotel
  in downtown, within walking distance to<em> theaters, </em>art
  galleries, restaurants and shops. Visit<em> Seattle Art Museum
  </em>by day, and then head over to<em> Benaroya Hall </em>to catch
  the evening's concert performance.
------------------------------------------------------------
Search result #2:
  Re-ranker Score: 2.271434783935547
  HotelName: Old Century Hotel
  // Trimmed for brevity
The semanticAnswer.js script returns a semantic answer (verbatim content) pulled from the result that best matches the question.
Semantic answer result #1:
Semantic Answer: Nature is Home on the beach. Explore the shore by
day, and then come home to our shared living space to relax around
a stone fireplace, sip something warm, and explore the<em> library
</em>by night. Save up to 30 percent. Valid Now through the end of
the year. Restrictions and blackouts may apply.
Semantic Answer Score: 0.9829999804496765

Search Results:

Search result #1:
2.124817371368408
Stay-Kay City Hotel
This classic hotel is fully-refurbished and ideally located on the
main commercial artery of the city in the heart of New York...
Caption: This classic hotel is<em> fully-refurbished </em>and
ideally located on the main commercial artery of the city...
// Trimmed for brevity
Understand the code
Note
The code snippets in this section might have been modified for readability. For a complete working example, see the source code.
Now that you've run the code, let's break down the key steps:
Configuration and authentication
The config.ts file loads environment variables, creates a DefaultAzureCredential for authentication, and defines a HotelDocument interface for type safety.
import { DefaultAzureCredential }
    from "@azure/identity";

export const searchEndpoint =
    process.env.AZURE_SEARCH_ENDPOINT
    || "PUT-YOUR-SEARCH-SERVICE-ENDPOINT-HERE";
export const indexName =
    process.env.AZURE_SEARCH_INDEX_NAME
    || "hotels-sample";
export const semanticConfigurationName =
    process.env.SEMANTIC_CONFIGURATION_NAME
    || "semantic-config";

export const credential = new DefaultAzureCredential();

export interface HotelDocument {
    HotelId: string;
    HotelName: string;
    Description: string;
    Category: string;
    Tags: string[];
}
Key takeaways:
DefaultAzureCredentialprovides keyless authentication using Microsoft Entra ID. It chains multiple credential types, including the Azure CLI credential fromaz login.- The
HotelDocumentinterface provides compile-time type checking for search results, ensuring type-safe access to document fields. - Environment variables are loaded from the
.envfile usingdotenv.
Update the index with a semantic configuration
The updateIndexSettings.ts file adds a semantic configuration to the existing hotels-sample index. This operation doesn't delete any search documents, and your index remains operational after the configuration is added. TypeScript type annotations ensure the configuration matches the expected schema.
import {
    SearchIndexClient,
    SemanticConfiguration,
    SemanticPrioritizedFields,
    SemanticField
} from "@azure/search-documents";
import {
    searchEndpoint, indexName,
    credential, semanticConfigurationName
} from "./config.js";

const indexClient = new SearchIndexClient(
    searchEndpoint, credential
);
const existingIndex =
    await indexClient.getIndex(indexName);

const fields: SemanticPrioritizedFields = {
    titleField: { name: "HotelName" },
    keywordsFields: [
        { name: "Tags" }
    ] as SemanticField[],
    contentFields: [
        { name: "Description" }
    ] as SemanticField[]
};

const newSemanticConfiguration:
    SemanticConfiguration = {
    name: semanticConfigurationName,
    prioritizedFields: fields
};

if (existingIndex.semanticSearch
    && existingIndex.semanticSearch.configurations) {
    existingIndex.semanticSearch.configurations
        .push(newSemanticConfiguration);
} else {
    existingIndex.semanticSearch = {
        configurations: [newSemanticConfiguration]
    };
}

await indexClient.createOrUpdateIndex(existingIndex);
Key takeaways:
- TypeScript types like
SemanticPrioritizedFields,SemanticConfiguration, andSemanticFieldprovide compile-time validation for the configuration structure. titleFieldsets the document title,contentFieldssets the main content, andkeywordsFieldssets the keyword or tag fields.createOrUpdateIndexpushes the updated schema to the search service without rebuilding the index or deleting documents.
Query the index
The query scripts run three queries in sequence, progressing from a basic semantic search to semantic ranking with captions and answers.
Semantic query (no captions, no answers)
The semanticQuery.ts script shows the minimum requirement for invoking semantic ranking with type-safe results.
import { SearchClient }
    from "@azure/search-documents";
import {
    HotelDocument, credential,
    searchEndpoint, indexName,
    semanticConfigurationName
} from "./config.js";

const searchClient =
    new SearchClient<HotelDocument>(
        searchEndpoint, indexName, credential
    );

const results = await searchClient.search(
    "walking distance to live music",
    {
        queryType: "semantic",
        semanticSearchOptions: {
            configurationName:
                semanticConfigurationName
        },
        select: [
            "HotelId", "HotelName", "Description"
        ]
    }
);
Key takeaways:
SearchClient<HotelDocument>provides type-safe access to document fields in results, with autocomplete for field names inselectandresult.document.queryType: "semantic"enables semantic ranking on the query.semanticSearchOptions.configurationNamespecifies which semantic configuration to use.
Semantic query with captions
The semanticQueryReturnCaptions.ts script adds captions to extract the most relevant passages from each result, with hit highlighting applied to the important terms and phrases.
const results = await searchClient.search(
    "walking distance to live music",
    {
        queryType: "semantic",
        semanticSearchOptions: {
            configurationName:
                semanticConfigurationName,
            captions: {
                captionType: "extractive",
                highlight: true
            }
        },
        select: [
            "HotelId", "HotelName", "Description"
        ]
    }
);

for await (const result of results.results) {
    const captions = result.captions;
    if (captions && captions.length > 0) {
        const caption = captions[0];
        if (caption.highlights) {
            console.log(
                `Caption: ${caption.highlights}`
            );
        }
    }
}
Key takeaways:
captions.captionType: "extractive"enables extractive captions from the content fields.- Captions surface the most relevant passages and add
<em>tags around important terms.
Semantic query with answers
The semanticAnswer.ts script adds semantic answers. It uses a question as the search text because semantic answers work best when the query is phrased as a question. The answer is a verbatim passage extracted from your index, not a composed response from a chat completion model.
The query and the indexed content must be closely aligned for an answer to be returned. If no candidate meets the confidence threshold, the response doesn't include an answer. This example uses a question that's known to produce a result so that you can see the syntax. If answers aren't useful for your scenario, omit answers from your code. For composed answers, consider a RAG pattern or agentic retrieval.
const results = await searchClient.search(
    "What's a good hotel for people who "
    + "like to read",
    {
        queryType: "semantic",
        semanticSearchOptions: {
            configurationName:
                semanticConfigurationName,
            captions: {
                captionType: "extractive"
            },
            answers: {
                answerType: "extractive"
            }
        },
        select: [
            "HotelName", "Description", "Category"
        ]
    }
);

const semanticAnswers = results.answers;
for (const answer of semanticAnswers || []) {
    if (answer.highlights) {
        console.log(
            `Semantic Answer: ${answer.highlights}`
        );
    } else {
        console.log(
            `Semantic Answer: ${answer.text}`
        );
    }
    console.log(
        `Semantic Answer Score: ${answer.score}`
    );
}
Key takeaways:
answers.answerType: "extractive"enables extractive answers for question-like queries.- Answers are verbatim content extracted from your index, not generated text.
results.answersretrieves the answer objects separately from the search results.
In this quickstart, you use the Azure AI Search REST APIs to add semantic ranking to an existing search index and query the index.
Semantic ranking is query-side functionality that uses machine reading comprehension to rescore search results, promoting the most semantically relevant matches to the top of the list. You can add a semantic configuration to an existing index with no rebuild requirement. Semantic ranking is most effective for informational or descriptive text.
Tip
Want to get started right away? Download the source code on GitHub.
Prerequisites
An Azure account with an active subscription. Create an account for free.
An index with descriptive text fields attributed as
searchableandretrievable. This quickstart assumes the hotels-sample index.Visual Studio Code with the REST Client extension.
Git to clone the sample repository.
The Azure CLI for keyless authentication with Microsoft Entra ID.
Configure access
Before you begin, make sure you have permissions to access content and operations in Azure AI Search. This quickstart uses Microsoft Entra ID for authentication and role-based access for authorization. You must be an Owner or User Access Administrator to assign roles. If roles aren't feasible, use key-based authentication instead.
To configure the recommended role-based access:
Enable role-based access for your search service.
Assign the following roles to your user account.
Search Service Contributor
Search Index Data Reader
Note
Unlike other quickstarts that create and load an index, this quickstart assumes an existing index that already contains data, so you don't need the Search Index Data Contributor role.
Get endpoint
Each Azure AI Search service has an endpoint, which is a unique URL that identifies and provides network access to the service. In a later section, you specify this endpoint to connect to your search service programmatically.
To get the endpoint:
Go to your search service in the Azure portal.
From the left pane, select Overview.
Make a note of the endpoint, which should look like
https://my-service.search.windows.net.
Start with an index
This quickstart modifies an existing index to include a semantic configuration. We recommend the hotels-sample index, which you can create in minutes using an Azure portal wizard.
To use a different index, replace the index name, field names in the semantic configuration, and field names in query select statements throughout the sample code. Your index should contain descriptive text fields that are attributed as searchable and retrievable.
To review and query the hotels-sample index before semantic ranking:
Go to your search service in the Azure portal.
From the left pane, select Search management > Indexes.
Select hotels-sample.
Select Semantic configurations to view any existing configurations. If you enabled semantic ranking during the wizard creation flow, there should be a default configuration.
Select Search explorer, and then select View > JSON view.
Paste the following JSON into the query editor.
{
  "search": "walking distance to live music",
  "select": "HotelId, HotelName, Description",
  "count": true
}
Select Search to run the query.
The response should be similar to the following example. This is a full-text query ranked by BM25, so results match on individual query terms and linguistic variants rather than the overall meaning of the query. For example,
walkingmatcheswalk, andliveandmusicmatch independently rather than as a phrase."@odata.count": 30, "value": [ { "@search.score": 5.004435, "HotelId": "2", "HotelName": "Old Century Hotel", "Description": "The hotel is situated in a nineteenth century plaza, which has been expanded and renovated to the highest architectural standards to create a modern, functional and first-class hotel in which art and unique historical elements coexist with the most modern comforts. The hotel also regularly hosts events like wine tastings, beer dinners, and live music." }, { "@search.score": 4.555706, "HotelId": "24", "HotelName": "Uptown Chic Hotel", "Description": "Chic hotel near the city. High-rise hotel in downtown, within walking distance to theaters, art galleries, restaurants and shops. Visit Seattle Art Museum by day, and then head over to Benaroya Hall to catch the evening's concert performance." }, { "@search.score": 3.5625167, "HotelId": "4", "HotelName": "Sublime Palace Hotel", "Description": "Sublime Cliff Hotel is located in the heart of the historic center of Sublime in an extremely vibrant and lively area within short walking distance to the sites and landmarks of the city and is surrounded by the extraordinary beauty of churches, buildings, shops and monuments. Sublime Cliff is part of a lovingly restored 19th century resort, updated for every modern convenience." }, ... // Trimmed for brevity ]Tip
This query shows how the response looks before semantic ranking is applied. After you configure a semantic configuration, add
"queryType": "semantic"and"semanticConfiguration": "semantic-config"to see how the same query is ranked differently by semantic ranking.
Set up the environment
Use Git to clone the sample repository.
git clone https://github.com/Azure-Samples/azure-search-rest-samplesNavigate to the quickstart folder and open it in Visual Studio Code.
cd azure-search-rest-samples/Quickstart-semantic-ranking
code .
In
semantic-index-update.rest, replace the placeholder value for@searchUrlwith the URL you obtained in Get endpoint.Repeat the previous step for
semantic-query.rest.For keyless authentication with Microsoft Entra ID, sign in to your Azure account. If you have multiple subscriptions, select the one that contains your Azure AI Search service.
az loginFor keyless authentication with Microsoft Entra ID, generate an access token.
az account get-access-token --scope https://search.azure.com/.default --query accessToken --output tsvIn both
.restfiles, replace the placeholder value for@personalAccessTokenwith the token from the previous step.
Run the code
Open
semantic-index-update.rest.Select Send Request on the first GET request to verify your connection.
A response should appear in an adjacent pane. If you have existing indexes, they're listed by name. If the HTTP code is
200 OK, you're ready to proceed.Send the
### Update the hotels-sample index to include a semantic configurationrequest to add a semantic configuration to the index.If you get a
400 Bad Requesterror, your index schema differs from the sample. Send the### Get the schema of the indexrequest, copy the response JSON, add thesemanticsection from the source code to the JSON, and replace the PUT request body with your merged schema.Switch to
semantic-query.restand send the requests sequentially: a simple query for baseline comparison, and then semantic queries with ranking, captions, and answers.
Output
The Send a search query to the hotels-sample index request returns results ranked by BM25 relevance, which is indicated by the @search.score field.
{
  "@odata.count": 30,
  "value": [
    {
      "@search.score": 5.004435,
      "HotelId": "2",
      "HotelName": "Old Century Hotel",
      "Description": "The hotel is situated in a nineteenth century plaza..."
    },
    // Trimmed for brevity
  ]
}
The Send a search query to the hotels-sample index with semantic ranking request adds @search.rerankerScore. Notice that the order changes from the simple query.
{
  "@odata.count": 30,
  "@search.answers": [],
  "value": [
    {
      "@search.score": 4.555706,
      "@search.rerankerScore": 2.613231658935547,
      "HotelId": "24",
      "HotelName": "Uptown Chic Hotel",
      "Description": "Chic hotel near the city. High-rise hotel in downtown..."
    },
    // Trimmed for brevity
  ]
}
The Return captions in the query request adds @search.captions with extracted text and highlights.
{
  "value": [
    {
      "@search.score": 4.555706,
      "@search.rerankerScore": 2.613231658935547,
      "@search.captions": [
        {
          "text": "Chic hotel near the city. High-rise hotel in downtown, within walking distance to theaters, art galleries, restaurants and shops...",
          "highlights": "Chic hotel near the city. High-rise hotel in downtown, within walking distance to<em> theaters, </em>art galleries, restaurants and shops..."
        }
      ],
      "HotelId": "24",
      "HotelName": "Uptown Chic Hotel"
    },
    // Trimmed for brevity
  ]
}
The Return semantic answers in the query request returns an extractive answer in @search.answers when the query is phrased as a question.
{
  "@odata.count": 46,
  "@search.answers": [
    {
      "key": "38",
      "text": "Nature is Home on the beach. Explore the shore by day, and then come home to our shared living space to relax around a stone fireplace, sip something warm, and explore the library by night...",
      "highlights": "Nature is Home on the beach. Explore the shore by day, and then come home to our shared living space to relax around a stone fireplace, sip something warm, and explore the<em> library </em>by night...",
      "score": 0.9829999804496765
    }
  ],
  "value": [
    {
      "@search.score": 2.060124,
      "@search.rerankerScore": 2.124817371368408,
      "@search.captions": [
        {
          "text": "This classic hotel is fully-refurbished and ideally located on the main commercial artery of the city...",
          "highlights": "This classic hotel is<em> fully-refurbished </em>and ideally located on the main commercial artery of the city..."
        }
      ],
      "HotelId": "1",
      "HotelName": "Stay-Kay City Hotel"
    },
    // Trimmed for brevity
  ]
}
Understand the code
Note
The code snippets in this section might have been modified for readability. For a complete working example, see the source code.
Now that you've run the code, let's break down the key steps:
Configuration and authentication
Both .rest files define variables at the top for reuse across all requests.
@searchUrl = PUT-YOUR-SEARCH-SERVICE-URL-HERE
@personalAccessToken = PUT-YOUR-PERSONAL-ACCESS-TOKEN-HERE
@api-version = 2025-09-01
Key takeaways:
@searchUrlis the endpoint of your search service.@personalAccessTokenis a Microsoft Entra ID token obtained from the Azure CLI. This replaces API keys with keyless authentication.Authorization: Bearer {{personalAccessToken}}is included in every request header for authentication.
Update the index with a semantic configuration
The ### Update the hotels-sample index to include a semantic configuration request in semantic-index-update.rest sends the full index schema along with a new semantic section. The REST API requires the complete schema for any update operation, so you can't send only the semantic configuration.
The key addition is the semantic section:
"semantic": {
    "configurations": [
        {
            "name": "semantic-config",
            "rankingOrder":
                "BoostedRerankerScore",
            "prioritizedFields": {
                "titleField": {
                    "fieldName": "HotelName"
                },
                "prioritizedContentFields": [
                    {
                        "fieldName": "Description"
                    }
                ],
                "prioritizedKeywordsFields": [
                    {
                        "fieldName": "Tags"
                    }
                ]
            }
        }
    ]
}
Key takeaways:
titleFieldidentifies which field contains the document title for semantic evaluation.prioritizedContentFieldsidentifies the main content fields. Semantic ranker evaluates these first when scoring relevance.prioritizedKeywordsFieldsidentifies keyword or tag fields for additional context.rankingOrder: BoostedRerankerScorecombines the BM25 score with the semantic reranker score.- The REST API requires the full schema for PUT operations. Only the
semanticsection is new; all other fields are unchanged.
Query the index
The requests in semantic-query.rest progress from a simple keyword search to semantic ranking with captions and answers. All queries are POST requests to the Documents - Search Post (REST API).
Simple query
The ### Send a search query to the hotels-sample index request is a simple keyword search that doesn't use semantic ranking. It serves as a baseline for comparing results with and without semantic reranking.
{
    "search":
        "walking distance to live music",
    "select":
        "HotelId, HotelName, Description",
    "count": true,
    "queryType": "simple"
}
Key takeaways:
queryType: "simple"uses the default BM25 ranking algorithm.- Results are ranked by keyword relevance (
@search.score) only.
Semantic query (no captions, no answers)
The ### Send a search query to the hotels-sample index with semantic ranking request adds semantic ranking. The following JSON shows the minimum requirement for invoking semantic ranking.
{
    "search":
        "walking distance to live music",
    "select":
        "HotelId, HotelName, Description",
    "count": true,
    "queryType": "semantic",
    "semanticConfiguration": "semantic-config"
}
Key takeaways:
queryType: "semantic"enables semantic ranking on the query.semanticConfigurationspecifies which semantic configuration to use.
Semantic query with captions
The ### Return captions in the query request adds captions to extract the most relevant passages from each result, with hit highlighting applied to the important terms and phrases.
{
    "search":
        "walking distance to live music",
    "select":
        "HotelId, HotelName, Description",
    "count": true,
    "queryType": "semantic",
    "semanticConfiguration": "semantic-config",
    "captions": "extractive|highlight-true"
}
Key takeaways:
captions: "extractive|highlight-true"enables extractive captions with<em>tags around important terms.- Captions appear in the
@search.captionsarray for each result.
Semantic query with answers
The ### Return semantic answers in the query request adds semantic answers. It uses a question as the search text because semantic answers work best when the query is phrased as a question. The answer is a verbatim passage extracted from your index, not a composed response from a chat completion model.
The query and the indexed content must be closely aligned for an answer to be returned. If no candidate meets the confidence threshold, the response doesn't include an answer. This example uses a question that's known to produce a result so that you can see the syntax. If answers aren't useful for your scenario, omit the answers parameter from your request. For composed answers, consider a RAG pattern or agentic retrieval.
{
    "search":
        "what's a good hotel for people who like to read",
    "select":
        "HotelId, HotelName, Description",
    "count": true,
    "queryType": "semantic",
    "semanticConfiguration": "semantic-config",
    "captions": "extractive|highlight-true",
    "answers": "extractive"
}
Key takeaways:
answers: "extractive"enables extractive answers for question-like queries.- Answers appear in the top-level
@search.answersarray, separate from individual results. - Answers are verbatim content extracted from your index, not generated text.
Clean up resources
When you work in your own subscription, it's a good idea to finish a project by removing the resources you no longer need. Resources that are left running can cost you money.
In the Azure portal, select All resources or Resource groups from the left pane to find and manage resources. You can delete resources individually or delete the resource group to remove all resources at once.