Note
Access to this page requires authorization. You can try signing in or changing directories.
Access to this page requires authorization. You can try changing directories.
Learn how to configure an indexer to extract searchable data from Azure SQL Database and send it to a search index in Azure AI Search.
In this tutorial, you use C# and the Azure SDK for .NET to:
- Create a data source that connects to Azure SQL Database
- Create an indexer
- Run an indexer to load data into an index
- Query an index as a verification step
Prerequisites
- An Azure account with an active subscription. Create an account for free.
- Azure SQL Database using SQL Server authentication.
- Azure AI Search. Create a service or find an existing service in your current subscription.
- Visual Studio.
Note
You can use a free search service for this tutorial. The Free tier limits you to three indexes, three indexers, and three data sources. This tutorial creates one of each. Before you start, make sure you have room on your service to accept the new resources.
Download files
Source code for this tutorial is in the DotNetHowToIndexer folder in the Azure-Samples/search-dotnet-getting-started GitHub repository.
Create services
This tutorial uses Azure AI Search for indexing and queries and Azure SQL Database as an external data source. If possible, create both services in the same region and resource group for proximity and manageability. In practice, Azure SQL Database can be in any region.
Start with Azure SQL Database
This tutorial provides the hotels.sql file in the sample download to populate the database. Azure AI Search consumes flattened rowsets, such as one generated from a view or query. The SQL file in the sample solution creates and populates a single table.
If you have an existing Azure SQL Database resource, you can add the hotels table to it starting at the Open query step.
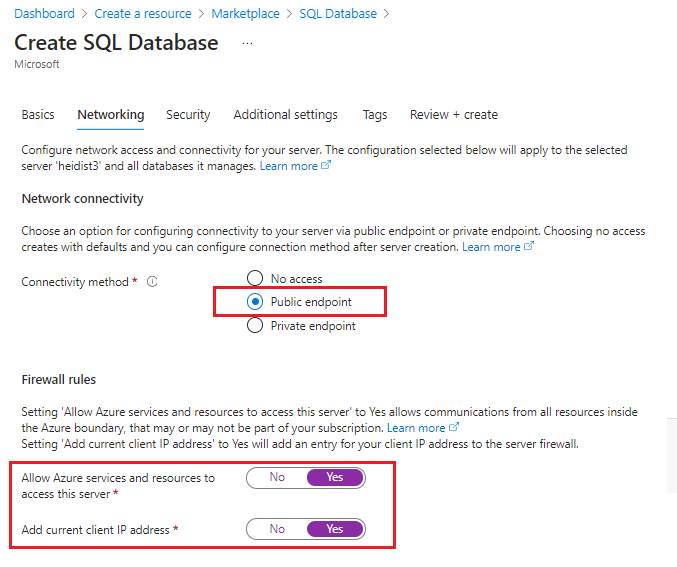
Create an Azure SQL database. Server configuration for the database is important:
Choose the SQL Server authentication option that prompts you to specify a username and password. You need this for the ADO.NET connection string used by the indexer.
Choose a public connection, which makes this tutorial easier to complete. Public isn't recommended for production, and we recommend deleting this resource at the end of the tutorial.
In the Azure portal, go to the new resource.
Add a firewall rule that allows access from your client. You can run
ipconfigfrom a command prompt to get your IP address.Use the Query editor to load the sample data. On the navigation pane, select Query editor (preview) and enter the username and password of the server admin.
If you get an access denied error, copy the client IP address from the error message, open the network security page for the server, and add an inbound rule that allows access from your client.
In Query editor, select Open query and navigate to the location of hotels.sql file on your local computer.
Select the file and select Open. The script should look similar to the following screenshot:

Select Run to execute the query. In the Results pane, you should see a query succeeded message for three rows.
To return a rowset from this table, you can execute the following query as a verification step:
SELECT * FROM HotelsCopy the ADO.NET connection string for the database. Under Settings > Connection Strings, copy the ADO.NET connection string, which should be similar to the following example:
Server=tcp:<YOUR-DATABASE-NAME>.database.windows.net,1433;Initial Catalog=hotels-db;Persist Security Info=False;User ID=<YOUR-USER-NAME>;Password=<YOUR-PASSWORD>;MultipleActiveResultSets=False;Encrypt=True;TrustServerCertificate=False;Connection Timeout=30;
You'll need this connection string to set up your environment in the next step.
Azure AI Search
The next component is Azure AI Search, which you can create in the Azure portal. You can use the Free tier to complete this tutorial.
Get an admin key and URL for Azure AI Search
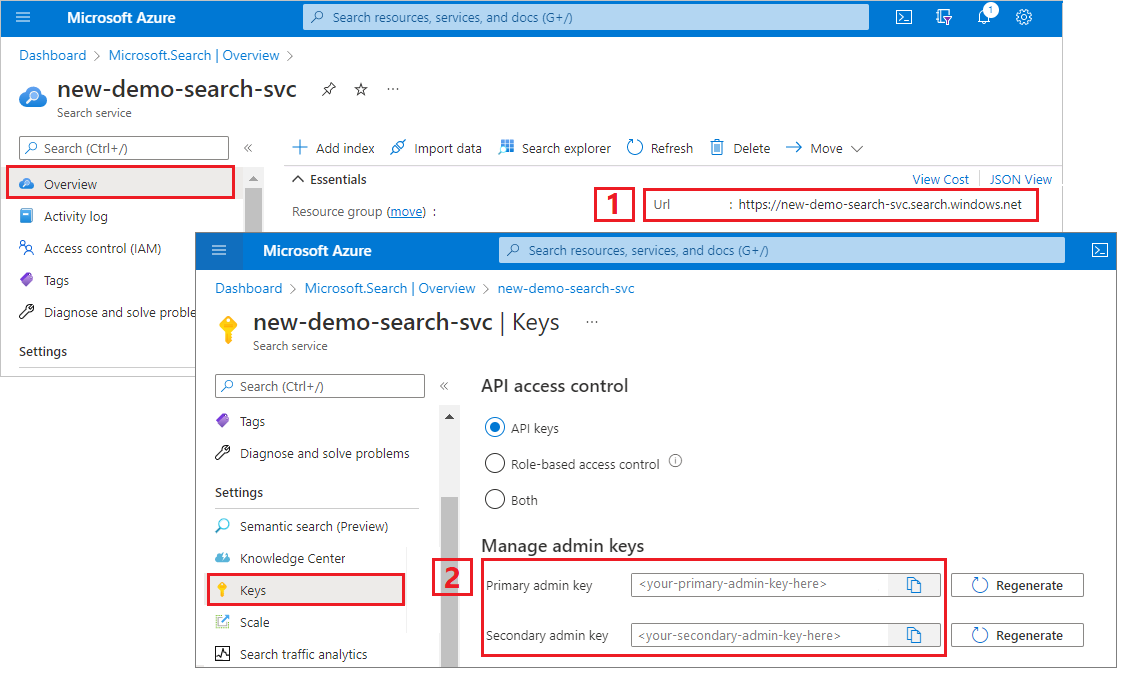
API calls require the service URL and an access key. A search service is created with both, so if you added Azure AI Search to your subscription, follow these steps to get the necessary information:
Go to your search service in the Azure portal.
On the Overview page, copy the endpoint URL. An example endpoint might look like
https://mydemo.search.windows.net.On Settings > Keys, get an admin key for full rights on the service. There are two interchangeable admin keys, provided for business continuity in case you need to roll one over. You can use either key on requests to add, modify, or delete objects.
Set up your environment
Start Visual Studio and open DotNetHowToIndexers.sln.
In Solution Explorer, open appsettings.json to provide connection information.
For
SearchServiceEndPoint, if the full URL on your service Overview page ishttps://my-demo-service.search.windows.net, provide the entire URL.For
AzureSqlConnectionString, the string format is similar to"Server=tcp:<your-database-name>.database.windows.net,1433;Initial Catalog=hotels-db;Persist Security Info=False;User ID=<your-user-name>;Password=<your-password>;MultipleActiveResultSets=False;Encrypt=True;TrustServerCertificate=False;Connection Timeout=30;".{ "SearchServiceEndPoint": "<placeholder-search-full-url>", "SearchServiceAdminApiKey": "<placeholder-admin-key-for-search-service>", "AzureSqlConnectionString": "<placeholder-ADO.NET-connection-string", }Replace the user password in the SQL connection string with a valid password. While the database and usernames will copy over, you must enter the password manually.
Create the pipeline
Indexers require a data source object and an index. The relevant code is in two files:
- hotel.cs contains a schema that defines the index
- Program.cs contains functions for creating and managing structures in your service
In hotel.cs
The index schema defines the fields collection, including attributes that specify allowed operations, such as whether a field is full-text searchable, filterable, or sortable, as shown in the following field definition for HotelName. A SearchableField is, by definition, full-text searchable. Other attributes are explicitly assigned.
. . .
[SearchableField(IsFilterable = true, IsSortable = true)]
[JsonPropertyName("hotelName")]
public string HotelName { get; set; }
. . .
A schema can also include other elements, such as scoring profiles for boosting a search score and custom analyzers. However, for this tutorial, the schema is sparsely defined, consisting only of fields found in the sample datasets.
In Program.cs
The main program includes logic for creating an indexer client, an index, a data source, and an indexer. The code checks for and deletes existing resources of the same name, assuming that you might run this program multiple times.
The data source object is configured with settings that are specific to Azure SQL Database resources, including partial or incremental indexing for using the built-in change detection features of Azure SQL. The source demo hotels database in Azure SQL has a "soft delete" column named IsDeleted. When this column is set to true in the database, the indexer removes the corresponding document from the Azure AI Search index.
Console.WriteLine("Creating data source...");

var dataSource =
      new SearchIndexerDataSourceConnection(
         "hotels-sql-ds",
         SearchIndexerDataSourceType.AzureSql,
         configuration["AzureSqlConnectionString"],
         new SearchIndexerDataContainer("hotels"));

indexerClient.CreateOrUpdateDataSourceConnection(dataSource);
An indexer object is platform agnostic, where configuration, scheduling, and invocation are the same regardless of the source. This example indexer includes a schedule and a reset option that clears the indexer history. It also calls a method to create and run the indexer immediately. To create or update an indexer, use CreateOrUpdateIndexerAsync.
Console.WriteLine("Creating Azure SQL indexer...");

var schedule = new IndexingSchedule(TimeSpan.FromDays(1))
{
      StartTime = DateTimeOffset.Now
};

var parameters = new IndexingParameters()
{
      BatchSize = 100,
      MaxFailedItems = 0,
      MaxFailedItemsPerBatch = 0
};

// Indexer declarations require a data source and search index.
// Common optional properties include a schedule, parameters, and field mappings
// The field mappings below are redundant due to how the Hotel class is defined, but
// we included them anyway to show the syntax
var indexer = new SearchIndexer("hotels-sql-idxr", dataSource.Name, searchIndex.Name)
{
      Description = "Data indexer",
      Schedule = schedule,
      Parameters = parameters,
      FieldMappings =
      {
         new FieldMapping("_id") {TargetFieldName = "HotelId"},
         new FieldMapping("Amenities") {TargetFieldName = "Tags"}
      }
};

await indexerClient.CreateOrUpdateIndexerAsync(indexer);
Indexer runs are usually scheduled, but during development, you might want to run the indexer immediately using RunIndexerAsync.
Console.WriteLine("Running Azure SQL indexer...");

try
{
      await indexerClient.RunIndexerAsync(indexer.Name);
}
catch (RequestFailedException ex) when (ex.Status == 429)
{
      Console.WriteLine("Failed to run indexer: {0}", ex.Message);
}
Build the solution
Select F5 to build and run the solution. The program executes in debug mode. A console window reports the status of each operation.
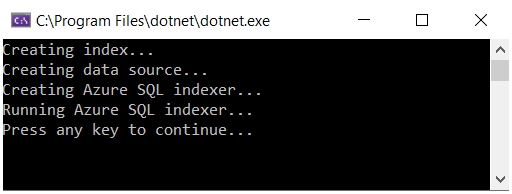
Your code runs locally in Visual Studio, connecting to your search service on Azure, which in turn connects to Azure SQL Database and retrieves the dataset. With this many operations, there are several potential points of failure. If you get an error, check the following conditions first:
Search service connection information that you provide is the full URL. If you only entered the service name, operations stop at index creation, with a failure to connect error.
Database connection information in appsettings.json. It should be the ADO.NET connection string obtained from the Azure portal, modified to include a username and password that are valid for your database. The user account must have permission to retrieve data. Your local client IP address must be allowed inbound access through the firewall.
Resource limits. Recall that the Free tier has limits of three indexes, indexers, and data sources. A service at the maximum limit can't create new objects.
Search
Use the Azure portal to verify object creation, and then use Search explorer to query the index.
Go to your search service in the Azure portal.
From the left pane, open each page to verify the objects are created. Indexes, Indexers, and Data Sources should have hotels-sql-idx, hotels-sql-idxr, and hotels-sql-ds, respectively.
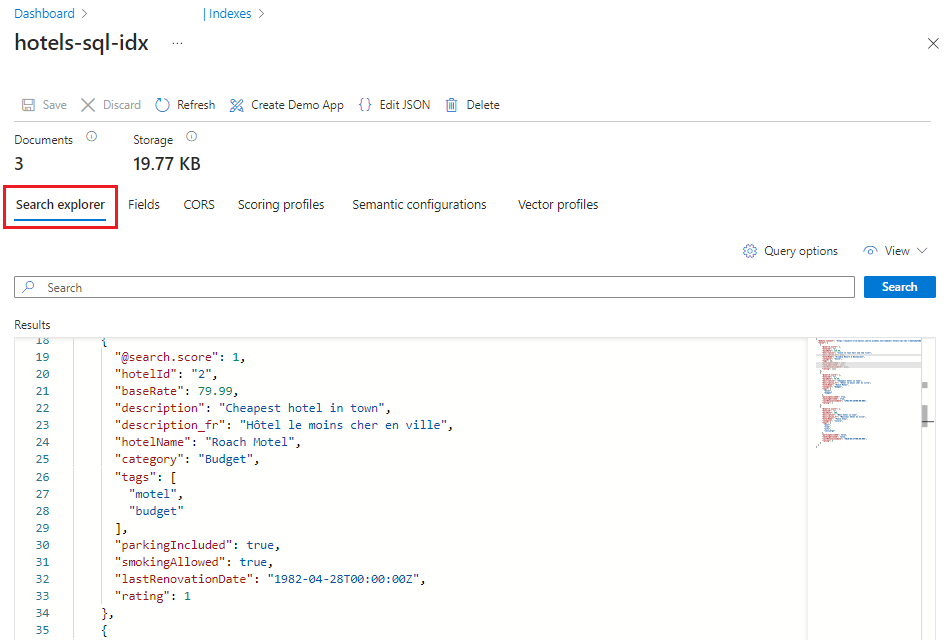
On the Indexes tab, select the hotels-sql-idx index. On the hotels page, Search explorer is the first tab.
Select Search to issue an empty query.
The three entries in your index are returned as JSON documents. Search explorer returns documents in JSON so that you can view the entire structure.
Switch to JSON view so that you can enter query parameters.
{
     "search": "river",
     "count": true
}
This query invokes full text search on the term
river. The result includes a count of the matching documents. Returning the count of matching documents is helpful in testing scenarios where you have a large index with thousands or millions of documents. In this case, only one document matches the query.Enter parameters that limit search results to fields of interest.
{
     "search": "river",
     "select": "hotelId, hotelName, baseRate, description",
     "count": true
}
The query response is reduced to selected fields, resulting in more concise output.
Reset and rerun
In the early experimental stages of development, the most practical approach for design iteration is to delete the objects from Azure AI Search and allow your code to rebuild them. Resource names are unique. Deleting an object lets you recreate it using the same name.
The sample code for this tutorial checks for existing objects and deletes them so that you can rerun your code.
You can also use the Azure portal to delete indexes, indexers, and data sources.
Clean up resources
When you're working in your own subscription, at the end of a project, it's a good idea to remove the resources that you no longer need. Resources left running can cost you money. You can delete resources individually or delete the resource group to delete the entire set of resources.
You can find and manage resources in the Azure portal, using the All resources or Resource groups link in the left-navigation pane.
Next steps
Now that you're familiar with the basics of SQL Database indexing, take a closer look at indexer configuration: