Note
Access to this page requires authorization. You can try signing in or changing directories.
Access to this page requires authorization. You can try changing directories.
This article explains how to restrict network access to a search service's public endpoint. To block all data plane access to the public endpoint, use private endpoints and connect from within an Azure virtual network.
This article assumes the Azure portal for configuring network access options. You can also use the Management REST API, Azure PowerShell, or the Azure CLI.
Prerequisites
A search service, any region, at the Basic tier or higher
Owner or Contributor permissions
When to configure network access
By default, Azure AI Search is configured to allow connections over a public endpoint. Access to a search service through the public endpoint is protected by authentication and authorization protocols, but the endpoint itself is open to the internet at the network layer for data plane requests.
If you aren't hosting a public web site, you might want to configure network access to automatically refuse requests unless they originate from an approved set of devices and cloud services.
There are two mechanisms for restricting access to the public endpoint:
Inbound rules listing the IP addresses, ranges, or subnets from which requests are admitted
Exceptions to network rules, where requests are admitted with no checks, as long as the request originates from a trusted service
Network rules aren't required, but it's a security best practice to add them if you use Azure AI Search for surfacing private or internal corporate content.
Network rules are scoped to data plane operations against the search service's public endpoint. Data plane operations include creating or querying indexes, and all other actions described by the Search REST APIs. Control plane operations target service administration. Those operations specify resource provider endpoints, which are subject to the network protections supported by Azure Resource Manager.
Limitations
There are a few drawbacks to locking down the public endpoint.
It takes time to fully identify IP ranges and set up firewalls, and if you're in early stages of proof-of-concept testing and investigation and using sample data, you might want to defer network access controls until you actually need them.
Some workflows require access to a public endpoint. Specifically, the indexing wizards in the Azure portal connect to built-in (hosted) sample data and embedding models over the public endpoint. You can switch to code or script to complete the same tasks when firewall rules in place, but if you want to run the wizards, the public endpoint must be available. For more information, see Secure connections in the import wizards.
Configure network access in Azure portal
Sign in to Azure portal and find your search service.
Under Settings, select Networking on the leftmost pane. If you don't see this option, check your service tier. Networking options are available on the Basic tier and higher.
Choose Selected IP addresses. Avoid the Disabled option unless you're configuring a private endpoint.
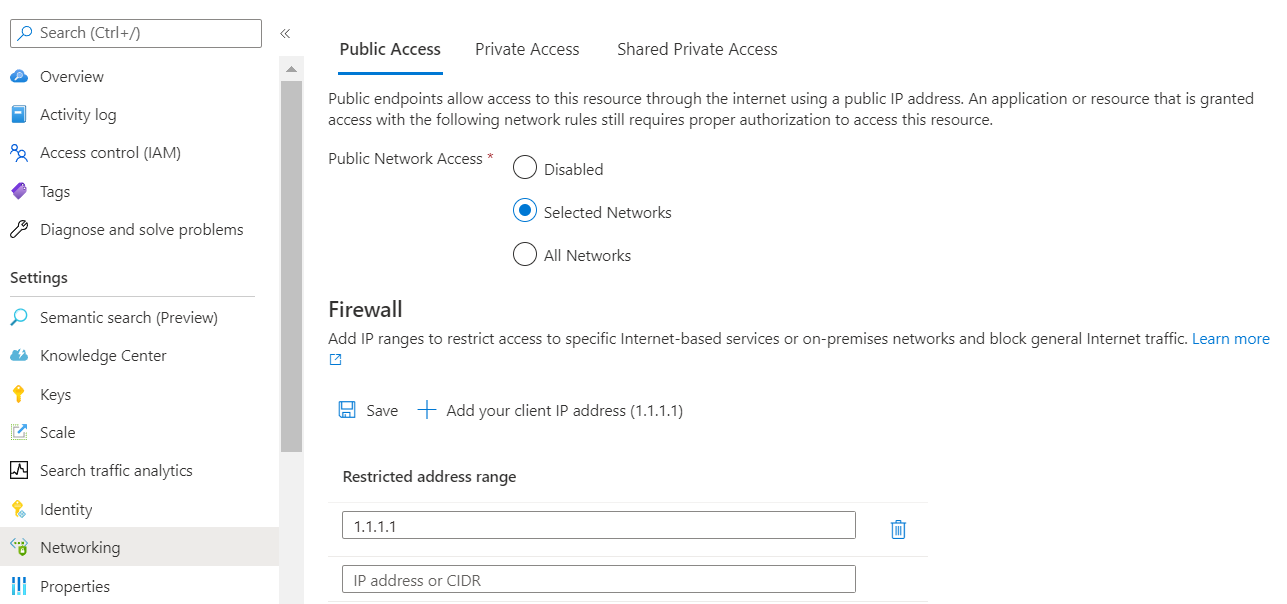
Under IP Firewall, select Add your client IP address. This step creates an inbound rule for the public IP address of your personal device to Azure AI Search. See Allow access from the Azure portal IP address for details.

Add other client IP addresses for other devices and services that send requests to a search service.
Specify IP addresses and ranges in the CIDR format. An example of CIDR notation is 8.8.8.0/24, which represents the IPs that range from 8.8.8.0 to 8.8.8.255.
To get the public IP addresses of Azure services, see Azure IP Ranges and Service Tags. If your search client is hosted within an Azure function, see IP addresses in Azure Functions.
Under Exceptions, select Allow Azure services on the trusted services list to access this search service.

The trusted service list includes:
Microsoft.CognitiveServicesfor Azure OpenAI and Azure AI servicesMicrosoft.MachineLearningServicesfor Azure Machine Learning
When you enable this exception, you take a dependency on Microsoft Entra ID authentication, managed identities, and role assignments. Any Azure AI service or AML feature that has a valid role assignment on your search service can bypass the firewall. See Grant access to trusted services for more details.
Save your changes.


After you enable the IP access control policy for your Azure AI Search service, all requests to the data plane from machines outside the allowed list of IP address ranges are rejected.
When requests originate from IP addresses that aren't in the allowed list, a generic 403 Forbidden response is returned with no other details.
Important
It can take several minutes for changes to take effect. Wait at least 15 minutes before troubleshooting any problems related to network configuration.
Allow access from the Azure portal IP address
The Azure portal has its own connection to Azure AI Search, separate from your local device and browser. If you use the Azure portal to manage your search service, you need to add the portal IP address as described in this section, and your client IP address as described in the previous section.
When IP rules are configured, some features of the Azure portal are disabled. For example, you can view and manage service level information, but portal access to the import wizards, indexes, indexers, and other top-level resources are restricted.
You can restore the Azure portal's access to the full range of search service operations by adding the Azure portal IP address to the restricted address range.
To get the Azure portal's IP address, perform nslookup (or ping) on:
stamp2.ext.search.windows.net, which is the domain of the traffic manager for the Azure public cloud.stamp2.ext.search.azure.usfor Azure Government cloud.
For nslookup, the IP address is visible in the "Non-authoritative answer" portion of the response. In the following example, the IP address that you should copy is 52.252.175.48.
$ nslookup stamp2.ext.search.windows.net
Server:  ZenWiFi_ET8-0410
Address:  192.168.50.1

Non-authoritative answer:
Name:    azsyrie.northcentralus.cloudapp.azure.com
Address:  52.252.175.48
Aliases:  stamp2.ext.search.windows.net
          azs-ux-prod.trafficmanager.net
          azspncuux.management.search.windows.net
When services run in different regions, they connect to different traffic managers. Regardless of the domain name, the IP address returned from the ping is the correct one to use when defining an inbound firewall rule for the Azure portal in your region.
For ping, the request times out, but the IP address is visible in the response. For example, in the message "Pinging azsyrie.northcentralus.cloudapp.azure.com [52.252.175.48]", the IP address is 52.252.175.48.
A banner informs you that IP rules affect the Azure portal experience. This banner remains visible even after you add the Azure portal's IP address. Remember to wait several minutes for network rules to take effect before testing.

Grant access to trusted Azure services
Did you select the trusted services exception? If yes, your search service admits requests and responses from a trusted Azure resource without checking for an IP address. A trusted resource must have a managed identity (either system or user-assigned, but usually system). A trusted resource must have a role assignment on Azure AI Search that gives it permission to data and operations.
The trusted service list for Azure AI Search includes:
Microsoft.CognitiveServicesfor Azure OpenAI and Azure AI servicesMicrosoft.MachineLearningServicesfor Azure Machine Learning
Workflows for this network exception are requests originating from Azure AI Foundry or other AML features to Azure AI Search. The trusted services exception is typically for Azure OpenAI On Your Data scenarios for retrieval augmented generation (RAG) and playground environments.
Trusted resources must have a managed identity
To set up managed identities for Azure OpenAI and Azure Machine Learning:
- How to configure Azure OpenAI in Azure AI Foundry Models with managed identities
- How to set up authentication between Azure Machine Learning and other services.
To set up a managed identity for an Azure AI service:
- Find your multi-service account.
- On the leftmost pane, under Resource management, select Identity.
- Set System-assigned to On.
Trusted resources must have a role assignment
Once your Azure resource has a managed identity, assign roles on Azure AI Search to grant permissions to data and operations.
The trusted services are used for vectorization workloads: generating vectors from text and image content, and sending payloads back to the search service for query execution or indexing. Connections from a trusted service are used to deliver payloads to Azure AI search.
On the leftmost pane, under Access control (IAM), select Identity.
Select Add and then select Add role assignment.
On the Roles page:
- Select Search Index Data Contributor to load a search index with vectors generated by an embedding model. Choose this role if you intend to use integrated vectorization during indexing.
- Or, select Search Index Data Reader to provide queries containing a vector generated by an embedding model at query time. The embedding used in a query isn't written to an index, so no write permissions are required.
Select Next.
On the Members page, select Managed identity and Select members.
Filter by system-managed identity and then select the managed identity of your Azure AI services multi-service account.
Note
This article covers the trusted exception for admitting requests to your search service, but Azure AI Search is itself on the trusted services list of other Azure resources. Specifically, you can use the trusted service exception for connections from Azure AI Search to Azure Storage.
Next steps
Once a request is allowed through the firewall, it must be authenticated and authorized. You have two options:
Key-based authentication, where an admin or query API key is provided on the request. This option is the default.
Role-based access control using Microsoft Entra ID, where the caller is a member of a security role on a search service. This is the most secure option. It uses Microsoft Entra ID for authentication and role assignments on Azure AI Search for permissions to data and operations.