3 - Deploy the search-enabled website
Deploy the search-enabled website as an Azure Static Web Apps site. This deployment includes both the React app for the web pages, and the Function app for search operations.
The static web app pulls the information and files for deployment from GitHub using your fork of the samples repository.
Create a Static Web App in Visual Studio Code
In Visual Studio Code, make sure you're at the repository root, and not the bulk-insert folder (for example,
azure-search-javascript-samples).Select Azure from the Activity Bar, then open Resources from the side bar.
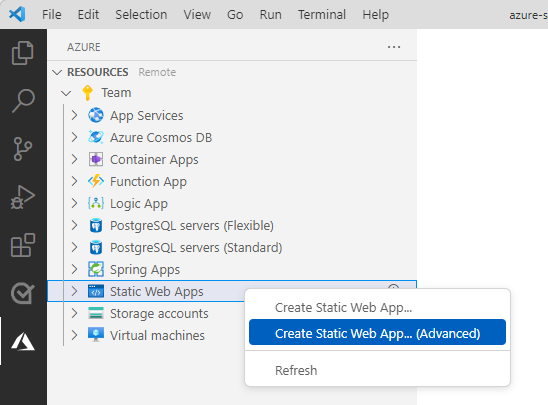
Right-click Static Web Apps and then select Create Static Web App (Advanced). If you don't see this option, verify that you have the Azure Functions extension for Visual Studio Code.
If you see a pop-up window in Visual Studio Code asking which branch you want to deploy from, select the default branch, usually main.
This setting means only changes you commit to that branch are deployed to your static web app.
If you see a pop-up window asking you to commit your changes, don't do this. The secrets from the bulk import step shouldn't be committed to the repository.
To roll back the changes, in Visual Studio Code select the Source Control icon in the Activity bar, then select each changed file in the Changes list and select the Discard changes icon.
Follow the prompts to create the static web app:
Prompt Enter Select a resource group for new resources. Use the resource group you created for this tutorial. Enter the name for the new Static Web App. Create a unique name for your resource. For example, you can prepend your name to the repository name such as, my-demo-static-web-app.Select a SKU Select the free SKU for this tutorial. Select a location for new resources. For Node.js: Select West US 2during the Azure Function programming model (PM) v4 preview. For C# and Python, select a region near you.Choose build preset to configure default project structure. Select Custom. Select the location of your client application code search-website-functions-v4/client
This is the path, from the root of the repository, to your static web app.Select the location of your Azure Functions code search-website-functions-v4/api
This is the path, from the root of the repository, to your static web app. If there are no other functions in the repository, you won't be prompted for the function code location. Currently, you'll need to perform extra steps to ensure the function code location is correct. These steps are performed after the resource is created and are documented in this article.Enter the path of your build output... build
This is the path, from your static web app, to your generated files.If you get an error about an incorrect region, make sure the resource group and static web app resource are in one of the supported regions listed in the error response.
When the static web app is created, a GitHub workflow YML file is also created locally and on GitHub in your fork. This workflow executes in your fork, building and deploying the static web app and functions.
Check the status of static web app deployment using any of these approaches:
Select Open Actions in GitHub from the Notifications. This opens a browser window pointed to your forked repo.
Select the Actions tab in your forked repository. You should see a list of all workflows on your fork.
Select the Azure: Activity Log in Visual Code. You should see a message similar to the following screenshot.

Currently, the YML file is created with erroneous path syntax for the Azure function code. Use this workaround to correct the syntax and rerun the workflow. You can perform this step as soon as the YML file is created. A new workflow launches as soon as you push the updates:
In Visual Studio Code explorer, open the
./.github/workflows/directory.Open the YML file.
Scroll to the
api-locationpath (on or near line 31).Change the path syntax to use a forward slash (only
api_locationneeds editing, other locations are here for context):app_location: "search-website-functions-v4/client" # App source code path api_location: "search-website-functions-v4/api" # Api source code path - optional output_location: "build" # Built app content directory - optionalSave the file.
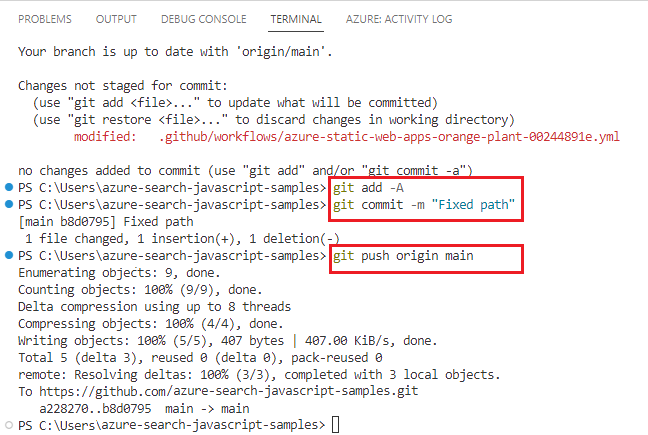
Open an integrated terminal and issue the following GitHub commands to send the updated YML to your fork:
git add -A
git commit -m "fix path"
git push origin main
Wait until the workflow execution completes before continuing. This may take a minute or two to finish.
Get the Azure AI Search query key in Visual Studio Code
In Visual Studio Code, open a new terminal window.
Get the query API key with this Azure CLI command:
az search query-key list --resource-group cognitive-search-demo-rg --service-name my-cog-search-demo-svcKeep this query key to use in the next section. The query key authorizes read access to a search index.
Add environment variables in Azure portal
The Azure Function app won't return search data until the search secrets are in settings.
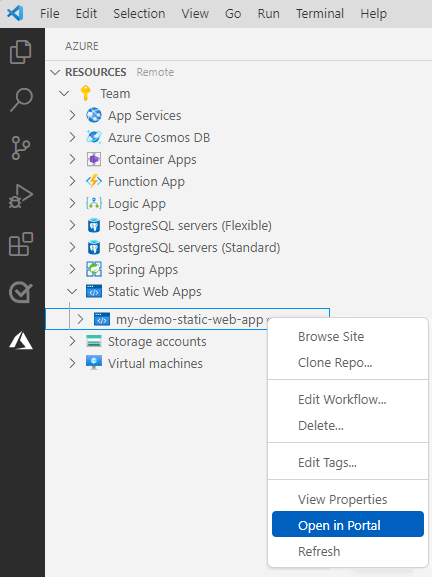
Select Azure from the Activity Bar.
Right-click on your Static Web Apps resource then select Open in Portal.
Select Environment variables then select + Add application setting.

Add each of the following settings:
Setting Your Search resource value SearchApiKey Your search query key SearchServiceName Your search resource name SearchIndexName good-booksSearchFacets authors*,language_codeAzure AI Search requires different syntax for filtering collections than it does for strings. Add a
*after a field name to denote that the field is of typeCollection(Edm.String). This allows the Azure Function to add filters correctly to queries.Check your settings to make sure they look like the following screenshot.

Return to Visual Studio Code.
Refresh your static web app to see the application settings and functions.

If you don't see the application settings, revisit the steps for updating and relaunching the GitHub workflow.
Use search in your static web app
In Visual Studio Code, open the Activity bar, and select the Azure icon.
In the Side bar, right-click on your Azure subscription under the
Static Web Appsarea and find the static web app you created for this tutorial.Right-click the static web app name and select Browse site.

Select Open in the pop-up dialog.
In the website search bar, enter a search query such as
code, so the suggest feature suggests book titles. Select a suggestion or continue entering your own query. Press enter when you've completed your search query.Review the results then select one of the books to see more details.
Troubleshooting
If the web app didn't deploy or work, use the following list to determine and fix the issue:
Did the deployment succeed?
In order to determine if your deployment succeeded, you need to go to your fork of the sample repo and review the success or failure of the GitHub action. There should be only one action and it should have static web app settings for the
app_location,api_location, andoutput_location. If the action didn't deploy successfully, dive into the action logs and look for the last failure.Does the client (front-end) application work?
You should be able to get to your web app and it should successfully display. If the deployment succeeded but the website doesn't display, this may be an issue with how the static web app is configured for rebuilding the app, once it is on Azure.
Does the API (serverless back-end) application work?
You should be able to interact with the client app, searching for books and filtering. If the form doesn't return any values, open the browser's developer tools, and determine if the HTTP calls to the API were successful. If the calls weren't successful, the most likely reason if the static web app configurations for the API endpoint name and Search query key are incorrect.
If the path to the Azure function code (
api_location) isn't correct in the YML file, the application loads but won't call any of the functions that provide integration with Azure AI Search. Revisit the workaround in the deployment section for help with correcting the path.
Clean up resources
To clean up the resources created in this tutorial, delete the resource group.
In Visual Studio Code, open the Activity bar, and select the Azure icon.
In the Side bar, right-click on your Azure subscription under the
Resource Groupsarea and find the resource group you created for this tutorial.Right-click the resource group name then select Delete. This deletes both the Search and Static Web Apps resources.
If you no longer want the GitHub fork of the sample, remember to delete that on GitHub. Go to your fork's Settings then delete the fork.
Next steps
Feedback
Coming soon: Throughout 2024 we will be phasing out GitHub Issues as the feedback mechanism for content and replacing it with a new feedback system. For more information see: https://aka.ms/ContentUserFeedback.
Submit and view feedback for