Note
Access to this page requires authorization. You can try signing in or changing directories.
Access to this page requires authorization. You can try changing directories.
Important
- Activity customization is in PREVIEW. See the Supplemental Terms of Use for Microsoft Azure Previews for additional legal terms that apply to Azure features that are in beta, preview, or otherwise not yet released into general availability.
- After March 31, 2027, Microsoft Sentinel will no longer be supported in the Azure portal and will be available only in the Microsoft Defender portal. All customers using Microsoft Sentinel in the Azure portal will be redirected to the Defender portal and will use Microsoft Sentinel in the Defender portal only. Starting in July 2025, many new customers are automatically onboarded and redirected to the Defender portal.If you're still using Microsoft Sentinel in the Azure portal, we recommend that you start planning your transition to the Defender portal to ensure a smooth transition and take full advantage of the unified security operations experience offered by Microsoft Defender. For more information, see It’s Time to Move: Retiring Microsoft Sentinel’s Azure portal for greater security.
Introduction
In addition to the activities tracked and presented in the timeline by Microsoft Sentinel out-of-the-box, you can create any other activities you want to keep track of and have them presented on the timeline as well. You can create customized activities based on queries of entity data from any connected data sources. The following examples show how you might use this capability:
Add new activities to the entity timeline by modifying existing out-of-the-box activity templates.
Add new activities from custom logs. For example, from a physical access-control log, you can add a user's entry and exit activities for a particular restricted area—say, a server room—to the user's timeline.
Getting started
- Users of Microsoft Sentinel in the Azure portal, select the Azure portal tab below.
- Users of the Microsoft Defender portal, select the Defender portal tab.
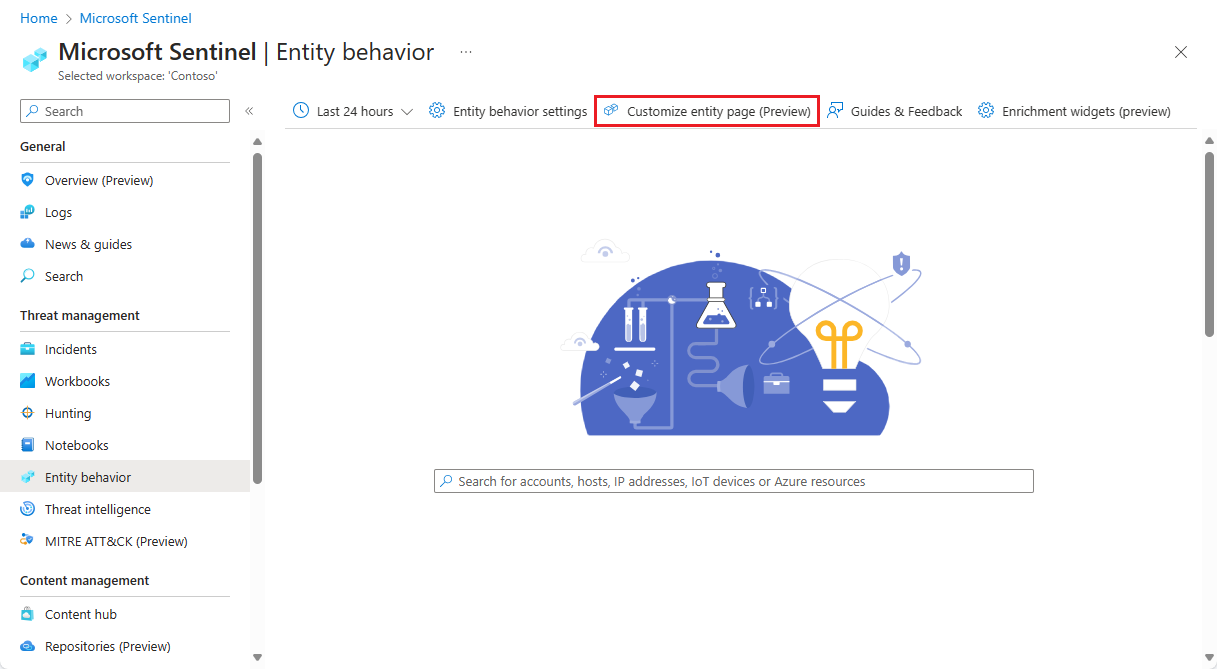
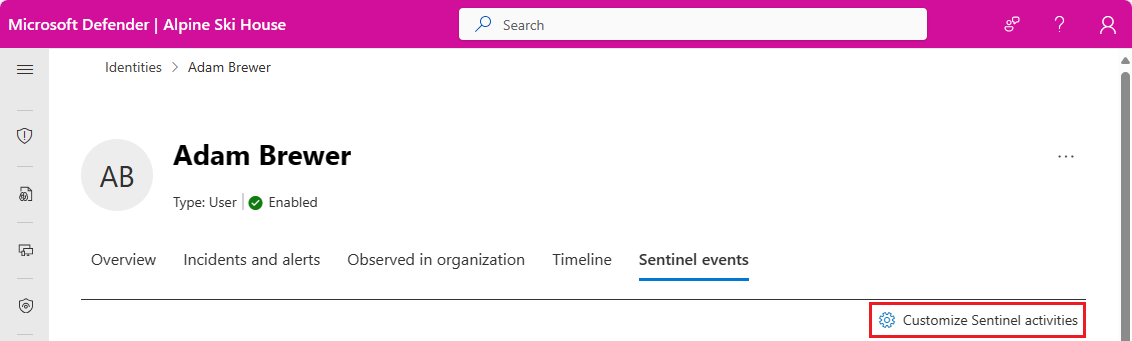
From the Microsoft Sentinel navigation menu, select Entity behavior.
On the Entity behavior page, select Customize entity page (Preview) at the top of the screen.
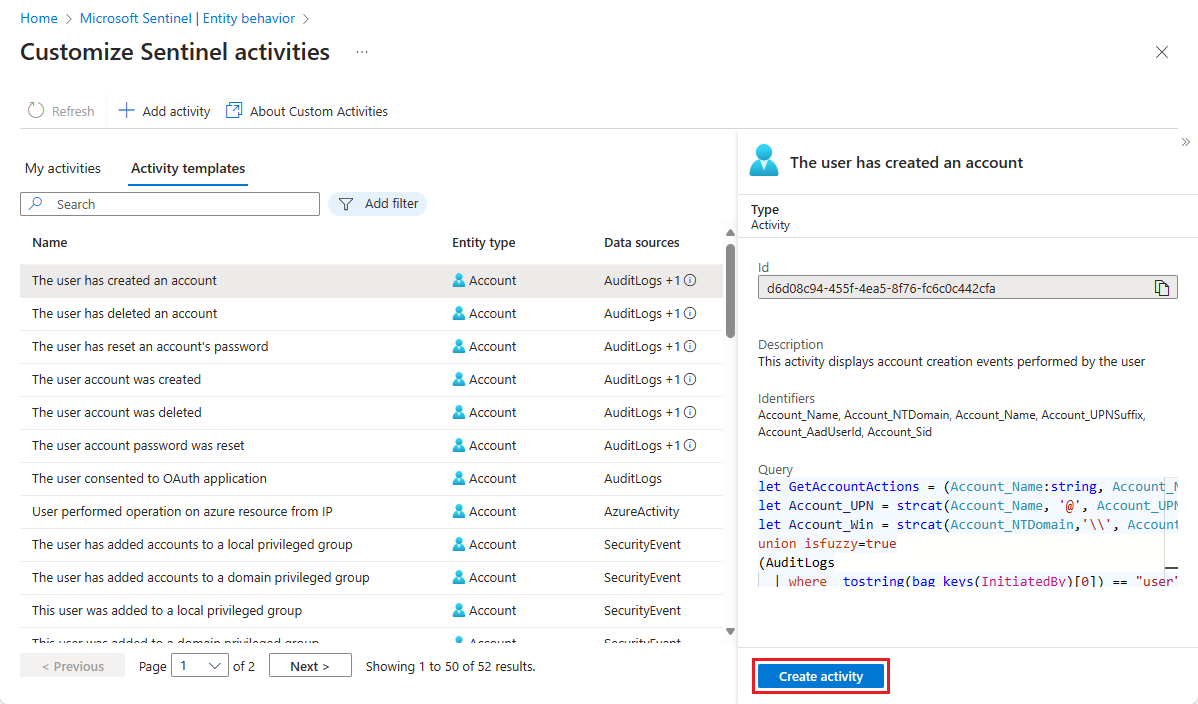
On the Customize Sentinel activities page, you'll see a list of any activities you've created in the My activities tab. In the Activity templates tab, you'll see the collection of activities offered out-of-the-box by Microsoft security researchers. These are the activities that are already being tracked and displayed on the timelines in your entity pages.
As long as you have not created any user-defined activities, your entity pages will display all the activities listed under the Activity templates tab.
Once you create or customize an activity, your entity pages will display only those activities, which appear in the My activities tab.
If you want to continue seeing the out-of-the-box activities in your entity pages, you must create an activity for each template you want to be tracked and displayed. Follow the instructions under "Create an activity from a template" below.
Create an activity from a template
Select the Activity templates tab to see the various activities available by default. You can filter the list by entity type as well as by data source. Selecting an activity from the list will display the following information in the details pane:
A description of the activity
The data source that provides the events that make up the activity
The identifiers used to identify the entity in the raw data
The query that results in the detection of this activity
Select Create activity at the bottom of the details pane to start the activity creation wizard.
The Activity wizard - Create new activity from template will open, with its fields already populated from the template. You can make changes as you like in the General and Activity configuration tabs, or leave everything as is to continue viewing the out-of-the-box activity.
When you are satisfied, select the Review and create tab. When you see the Validation passed message, click the Create button at the bottom.
Create an activity from scratch
From the top of the activities page, click on Add activity to start the activity creation wizard.
The Activity wizard - Create new activity will open, with its fields blank.
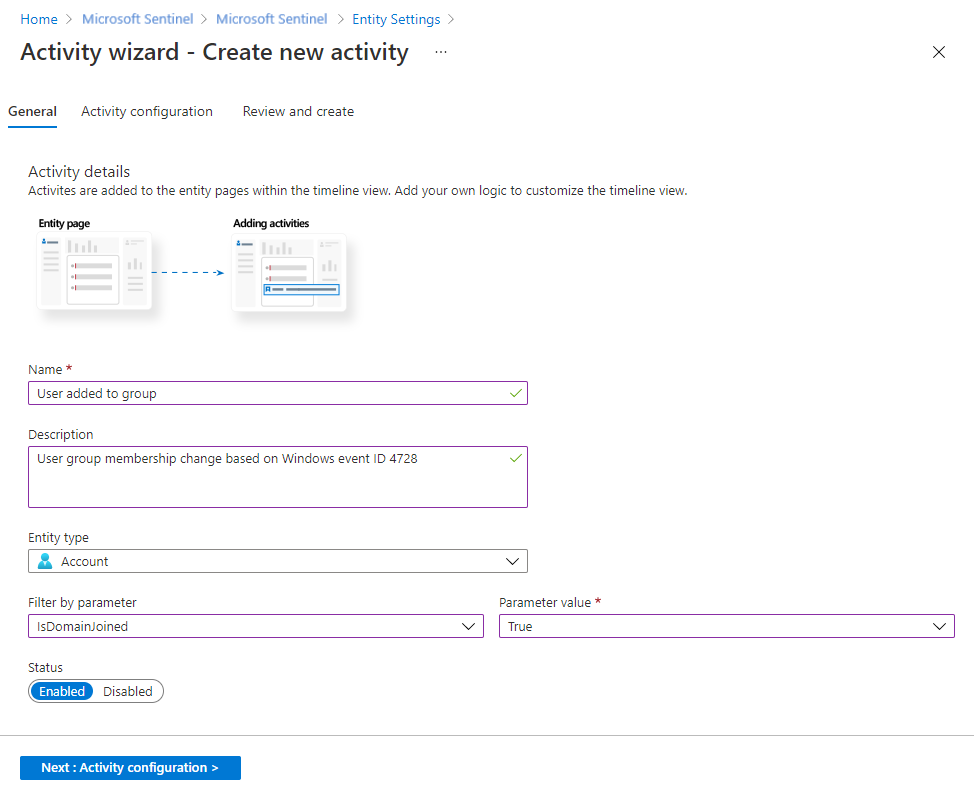
General tab
Enter a name for your activity (example: "user added to group").
Enter a description of the activity (example: "user group membership change based on Windows event ID 4728").
Select the type of entity (user or host) this query will track.
You can filter by additional parameters to help refine the query and optimize its performance. For example, you can filter for Active Directory users by choosing the IsDomainJoined parameter and setting the value to True.
You can select the initial status of the activity to Enabled or Disabled.
Select Next : Activity configuration to proceed to the next tab.
Activity configuration tab
Writing the activity query
Here you will write or paste the KQL query that will be used to detect the activity for the chosen entity, and determine how it will be represented in the timeline.
Important
We recommend that your query uses an Advanced Security Information Model (ASIM) parser and not a built-in table. This ensures that the query will support any current or future relevant data source rather than a single data source.
In order to correlate events and detect the custom activity, the KQL requires an input of several parameters, depending on the entity type. The parameters are the various identifiers of the entity in question.
Selecting a strong identifier is better in order to have one-to-one mapping between the query results and the entity. Selecting a weak identifier may yield inaccurate results. Learn more about entities and strong vs. weak identifiers.
The following table provides information about the entities' identifiers.
Strong identifiers for account and host entities
At least one identifier is required in a query.
| Entity | Identifier | Description |
|---|---|---|
| Account | Account_Sid | The on-premises SID of the account in Active Directory |
| Account_AadUserId | The Microsoft Entra object ID of the user in Microsoft Entra ID | |
| Account_Name + Account_NTDomain | Similar to SamAccountName (example: Contoso\Joe) | |
| Account_Name + Account_UPNSuffix | Similar to UserPrincipalName (example: Joe@Contoso.com) | |
| Host | Host_HostName + Host_NTDomain | similar to fully qualified domain name (FQDN) |
| Host_HostName + Host_DnsDomain | similar to fully qualified domain name (FQDN) | |
| Host_NetBiosName + Host_NTDomain | similar to fully qualified domain name (FQDN) | |
| Host_NetBiosName + Host_DnsDomain | similar to fully qualified domain name (FQDN) | |
| Host_AzureID | the Microsoft Entra object ID of the host in Microsoft Entra ID (if Microsoft Entra domain joined) | |
| Host_OMSAgentID | the OMS Agent ID of the agent installed on a specific host (unique per host) |
Based on the entity selected you will see the available identifiers. Clicking on the relevant identifiers will paste the identifier into the query, at the location of the cursor.
Note
The query can contain up to 10 fields, so you must project the fields you want.
The projected fields must include the TimeGenerated field, in order to place the detected activity in the entity's timeline.
SecurityEvent
| where EventID == "4728"
| where (SubjectUserSid == '{{Account_Sid}}' ) or (SubjectUserName == '{{Account_Name}}' and SubjectDomainName == '{{Account_NTDomain}}' )
| project TimeGenerated, SubjectUserName, MemberName, MemberSid, GroupName=TargetUserName

Presenting the activity in the timeline
For the sake of convenience, you may want to determine how the activity is presented in the timeline by adding dynamic parameters to the activity output.
Microsoft Sentinel provides built-in parameters for you to use, and you can also use others based on the fields you projected in the query.
Use the following format for your parameters: {{ParameterName}}
After the activity query passes validation and displays the View query results link below the query window, you'll be able to expand the Available values section to view the parameters available for you to use when creating a dynamic activity title.
Select the Copy icon next to a specific parameter to copy that parameter to your clipboard so that you can paste it into the Activity title field above.
Add any of the following parameters to your query:
Any field you projected in the query.
Entity identifiers of any entities mentioned in the query.
StartTimeUTC, to add the start time of the activity, in UTC time.EndTimeUTC, to add the end time of the activity, in UTC time.Count, to summarize several KQL query outputs into a single output.The
countparameter adds the following command to your query in the background, even though it's not displayed fully in the editor:Summarize count() by <each parameter you’ve projected in the activity>Then, when you use the Bucket Size filter in the entity pages, the following command is also added to the query that's run in the background:
Summarize count() by <each parameter you’ve projected in the activity>, bin (TimeGenerated, Bucket in Hours)
For example:
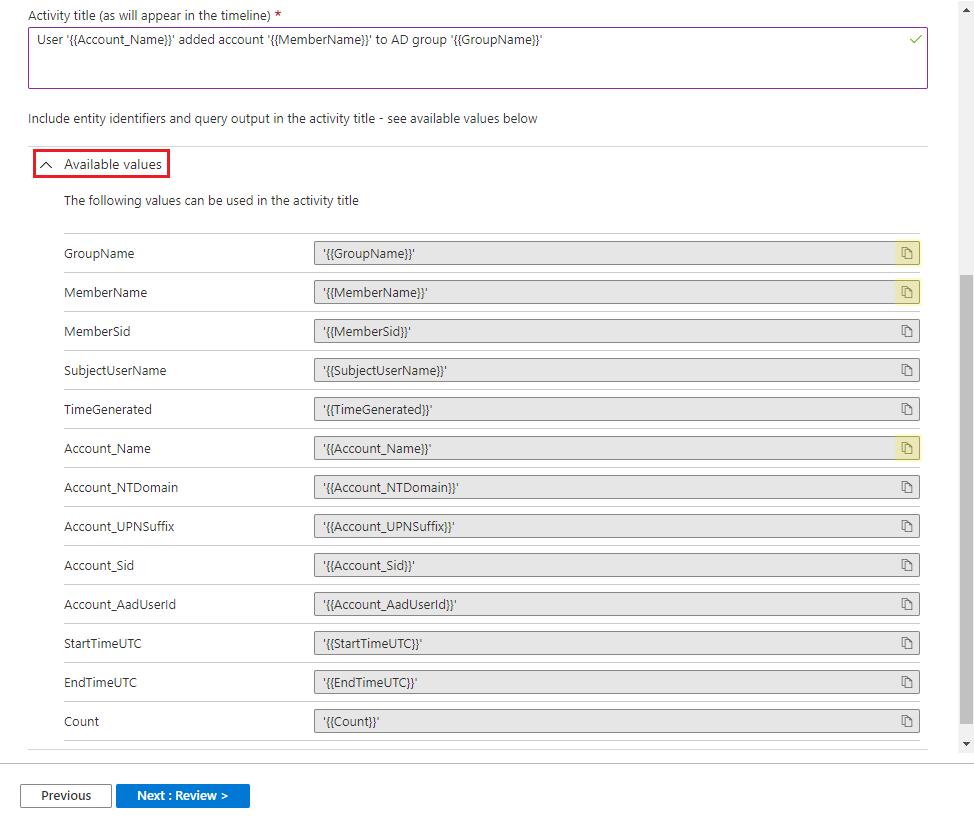
When you are satisfied with your query and activity title, select Next : Review.
See more information on the following items used in the preceding examples, in the Kusto documentation:
For more information on KQL, see Kusto Query Language (KQL) overview.
Other resources:
Review and create tab
Verify all the configuration information of your custom activity.
When the Validation passed message appears, click Create to create the activity. You can edit or change it later in the My Activities tab.
Manage your activities
Manage your custom activities from the My Activities tab. Click on the ellipsis (...) at the end of an activity's row to:
- Edit the activity.
- Duplicate the activity to create a new, slightly different one.
- Delete the activity.
- Disable the activity (without deleting it).
View activities in an entity page
Whenever you enter an entity page, all the enabled activity queries for that entity will run, providing you with up-to-the-minute information in the entity timeline. You'll see the activities in the timeline, alongside alerts and bookmarks.
You can use the Timeline content filter to present only activities (or any combination of activities, alerts, and bookmarks).
You can also use the Activities filter to present or hide specific activities.
Next steps
In this document, you learned how to create custom activities for your entity page timelines. To learn more about Microsoft Sentinel, see the following articles:
- Get the complete picture on entity pages.
- Learn about User and Entity Behavior Analytics (UEBA).
- See the full list of entities and identifiers.