Deploy for Dynamics 365 Finance and Operations
This article describes how to deploy the Dynamics 365 Finance and Operations content within the Microsoft Sentinel solution for Microsoft Business Applications. The solution monitors and protects your Dynamics 365 Finance and Operations system: It collects audits and activity logs from the Dynamics 365 Finance and Operations environment, and detects threats, suspicious activities, illegitimate activities, and more. Read more about the solution.
Important
- The Microsoft Sentinel solution for Dynamics 365 Finance and Operations is currently in PREVIEW. The Azure Preview Supplemental Terms include additional legal terms that apply to Azure features that are in beta, preview, or otherwise not yet released into general availability.
- The solution is a premium offering. Pricing information will be available before the solution becomes generally available.
Prerequisites
Before you begin, verify that:
The Microsoft Sentinel solution for Microsoft Business Applications solution is enabled.
You have a defined Microsoft Sentinel workspace and have read and write permissions to the workspace.
Microsoft Dynamics 365 Finance version 10.0.33 or above is enabled and you have administrative access to the monitored environments.
You can create Data Collection Rules/Endpoints with the permissions:
Microsoft.Insights/DataCollectionEndpoints, andMicrosoft.Insights/DataCollectionRules
Collect the environment URL from your Finance and Operations cloud environment
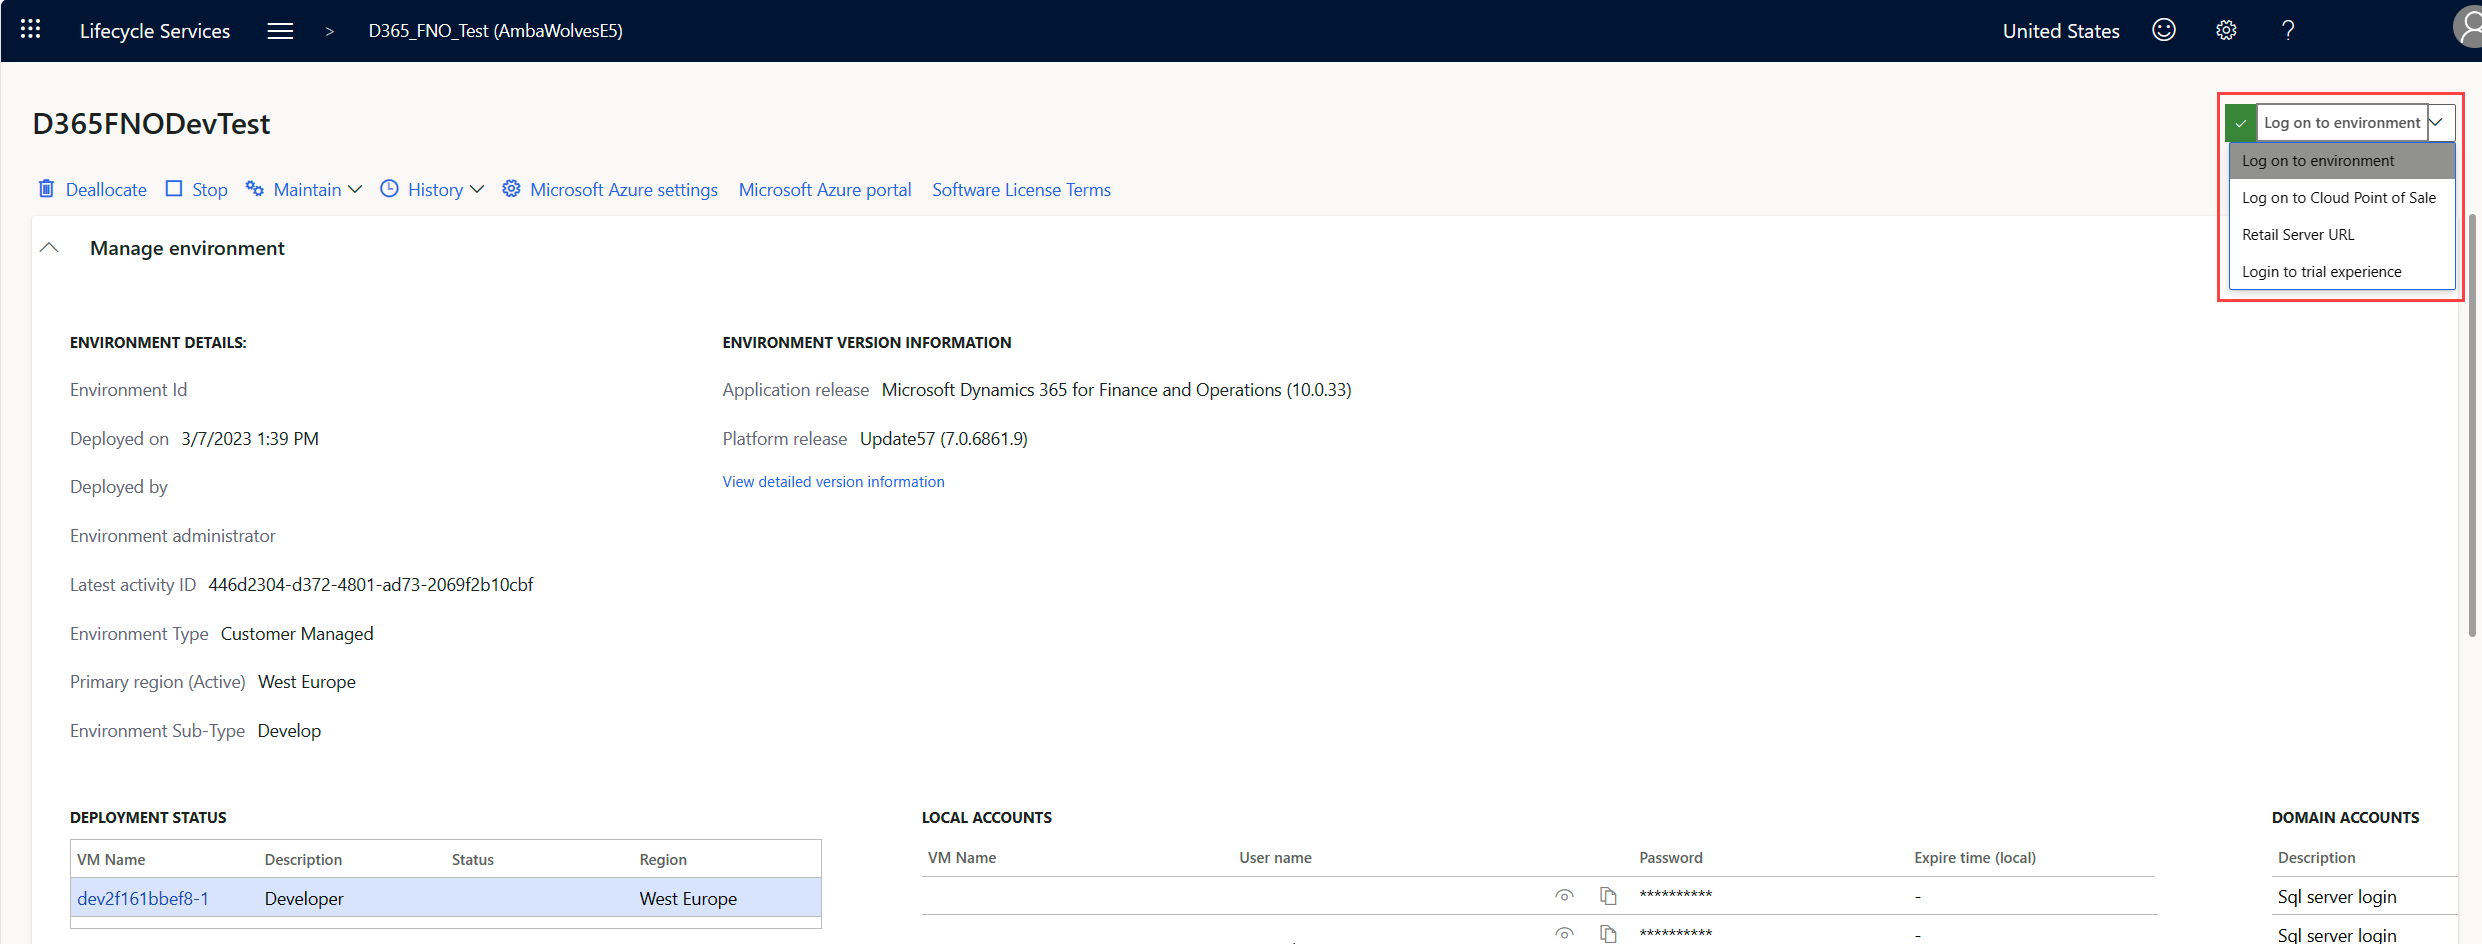
Open your Dynamics 365 project in Microsoft Dynamics Lifecycle Services (LCS) and select the specific Finance and Operations environment you want to monitor with Microsoft Sentinel.
In the Environment version information section, make sure that you're using application release version 10.0.33 or above.

To collect your environment URL, select Log on to environment and save the URL in the browser to use when you deploy the ARM template. For example:
https://sentineldevc055b257489f70f5devaos.axcloud.dynamics.com.Note
The URL may look different, depending on the environment you use, for example, you could be using a sandbox, or a cloud hosted environment. Remove any trailing slashes:
/.

Deploy the solution and enable the data connector
Navigate to the Microsoft Sentinel service.
Select Content hub, and in the search bar, search for Microsoft Business Applications.
Select Microsoft Business Applications.
Select Install.
For more information about how to manage the solution components, see Discover and deploy out-of-the-box content.
Deploy the data connector
Once the solution deployment is complete, return to your Sentinel workspace and select Data connectors.
In the search bar, type Dynamics 365, and select Dynamics 365 Finance and Operations.
Select Open connector page.
In the connector page, make sure that you meet the required prerequisites and complete the following configuration steps.
Configure the data connector
To enable data collection, you create a new role in Finance and Operations with permissions to view the Database Log entity. The role is then assigned to a dedicated Finance and Operations user, mapped to the Microsoft Entra client ID of an app registration.
Enable data collection
To collect the managed identity application ID from Microsoft Entra ID:
Sign in to the Azure portal.
Browse to Microsoft Entra ID > App registrations.
Create a new registration and enter a name for the app registration.
Select Accounts in this organization only (single tenant) and click register.
From the overview page of the new app registration, take note of the tenant ID and application (Client) ID for use in the next steps.
Within the Certificates & Secrets menu, create a new client secret.
Store the client secret in a secure location for use in the next steps.
Create a role for data collection in Finance and Operations
In the Finance and Operations portal, navigate to Workspaces > System administration, and select Security Configuration.
Under Roles, select Create new and give the new role a name, for example, Database Log Viewer.
Select the new role from the list of roles, and select Privileges > Add references.
Select Database log Entity View from the list of privileges.
Select Unpublished objects, and select Publish all to publish the role.
Create a user for data collection in Finance and Operations
In the Finance and Operations portal, navigate to Modules > System administration, and select Users.
Create a new user and assign the role you created in the previous step to the user.
Register the app registration in Finance and Operations
In the Finance and Operations portal, navigate to System administration > Setup > Microsoft Entra ID applications.
Create a new entry in the table:
- For the Client Id, type the application ID of the app registration.
- For the Name, type a name for the application.
- For the User ID, type the user ID created in the previous step.
Enable auditing on the relevant Dynamics 365 Finance and Operations data tables
Note
Before you enable auditing on Dynamics 365 F&O, review the database logging recommended practices.
The analytics rules provided with this solution monitor and detect threats based on logs generated in the System Database Log.
If you're planning to use the analytics rules provided in this solution, enable auditing for the following tables:
| Category | Table |
|---|---|
| System | UserInfo |
| Bank | BankAccountTable |
| Not specified | SysAADClientTable |
Enable auditing on tables using the Database log setup wizard in the Finance and Operations portal.
- In the Tables and fields page, you might want to select the Show table names checkbox to make it easier to find your tables.
- To enable auditing of all fields in the selected tables, in the Types of change page, select all four check boxes for any relevant table names with empty field labels. Sort the table list by the Field label column in ascending order (A-Z).
- Select Yes for all warning messages.
For more information, see Set up database logging.
Enable data collection
Navigate to the data connectors blade in Microsoft Sentinel, search for Dynamics 365 Finance and Operations.
Using the Tenant ID, Client ID, Client Secret and Environment URL, connect the data connector.
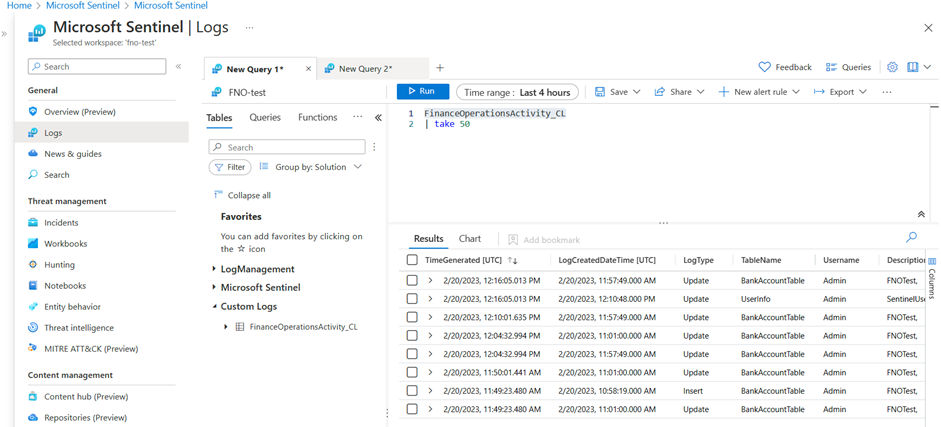
Verify that the data connector is ingesting logs to Microsoft Sentinel
To verify that log ingestion is working:
Run activities (create, update, delete) on any of the tables you enabled for monitoring in the previous step.
Wait up to 15 minutes for Microsoft Sentinel to ingest the logs to the logs table in the workspace.
Query the
FinanceOperationsActivity_CLtable in the Microsoft Sentinel workspace under Logs.Check that the table shows new logs that reflect the activities you executed in step 1 of this procedure.
Related content
In this article, you learned how to deploy Dynamics 365 Finance and Operations features included in the Microsoft Sentinel solution for Microsoft Business Applications.