Note
Access to this page requires authorization. You can try signing in or changing directories.
Access to this page requires authorization. You can try changing directories.
Proactive threat hunting is a process where security analysts seek out undetected threats and malicious behaviors. By creating a hypothesis, searching through data, and validating that hypothesis, they determine what to act on. Actions can include creating new detections, new threat intelligence, or spinning up a new incident.
Use the end to end hunting experience within Microsoft Sentinel to:
- Proactively hunt based on specific MITRE techniques, potentially malicious activity, recent threats, or your own custom hypothesis.
- Use security-researcher-generated hunting queries or custom hunting queries to investigate malicious behavior.
- Conduct your hunts using multiple persisted-query tabs that enable you to keep context over time.
- Collect evidence, investigate UEBA sources, and annotate your findings using hunt specific bookmarks.
- Collaborate and document your findings with comments.
- Act on results by creating new analytic rules, new incidents, new threat indicators, and running playbooks.
- Keep track of your new, active, and closed hunts in one place.
- View metrics based on validated hypotheses and tangible results.
Important
After March 31, 2027, Microsoft Sentinel will no longer be supported in the Azure portal and will be available only in the Microsoft Defender portal. All customers using Microsoft Sentinel in the Azure portal will be redirected to the Defender portal and will use Microsoft Sentinel in the Defender portal only.
If you're still using Microsoft Sentinel in the Azure portal, we recommend that you start planning your transition to the Defender portal to ensure a smooth transition and take full advantage of the unified security operations experience offered by Microsoft Defender.
Prerequisites
In order to use the hunts feature, you either need to be assigned a built-in Microsoft Sentinel role, or a custom Azure RBAC role. Here are your options:
Assign the built-in Microsoft Sentinel Contributor role assignment.
To learn more about roles in Microsoft Sentinel, see Roles and permissions in Microsoft Sentinel.Assign a custom Azure RBAC role with the appropriate permissions under Microsoft.SecurityInsights/hunts.
For more information, see Roles and permissions in the Microsoft Sentinel platform.
Define your hypothesis
Defining a hypothesis is an open ended, flexible process and can include any idea you want to validate. Common hypotheses include:
- Suspicious behavior - Investigate potentially malicious activity that's visible in your environment to determine if an attack is occurring.
- New threat campaign - Look for types of malicious activity based on newly discovered threat actors, techniques, or vulnerabilities. This might be something you heard about in a security news article.
- Detection gaps - Increase your detection coverage using the MITRE ATT&CK map to identify gaps.
Microsoft Sentinel gives you flexibility as you zero in on the right set of hunting queries to investigate your hypothesis. When you create a hunt, initiate it with preselected hunting queries or add queries as you progress. Here are recommendations for preselected queries based on the most common hypotheses.
Hypothesis - Suspicious behavior
For Microsoft Sentinel in the Azure portal, under Threat management, select Hunting.
For Microsoft Sentinel in the Defender portal, select Microsoft Sentinel > Threat management > Hunting.Select the Queries tab. To identify potentially malicious behaviors, run all the queries.
Select Run All queries > wait for the queries to execute. This process might take a while.
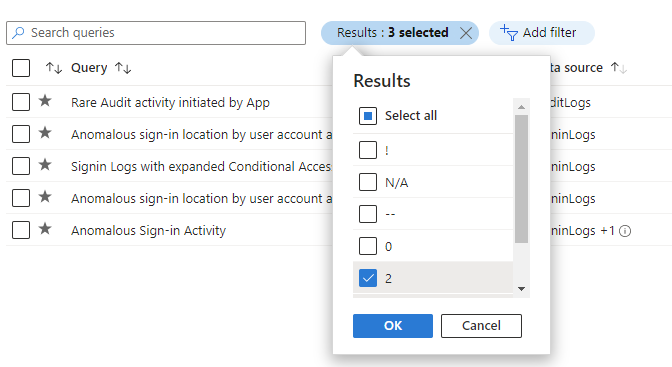
Select Add filter > Results > unselect the checkboxes "!", "N/A", "-", and "0" values > Apply
Sort these results by the Results Delta column to see what changed most recently. These results provide initial guidance on the hunt.
Hypothesis - New threat campaign
The content hub offers threat campaign and domain-based solutions to hunt for specific attacks. In the following steps, you install one of these types of solutions.
Go to the Content Hub.
Install a threat campaign or domain-based solution like the Log4J Vulnerability Detection or Apache Tomcat.

After the solution is installed, in Microsoft Sentinel, go to Hunting.
Select the Queries tab.
Search by solution name, or filtering by Source Name of the solution.
Select the query and Run query.

Hypothesis - Detection gaps
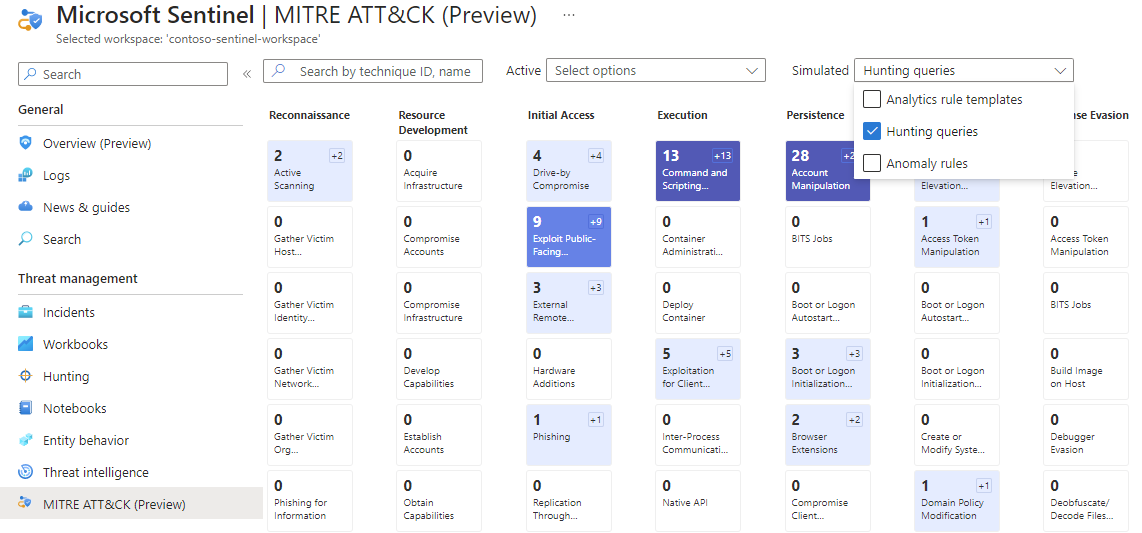
The MITRE ATT&CK map helps you identify specific gaps in your detection coverage. Use predefined hunting queries for specific MITRE ATT&CK techniques as a starting point to develop new detection logic.
Navigate to the MITRE ATT&CK (Preview) page.
Unselect items in the Active drop-down menu.
Select Hunting queries in the Simulated filter to see which techniques have hunting queries associated with them.
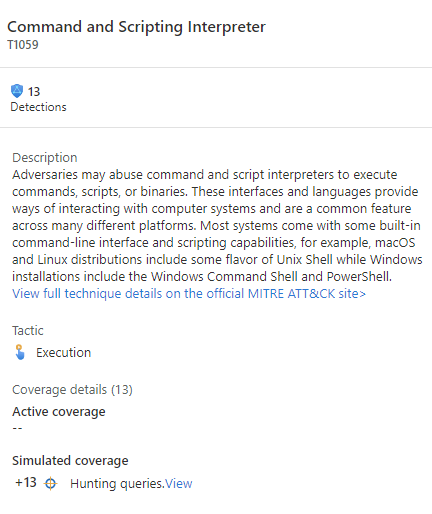
Select the card with your desired technique.
Select the View link next to Hunting queries at the bottom of the details pane. This link takes you to a filtered view of the Queries tab on the Hunting page based on the technique you selected.
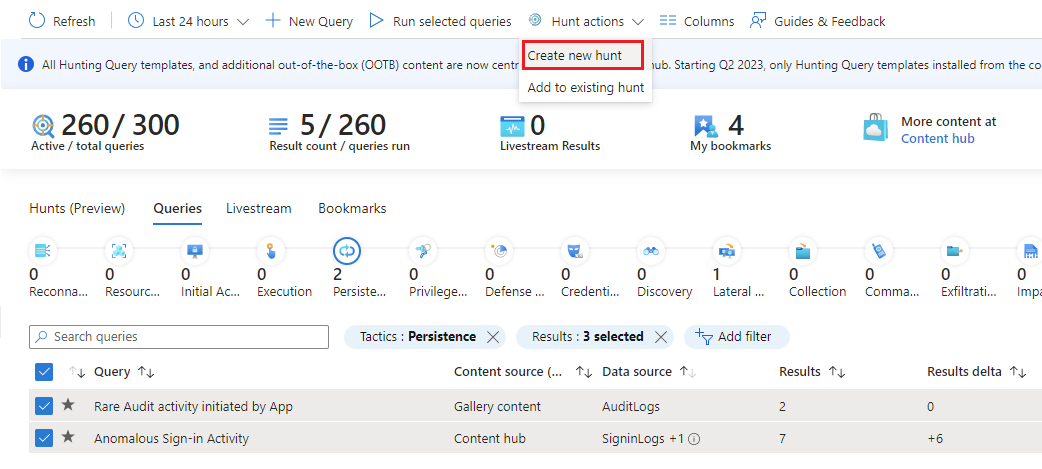
Select all the queries for that technique.

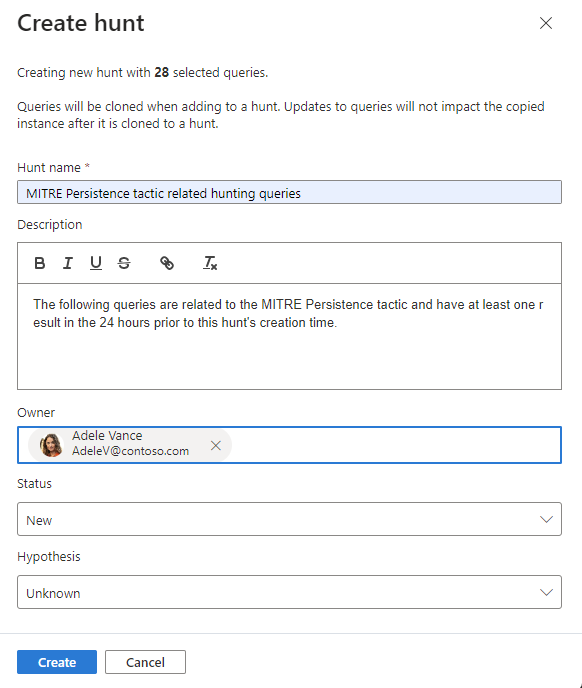
Create a Hunt
There are two primary ways to create a hunt.
If you started with a hypothesis where you selected queries, select the Hunt actions drop down menu > Create new hunt. All the queries you selected are cloned for this new hunt.
If you haven't decided on queries yet, select the Hunts (Preview) tab > New Hunt to create a blank hunt.
Fill out the hunt name and optional fields. The description is a good place to verbalize your hypothesis. The Hypothesis pull down menu is where you set the status of your working hypothesis.
Select Create to get started.
View hunt details
Select the Hunts (Preview) tab to view your new hunt.
Select the hunt link by name to view the details and take actions.

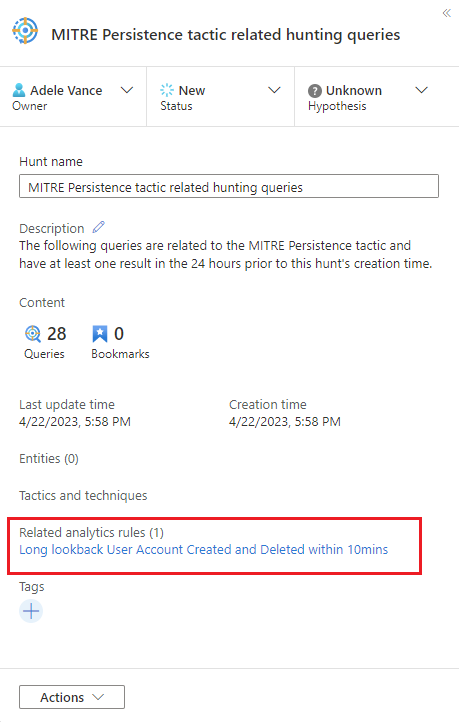
View the details pane with the Hunt name, Description, Content, Last update time, and Creation time.
Note the tabs for Queries, Bookmarks, and Entities.
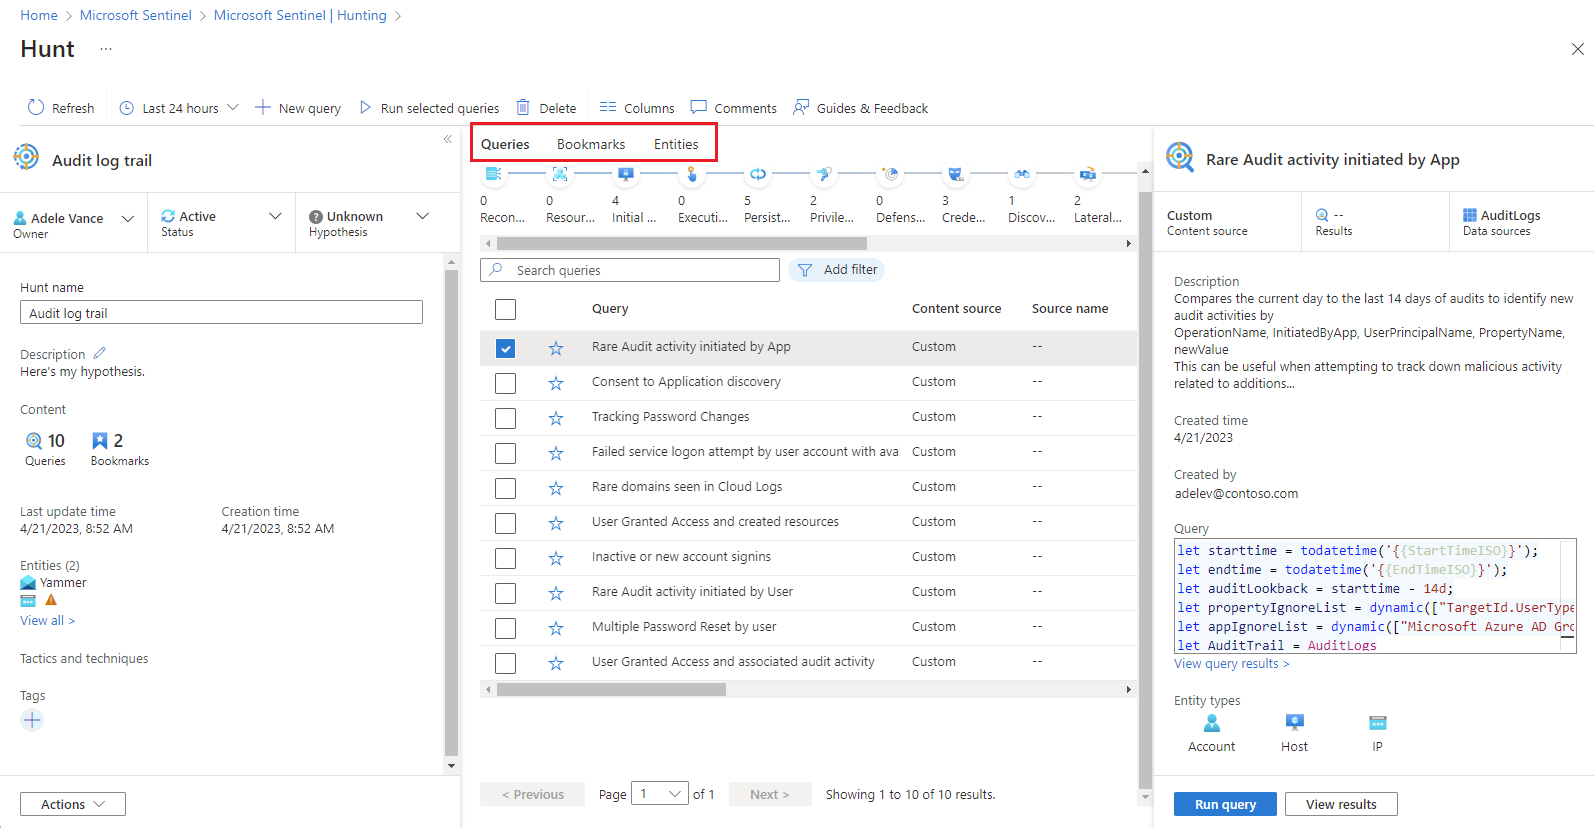


Queries tab
The Queries tab contains hunting queries specific to this hunt. These queries are clones of the originals, independent from all others in the workspace. Update or delete them without impacting your overall set of hunting queries or queries in other hunts.
Add a query to the hunt
- Select Query Actions > add queries to hunt
- Select the queries you want to add.


Run queries
- Select
 Run all queries or choose specific queries and select
Run selected queries.
Run all queries or choose specific queries and select
Run selected queries. - Select
 Cancel to cancel query execution at any time.
Manage queries
Right-click a query and select one of the following from the context menu:
- Run
- Edit
- Clone
- Delete
- Create analytics rule
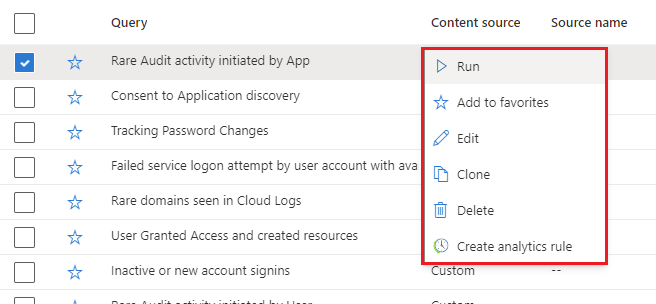
These options behave just like the existing queries table in the Hunting page, except the actions only apply within this hunt. When you choose to create an analytics rule, the name, description, and KQL query is prepopulated in the new rule creation. A link is created to view the new analytics rule found under Related analytics rules.
View results
This feature allows you to see hunting query results in the Log Analytics search experience. From here, analyze your results, refine your queries, and create bookmarks to record information and further investigate individual row results.
- Select the View results button.
- If you pivot to another part of the Microsoft Sentinel portal, then browse back to the LA log search experience from the hunt page, all your LA query tabs remain.
- These LA query tabs are lost if you close the browser tab. If you want to persist the queries long term, you need to save the query, create a new hunting query, or copy it into a comment for later use within the hunt.
Add a bookmark
When you find interesting results or important rows of data, add those results to the hunt by creating a bookmark. For more information, see Use hunting bookmarks for data investigations.
Select the desired row or rows.
Above the results table, select Add bookmark.
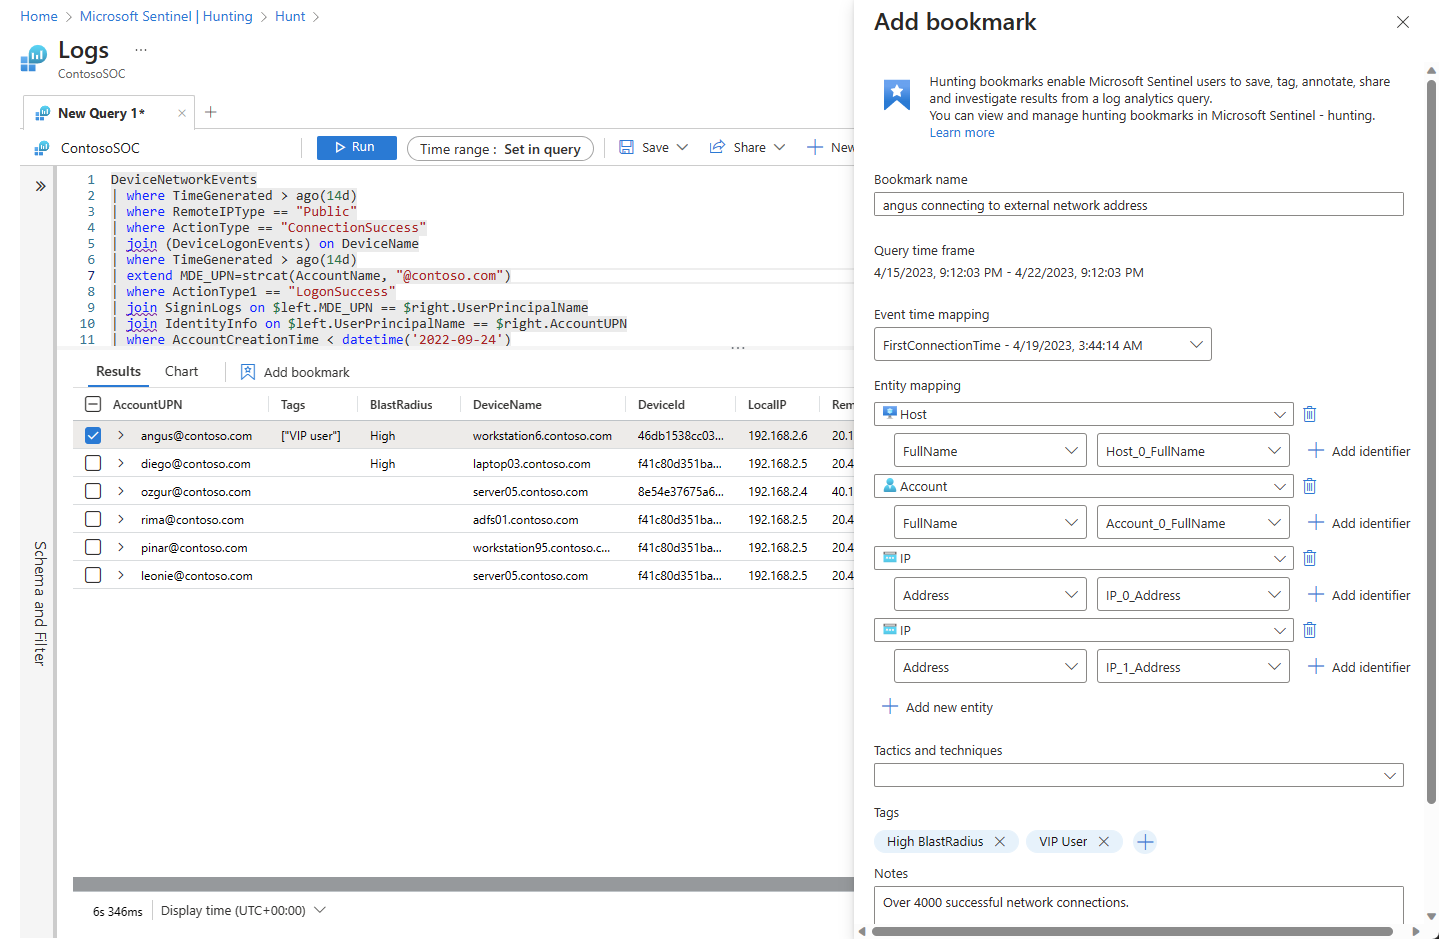
Name the bookmark.
Set the event time column.
Map entity identifiers.
Set MITRE tactics and techniques.
Add tags, and add notes.
The bookmarks preserve the specific row results, KQL query, and time range that generated the result.
Select Create to add the bookmark to the hunt.

View bookmarks
Navigate to the hunt's bookmark tab to view your bookmarks.

Select a desired bookmark and perform the following actions:
- Select entity links to view the corresponding UEBA entity page.
- View raw results, tags, and notes.
- Select View source query to see the source query in Log Analytics.
- Select View bookmark logs to see the bookmark contents in the Log Analytics hunting bookmark table.
- Select Investigate button to view the bookmark and related entities in the investigation graph.
- Select the Edit button to update the tags, MITRE tactics and techniques, and notes.

Interact with entities
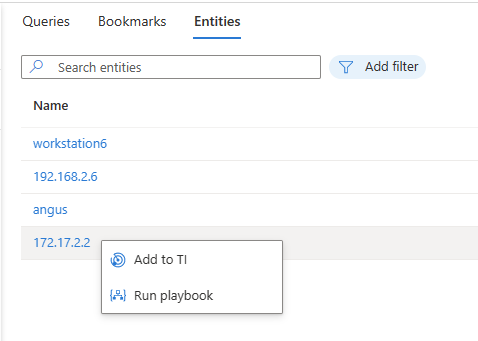
Navigate to your hunt's Entities tab to view, search, and filter the entities contained in your hunt. This list is generated from the list of entities in the bookmarks. The Entities tab automatically resolves duplicated entries.
Select entity names to visit the corresponding UEBA entity page.
Right-click on the entity to take actions appropriate to the entity types, such as adding an IP address to TI or running an entity type specific playbook.
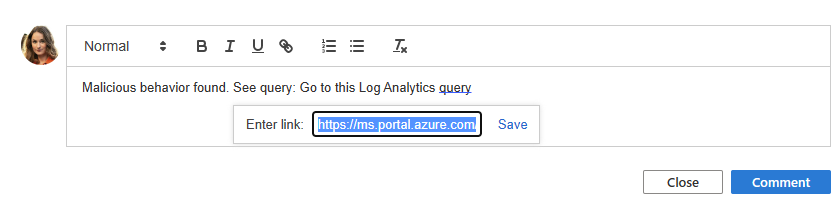
Add comments
Comments are an excellent place to collaborate with colleagues, preserve notes, and document findings.
Select

Type and format your comment in the edit box.
Add a query result as a link for collaborators to quickly understand the context.
Select the Comment button to apply your comments.
Create incidents
There are two choices for incident creation while hunting.
Option 1: Use bookmarks.
Select a bookmark or bookmarks.
Select the Incident actions button.
Select Create new incident or Add to existing incident
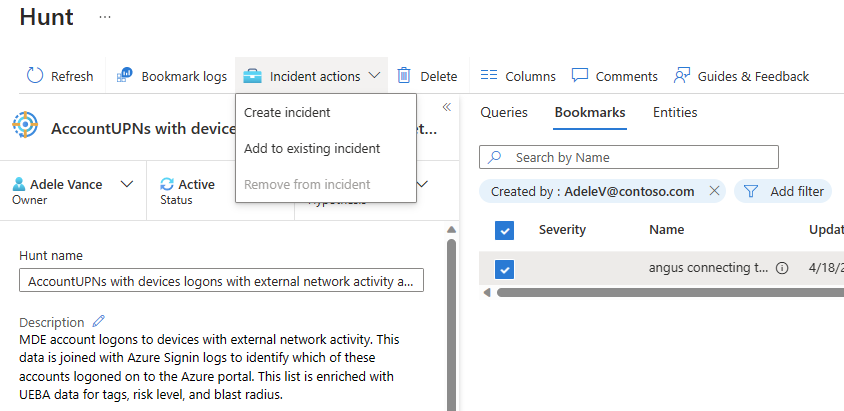
- For Create new incident, follow the guided steps. The bookmarks tab is prepopulated with your selected bookmarks.
- For Add to existing incident, select the incident and select the Accept button.
Option 2: Use the hunts Actions.
Select the hunts Actions menu > Create incident, and follow the guided steps.
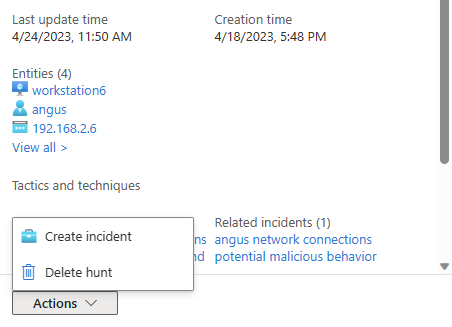
During the Add bookmarks step, use the Add bookmark action to choose bookmarks from the hunt to add to the incident. You're limited to bookmarks that aren't assigned to an incident.
After the incident is created, it will be linked under the Related incidents list for that hunt.
Update status
When you captured enough evidence to validate or invalidate your hypothesis, update your hypothesis state.
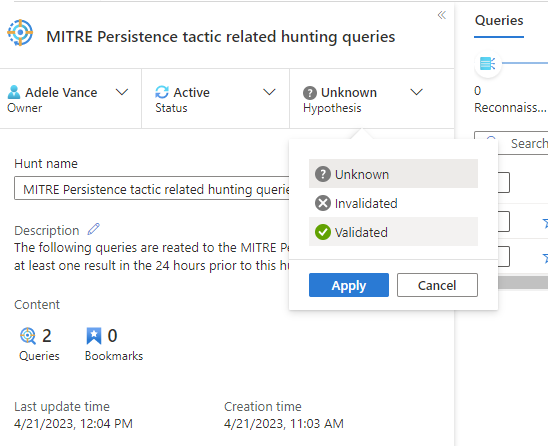
When all the actions associated with the hunt are complete, such as creating analytics rules, incidents, or adding indicators of compromise (IOCs) to TI, close out the hunt.
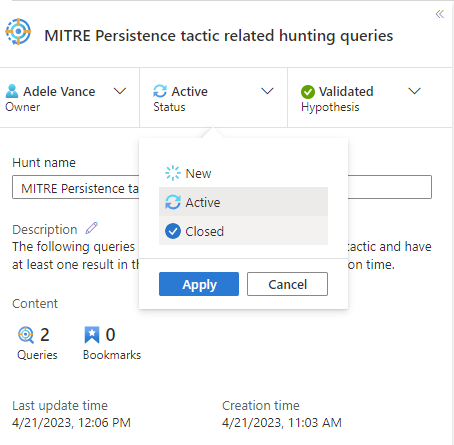
These status updates are visible on the main Hunting page and are used to track metrics.
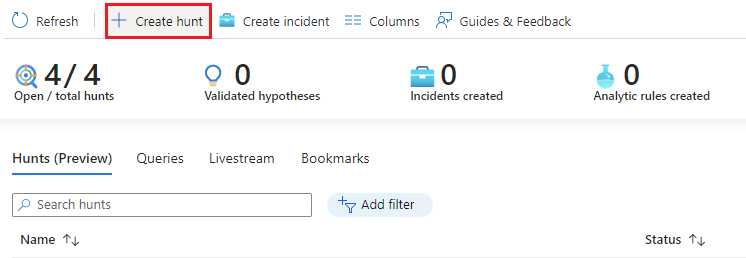
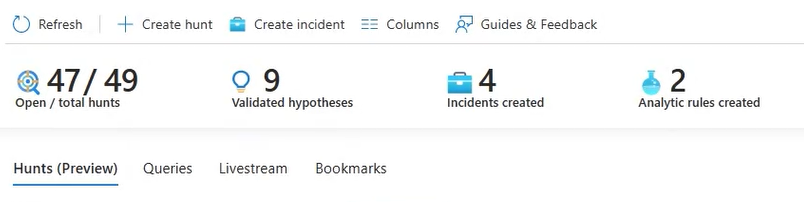
Track metrics
Track tangible results from hunting activity using the metrics bar in the Hunts tab. Metrics show the number of validated hypotheses, new incidents created, and new analytic rules created. Use these results to set goals or celebrate milestones of your hunting program.
Next steps
In this article, you learned how to run a hunting investigation with the hunts feature in Microsoft Sentinel.
For more information, see: