Note
Access to this page requires authorization. You can try signing in or changing directories.
Access to this page requires authorization. You can try changing directories.
As part of your security investigations and hunting, launch and run Jupyter notebooks to programmatically analyze your data.
In this article, you create an Azure Machine Learning workspace, launch notebook from Microsoft Sentinel to your Azure Machine Learning workspace, and run code in the notebook.
Important
Microsoft Sentinel is generally available in the Microsoft Defender portal, including for customers without Microsoft Defender XDR or an E5 license.
Starting in July 2026, Microsoft Sentinel will be supported in the Defender portal only, and any remaining customers using the Azure portal will be automatically redirected.
We recommend that any customers using Microsoft Sentinel in Azure start planning the transition to the Defender portal for the full unified security operations experience offered by Microsoft Defender. For more information, see Planning your move to Microsoft Defender portal for all Microsoft Sentinel customers.
Prerequisites
We recommend that you learn about Microsoft Sentinel notebooks before completing the steps in this article. See Use Jupyter notebooks to hunt for security threats.
To use Microsoft Sentinel notebooks, you must have the following roles and permissions:
| Type | Details |
|---|---|
| Microsoft Sentinel | - The Microsoft Sentinel Contributor role, in order to save and launch notebooks from Microsoft Sentinel |
| Azure Machine Learning | - A resource group-level Owner or Contributor role, to create a new Azure Machine Learning workspace if needed. - A Contributor role on the Azure Machine Learning workspace where you run your Microsoft Sentinel notebooks. For more information, see Manage access to an Azure Machine Learning workspace. |
Create an Azure Machine Learning workspace from Microsoft Sentinel
To create your workspace, select one of the following tabs, depending on whether you're using a public or private endpoint.
- We recommend that you use a public endpoint when your Microsoft Sentinel workspace has one, to avoid potential issues in the network communication.
- If you want to use an Azure Machine Learning workspace in a virtual network, use a private endpoint.
For Microsoft Sentinel in the Azure portal, under Threat management, select Notebooks.
For Microsoft Sentinel in the Defender portal, select Microsoft Sentinel > Threat management > Notebooks.Select Configure Azure Machine Learning > Create a new AML workspace.
Enter the following details, and then select Next.
Field Description Subscription Select the Azure subscription that you want to use. Resource group Use an existing resource group in your subscription or enter a name to create a new resource group. A resource group holds related resources for an Azure solution. Workspace name Enter a unique name that identifies your workspace. Names must be unique across the resource group. Use a name that's easy to recall and to differentiate from workspaces created by others. Region Select the location closest to your users and the data resources to create your workspace. Storage account A storage account is used as the default datastore for the workspace. You might create a new Azure Storage resource or select an existing one in your subscription. KeyVault A key vault is used to store secrets and other sensitive information that is needed by the workspace. You might create a new Azure Key Vault resource or select an existing one in your subscription. Application insights The workspace uses Azure Application Insights to store monitoring information about your deployed models. You might create a new Azure Application Insights resource or select an existing one in your subscription. Container registry A container registry is used to register docker images used in training and deployments. To minimize costs, a new Azure Container Registry resource is created only after you build your first image. Alternatively, you might choose to create the resource now or select an existing one in your subscription, or select None if you don't want to use any container registry. On the Networking tab, select Enable public access from all networks.
Define any relevant settings in the Advanced or Tags tabs, and then select Review + create.
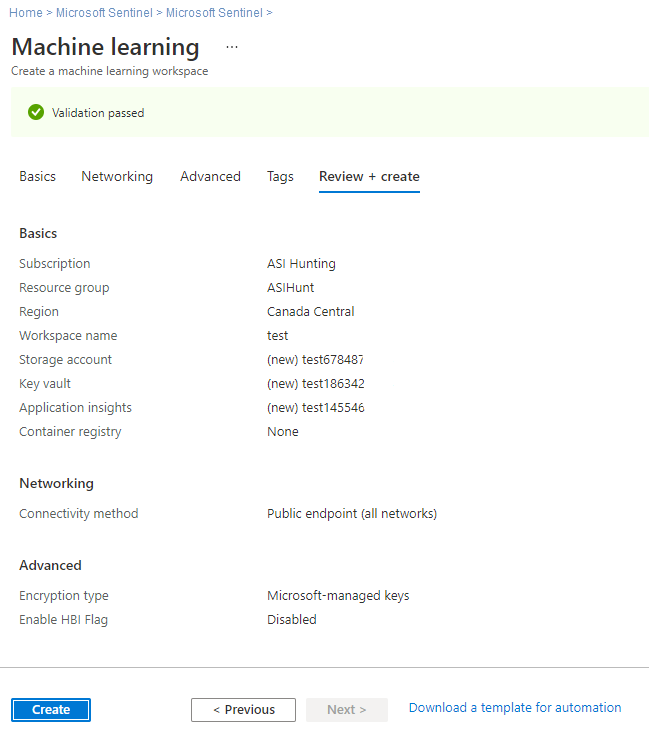
On the Review + create tab, review the information to verify that it's correct, and then select Create to start deploying your workspace. For example:
It can take several minutes to create your workspace in the cloud. During this time, the workspace Overview page shows the current deployment status, and updates when the deployment is complete.


After your deployment is complete, go back to Notebooks in Microsoft Sentinel and launch notebooks from your new Azure Machine Learning workspace.
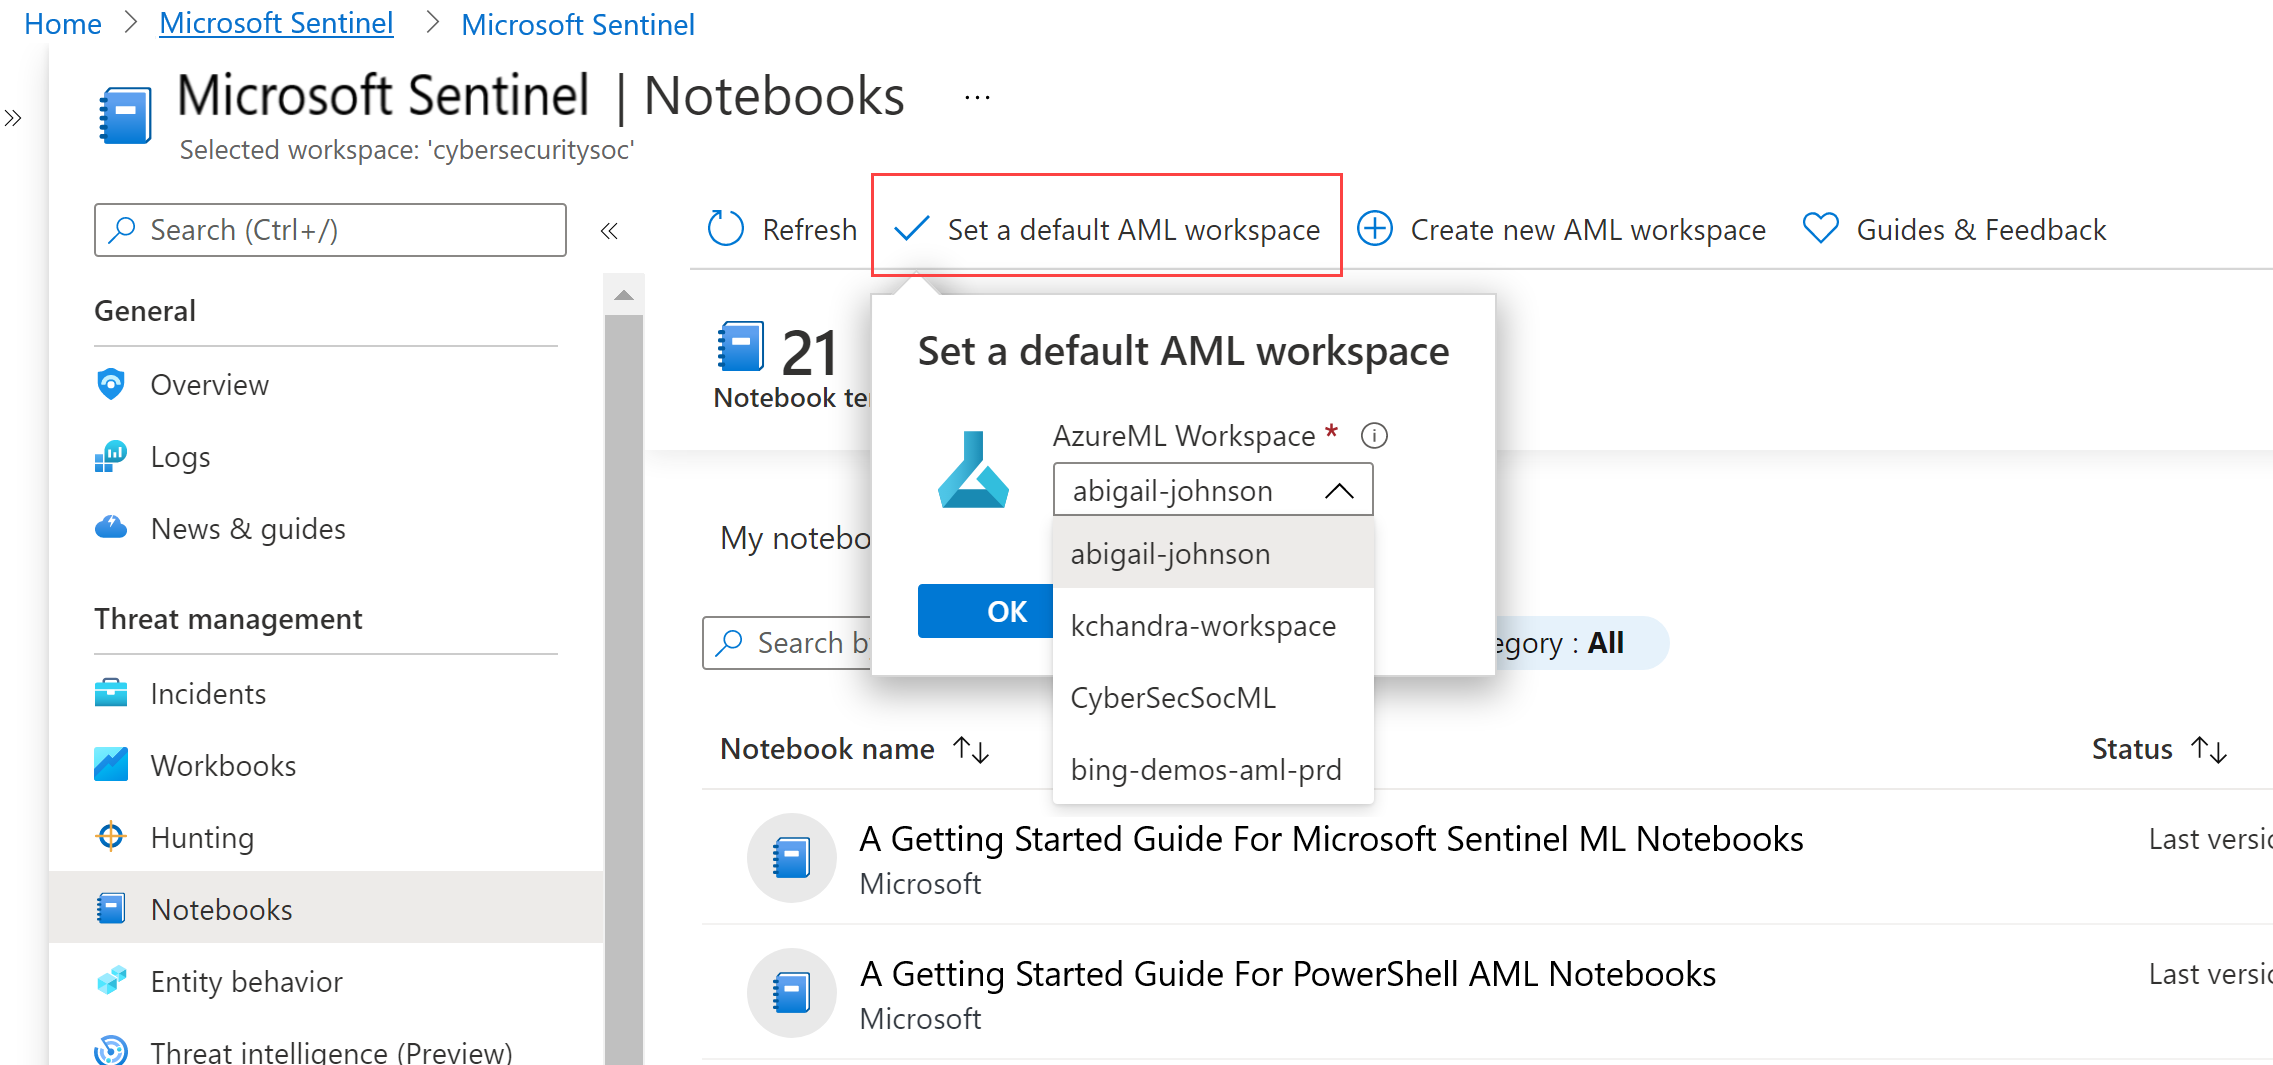
If you have multiple notebooks, make sure to select a default AML workspace to use when launching your notebooks. For example:
Launch a notebook in your Azure Machine Learning workspace
After you create an Azure Machine Learning workspace, launch your notebook in that workspace from Microsoft Sentinel. Be aware that if you have private endpoints or restrictions on the public network access enabled in your Azure storage account, you can't launch notebooks in the Azure Machine Learning workspace from Microsoft Sentinel. You must copy the notebook template from Microsoft Sentinel and upload the notebook to the Azure Machine Learning studio.
To launch your Microsoft Sentinel notebook in your Azure Machine Learning workspace, complete the following steps.
For Microsoft Sentinel in the Azure portal, under Threat management, select Notebooks.
For Microsoft Sentinel in the Defender portal, select Microsoft Sentinel > Threat management > Notebooks.Select the Templates tab to see the notebooks that Microsoft Sentinel provides.
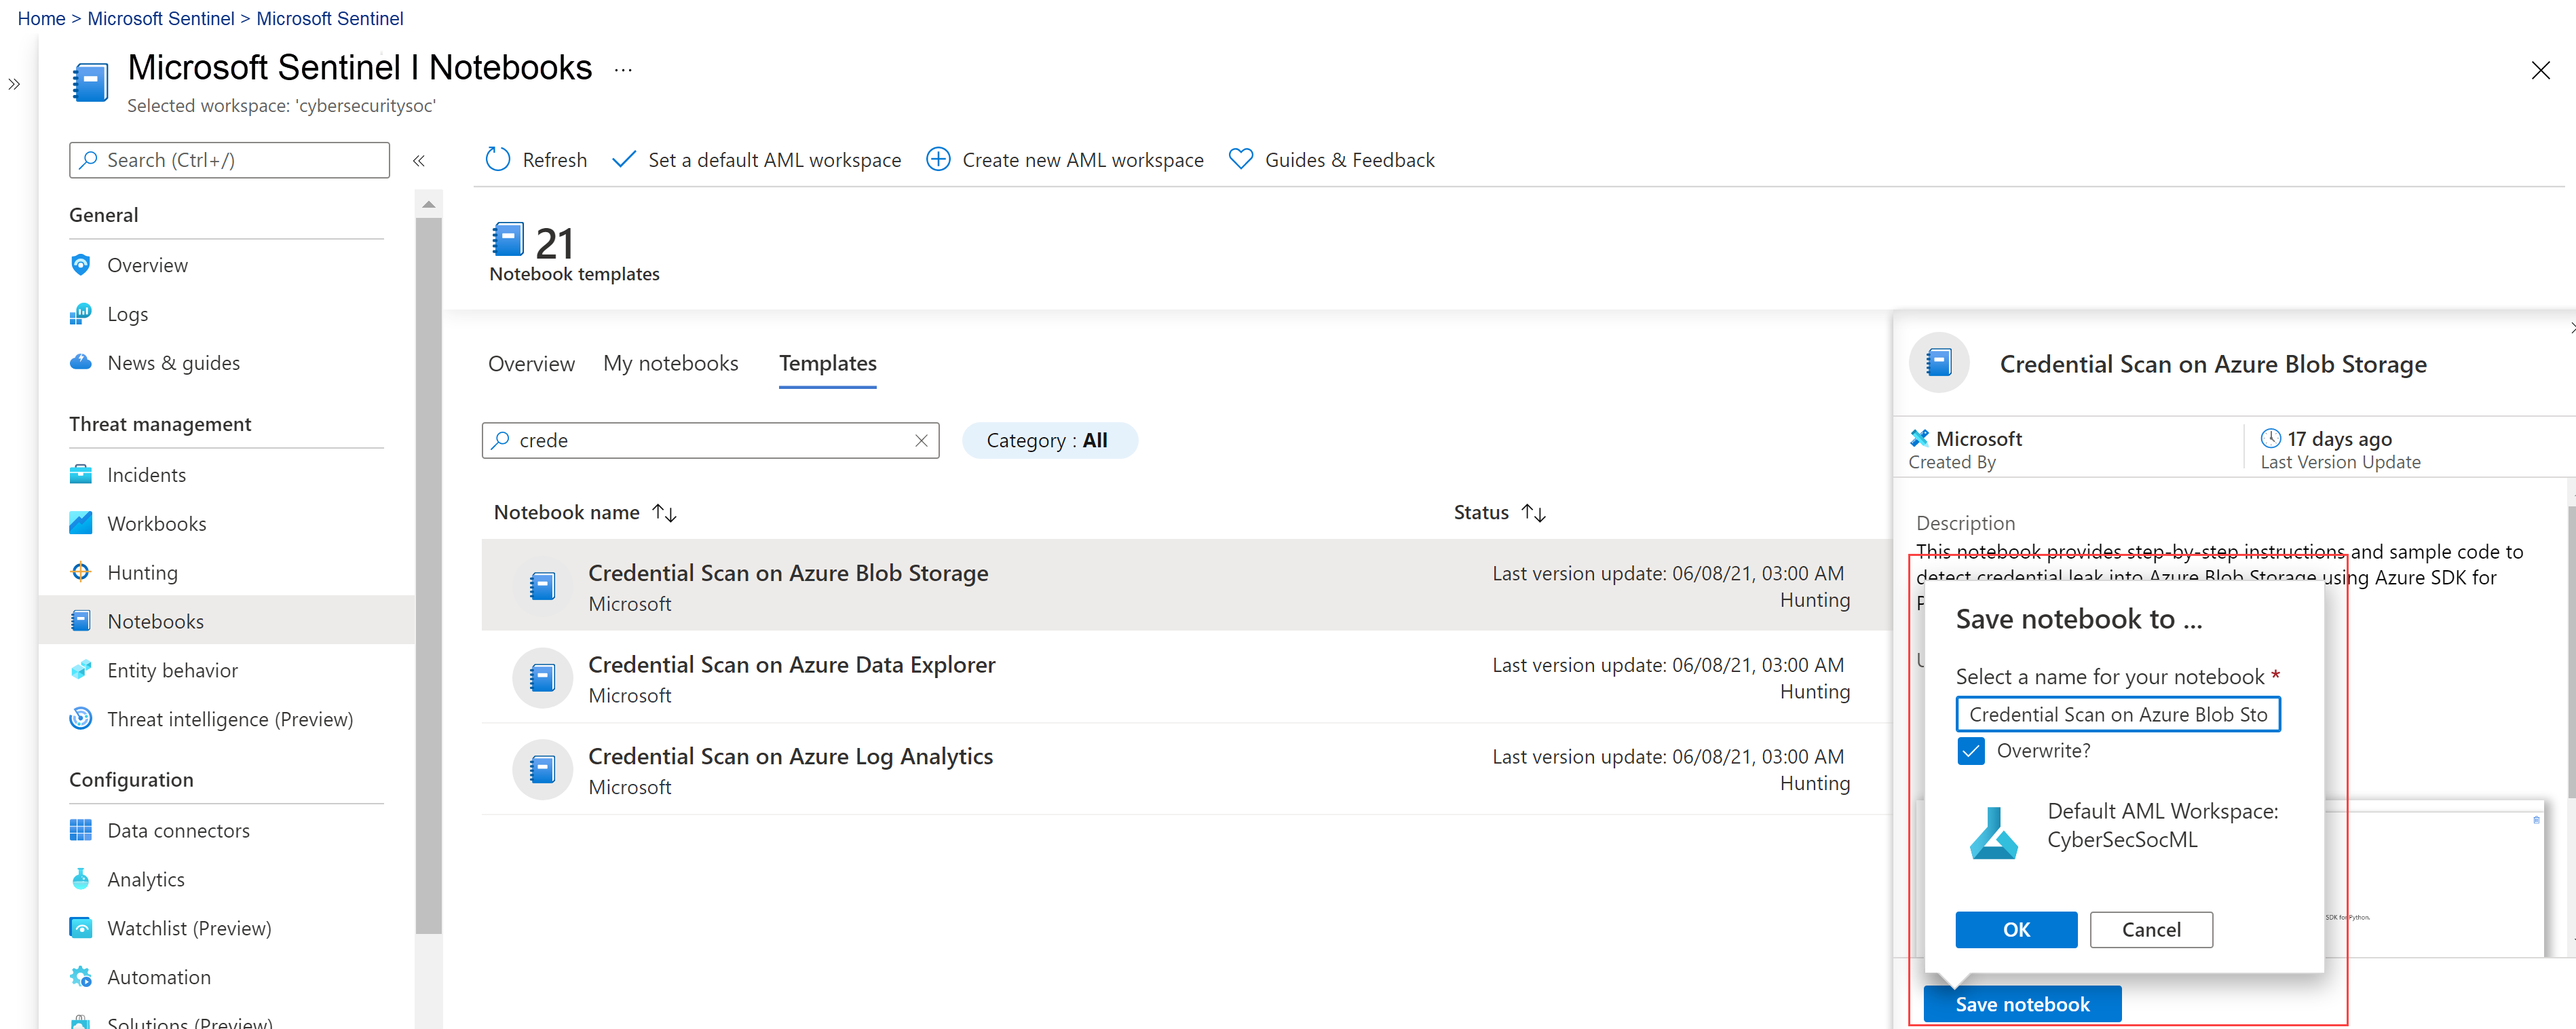
Select a notebook to view its description, required data types, and data sources.
When you find the notebook you want to use, select Create from template and Save to clone it into your own workspace. Only Azure Machine Learning workspaces in the same subscription can be selected.
Edit the name as needed. If the notebook already exists in your workspace, overwrite the existing notebook or create a new one. By default, your notebook is saved in /Users/<Your_User_Name>/ directory of selected AML workspace.
After the notebook is saved, the Save notebook button changes to Launch notebook. Select Launch notebook to open it in your AML workspace.
For example:
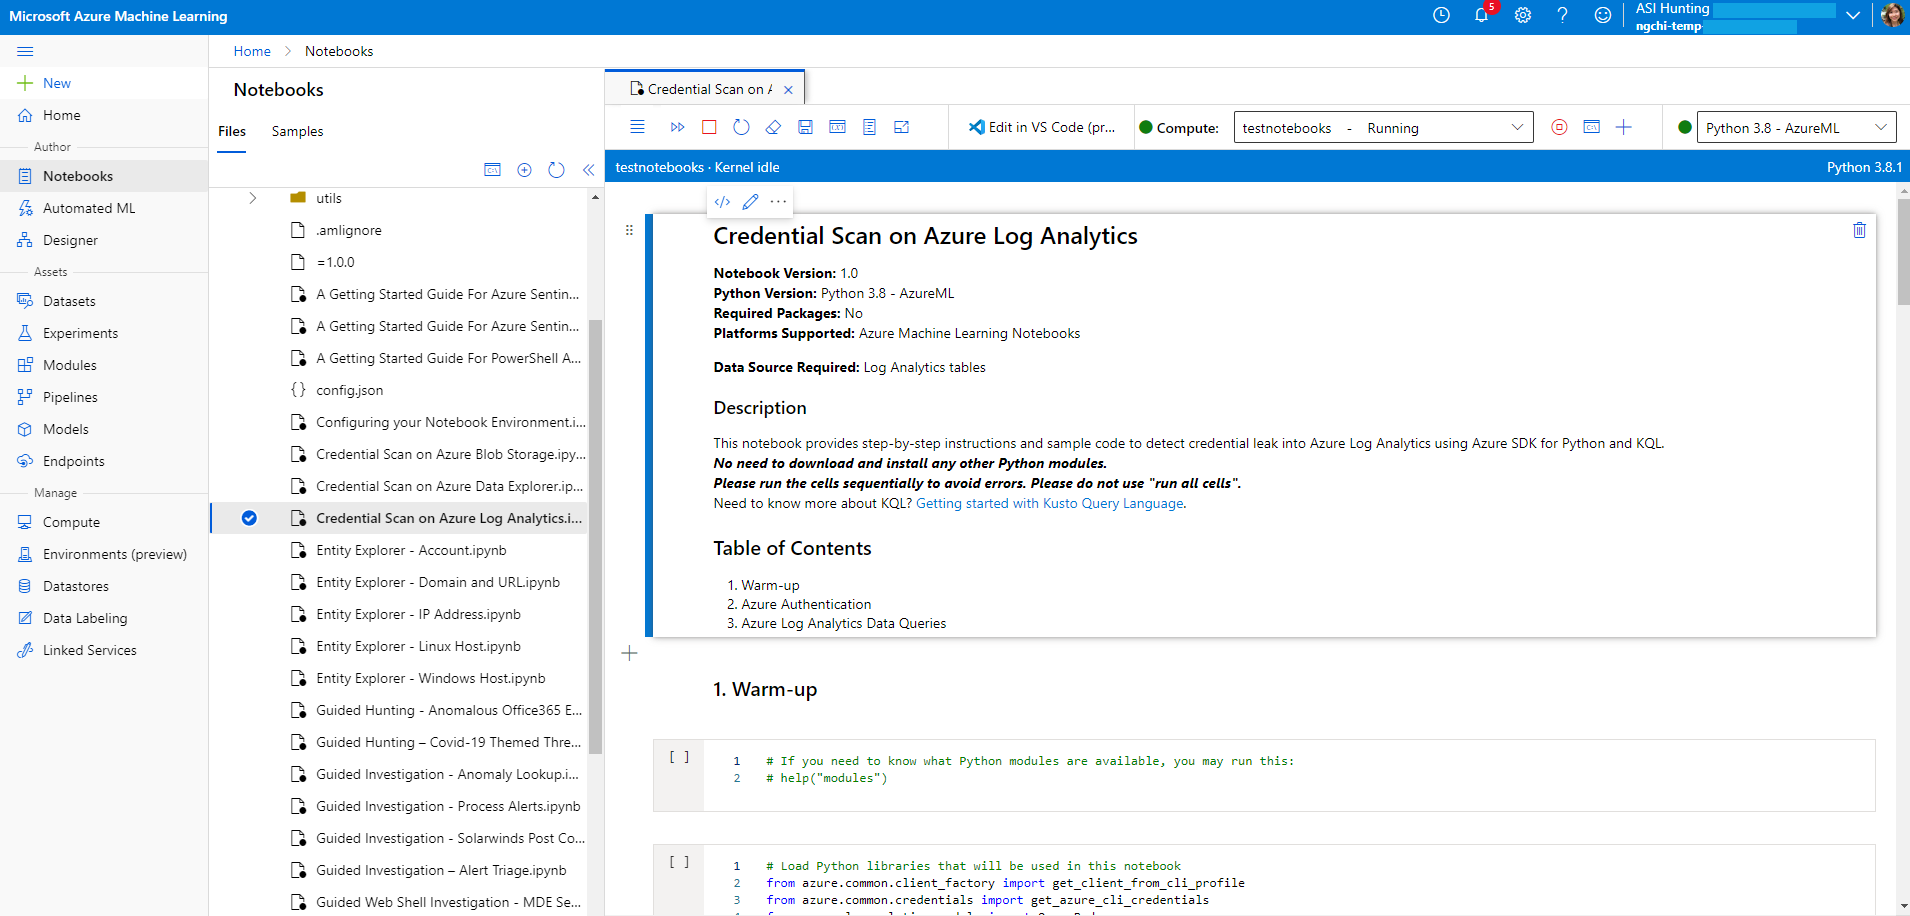
At the top of the page, select a Compute instance to use for your notebook server.
If you don't have a compute instance, create a new one. If your compute instance is stopped, make sure to start it. For more information, see Run a notebook in the Azure Machine Learning studio.
Only you can see and use the compute instances you create. Your user files are stored separately from the VM and are shared among all compute instances in the workspace.
If you're creating a new compute instance in order to test your notebooks, create your compute instance with the General Purpose category.
The kernel is also shown at the top right of your Azure Machine Learning window. If the kernel you need isn't selected, select a different version from the dropdown list.
Once your notebook server is created and started, run your notebook cells. In each cell, select the Run icon to run your notebook code.
For more information, see Command mode shortcuts.
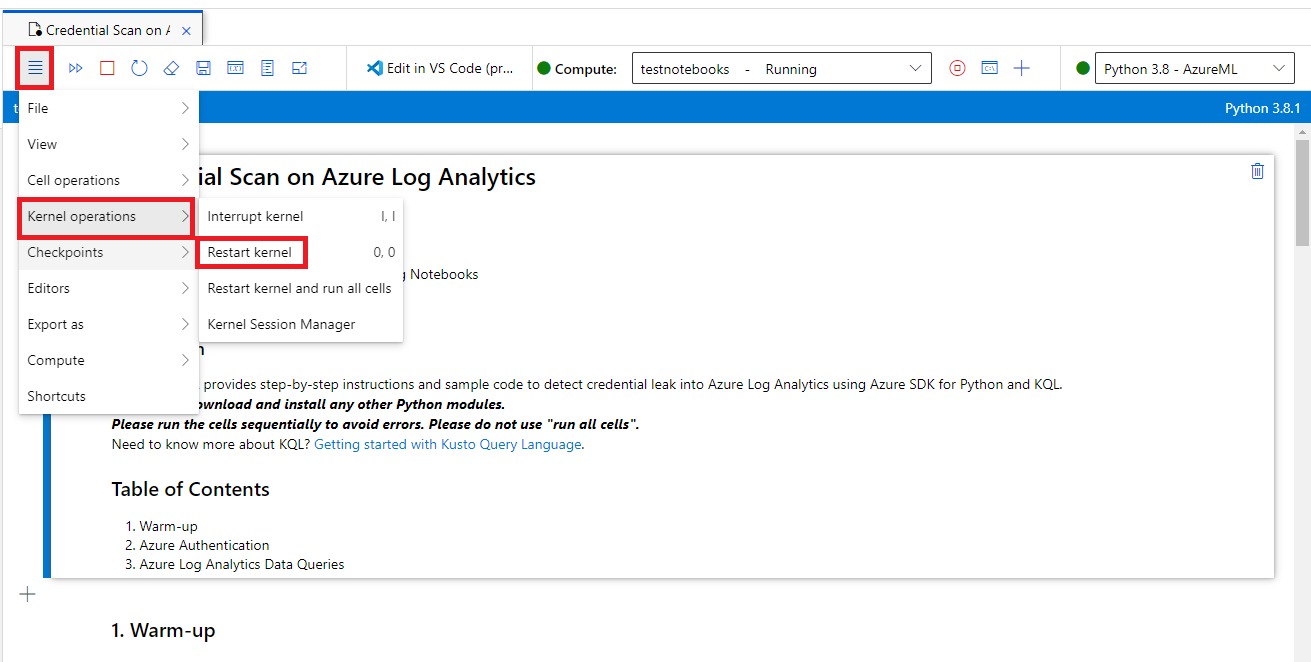
If your notebook hangs or you want to start over, you can restart the kernel and rerun the notebook cells from the beginning. If you restart the kernel, variables and other state are deleted. Rerun any initialization and authentication cells after you restart.
To start over, select Kernel operations > Restart kernel. For example:
Run code in your notebook
Always run notebook code cells in sequence. Skipping cells can result in errors.
In a notebook:
- Markdown cells have text, including HTML, and static images.
- Code cells contain code. After you select a code cell, run the code in the cell by selecting the Play icon to the left of the cell, or by pressing SHIFT+ENTER.
For example, run the following code cell in your notebook:
# This is your first code cell. This cell contains basic Python code.

# You can run a code cell by selecting it and then selecting
# the Play button to the left of the cell, or by pressing SHIFT+ENTER.
# Code output displays below the code.

print("Congratulations, you just ran this code cell")

y = 2 + 2

print("2 + 2 =", y)
The sample code produces this output:
Congratulations, you just ran this code cell

2 + 2 = 4
Variables set within a notebook code cell persist between cells, so you can chain cells together. For example, the following code cell uses the value of y from the previous cell:
# Note that output from the last line of a cell is automatically
# sent to the output cell, without needing the print() function.

y + 2
The output is:
6
Download all Microsoft Sentinel notebooks
This section describes how to use Git to download all the notebooks available in the Microsoft Sentinel GitHub repository, from inside a Microsoft Sentinel notebook, directly to your Azure Machine Learning workspace.
Storing the Microsoft Sentinel notebooks in your Azure Machine Learning workspace allows you to keep them updated easily.
From a Microsoft Sentinel notebook, enter the following code into an empty cell, and then run the cell:
!git clone https://github.com/Azure/Azure-Sentinel-Notebooks.git azure-sentinel-nbA copy of the GitHub repository contents is created in the azure-Sentinel-nb directory on your user folder in your Azure Machine Learning workspace.
Copy the notebooks you want from this folder to your working directory.
To update your notebooks with any recent changes from GitHub, run:
!cd azure-sentinel-nb && git pull